Window finishing methods
Today, there are various methods of finishing slopes for plaster windows. Everyone can choose the most suitable type of finish for themselves:
- plaster;
- MDF panels;
- drywall;
- gypsum fiber;
- insulated sandwich panels;
- cork panels.
Options for finishing window slopes
Which slopes are better
When choosing an option for finishing slopes for plastic windows, the master asks himself which type to give preference to. Builders prefer plastic and plastered window openings. After studying the table, you can familiarize yourself with the advantages and disadvantages of various finishing methods.
Comparison of slopes made of different materials
Next, we will take a closer look at the method of finishing using plaster.
Why do you need plastering of window slopes?
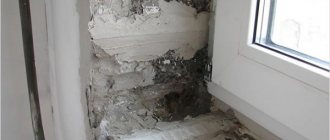
Often, a property owner thinks about the need to plaster the slopes of plastic windows with his own hands after replacing double-glazed windows. During the installation of windows, part of the wall is destroyed. To restore its integrity, it is necessary to apply a layer of plaster.
The application of a finishing layer to slopes is carried out not only to improve the aesthetic appearance of the room, but also to:
- cover up cracks, chips and small cracks;
- hide fasteners;
- protect windows from high humidity;
- improve the degree of sound insulation;
- increase thermal insulation.
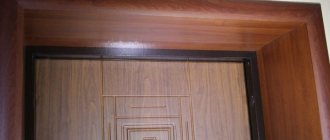
The method of applying plaster has much in common with the process of finishing the doorway area. Read more about plastering door slopes in a separate article.
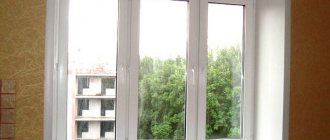
If desired, plastered window openings can be decorated in a variety of ways (pasting them or draping/painting them).
In addition to its aesthetic function, plaster improves the performance characteristics of the room.
Advantages of the plastering method
Plastering window slopes is a popular way of finishing window openings due to the following advantages:
- Durability of the material.
- Resistance to mechanical stress.
- The vapor permeability of the mortar eliminates the accumulation of condensation in the area of window openings and the appearance of plaque, mold or mildew.
- The best maintainability among other materials.
The main advantage of plaster on slopes is its long service life
We plaster slopes with our own hands correctly: pros and cons - Review + Video
“Why you can’t plaster slopes” - a refutation of the opinion and instructions for performing the work. A popular method for decorating and leveling window openings is plastering the slopes. This is in many ways similar to the leveling of walls, which is performed during the construction process, when repairing or replacing wood frames with metal-plastic structures. Let's see how to properly plaster slopes, how to do it and how to extend their service life. Not every person cares about the type of windows in an apartment/house/utility room. People look at windows as standard openings that let in light and help visually increase the space of a room. They play only an aesthetic function, and therefore everyone tries to make them perfectly even.
Rules for finishing windows with plaster
Plastering slopes after installing plastic windows requires a competent approach. And in order for the window opening to remain beautiful for a long time and complement the interior, you need to adhere to a number of rules:
- The temperature of the room where the slopes are finished must be at least +5 °C when using cement mortar. Rodband plaster requires a little more indicators - from +10 °C.
- Each mixture should be prepared according to the instructions supplied with the finished product.
- Any type of solution has an individual period of time after which it begins to set. For example, a cement-based mixture should be used for 30 minutes, no more. It cannot be diluted again, as it loses its performance qualities. Therefore, the solution is prepared in portions.
- Before starting work, it is better to calculate how much mortar will be needed, depending on the thickness of the window openings and the desired dimensions of the slopes.
Following these simple rules allows you to keep parts of the window openings intact, and they will not become covered with cracks.
Retreat
It’s strange, but very little importance is given to the finishing of slopes. It is believed that this design element does not carry a special interior design. Therefore, very often you can see how, next to a new and beautiful window (door), a rather crooked and primitive surface is made, which completely neutralizes any efforts. Although various materials have now appeared that make it possible to hide any imperfections, they require installation skills.
But there is a very simple way, namely, plastering the slopes. Despite its simplicity, it has many advantages:
- Low material cost.
- Simplicity. All work is done independently.
- The ability to create a harmonious part of the interior.
And, despite the fact that this option has been used for many decades, it still enjoys due popularity.
Plastering slopes is a simple and cheap way to strengthen the wall
Tools and materials
Even a beginner in the repair business can cope with finishing slopes. The most important thing is to adhere to the builders' recommendations and follow the step-by-step implementation process. During the work you will have to use:
- building level;
- tape measure;
- aluminum rule;
- spatula;
- trowel;
- sealant;
- profiles and strips;
- a knife, a pencil and a brush that allows you to apply a layer of primer;
- float for cement mortar.
You also cannot do without a mixer and a suitable container for mixing the solution; a hammer will come in handy. You also need a pencil for marking.
Tools for preparatory work
Necessary tools and some activities before starting work
To perform the work efficiently, you will need the following tools:
- water building level;
- fry;
- pencil for marking;
- narrow and wide spatula;
- container in which the mixture is prepared;
- rule;
- Master OK;
- hammer;
- grater, grater or smoother.
Plastering slopes requires special tools.
Before you start plastering, you need to prepare your workplace.
To begin, cover the window sill with film, cloth or cardboard so that it is not damaged during plastering. Then you need to protect the double-glazed window: to do this, you can simply glue the film onto the glass using tape. Carefully cut off the remaining foam.
How to plaster slopes on windows
In practice, window slopes are finished with two types of plaster - cement and gypsum. Let's look at each one separately.
Cement mixture
The cement mortar is moisture resistant and resistant to ultraviolet rays. It is worth considering that there are 2 types of mixtures on sale:
- For rough coating (contains coarse sand).
- For finishing (fine-grained sand components are added to the solution).
Experts recommend using a mixture of coarse sand for rough work. For finishing, it is better to use a composition with finely dispersed, purified sand.
The cement mixture can be prepared at home. The composition is easy to apply. When choosing a cement mixture, it is important to remember that it will take much longer to dry than a gypsum composition.
The most durable material for mortar is cement
Gypsum plaster
Gypsum plaster is endowed with the ability to absorb moisture. That is why experts recommend using the solution only in a dry room, the surface of which is not in contact with precipitation. You should not plaster window openings with gypsum mixture on the outside of the building.
Gypsum plaster must be used with caution. Even if slope insulation is used, it is difficult to be 100% sure that moisture will not penetrate the house and spoil the finish of the gypsum plaster slopes. There is a risk of the material getting wet due to condensation, and as you know, gypsum plaster is not moisture resistant. Therefore, in all situations where condensation may occur, it is recommended to use a cement mixture.
The solution sets quickly, so some preparation is required to work with the composition.
Making slopes
For the main elements when creating a template, we will take the window frame and the rule (with emphasis on “and”), set in advance according to the level. The rule must perform 2 functional actions - play the role of a beacon and set a clear limitation of the slope surface to obtain an even external angle.
Attention: The rules for plastering slopes are the same for both windows and doors. It does not matter. Doing the job is exactly the same.
Choosing material
First of all, we decide what to plaster the slopes with. First of all, it depends on what kind of environment you are staying in. Plaster for slopes can be done both indoors and outdoors.
So the first division is precisely on this basis:
For external surfaces Plastering external slopes is done with a mixture specifically for external surfaces. It is mainly made on the basis of cement (see Cement or gypsum plaster: which is better to choose) and has a coarser fraction. Tolerates high humidity and low temperature. For internal surfaces Do-it-yourself plastering slopes with this material have a smooth and even surface. Here the fraction is small and a mixture with the addition of gypsum is mainly used. The material hardens faster.
Making your own plaster mortar
Builders involved in the repair of slopes prefer to prepare a mixture consisting of 1 part cement and 2-4 parts sand for plastering window openings. To properly prepare plaster, you will need:
- Pour the sand into a deep container.
- Add a layer of cement.
- Mix the dry ingredients thoroughly and pour water into the container. The composition is constantly mixed at this time.
- Liquid is added until the consistency of sour cream is obtained.
To speed up the setting process of the plaster, you should add a small amount of PVA glue or building plaster to the composition. To slow down the setting, you need to add detergent.
To obtain a homogeneous solution, use a construction mixer
Do-it-yourself plastering of window slopes along lighthouses at dawn
August 8, 2021 15:04 ·
Expert builder Viktor Petrovich says:
Today we will tell you and show you how to plaster window slopes at dawn. And usually questions immediately arise about what dawn on window slopes is and why it is needed. We are talking about turning the slopes, but not at a right angle, but at a large angle, like sliding shutters, so that the turning of the window openings is more impressive.
This is necessary so that more light enters the room and it is not gloomy, that is, so that more of the area in it is illuminated by natural light from the window. This kind of reversal of window slopes especially needs to be done when the room is dark and more light needs to be added to it.
Before plastering the slopes, it is necessary to protect the frame and glass from damage. For this, it is good to use ordinary polyethylene and tape: the polyethylene is secured with tape around the perimeter of the window, while covering the frame and glass.
Marking a slope using a laser level
We begin the process by marking the slopes using a laser level. A mark is made on the frame, retreat 5 mm. What are these 5 mm for? So that the plaster fits onto the frame and there are no drafts. Then we use a construction corner: we put it in a corner, press it against the frame and with its help we draw a line on the upper slope.
That is, we have defined an angle of 90 degrees on the slope. We need it, although we remind you that we will now be doing the slopes at dawn. But in order for us to get everything straight, we also make markings on the other side of the window using a construction corner. In total, in this work we use a stepladder, a tape measure, a construction angle and a pencil.
A common mistake in this process is that everyone just foams, installs drywall and expects that everything will be fine. But, in fact, this is not so: over time, the foam here turns into dust, and it begins to blow from the windows, the slopes then get wet, and mold forms. To prevent this from happening, we will teach you how to do everything correctly. By the way, they also seal the slopes with mastic - a special rubberized one - on top of the foam.
Next we use a laser level. We set it according to the mark that we just made on the upper slope with a pencil. We see that everywhere by 5 mm it shows us an indentation; let us remind you that this is necessary so that the window does not blow in later. Next, the red laser line allows us to see what level of slope reversal we can expect. In our specific example, the difference in distances between the straight line of the laser level and the actual slope is on the four sides of the window - 3 cm, 2.7 cm, 2.8 cm and 3.5 cm.
We measure the distance using a laser level and make marks
We set the marks using a laser level. They are at the same distance from the edge of the frame on one side and the other. Now we retreat to the possible extent of these marks, which we measured with a laser level. The minimum indentation we got was approximately 2.5 cm. This is the distance that we can use for our reversal.
Many people use 1 cm or 1.5 cm for dawn as a rotation angle, but now we will make 2.5 cm. This distance is more beneficial, as it allows you to make the room brighter: by increasing the amount of light supplied to the room. Also, from the point of view of economy, in this case we will use less material. That is, we have a brick slope going away from the frame by 3 cm at once. In this case, we will eliminate the slope very smoothly, which will be beautiful, neat and economically profitable.
Then we measure 2.5 cm from the existing mark on both sides of the window. Then we use a laser level, and move this mark down, and put a mark with a pencil - on the slope and on the floor. Such marks are needed in order to use them to set either a board or a rule according to which we will further plaster the slope. But first we need to set up more beacons.
Now from the first mark, which is located closer to the window, we measure 6 mm, since this is exactly the width of our beacon. Accordingly, you need to subtract 6 mm and draw a line. Next, along this line, we lower the laser level line down and put a mark there too. As a result, we will have two marks for the beacon. We do the same on the opposite side. We will already have the marks of the beacons.
We take a hammer drill and make holes for self-tapping screws on the window slopes. We first screw the dowels into the holes, and then the screws, so that their heads are illuminated by a red laser beam, that is, we align them at the same vertical level.
Screw in the self-tapping screw using a laser level
Primer
We have already made window protection, made holes for the screws and installed them. Now we prime the slopes. We use AquaStop Concentrate primer and dilute it with water. In our work we use a roller and rolling out. Rolling is our special tray into which the primer is poured and it is convenient to wet the roller in it. During the priming process, we use a stepladder to reach the highest parts of the slopes. In this case, we prime two side slopes and one upper one.
Installation of beacons
We have already primed the slopes and now we are measuring the height of the slope. Here we get 2.55 m. We take three-meter beacons, cut them to the required length and prepare them for installation. Our goal is to install them using self-tapping screws, which we have already set using a laser level. At the same time, we install the laser level again: it passes over the heads of the screws and illuminates them. That is, we checked everything again - everything is smooth.
Then we mix the plaster solution. By this time the primer had already dried. On the slopes we make “splashes” of plaster. Then we take a perforated beacon and embed it into the solution on the slopes. Moreover, the support for the lighthouse will be self-tapping screws: they will “tell” at what level the lighthouse needs to be immersed in the plaster and will not allow it to exceed the required depth. That is, even if we forcefully sink the lighthouse, it will not go beyond the screws. Therefore, we recommend that you use self-tapping screws.
Installing a beacon on smears and blotches
We install and check: there are no gaps between the rule with which we check the accuracy of vertical installation and the beacon. The lighthouse is installed perfectly level. But to be sure, let’s check it again with the level rule at the end of installing the beacons. His bubble should be strictly in the center.
Such a check should be carried out several times, because during work it is easy to drown the beacon or bend the angle of its contact with the slope. Installing beacons is the most labor-intensive process of all our work. That is, marking and installing beacons is the most difficult thing, and the rest - stirring the solution and throwing it on - is not difficult and does not take long.
Moreover, our plastering work proceeds with a gap of about 3 cm, so you have to hold the lighthouse with your hand and in general it is difficult to carry out such a process and needs to be very careful. If the distance between the window frame and the slope is greater, say, around 5-6 cm, you can stick plasterboard. You cut off strips of it and either glue it on or shoot it with self-tapping screws.
Then the beacons are placed on the drywall, the slopes are leveled and plastered. It turns out that less plaster is wasted and there is a saving on materials. But in this case, our situation is different - the thickness of the dawn is 3 cm, which is not much. At the same time, if we glue Gyprok, then we will have even less dawn. We will not do this, since - also important - our slopes are not so wide.
Next, we make a control measurement of the frozen beacons. We take the level rule and look: the bubble should be in the center, the vertical should be even, and, accordingly, there should be no gaps between the rule and the beacon. Now we do the same on the opposite side. That is, we install the beacon using a laser level and control it with a rule.
In order to install the beacon on the upper slope of the window, we will need a laser level again. We install it on the wall with a calculation so that it can be adjusted. It has a special device that allows you to hang it on the wall and adjust the angle of inclination. We installed a self-tapping screw on the wall, and now we hang our laser level on it. Then its beam will show us a flat horizontal line along which we will work.
We set it to 5 mm with an approach to the frame. To do this, take a tape measure, a stepladder, climb up, and put pencil lines on the left and right sides of the frames. Using these lines you can already set the laser beam. That is, using them and the laser beam, we will then attach the beacon to the upper slope of the window.
Our lighthouse is 6 mm thick, and, accordingly, we make a mark slightly higher than the one we had before - by 6 mm. This means that we get two marks - on the left side and on the right. The lower mark is the surface of the perforated beacon, and the upper mark is the head of the level screw. That is, between the two marks we get 6 mm, since this is how much the thickness of the beacon is.
Then we align the screw heads on the upper slope using a laser level. Their hats are illuminated. Now we will install a perforated beacon on these screws. To tighten the short self-tapping screw, we installed a small wooden board in one place. Using a tape measure, we measure the distance from one beacon to another, which we installed vertically, so that we can cut the beacon of the required size for the horizontal upper slope.
Then we install the perforated beacons on the screws fixed in the slope. At the same time, accordingly, where we have a wide layer of plaster, we make thick patches, and where there is a thin layer, we make thin patches. Now we install the perforated beacon. We follow it strictly according to the laser level, it is supported in this position by blotches, and is limited on the side of the slope by self-tapping screws.
Installation of a beacon on the upper slope
In our particular case, the lighthouse at the top does not hold, since there is a wide layer of blotches there. Therefore, we tie the beacon with a rope to the screws. As a result, with the help of such cunning and subtlety, we keep it well at a height in a horizontal position. This rope is needed until he freezes well into the plaster.
We will remove the exposed beacons on the slopes after we have plastered everything and formed the slope. Since we will not glue sound insulation to the slopes and, accordingly, there will be high humidity here, we will not take risks. Over time they may rust. Therefore, we will remove them and seal the grooves.
Installation of formwork
In order to set the formwork for the upper slope, we take a laser level. We hang it on a self-tapping screw attached to the wall, position it and find the points needed there along the laser line. Now we will take the rule and attach it to the screws on the upper slope of the window. We will get a formwork that will follow the laser level.
Fastening the formwork with self-tapping screws
To do this, take a hammer drill, drill a hole, insert a dowel there, and then a self-tapping screw, which is screwed in with a screwdriver, but you can also use a screwdriver. We use black wood screws. The length of the screw should be sufficient to screw the rule to the wall. First we attach the rule to the wall on one side, and then on the other.
Throwing and leveling plaster mortar
Stir the plaster solution, wait until it sets (1-2 minutes), and begin casting onto the slope. Our slope is pre-primed. We use two “tens” spatulas, that is, they are 10 cm wide. And with sharp movements we throw the plaster mortar onto the slope.
Leveling the slope with a spatula
Then we take a spatula 35 cm wide and move it along the beacon and the rule. Make a smooth surface with a smooth movement. You need to apply a little force and press upward with the spatula. Then sliding through the mixture will be smooth and the surface of the slopes will eventually be smooth. In this way we successfully completed the task.
How to plaster slopes on windows - 7 steps
In order to plaster the slopes on the windows, you must take into account the recommendations of specialists and strictly follow the step-by-step instructions. This will allow you to avoid mistakes and perform high-quality finishing of window openings.
For those who are already familiar with the features of covering walls with mortar, it is easy to understand how to plaster window slopes. The principles are the same here, and the difference lies only in geometry. In addition, it is necessary to make a quality transition from the window frames to the main surfaces.
Step 1. Surface preparation
To obtain a durable and even surface, you should not neglect the need for preparatory work. Before you start plastering the slopes, you should:
- Clean the base from the layer of old coating and crumbling plaster.
- Remove excess polyurethane foam, which the builders used to blow out the gaps between the wall and the window.
- Remove dust and other contaminants from the slopes.
- Carry out wet cleaning by thoroughly rinsing the surface on which the solution will be applied with a damp cloth. After wet cleaning, you need to leave the slopes for a couple of hours to dry.
- After the specified period of time, it is necessary to apply a couple of layers of deep penetration primer to the surface of the window openings.
Before applying the primer, be sure to make notches if the walls are concrete. On brick surfaces, part of the mortar is removed. This is done to ensure good adhesion of the plaster. And only then the slopes are covered with a primer.
The preparatory stage should be given a lot of time and attention
Step 2. Insulation of slopes under plaster
In order to prevent moisture condensation on the glass and window surfaces, it is necessary to take care in advance of insulating the slopes. If there is no thermal insulation gasket (such as foam or tow) in the area of the joints, during the cooling of the double-glazed windows, the flow of cold will begin to be transferred to the adjacent walls.
The foam, which begins to crumble, will cause cracks to form, and cold will seep through them. Against this background, condensation will appear. To insulate the structure, you can use sheet insulation sheets such as polystyrene foam or polystyrene foam and use a warm plaster composition (perlite or other warm mixture for plaster).
Sheet foam is not resistant to moisture, so when using this material, high-quality waterproofing will be required. The best insulation for slopes is considered to be penoplex, which can be easily plastered. To insulate a window opening you will need:
- cut sheet insulation into pieces of the required size;
- glue the material to the frame;
- fix the reinforcing mesh over the insulation;
- apply a layer of plaster.
Insulation option 1
Insulation option 2
With regard to plastic windows, compliance with the technology of plastering slopes can improve thermal insulation indoors. Namely, it is worth considering:
- For the inside, it is better to use sealed and dense materials.
- Closer to the outside, it is better to give preference to heat-insulating and porous analogues.
This measure ensures good ventilation, thereby eliminating the formation of condensation. In ensuring high-quality sound insulation, an important role is played not only by the double-glazed window - types of window seals and sealants also have an impact on this. Any hardware store has a wide range of insulation materials such as polyurethane foam or polyethylene foam.
Step 3. Strengthen the corners
To protect internal corners (husks) from the formation of cracks, builders use corners for plastering slopes. The procedure for strengthening internal corners:
- Apply a small amount of solution to the corner area and level it using a special spatula.
- Having applied a strip of serpyanka, you need to press it with a spatula into the construction mixture.
- Next, more solution is applied and leveled with a spatula.
- Once the solution has hardened, you can rub it in.
Plastering slopes will not turn out to be of high quality if the outer corners (crests) are not reinforced, since after a while they quickly become damaged. For reinforcement, corners for plastering slopes (counter-shoulders) are used. They are made of plastic or metal. The procedure for strengthening external corners:
- To begin with, the profile of the required length is measured and cut.
- Plaster is applied to the outer corner on both sides.
- The counter-shultz is applied and carefully pressed into the building mixture.
- At the same time, monitor the verticality of the profile using a level.
- Protruding mortar residues are leveled with a spatula.
Strengthening corners when plastering window slopes
Step 4. Attaching the beacons
When starting to apply a leveling layer of plaster on the slopes along the beacons, it is necessary to mark, correctly install and fix the beacon profiles. The functions of beacons can be performed by:
- plastic profile;
- wooden edged board;
- mortar path;
- pieces of plywood that are attached to the corner with self-tapping screws.
To assemble the beacon profile, you will need to screw in 3 self-tapping screws on the surface of the slope. In this case, the caps are placed in one vertical line along the line that was drawn during marking. This procedure is best performed plumb.
A small amount of solution should be applied along the entire length of the line. In this case, it is important to control the position of the profile using a level. At the next stage, final fixation with the solution occurs.
In addition to attaching beacons to the building mixture, you can use parts that are easy to install:
- clips;
- cleverness;
- Ushastiki.
Beacons on cement mortar can only be used after 24 hours.
Beacons allow you to achieve a perfectly flat surface of slopes
Step 5. Plastering slopes along beacons
It's time to figure out the process of how to properly plaster slopes using beacons. It is recommended to start plastering from the inside. The building mixture is applied to the bottom and sides, and only then is it possible to move to the top of the opening. By applying a layer of plaster to the openings, the slopes on the windows should be leveled.
The procedure for plastering window slopes:
- First you need to make a small part of the solution more liquid. The composition should be of such a consistency that the plaster does not spread, but also does not stick to the slope.
- Then apply the composition over the surface of the opening, and use a spatula to level the layer of plaster.
- Leave the work for a while so that the first layer has time to dry.
- Use a level and install the corner profile.
- Continue laying the building mixture, checking how even the surface is.
- Correct the corners after the solution has completely dried.
- Grout.
- If desired, decorate the slopes with decorative plaster.
When using beacons, all work is performed in the same way as in the case of plastering walls using beacons. However, here the distance between them is small and therefore a wide spatula or a short rule is sufficient for leveling.
It is most convenient to carry out plastering work on slopes along beacons
Step 6. Grout
At this stage, a flat surface is created. You can start grouting only when the solution has dried. This usually takes from 16 hours to a whole day. It is better to give the mixture more time to set, but not to wait too long - more than 24 hours. The determining factors are humidity and temperature.
To understand when to start grouting, you should use a clever trick. Take a little solution from the slope and rub it between your fingers. If crumbs fall, then the time has come, it’s smeared - wait until the next check.
For grouting, the mixture is made more liquid, and it is no longer applied, but rather splashed over the surface. After this, you no longer use a spatula; here you need to use a grater with a foam working surface and a handle. You need to make circular movements with the tool. Upon completion of the work, the slopes are leveled.
This stage is not mandatory and you can do without it, especially when you plan to cover the slopes with putty in the future.
After the plaster has dried, the surface is grouted.
Step 7. Finishing the work
At the end of the process, it is necessary to apply a small layer of putty to the plastered slopes, and after the surface has dried, paint it or decorate it with facing material. Before applying putty, builders recommend cleaning the openings with sandpaper from drying lumps and irregularities. After applying a layer of primer, you can putty. It is worth considering that the starting mixture is applied first, and only after that the finishing mixture.
Preparatory work
If there is a window sill, it is better to install it before plastering the slope, otherwise you will need to knock off part of the slope from below and re-seal the flaws. Installing a window sill is simple, but before you plaster the slope on the window, you need to seal it with tape and film or paper so that it does not become dirty or damaged. The preparation of the window slope is as follows:
- A layer of old mortar is removed from the window, after which the walls are swept with brooms so that the plaster adheres well to the surface. Otherwise, cracks will appear, even worse if the new layer simply falls off the wall.
- It is better to cover the window frame itself with tape or tape.
- Inside, it is better to cover the fittings on the window, as well as the radiator under the window.
Prepared window surface for plastering
- The entire surface to be treated is primed with a deep penetration agent. This allows you to achieve maximum adhesion of materials.
- Next, the window is left for the soil to dry out; insulation can be done if necessary. Insulate the window sill itself before installation and you can use the material for the slope. Not just any insulation for a slope is suitable; the use of polystyrene foam and expanded polystyrene is allowed.
Features of updating an old plastered opening
Plaster slopes need periodic updating. If the old layer of mortar begins to collapse, it is necessary to remove the layer of paint and tap the entire area of the openings, discarding the fallen pieces of mortar.
The resulting cracks are cleaned, the layer of dust and mold is removed. If there is a deep pothole, you should moisten it with water, go over it with a primer, and only then fill it with a solution. As soon as the construction mixture applied to the surface of the slope dries, you can begin to continue working with the opening.
Slope plastering technology
It is best to plaster the slopes simultaneously with plastering the walls; in this case, the corner protection profile is immediately smeared into the plaster layer of the wall and goes into the slope.
But this work can be done after plastering the walls. To do this, you will have to knock down about 5 cm of the plaster layer from the edge to install the profile. Work should begin with surface preparation. It is necessary to dismantle the old plaster, decorative panels, drywall, carefully treat the surface with a primer and carefully seal the window and frame with a protective film.
Preparation should be carried out immediately before plastering work, and not several days before it begins. Since the surface will become dusty during this time, especially under repair conditions. Then, using a vertical level (you can use a laser or bubble level), install a galvanized mesh profile on the outer corner. It will serve as a guide and set the desired turn. The profile must be set taking into account what “opening angle” we need: straight or “at dawn”. For a professional, this is enough to move on to plastering. To do this, the master cuts out
aluminum rule so that it moves freely along the window frame, setting the desired angle.
Features of plastering exterior window slopes
After installing a plastic window, there remains a space between the frame and the wall occupied by polyurethane foam. This distance is needed in case of changes in the linear dimensions of the material due to natural shrinkage of the building. In the absence of such clearance, the window structure becomes deformed over years of use and there is a high risk that the glass will break.
After installing the window, the foam should not be left open. Otherwise, it will be destroyed under the influence of external weather and other factors. The plaster itself will cover the mounting foam, thereby leaving it intact. For this purpose, it is better to choose a facade mixture.
Polyurethane foam must be covered with plaster
Plastering slopes: important things you need to know
Any technology, even if, in your opinion, it is hopelessly outdated, has some features that, as they say, are more expensive to ignore - that is, these are moments that lead to damage to something. Slopes in this regard are no exception - if we talk about their production using the plaster method, then the following can be highlighted as such points.
- Antifungal treatment of window openings. This point is especially important when plastered slopes are attached to sealed metal-plastic windows. Condensation is normal for them, and condensation plus heat is an ideal environment for the development of fungus and mold. This scourge can only be resisted by preliminary antifungal treatment of the window opening. It is the window opening - this does not happen with doorways and slopes. Unless we talk about entrance doors - such treatment is also necessary here. It is produced not with a simple antifungal primer, but with a so-called “fungus killer” primer - roughly speaking, it is a concentrate that kills fungus and mold. It creates in advance an environment unsuitable for their growth.
- Proper installation of windows or doors is of great importance. If anyone doesn’t know, then there is one requirement for installing windows, which is often violated - the window profile must be immersed in a quarter of the window opening by a third of its width. Otherwise, it will be useless to fight the cold coming from the slopes, even with the help of internal and external insulation of the slopes. In such situations, condensation and mold are 100 percent guaranteed. As for doors (especially those made of wood and wood-derived materials), during their installation the door frames must be waterproofed. Plastering door slopes is a wet process, and the door frame will certainly draw this moisture into itself - as a result, deformation and loss of appearance.
- A high-quality solution plays an important role. Everything is simple here - after drying, the solution should not peel off from the opening, much less crumble. Three points are important here - the correct technology for applying plaster (we’ll talk about it later), a high-quality solution of sand and cement mixed in a 1:4 ratio and professional grouting. In principle, there is nothing complicated.
Plastering window slopes photo
This concerns the durability and other characteristics of plastered slopes - if we talk about the appearance of these building elements, it depends directly on the skill of the master to install beacons. This is a separate topic of conversation that is worth talking about in more detail.
How to calculate the amount of plaster for a slope
Before you start plastering window slopes with your own hands, you need to calculate the amount of material. For one square meter of surface, you should prepare 300-500 g of dry mixture (coarse fraction). If fine-grained plaster is used during the work, then at least 500 g of dry building mixture will be required per square meter. The volume must be multiplied by a factor of 1.1. It is not possible to calculate the exact amount of plaster and therefore the material should be taken with a reserve for unforeseen cases.
Stages of surface plastering
Before you get started, you need to know how to make slopes. To do this you need to do the following:
- to begin with, a little solution is diluted to a more liquid state and applied to the surface to ensure better adhesion;
- the plaster solution is thrown with sharp movements onto the surface: it should stick, but not flow off it;
- you will have to wait until the first layer dries;
- if a gypsum mixture is used, you need to use a corner for plastering the slopes. It is mounted using a level;
- distribute the mixture along the slope using a spoon, moving it from bottom to top. Please note that the solution should not get on the frame;
The solution must be distributed so that it does not get on the frame - after drying, adjust the corners;
- then the entire surface is rubbed with a grater;
- when everything is dry, a primer is applied and the slopes are decorated with plaster, paint or wallpaper.
It is most convenient to carry out plastering work on slopes along beacons. To do this, to obtain a beautiful corner, place a paint corner on the outside, which is well secured with a solution. A beacon is installed along the frame, on which the tool will rest to cut off the excess layer of mortar.
After the rough plastering stage, the solution is poured onto the surface in the bottom-up direction. Then they move along the beacons with a rule and remove the excess layer, putting it back into the container.
Scheme for plastering slopes along lighthouses
A plaster mixture is usually spread on the upper slope. If the surface is prepared correctly, then there will be no problems. You can carry out the work with a rotband. This is a ready-made mixture that can be purchased at a hardware store.
After the first layer has dried, finish plastering the surface. This will require a more liquid consistency of the composition. The mixture is applied in the same way as the rough layer and stretched using the rule. Now it is important to get a smooth and even surface. After leaving the plastered surface for several hours (about a day), they begin to grout it.
After the plaster has dried, the surface is grouted.
Dilute the liquid solution to such a state that it can be poured onto the surface. The work is done with a grater. The solution is applied to it and distributed over the surface in a circular motion. This stage is optional if you plan to putty the slopes.
Nuances when plastering slopes
Typically the work includes two main stages. Upon completion of each operation, you need to wait a certain period of time for the applied layer to dry. In addition, the joint between the plaster and the window may become cracked. To avoid this, it is better to apply sealant to the seam.
It is important to correctly calculate the time of working with the mixture
Possible problems during operation
When plastering external or internal window slopes, various problems may arise. The cause of trouble may be:
- Poorly installed windows. It is important to keep control over the installation of double-glazed windows. In a situation where a defect has been noticed, it is necessary to agree on an immediate elimination of the problem. If you ignore this recommendation, after a while you will need to replace the windows and re-do the slopes.
- Critical increase or decrease in temperature. When mixing the solution, it is necessary to take into account the temperature conditions at which you can work with the construction mixture. Gypsum mortar can be used when the room temperature is above 10 °C. It is permissible to work with cement mortars at a temperature not lower than 5 °C. Ignoring this rule may cause poor quality slopes.
When working with plastic windows, it is important to make grooves along the perimeter between the slopes and the frame, the depth of which will reach 5-6 mm. As soon as the solution dries, it is necessary to fill the recess with a layer of silicone sealant. During the summer heat, plastic increasing in volume will not provoke the appearance of cracks on the slopes.
Plastering window slopes from the inside and outside of the house is not so difficult. The most important thing is to familiarize yourself with the step-by-step process of work and follow the recommendations of experts. When choosing a solution, you need to pay attention to the shelf life of the composition. An expired composition will lose a large number of beneficial properties. This may negatively affect the final result.
Plastering the slopes of plastic windows is a simple process that can be handled not only by a professional, but also by any apartment owner. If you prefer this finishing method, you should purchase high-quality materials for the work, and after applying the finishing layer, take care to thoroughly dry the plaster.
Have you ever had to plaster slopes? Share your experiences and impressions in the comments!
Useful tips
Remember that plastering can be carried out in a room where the temperature is at least 6 degrees Celsius. If this rule is not followed, the quality of the slopes will be low.
Carefully read the instructions for preparing the solution that the manufacturer puts on the packaging. The expiration date is also important, since after its expiration the mixture will not have the necessary characteristics. The expiration date that is close to expiration may also not have a very good effect on the final result.
When working with plastic windows, do not forget to make a groove along the entire perimeter between the frame and the slopes, 5 mm deep. After the solution has dried, the recess is filled with silicone sealant. This ensures that in extreme heat, when the volume of plastic increases, the slope will not crack.