Paints and roller
It is necessary to understand whether a certain roller is suitable for working with the purchased paint or not. The essence of the problem lies in the composition of the water-based paint. In the domestic building materials market, as a rule, several varieties of such a coloring composition are common:
- silicone;
- silicate;
- mineral;
- acrylic.
Acrylic water-based paint is perhaps the most commonly used. It contains a large amount of acrylic resins and latex. The treated surface is almost 100% moisture resistant and is not afraid of even direct impact. This coating can be washed without any consequences for the surface.
Silicone paint contains many complex synthetic compounds. With their help, paint easily copes with filling small cracks in the surface with a depth of no more than 2 mm. Most often, such paint is applied to coatings that are often in contact with water. The only disadvantage of this coloring composition is its high cost.
Mineral water-dispersion paint contains cements or the hydroxide form of calcium. This type of water-based emulsion is ideal for application to the walls and ceilings of technical rooms, where the scale can be truly enormous, and there is no point in buying expensive material. The disadvantage of this coating is its rapid wear.
Silicate water-based paint contains colored glass as a key component. This type of coating is most often used for facade work and painting the external contour of a building. Such paint can withstand almost any weather conditions throughout its entire service life. Next you need to decide on the roller. Most often on the building materials market you can find rollers made of pile, polyamide, foam rubber or velor.
Products made from foam rubber are used mainly for working with glue and varnish. And foam rubber is certainly not suitable for working with water-based paint - it very quickly becomes saturated with the coloring composition and stops absorbing it, which results in streaks and splashes. And foam rollers have to be constantly changed even when working with an adhesive substance.
Nap rollers are better suited for working with water-based paint. It’s almost impossible to find natural pile in stores now, but the situation with synthetic pile is much better - on the shelves it’s not difficult to find rollers with fine, medium and long pile. Of course, the choice here should be made based on your own needs - rollers with long pile absorb a lot of paint, but it is also much more difficult for a beginner to work with them.
Therefore, if you choose a roller with a pile, it is better to choose a model with a fine or medium pile coating.
Velor products are known for the fact that the material has excellent resistance to the aggressive environment of water-based paint, solvent or varnish. Velor rollers have no pronounced disadvantages, and therefore they are often used for work on large industrial sites where the use of a spray gun is excluded for some reason. Polyamide rollers are made from raw materials similar in properties to textiles.
The peculiarity of the production of such products is that the pillow is repeatedly stitched at the assembly stage with a strong polymer thread - this significantly increases the strength of the product and its service life. For the general consumer, the polyamide roller comes first. This is especially true for those places where you have to work with acrylic water-based paint.
In domestic construction markets you can most often find replacement rollers of three standard sizes:
- up to 100 mm;
- 100-150 mm;
- over 150 mm.
Of course, choosing the appropriate nozzle is a matter for buyers only. It all depends on what size the drum handle is and what needs to be painted. As a rule, a tool with a long handle is convenient when working in high rooms. The drum size is selected both taking into account the tool and with an emphasis on the task at hand.
No one argues that with a 300 mm drum the work can be done faster, but add here a wall height of 4-5 meters, a telescopic handle and the drum being saturated with paint - and the optimism of novice builders immediately disappears, since their hands will simply begin to get tired faster .
Which roller to paint the ceiling with
It is quite important to choose the right roller for painting the ceiling with water-based paint. Many people recommend testing a product before making a purchase, which makes it possible to prevent the purchase of a low-quality product
Without a doubt, cost comes first. As a rule, budget models are not able to provide high-quality painting; in addition, the service life will be much shorter.
It is best to do the following:
first of all, it is recommended to compress the roller and check it for deformation; if the tool is deformed, then it is better not to purchase it; it is important to understand that if there is a seam on the fur coat, then the composition on the surface will not be applied well, as traces will remain; when choosing a fur coat with long pile, you should first tug it a little; if after these actions there is pile left in your hand, then you should think about the quality of the product.
If you follow these simple recommendations, you can avoid purchasing low-quality products.
How to choose a roller for painting the ceiling according to the type of construction
Today you can find on sale a large number of tools designed for applying paint and varnish to the surface of the ceiling. Since you can quite easily get lost in this abundance, it’s worth understanding what options exist.
If we consider the design features according to the principle of operation, then in this case it is possible to distinguish the following models:
- The usual submersible model.
- With a piston system that delivers the paint. In this case, the handle is a kind of reservoir, which can hold up to 500 ml of paint and varnish composition.
- Automatic paint supply. Such devices have a high cost, but the payback comes due to a high level of performance.
Thanks to this variety, you can choose a tool to suit your budget.
What kind of roller is needed for painting a ceiling like a fur coat?
If we consider finished products by type of coating, it is worth highlighting the following models:
- fur is a universal option, suitable for all compositions;
- foam rubber - great for painting, but limited number of paint coatings;
- velor - used mainly for varnish, the tool is intended mainly for professionals;
- threads or fabric are an excellent option for paints of any kind;
- models with a smooth surface - as practice shows, these options are intended only for smooth surfaces that have undergone a preliminary preparation process.
A fur coat is considered the best option.
What drum size to choose for a roller for painting the ceiling
When choosing a roller for applying paint, you should pay special attention to the size of the drum. Today the drum is found in 3 variations:
- Short - dimensions vary from 8 to 10 cm, diameter is about 10-15 mm. This option is great for places that are quite difficult to reach and for small areas.
- Average – 15-20 cm, diameter from 20 to 90 mm. An excellent option for painting the ceiling surface.
- Long - from 25 cm, diameter more than 80 mm. Such models have reinforced fasteners and high quality nozzle material.
When you need to paint a small area, the choice of model is not so important.
Important! Long rollers are considered professional.
What size roller handle is best for painting the ceiling?
When you plan to paint the surface of the ceiling, you should choose the right tool for applying paint. As practice shows, the most popular tool for carrying out this work is a roller. On the market of goods and services for sale you can find a large number of products that differ from each other not only in the sandpaper, the length of the pile, the material, the size of the drum, but also the length of the handle.
As a rule, the length of the handle starts from 70 cm. Thanks to the presence of a telescopic base, it is possible to extend the handle up to 4 m
It is important to understand that not every product can be equipped with a long handle. That is why it is recommended to first take into account at what height the work will be carried out and, based on this, choose a roller of suitable sizes for the job.
Dyeing technology
By observing certain rules and following step-by-step instructions, you can achieve high-quality coating of the ceiling surface with your own hands.
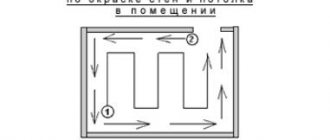
Any painting, as a rule, starts from a certain place. The ceiling surface is no exception. In this case, you first need to paint the joints of the ceiling slab with the wall, starting from the far corner relative to the door. To do this, you need to use a brush with paint to walk around the perimeter of the surface. The width of the painted surface should be at least 5 cm. This margin will protect problem areas from excess paint.
The main application of the layer should begin perpendicular to the window opening. The starting point is at the window. In the next stage, paint should be applied in a different direction, namely parallel to the window. The final application of the layer should be carried out in the direction of the window, starting from the doorway.
After applying the first layer of emulsion, it is necessary to wait a certain time. As a rule, the ceiling surface dries for at least 8-12 hours. The second layer should not be applied before a certain period of time.
When drying the ceiling, it is necessary to exclude the possibility of sunlight hitting the surface. In addition, during this period it is worth taking care that there are no drafts, otherwise stains may form on the surface and the ceiling will have to be repainted.
The step-by-step process of painting the ceiling is as follows:
- A small amount of paint, mixed and brought to a certain consistency, is poured from the jar into the cuvette. The prepared roller is wetted in the mixture and then passed over the grooved surface to evenly distribute the composition.
- The layer application begins from the far corner, located on the left side relative to the window opening. Carefully paint the ceiling. After the first approach, we change direction, while simultaneously monitoring the quality of the layer. A correctly applied layer should be uniform, without visible transitions.
- If excess paint appears on the surface, it can be removed by rolling a roller along the grooved surface of the cuvette.
- Before the third time, you can replace the rotating part of the roller with a new one. This will help improve the quality of the layer.
Features of water-based paint
Since in most cases water-based paints are used to treat the ceiling, it is worth considering their features in order to know how to work with them. The material is really very good - it does not smell, can be cleaned with wet water and is easily applied to the surface of the ceiling, as a result giving it a rather attractive appearance.
In short, the main advantages of water-based compositions can be reduced to the following list:
- Environmentally friendly composition - the paint does not contain synthetic and toxic impurities;
- The paint has no characteristic odor;
- After application, the paint forms a uniform coating, i.e. we can talk about the high visual qualities of the material.
Water-based paints are classified depending on the main component into the following types:
- Acrylic;
- Silicate;
- Silicone;
- Mineral.
Each option has its own characteristics. For example, after hardening, acrylic paints are almost impossible to wash off - they contain adhesive and latex components that improve adhesion to the ceiling surface and ensure its waterproofness.
Operations with different instruments
Painting the ceiling with water-based paint is a process that each master does in his own way, so the result can vary greatly. The work uses brushes, rollers or spray guns.
Painting with a brush
For many, such work is a hello from the Soviet past, but in this case you can’t expect a decent result, since all the stains and strokes will be obvious. Another disadvantage of the method is the excessive consumption of paint, which readily leaves the brush, plopping onto the floor and the artist. Uneven coloring is the reason why some layers contain more water-based emulsion.
This method is applicable in summer cottages, for utility rooms, in workshops or garages, but you must keep in mind that this work will steal at least three times as much time, and for water-based paint this is money, because you need to do it in 20 minutes.
Roller painting
This option, on the contrary, makes it possible to obtain a ceiling without streaks and other defects. They act when dyeing in this now traditional way:
- The junction of the walls and ceiling along the perimeter of the room is sealed with masking tape. All surfaces are protected from water-based paint with polyethylene film.
- Prepare the composition for use: stir or dilute with water, following the manufacturer’s instructions. Experienced craftsmen advise diluting the paint for the first layer a little thinner. Mix the composition with a mixer attachment. The grains that appear on the surface of the paint are removed by filtering the mixture through a triple layer of gauze.
- Use a large brush to paint the joints between the ceiling and the walls and places that are difficult to reach with a roller (for example, heating pipes). Dip the brush into the container a third of the way, be sure to squeeze it against the edge to remove excess, which will not allow you to get a thin layer. Correct the “picture” with a small tool.
- The water-based emulsion is poured into the cuvette, then the roller is moistened (rolled) along its entire length (width) until the entire surface is evenly covered with paint. Apply the water-based emulsion starting from the corner.
- The strip width is a maximum of 50 cm, the overlap is 5-10 cm. The roller handle is held at an angle of 45° to provide better control over the contact of the tool pile with the surface. The quality of work is checked by shining a flashlight onto the area. Or they simply change the viewing angle.
- Any sagging that appears is removed with a used (no longer paint) roller. Marks from overlapping work - with W-shaped movements. The finished surface is left for 12 hours so that the layer is completely dry.
Working with a spray gun
Painting the ceiling with water-based paint using this device is the most enjoyable operation, because it not only guarantees a flawless appearance of the ceiling, but is also quick, easy, and effortless. The process itself looks like this:
- First of all, water-based paint is diluted with water, since the composition for a roller and brush is too thick for this tool. Then the paint must be filtered; this is required by the nozzle, which becomes clogged even with small particles.
- Before you start painting the ceiling, adjust the flow of the mixture. To do this, choose another surface as a target, which is “watered” for about 20-30 seconds. Having stabilized the supply, they move on to painting the ceiling.
- They try to keep the nozzle perpendicular to the plane being processed, the distance from it to the tool is about 50 cm. They control the pace and speed of painting; 1 m2 in 5 seconds is considered ideal.
- Painting is carried out in squares: movement in one direction is alternated with a transverse direction, then move on to the next section. Delays are avoided, because such a mistake will result in a thicker layer of water-based emulsion. In this case, underpainting is much better, since it will subsequently be reliably hidden by the second layer. Their optimal number is 3.
Painting a ceiling with water-based paint is an activity that can hardly be called super-complicated, and a decent result will be ensured by premature acquaintance with the peculiarities of the work and potential mistakes that can be easily avoided.
The following video will show you how this work works:
Do-it-yourself effective ceiling painting technology
You need to paint the ceiling using quick, even movements. The difficulty lies in maintaining an even application.
The surface must be treated within an hour. The process of applying ceiling paint with your own hands includes the following steps:
- Preparing tools. You will need a roller with the required attachment, a paint composition, and a container with a grooved edge. The volume of the water-based composition is selected in accordance with the area of the room. When applying the primary coating, the paint is diluted with water to the consistency of kefir. When forming subsequent layers, thicker material is used. To give the composition the desired color, color is added in small portions.
- Applying the first layer. The nozzle is moistened with coloring agent so that the cylinder is covered on all sides. The excess is removed by rolling the tool on the grooved side of the tray. This will prevent liquid paint from getting onto the floor and causing smudges. A handle is placed on the base of the clasp. The telescopic structure is given the desired length. At the first stage, hard-to-reach places are painted with an angled roller. After this, they begin processing flat surfaces, moving from the window to the front door.
- Applying subsequent layers. After pre-staining, wait 10 hours. The coating must dry completely. The coloring agent is applied in narrow strokes perpendicular to the previous one. After the last layer has been applied, the surface is treated with a clean nozzle, which helps eliminate defects.
How to choose the right roller
Water-based paints vary in their composition, but the basis for all is water, which also serves as a thinner. In each specific case, the components provide different viscosity (ductility) of the mixture, which affects the choice of tool.
To choose a roller for water-based emulsion, you need to pay attention to several basic parameters:
- Fur coat material. For these purposes, foam rubber, natural or artificial fur, acrylic, velor and other varieties can be used.
- Device size. There are variations in the length of the nozzle, each of which is suitable for a specific task. The width of the pillow is also important.
- Possibility of replacing components. The parts of the tool can be separated, which allows you to change the coat if it becomes unusable or another material is needed.
- Fastening. The bracket can be fixed on one or both sides, which affects the functionality of the roller.
Modern rollers are equipped with a convenient coating fastening system, which allows you to easily change the nozzle.
An assessment of all parameters will allow you to paint the surface with high quality and without flaws.
Fur coat material
Paint rollers are usually divided into three main types depending on the material:
- Plastic. These devices are not direct application tools; they are used to give the surface a certain texture.
- Foam rubber. This option is considered one of the most popular, due to its low price and availability. Despite its obvious advantages, it is this variety that has the most disadvantages, especially the rapid loss of its original shape. This tool is great for applying varnish, primer, glue and oil-based paints. When working with water-based emulsion (regardless of its viscosity), many problems arise. Firstly, foam rubber absorbs the coloring composition well. This leads to the fact that when working with the ceiling, most of the solution ends up on the floor, and when painting the walls, difficult-to-remove drips form. Secondly, such a roller contributes to the appearance of bubbles, which give the surface heterogeneity.
A foam paint roller is one of the cheapest and requires some experience.
- Fleecy. This category includes materials whose coat has different lengths: Short pile. This is the best option for substrates that have been thoroughly prepared. If the walls or ceiling have a rough structure, then the lack of paint on the instrument will have to be compensated for by frequent dipping into a container with the composition.
- Average. This size is considered universal, since in this case the paint is absorbed in the required volume and distributed evenly over the surface.
- Long. A large amount of composition and the structure of the pile contribute to obtaining a thick layer and good texture of the coating.
Pile length of fur coats
The disadvantage of this tool is hair loss. If the problem is permanent, then the fur coat needs to be replaced.
Cylinder width and size
The size of the working surface of the roller affects the time and features of the process. The range of cylinder width can vary from 5 to 30 cm, and the diameter - from 4 to 11 cm. The gradation in size is as follows:
- Mini. The width of the tool is no more than 10 cm, and the diameter is up to 3 cm. They are used for work in hard-to-reach places, well suited for small areas.
- Average. Width – up to 15–18 cm with a diameter of up to 6 cm. Standard size, which is used for working on prepared surfaces, including when painting wallpaper.
- Big ones. The width is more than 18 cm and the diameter is more than 6 cm. This is a specialized tool that requires certain skills to work with. Not suitable for low viscosity water emulsion.
The different widths of the rollers help to perform any task, from painting corners to facade work
There are also corner rollers that have a small cylinder with a diameter of 5 to 12 cm.
Bracket Attachment
The fixation of the bracket affects the order of work. There are two options:
One side fastening. This is a classic variation that allows you to change hands. Ideal for painting walls. The design can be collapsible or non-demountable.
Tool with double-sided fixation. Allows you to quickly paint the ceiling and obtain surfaces of excellent quality
This is ensured by a uniform load, which is important when working at height.
Roller selection
To understand which roller is best to paint the ceiling with water-based paint, you need to compare them.
| View | Characteristic |
| Fur | Are popular. Working with them is a pleasure, since the material saves paint, that is, the entire volume that it absorbed is released onto the surface. With their help you can create a perfectly even coating without further ado. They have a high price. Suitable for water-based, latex paint. With this tool, you don’t have to ask the question of how to paint the ceiling with a roller without streaks. Disadvantage: The lint may remain on the walls or ceiling. |
| Thread | Easy to use, best quality. It is difficult to work with them, as they are capable of splashing the dye. |
| Velor | Suitable for: acrylic, lining, water-dispersion, water-based, latex paints. Not afraid of solvents, wear-resistant. Disadvantage: it is expensive, the velor material attracts a lot of paint, which is why it often needs to be dipped into the emulsion. |
| foam rubber | Has a low price. After applying enamel to the wall, small bubbles form that cannot be hidden. The foam material excessively absorbs paint, which drips during painting, forming a streak. The material is not wear-resistant. Suitable for lacquered materials and adhesives. If the question arises about which roller to paint the ceiling with acrylic paint, then a foam tool will help solve this problem. Not suitable for relief structures. |
Wall painting procedure
Before painting the walls, you need to prepare a tool and a flat container for impregnating the roller with paint (with a grooved plane to drain excess enamel from the coat).
The painter should first inspect the surfaces and eliminate any defects found. The appearance of the room after renovation depends on the quality of the preparatory work. Potholes and cracks on the walls are emphasized by the paintwork or the flow of light from the window.
Preparing the room and surface
At the preliminary stage it is necessary:
- Remove furniture from the room or install it in the center of the room. Cover the remaining interior items, windows and doors with newspapers or plastic wrap. Connect the edges of the protection with adhesive tape.
- Disconnect the heating system radiators from the pressure pipes, first turning off the liquid supply with the valves. In winter, the heating system remains in its original place.
- Remove (if necessary) sockets and switches, wrap the wires with insulating tape or turn off the power supply to the room.
- Clean the wall surfaces from old coating and oil stains, and then remove the dust using a wet method.
- Cover cracks and depressions with putty, saturate the walls with a primer that increases the adhesion of the paintwork.
- Carry out a test painting of a small area to analyze the characteristics of the selected paint.
Priming walls before painting.
Features of painting work
When organizing the process, it is necessary to consider:
- The paint should be mixed with solvent in the ratio specified by the manufacturer. If the proportions are violated, the adhesion and hiding power of the material deteriorates.
- When rolling, it is necessary to minimize the paint layer. Do not go over the same area multiple times due to the risk of swelling of the enamel and changes in texture.
- The finishing layer is applied in the direction of the window opening. The light falling along the paint strips conceals the seam lines.
- If a defective area is discovered, the entire wall must be repainted. In the case of local modification, a zone is formed that differs in color from the main background.
- To search for defects, you need to look at surfaces at different angles and from different distances. To improve efficiency, it is recommended to carry out the inspection with an assistant.
- Before applying paint, it is necessary to saturate the walls well with primer. If the preparation is poor, the enamel does not adhere well to the surface or stains form due to uneven absorption.
- You should not delay the painting process, because due to the evaporation of the solvent, the material thickens and begins to stick to the pile. When working in rooms with a large area, pour enamel in portions and store the remainder in sealed packaging.
- If you plan to decorate a room with paints of several colors, then you need to purchase an individual roller for each shade. To separate areas, use masking tape to provide a clear boundary.
- When applying synthetic-based enamels, it is necessary to provide ventilation for the room.
Direction of the paint layer.
Roller paint application technology
Before choosing a painting technology, it is necessary to analyze the free space along the walls. The W method involves drawing vertical stripes with the edges crossing at the junction.
The technology allows you to speed up work, but requires free space to manipulate a tool with an extended handle. The squares technique is based on dividing the wall into sections at the corners, followed by painting and joining with horizontal movements. When choosing this technology, you should take into account the direction of light from the windows.
Final touches
After finishing the painting work, it is necessary to inspect the walls and eliminate unpainted areas. Then carefully wash the roller coat or dispose of the tool.
It is recommended to remove protective covers from windows and furniture after the coating has polymerized. Otherwise, dust may get on the fresh paint. When the layer hardens, if there are no defects, sockets and switches are installed in place.
Types of water-based paint
Before painting the ceiling with ceiling paint, you need to familiarize yourself with the variety of water-based compositions. They are used much more often than acrylic or oil ones.
Water-based paints are less toxic and smelly and do not need to be diluted with solvents such as acetone or white spirit. To achieve the required consistency and follow the recommendations on how to properly paint the ceiling with a roller, you need to add ordinary water to the coloring composition.
The water-based coating is resistant to vapor and humidity; ordinary detergents are used to remove contaminants from it.
There are the following types of such paints:
- Silicate
. For their production, so-called “liquid glass” is used. They should not be used in rooms with high humidity, but they are suitable for painting ceiling surfaces in living rooms. - Mineral
. They are produced on the basis of lime or cement. Such compositions are used for facade work. - Acrylic-latex
. In addition to the coloring pigment and water, they contain low-toxic resins, thanks to which the coating becomes glossy or matte, which depends on the type of composition.
Polyamide or velor
The advantage of velor fur coats is their resistance to chemical components of paints and varnishes. Rollers can be used with any dyes, including emulsions for painting ceilings.
A tool with a velor coat is convenient because when using it, the paint not only does not splash, but also does not roll off. The only drawback of the devices is the rapid absorption of liquid and the need to repeatedly lower the roller into the paint tray.
The polyamide version of the device is a textile pillow stitched with strong threads. Its main area of application is decorative work, during which you need to ensure that the paint does not splash around.
How to paint a ceiling using a roller
Painting is carried out in several stages:
- Surface preparation.
After you have removed all the furniture from the room and covered with plastic wrap any that cannot be removed, you can begin preparing the surface for painting.
- First you need to clean it of old whitewash.
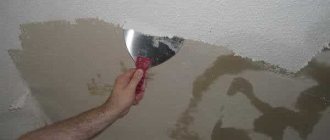
- If there are seams on the ceiling, use a spatula to free them from the old putty and carefully seal them with fresh compound.
- Use sandpaper to sand the surface and remove all dust.
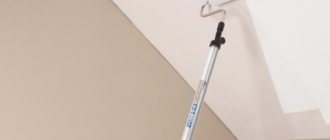
After cleaning and treating the seams, a primer mixture is applied
The primer should be applied starting from one of the corners and, moving along the perimeter, proceed to the entire surface of the ceiling, paying special attention to corners and hard-to-reach places. This is done so that the plaster holds tightly and does not crumble.
Figure 2. Painting the ceiling in stripes.
Next, using a special compound and a spatula, you need to plaster the ceiling to obtain a perfectly flat surface. After finishing the putty, you should go over the entire surface with fine sandpaper, destroying all irregularities and defects.
- Coloring.
The choice of paint must be taken very responsibly, because the process and quality of painting, appearance, durability of the finish, as well as the serviceability of the tool will depend on this. If the paint is not thinned enough, the roller will have to work in harsh conditions and will quickly deteriorate. For example, the foam coating begins to delaminate and tear.
Water-based paint is considered the most suitable for painting the ceiling. It ensures the application of an even and uniform layer, dries fairly quickly, is non-toxic, has no unpleasant odor, and is easily washed off from hands and tools.
After all the preparatory work has been completed, you can immediately begin painting the ceiling with a roller.
- Use a brush to paint all corners and other hard-to-reach places.
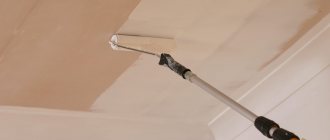
- Then pour paint into the tray, dip the roller and roll it over the squeezing grid several times.
- After the roller is saturated with paint on all sides, begin painting, rolling it over the surface of the ceiling.
- To ensure that the paint applies correctly and evenly, apply stripes 50 centimeters wide.
- The new strip must overlap the previous one by at least 10 centimeters to avoid any gaps.
- When painting, do not lift the roller from the surface, and as you use up the paint, increase the pressure.
- When the roller runs out of paint, dip it back into the tray.
Figure 3. Painting the ceiling in a perpendicular way.
And so continue until the end of painting.
After you have applied the first layer of paint, you need to wait for it to dry completely, and then apply the second layer in exactly the same way. However, keep in mind that the joints of the first layer should in no case coincide with the joints of the new one.
There are two ways to properly paint the ceiling surface:
- Stripes, from one side to the other and back again. This method allows you to perfectly paint the surface without leaving gaps. Figure 2.
- First, paint the surface horizontally, and apply the second layer vertically. Figure 3.
After finishing the painting work, you need to thoroughly clean the tool and put it in storage.
Otherwise, the tool will become damaged and you will never be able to use it again.
If the work was carried out using water-based paint, it is necessary to wash the tool in water and, in order not to cause its deformation, hang it to dry without squeezing it.
When varnishes or acrylic paints were used to paint the surface, a special composition will be needed. The cleaning procedure must be performed immediately after completion of work.
Preparing the ceiling surface for painting
Before painting the surface with water-based paint, you need to prepare the surface.
First, you need to remove old paint, wallpaper, and whitewash. These materials are easily removed with water. You need to wet the ceiling with water, wait a while, and easily remove the old material.
After removal, the ceiling is washed with a sponge. If the material is difficult to remove, you can use a spatula. You need to wait a while for the surface to dry and you can begin leveling.
Thin-layer putty is suitable for sealing cracks.
It has adhesion, elasticity, can make the surface smooth, and can be easily sanded with a float or sandpaper. The putty material is applied using a spatula. After this layer has dried, prime it.
Priming is performed with the same material. It should be applied in a thin layer. Wait a while for the ceiling to dry.
If you do not wait enough time for drying after each layer, then the surface will crack or peel off in the future.
A good renovation of a room should always start with the correct purchase of finishing materials, but you should also not forget about high-quality tools for their use. Often, more than one question arises about the design of the ceiling, which can be stretched, plastered, pasted or painted. Which roller will cope best with painting the ceiling surface?
How to choose and prepare paint
There are different water-based compositions. Each of them has features that will need to be taken into account when choosing paint:
- Acrylic. This water-based emulsion is good because it allows you to get a smooth surface, hiding small defects, such as small bulges or cracks. It serves for a long time and has low consumption when painting. Acrylic paints are suitable only for dry rooms, but they are resistant to wet cleaning. The disadvantage of acrylic is the high price, as well as the impossibility of painting a poorly dried surface.
- Silicates. This coating is resistant to moisture and is suitable for external work, for whitewashing ceilings on balconies and verandas.
- Mineral water emulsions. Such compositions adhere to any surface without problems, but are also easily washed off, so wet cleaning is not available for surfaces painted with mineral emulsion. These paints are the cheapest.
- Silicone. Such paints are attractive because they allow you to get a smooth ceiling even without careful preparation. Silicone emulsion can mask cracks up to 2 mm. It is suitable for ceilings in bathrooms and other wet areas. The disadvantage is the high cost.
Based on the characteristics of the listed compositions, you can choose exactly the one that is most appropriate for painting the ceiling in a particular room. By color you can choose matte, semi-matte, glossy or semi-gloss water-based emulsion. There are instructions on the paint container that outline the work procedure. Some paints require dilution with water, others just need to be stirred.
If the emulsion is diluted with water, this happens gradually. After adding water, everything is mixed, and then the resulting composition is tested on a small area of the surface.