Drywall is a modern technological material for cladding premises. With its help, it is possible to obtain a perfectly flat base for painting or wallpapering. The final decorative finishing is preceded by puttying the entire surface of the sheets. Many people have a general idea of how to putty drywall. But there are nuances that are worth paying attention to.
Do I need to putty drywall before wallpapering?
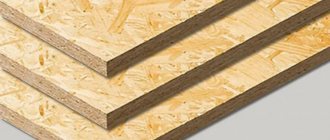
Drywall, or dry plaster, is a sheet consisting of 3 layers: a gypsum core and two cardboard shells. At first glance, it seems that it is enough to putty the seams and screws, and then the wallpaper can be glued directly to the paper.
But it is not so. Glue and paints cause the cardboard layer, which is not resistant to moisture, to swell, become deformed and can ruin the appearance of the finish. If the wallpaper is thin and light, the dark background will show through. In addition, when it comes time to change the old wallpaper, it may come off along with the cardboard. It is not entirely possible to putty drywall only when laying facing tiles or panels. Therefore, there are clear recommendations from technologists - you need to putty.
Advice from the experts
Puttying joints is a labor-intensive procedure, but not too complicated and accessible even to a layman. However, there are some useful tricks here:
- When processing bevels, it is recommended to first wet the cardboard, then the strip will be easier to cut.
- It is better to use two spatulas - a narrow one and a wide one. The narrow one takes a portion of the mixture, then it is applied to the edge of the wide one, and then it is they who do the work itself.
- When sealing seams on the wall, the spatula blade is pulled from the bottom up. Otherwise, there is a risk that a lump of solution will fall to the floor.
- When reinforcing corner joints, you need to make sure that the serpyanka does not go too deep into the corner space. A strongly bent mesh will spring back and may come unstuck from the solution.
Puttying seams is a labor-intensive, dirty, but necessary procedure. However, any master can do it efficiently.
Do I need to prime drywall before puttying?
Primer is a special quick-drying solution that improves adhesion between materials, reduces putty consumption, and prevents dehydration of adhesives and paints. In addition, it additionally protects the sheet from damaging factors - humidity and the aggressive effects of adhesive components.
If the drywall is not primed before puttying, the leveling mixture will not adhere well and will weakly adhere to the paper base, and the structure will be loose and fragile. It may quickly peel off along with the wallpaper or paint, which will lead to the need for expensive repairs.
Manufacturers produce special acrylic-based primers for drywall. They are environmentally friendly, giving gypsum board water resistance, resistance to mold and fungi, fire resistance, without reducing vapor permeability.
Before puttingtying drywall, you need to select a primer based on operating conditions:
- For wet rooms, preference is given to moisture-resistant compounds that form a water-repellent film on the surface of drywall.
- For heavy wallpaper, decorative plaster and facing tiles, deep penetration products are intended. They additionally strengthen the base and increase its load-bearing capacity.
- For painting or light wallpaper, you can choose a primer with average adhesion and penetration depth.
Universal primers have been developed for all types of subsequent finishing. The technology involves processing not only the base for putty, but also all layers - starting and finishing.
Priming is carried out with a roller or brush. For maximum effect, the composition should be applied in 2 layers. The room must have a positive temperature. To quickly remove evaporation products from the air, it is necessary to organize good ventilation.
Putty for drywall – what to choose?
How to putty drywall largely depends on the composition and purpose of the putty. On sale you can find mixtures made on a cement, gypsum or polymer base. Cement and gypsum are produced in bags in the form of finely ground powder. When preparing, they are diluted with water in the required proportions. Polymer putties are ready-to-use pastes, packaged in buckets.
The advantages of cement putties are strength and resistance to water. Most often they are used in damp rooms to work with moisture-resistant drywall. Gypsum putties are flexible, economical in consumption and easy to sand. Their area of application is only dry rooms.
Compositions based on polymer binders - acrylic or latex - are universal. They are not afraid of water, apply well, and can be sanded without any problems. Putties differ in the size of the filler grains. Mixtures intended for leveling out gross errors are called starting mixtures, and for final fine processing - finishing. The thickness of the applied layers varies from 0.2 to 5 mm.
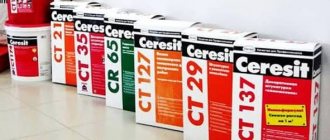
Modern high-quality putties for drywall are environmentally friendly, resistant to shrinkage and cracking, and durable. Leading manufacturers are Knauf, Weber-Vetonit, Sheetrock, Ceresit and others.
Necessary materials
Necessary materials and tools
In most cases, there are no problems with finding the necessary materials and tools. You will need the following:
- Wide brush.
- Drywall tape.
- Putty knife.
- Primer.
- Putty.
This is a standard set of tools that is used when working with drywall. In some cases, you will need to use a stationery knife that can cut the paper edge.
Preparation for finishing
Before puttingtying drywall for wallpaper or painting, the surface of the sheets is carefully prepared:
- It is necessary to ensure that the drywall does not rest rigidly on the floor or ceiling. A small gap will prevent deformation of the drywall during operation.
- Treat the cut edges that were formed when cutting sheets, as well as corners, junctions, places of fastening of socket boxes, air conditioners and other communications by chamfering at 45° with a knife or a special small plane.
- Screw the screws flush with the surface of the cardboard. You can’t leave the caps protruding or, conversely, immerse them too much in the drywall. In conditions of high humidity, it is recommended to coat the hardware with oil paint or varnish.
- Place the dividing tape at the junction of drywall and other structures - walls, ceiling, plastic slope, etc. It will provide a sliding connection and prevent the putty from sticking and cracking.
- Remove dust and prime the joints, seams and places where screws are installed.
What exactly is the problem?
But before moving on to the most important thing, I’ll focus on the essence of the problem: why is it even necessary to seal these tiny distances between the installed sections of drywall? Everything is very simple.
The fact is that if this is not done, then over time, depending on the type of cladding, the following effects can be observed:
- The paint will crack , since there will be no base underneath it at the joints to support it;
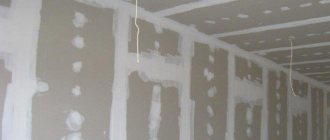
Photo of a crack formed at the joint of the plasterboard
- Unsightly sunken lines will appear on the wallpaper where there is emptiness behind them.
The only way out is to make the plasterboard covering completely monolithic, so that the paint and glue are distributed evenly over its entire surface without exception. This is where putty comes into play.
Although, of course, there is always an alternative solution: you can simply change the finishing cladding every year or even every month, depending on your luck. I’m not that rich and therefore I still prefer to putty the joints.
Required Tools
To work you will need:
- roller and brush with medium-length bristles for applying primer;
- container and mixer for preparing the solution (if a dry mixture is used);
- 2 spatulas - small (8-10 cm) for seams, large (40-50 cm);
- rule for controlling unevenness;
- sanding block, hand block or electric machine with dust extraction.
After sanding, it is necessary to remove dust from the surface using a brush or household vacuum cleaner. This operation should not be neglected, since small particles deposited on the wall impair the adhesion of materials and make it difficult to apply putty. In addition, dust penetrates into all crevices and is dangerous to inhale.
Preparation of putty solution for gypsum joints
When working with dry putty, it becomes possible to select the thickness of the solution. The optimal consistency for application is considered to be one in which the cone from the mixer on the surface does not fall off or spread. Then the finished composition reliably sticks to the spatula and adheres perfectly to both the wall and the ceiling.
The required amount of dry putty is placed in a specially prepared container according to the instructions, filled with water and stirred until smooth. If dust is generated, you need to take care of protective equipment. It is advisable to prepare no more than 5 liters of the mixture at a time, since its so-called. The pot life is only 30–40 minutes.
What is the difference between preparation for wallpaper and painting?
Although the plasterboard sheets are quite smooth, if the putty is of poor quality, joints, screw installation points, and incorrectly placed corners are visible. Even thick wallpaper cannot hide such defects, and when painted they become even more noticeable.
Putty for different types of finishing differs in requirements for surface quality:
- Under thick wallpaper or wallpaper for painting, fiberglass, decorative plaster made from materials of coarse fractions, it is allowed to apply putty with minor defects. Subsequently, they will be disguised under a layer of finishing.
- For painting, thin wallpaper, thin-layer decorative plaster, the surface must be perfectly flat and smooth. Preparation requires more time and materials. You may need to apply at least 3-4 coats and sand each one very carefully.
In Europe they use their own line to indicate surface quality Q1-Q4. The lowest category Q1 is used when laying panels, tiles and other piece facing materials. Q2 is suitable for textured coatings, Q3 for matte paints, thick wallpaper. Maximum smoothness is characterized by Q4 surfaces, which are prepared for materials with a fine structure, semi-matte and glossy coatings.
Work order
Each master has his own secrets on how to putty drywall under wallpaper. However, the work is carried out according to the technology in several stages:
- All joints and defects are carefully leveled.
- External and internal corners are formed.
- The puttyed areas are sanded.
- The entire surface is dusted and primed.
- Putty is applied.
- Sanding and priming are carried out for subsequent finishing.
You can control the quality of the base using the directional light of a lamp or flashlight. If defects are noticeable, you need to apply subsequent layers until the desired result is achieved.
Sealing seams, holes and defects
All recesses on the wall surface must be tightly filled with putty. Professional craftsmen recommend using the Knauf-Fugen mixture for this. It is flexible, easy to use, and fills joints well.
The putty is rubbed into the defects with little force until a roll of material is formed on the surface. It is recommended to treat self-tapping screws with Knauf-Fugen 2 times to avoid shrinkage.
To strengthen the seams, reinforcing paper tape or sickle tape is used. They protect the putty from cracking and destruction.
Sealing of seams is carried out in the following ways:
- Pre-wet the paper tape in water for better adhesion to the surface and to prevent the formation of bubbles. Fill the seam with putty and glue the tape, pressing it lightly with a narrow spatula. The tape must be completely immersed in the solution.
- Apply finishing putty to the seam. Glue the soaked tape with PVA glue to the joint. After drying, putty the entire surface.
- When using serpyanka, the seam is also first filled with putty. Remove excess mortar from the middle with a narrow spatula, then smooth the tape with your hand exactly in the center of the joint, pressing slightly. Cover with putty using a wide spatula.
There should be no voids left in the seams and holes, and no bubbles under the tape or sickle tape. Grinding begins after the solution has dried (10-12 hours).
Video - how to putty drywall seams
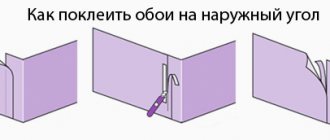
Puttying drywall corners
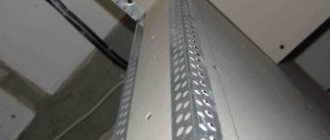
The technology for processing external and internal corners differs. For external corners, special perforated profiles made of galvanized steel or plastic are used. They allow you to strengthen the joint of two sheets and give the corner the correct geometry.
The area is first covered with fresh putty. The profile is applied to the corner and pressed slightly. A portion of putty is applied on top and smoothed down so that the corner is completely hidden under it. You can pre-fix the profile with self-tapping screws.
Paper tape is used to reinforce internal corners. The joint must be coated well with putty. Place the tape over the solution and press firmly. Using a narrow spatula, carefully level it, then cover it with a small amount of putty.
Video - puttying drywall corners
Finishing putty on plasterboard walls for painting
The base for painting should be almost perfect. The task of finishing putty is to smooth out even the slightest defects.
Before you putty the drywall for painting, the entire surface must be covered with a starting mixture, dried and sanded. Clean the walls from dust and prime them. After drying, start working:
- Mix the finishing putty composition thoroughly. If it is prepared from a dry mixture, you need to achieve a uniform and smooth consistency, reminiscent of sour cream.
- Apply the mixture with a trowel onto a long spatula and spread it over the wall.
- Then rub in a circular motion over the surface in as thin a layer as possible.
- Sequentially putty each area, extending onto the adjacent one, so as not to leave rough marks from the spatula. Movements must be done with even pressure.
To speed up work and improve its quality in corners, it is recommended to use a special corner spatula. It copes well even with hard-to-reach places.
The air temperature in the room should not be lower than 10%. Drying time - 8 hours. After complete drying, begin sanding. This is a labor-intensive process, but the final result will depend on the quality of the work done.
For final finishing, remove dust and apply primer. If necessary, repeat the putty-grind-primer cycle several times until the desired surface quality is achieved.
Summing up
Now you know how to properly plaster drywall. In order to more accurately understand the technological and practical issue, our website provides detailed photo instructions in which you will find the necessary information on this issue. Good luck!
Plasterboard is used to line the walls and ceilings. Furniture and decorative elements are made from this building material. After leveling, the finishing process begins. In addition to wallpapering and laying tiles, decorative plaster is used on drywall.
The question arises: is it possible to apply decorative plaster to drywall? Yes, this building material fits perfectly on a flat, prepared surface. With its help, walls are finished and... In this case, no wallpaper is needed. The plaster looks fashionable and solid. The room takes on a modern look, while at the same time creating coziness and comfort.
The construction market offers a wide selection of decorative mixtures. You just need to choose what kind of plaster is needed for the room.
To choose decorative plaster, you need to have an idea of what it is and how to work with it?
- Liquid decorative plaster is inconvenient to use. It is diluted with water.
- Adding coarse crumbs. The work is carried out without special equipment; everything is added by hand.
- Different baby. When applied, large pebbles often fall out.
- Decorative plaster mixed with water is not as practical as other types. It does not contain toxins.
Despite the large selection, there is one common factor - time. The decor dries completely after two full days. Polymerization – 9 days.
Samples of decorative plaster
In the first 48 hours there should be no drafts, temperature changes, or exposure to moisture.
Types of decorative plaster are presented below.
Structural plaster
Contains pebbles (grainy). Pebbles can be of different sizes: all large, all small and mixed grains. To work with such plaster there must be a clean and even surface.
Structural plaster
Initially, a plasterboard surface follows. You need to wait until it completely dries. The plaster is applied with your own hands using a trowel or spatula. You should work slowly and carefully. The mixture is applied in 1 layer. The engraving will depend on the movements of the hand: curly, circular, even texture.
Decorative plaster will harden in 3 hours. Complete drying after 7 days.
Textured plaster
Creates a unique texture on the plane. For application you need:
- Prime the surface. Wait until dry.
- Afterwards, a base is made from special paint with the addition of sand. This is for better adhesion of the layer of decorative plaster.
- Various tools are used to create drawings. The plaster mixture is applied with your own hands in two layers.
- Drying time 5 hours. Full readiness time 7 days.