Today, aerated concrete blocks are considered a popular material for the construction of facilities. They are characterized by a low thermal conductivity and good strength, which makes it possible to use them for the construction of one- and two-story houses. The structure of aerated concrete is porous, the blocks quickly absorb moisture and are easily exposed to the negative effects of natural factors, and therefore it is recommended to finish walls made of this material with a facing layer. In the process of work, one of the stages is considered to be puttying of aerated concrete without plaster, the rules for applying which will be discussed below.
Is it necessary to plaster aerated blocks before finishing, or can you get by with “a little bloodshed”
It's no secret that the lion's share of the costs when building a house is spent on interior work.
For many years, plastering for stone houses was a mandatory step and the only way to prepare walls for further finishing. The situation with brick houses today has not changed much, except that the plaster compositions have been improved. With aerated concrete blocks, under certain conditions, an alternative is possible - thin-layer compounds or, simply, putty. Is it possible to do without a thick layer of plaster and what exactly to replace it with – say the participants of our portal. I have seen a lot of information and please share your experience, who has done this (putty immediately without plaster) and what are the disadvantages, maybe operating experience (heated/unheated room)? The main disadvantages for finishers and sellers of building materials are clear - lack of work (I predict sharp criticism, especially for finishers), but from the point of view of quality and operation?
Pros and cons of the process
Puttying walls made of aerated concrete without plaster has certain advantages that are quite obvious to the developer:
- there is an opportunity to save on finishing materials;
- the time required to complete the work is reduced;
- the vapor permeability of walls improves;
- The useful volume of the room does not change after interior decoration.
In addition, puttying work on a gas-block surface makes it possible to do without a plastering station, which would have to be rented. A large product line allows you to choose the material that is easiest to apply and is in a price range acceptable to the developer.
Unfortunately, there are still certain disadvantages:
- insufficiently good grouting of the joint areas of the masonry leads to the fact that after some time a mesh of block stone and joints appears on the wall surface;
- to level out unevenness exceeding a three-millimeter height, the putty mixture must be applied in several layers;
- Certain types of putty require sanding with abrasive tools for finishing work.
Types of finishing
The main task of cosmetic finishing is to level out uneven areas, seam areas and joints. Due to its structural capabilities, block material forms smooth surfaces during installation, so in this case it is possible to putty walls made of aerated concrete without applying plaster.
Two options are used:
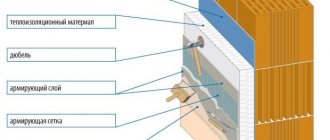
- classic - first a mesh-reinforced layer of plaster is applied, on top of which putty is applied;
- lightweight - apply putty in two layers.
The first option is considered more durable and durable, does not crack, and does not require frequent updates. But the process is labor-intensive and expensive.
In the second case, if high-quality compounds are used, the putty layer will last a long time.
What is putty and why is it needed?
Putty or putty is a building material in the form of a thick solution used to level surfaces before finishing. The composition of the putty mixture includes: film-forming compounds, fillers, pigments. Talc, chalk, barite, gypsum, and cement are used as fillers. The purpose of the material depends on the size of the aggregate. There are two types of putty:
- starting - for rough leveling under wallpaper, contains coarse filler;
- finishing - for leveling walls to a “gloss” finish for touch-up, contains fine filler.
The starting putty for aerated concrete, internal and external, has a gray tint, the finishing putty is only white. Puttying of aerated concrete blocks can be done on a layer of plaster or directly on aerated concrete blocks. In this case, before applying putty on aerated concrete, the surface is always pre-primed. This is necessary for reliable adhesion of materials to the surface.
Puttying aerated concrete without plaster - working algorithm
Today, aerated concrete blocks are considered a popular material for the construction of facilities. They are characterized by a low thermal conductivity and good strength, which makes it possible to use them for the construction of one- and two-story houses. The structure of aerated concrete is porous, the blocks quickly absorb moisture and are easily exposed to the negative effects of natural factors, and therefore it is recommended to finish walls made of this material with a facing layer. In the process of work, one of the stages is considered to be puttying of aerated concrete without plaster, the rules for applying which will be discussed below.
- What is putty used for?
- Pros and cons of the process
- Types of compositions
- Cement based mixtures
- Adhesive based solution
- Gypsum materials
- Oil solutions
- Polymer composition
- Algorithm for applying the mixture to the surface
- Preliminary preparation
- Preparing tools and materials
- Apply a starting layer
- Finishing layer
Selection of material for putty
The putty should not completely clog the pores
. To produce a high-quality finish, putty for aerated concrete must be selected in accordance with the requirements for this material.
First of all, the putty composition should not tightly clog the pores of the blocks, otherwise the gas block will lose its main advantages.
If the finishing solution is not vapor-permeable, moisture will accumulate inside the wall, negating its sound-absorbing and heat-insulating properties. Excessive dampness, in turn, can easily lead to the development of rot and fungus on the walls.
Gypsum mixtures go well with foam blocks
To more accurately determine which putty is best to choose for a building made of aerated concrete blocks, we will consider all the options for putty mixtures available on our finishing materials market.
- Oily. It is created on the basis of drying oil and has the property of densely filling all small surface spaces - pores and microcracks. A protective oil film is formed on the treated surface, preventing moisture from penetrating into the wall. But at the same time, oil drying oils also block the natural gas exchange between interior spaces and atmospheric air.
- Adhesive. It consists of 10% PVA construction adhesive with the addition of the same drying oil. PVA itself is quite vapor-permeable, but the oil component makes this option not the best for gas blocks.
- Epoxy. A very rarely used two-component composition of epoxy resin and hardener. Mainly used for sealing seams or cracks. To finish large surfaces, using epoxy putty is very problematic because of its rapid “setting”.
- Polymer. It is made from polymer chemical components that give the composition increased plasticity. As a result, polymers penetrate into all pores, firmly sealing them, so polymer compositions also do not differ in vapor-conducting properties.
- Plaster. It consists of gypsum - an environmentally friendly material with excellent gas permeability. Walls plastered with gypsum compounds continue to “breathe” unhindered. Other advantages include affordable cost, lower than other mixtures. The only major disadvantage of the gypsum composition is the fear of dampness, so gypsum can only be used for finishing aerated concrete in dry rooms. Due to its fine texture, it is usually used as a finishing putty.
- Cement. Unlike gypsum mortars, cement mortars can be used for finishing external walls, as well as indoors with high humidity. They are also low cost and do not interfere with free gas exchange. Cement putty most often acts as a base putty, as a basis for a thinner finishing mixture. For more information about which mixture to choose, watch this video:
As you can see, aerated concrete should be puttyed with either a cement or gypsum composition.
It is also possible to use them together: a cement composition as a base, and a gypsum composition for finishing.
Other types of putties are not very suitable for aerated concrete due to their technical parameters.
In the construction market recently you can find special compositions for finishing aerated concrete walls. They are created taking into account the operational characteristics of aerated concrete, so it is best to use such mixtures in the work.
Types of putties
There are several types of putty on sale:
- Cement. Can only be used indoors.
- Adhesive. It consists of 10% glue and also contains drying oil.
- Epoxy. It is used very rarely, mainly for sealing seams between tiles. Its main advantage over other types of putties is the easy removal of grease and dust.
- Plaster. A cheap option that can be used in dry residential areas.
- Oily. It is produced on the basis of drying oil.
- Polymer. The most expensive and high-quality putty.
Features of using putty for aerated concrete
It is used to level walls, seal cracks and joints, this finish prevents the formation of bubbles when wallpapering, they stick better to it and last longer.
For residential premises, gypsum putty is used. It is used for rooms where moisture access is limited. Its main component serves as a filler and binder. This material is finely ground.
For rooms with high humidity, polymer and cement varieties are used.
The first is divided into two types:
- Acrylic. The material consists of water, acrylic resin and chalk. After applying it, the surface becomes glossy. This type is universal and can be used on any surface.
- Latex. It consists of fillers, binders, antiseptics, plasticizers and hardening regulators. This type of putty demonstrates high plastic properties during operation; it should be applied in thin layers. After drying, the putty does not crack or crumble. It does not need to be diluted with water; it is sold in completely finished form.
The polymer material has no disadvantages, it has only advantages, its only disadvantage is its high price.
Cement putty consists of cement, sand, water and plasticizer. It is very resistant to moisture, but when applied to walls it shrinks greatly; it is used only for finishing aerated concrete inside buildings; over time, cracks may appear on its surface.
Features of aerated concrete
Aerated concrete belongs to the class of cellular concrete. By the way, foam concrete, which is made from cement, sand, foam and water, is also classified as a type of material. The composition of aerated concrete is somewhat different: quartz sand, lime, cement, aluminum powder, and water are used in its production.
Since water is used in the production of aerated concrete, at the exit from the factory gate these products are characterized by high humidity, reaching 25-30%. Increased humidity levels persist for a certain period of time, so after the construction of a building, building codes require a 6-month waiting period. During this period, you cannot putty the walls, since the aerated concrete must completely dry and the base of the structure must settle.
Tools
Each construction begins with the calculation of the required amount of material and the preparation of the necessary tools. Regarding the last point you will need:
- container for mixing putty composition;
- roller for priming work;
- painting rule of two meters length;
- construction level;
- plane for leveling wall surfaces;
- metal trowel (for performing plastering work);
- spatula for applying putty composition;
- a tray or sheet of metal on which the putty is laid out;
- mesh for plastering work with five-millimeter cells;
- beacon profiles made of galvanized metal;
- electric drill for making batches;
- sander
Alternative
When vapor barriering aerated concrete blocks, the material must not be allowed to become damp.
However, there is another finishing option that is used relatively rarely for aerated concrete houses. Its essence lies in maximum vapor barrier of the wall surface using special primers and putty solutions.
It is used if the facade of the building is finished with a material that does not allow moisture to pass through - porcelain stoneware, facing tiles or stone.
In this situation, it is necessary to prevent moisture from absorbing into the aerated concrete. It is quite clear that in this case the owner of the house will have to fork out for the installation of fresh air ventilation in the house.
This method is rarely encountered for the reason that using such a unique material in construction in order to ultimately abandon all its advantages is very unwise and wasteful.
Plastering process
Important! In blocks that leave the factory, the humidity level is approximately 30 percent. During operation, the humidity decreases and the component shrinks. Therefore, it is necessary to carry out plastering and other finishing work directly on the wall six months after the construction of the house. Otherwise, cracks will soon appear in the finish.
Light version
- It differs from the standard one in that it does not imply the installation of a reinforcing mesh. The process is divided into the following components:
- We process the wall with a planer if it is necessary to remove irregularities;
- The wall surface is coated with a primer composition in order to improve adhesion to the composition;
- The putty is mixed. Pour about a third of the water into a bucket or basin, then pour the mixture into it until a mound forms above the surface of the water. Next, we need to mix until the lumps are completely eliminated, and the composition is given the consistency of thick sour cream;
- The putty is applied in accordance with the operating rules, which can be read on our website. After the composition has dried, you need to go over the wall with a float to level it, then apply the primer again, and then apply a second layer of putty.
Method with reinforcement
In this case, the preparatory stage is the same - we go through the walls with a plane, removing irregularities. If it is necessary to eliminate the holes, we fill them with the same solution on which the blocks themselves were laid directly. After this, the wall is covered with a primer composition, and, if necessary according to the plan, a beacon profile is attached to it.
After the process of mixing the plaster described above, the latter is laid out on the wall and leveled. At this stage, while the mixture has not yet dried, a mesh is laid out on the wall, which is pressed in and evenly leveled over the surface. After making sure that the reinforcing network is securely fixed, the wall is left for 24 hours until the plaster has completely gained strength and has fixed the reinforcing network.
After the layer with the mesh inserted into it has dried, it is necessary to treat it with a primer and apply a second layer of plaster. If beacons were previously installed, then the top layer should exactly correspond to their ridges. It is necessary to work on further finishing of the wall only after 24 hours from the moment of applying the second layer.
This process takes more time, resources and effort. However, practice shows that in this case you can count on a more durable finish that can withstand stronger external influences.
Preparation of putty
Before starting work, you should prepare the material. The final quality of the work performed will depend on its consistency. The preparatory process includes certain stages:
- a little water is poured into the container, the putty mixture is added;
- the components are mixed with a simple spatula;
- To give the composition uniformity, use a mixer. If the result is a thick mass, add water;
- The solution is left for about five minutes, after which it is mixed again.
Now you are allowed to move on to finishing the aerated concrete with putty. There is no need to knead a large amount of material. Remember that it is recommended to prepare the prepared composition within thirty minutes, otherwise it will begin to thicken and become unsuitable for use. A new batch will need to be prepared.
Useful tips
During the work process, certain requirements must be observed:
- The temperature during the puttying period and for several days should not be below five degrees Celsius and not exceed the twenty-five degree mark.
- It is recommended to protect freshly finished surfaces from excessive humidity, low temperatures, strong winds and sunlight.
- First, the internal putty of aerated concrete is performed, after which they move on to the external walls.
This sequence of work makes it possible to maintain natural drainage from the aerated block material into the external environment.
To mix the putty composition, use clean containers, well rinsed with water to remove the remnants of the old mixture. First, water is poured in, then the mixture is poured. Its quantity is determined by eye - a mound should appear from the water, which means that backfilling stops.
The kneading is carried out without lumps, the consistency of the putty should be similar to sour cream. For ease of use, put the putty in small parts on a metal sheet, covering it with a damp cloth so that the composition does not dry out.
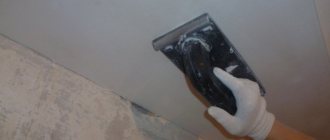
Having processed a certain area, it is necessary to level its surface by performing several sweeping movements with a spatula. The completely dried layer is sanded off with sandpaper.
It is prohibited to putty on a damp wall surface. Putty for walls made of aerated concrete indoors with excessive moisture content is carried out with facade compounds. The best option in this case is a cement-based putty composition.
If there are no polymer compounds, then the internal walls can be treated with gypsum or lime mixture.
How to putty walls made of aerated concrete step by step instructions
It is easier not to plaster, but to putty on new walls, or walls that did not have a plaster layer. The step-by-step instructions below are just for such a case:
- Preparing the base involves removing excess masonry mortar or adhesive from the joints. All protruding irregularities in the blocks are smoothed out using a spatula and sandpaper. If the wall is not new and has any coatings, they are removed. They take out old nails and fastenings for cornices, shelves, and pictures. The surface prepared in this way is primed twice. The second layer of primer is applied after the first has dried. It is important that the primer saturates the aerated concrete well.
Tip: Choose a primer that is compatible with the putty. It is advisable to use primer and putty from the same manufacturer and strictly follow the included instructions.
- Preparation of tools and materials. The set of tools for performing putty work includes:
- electric drill with a mixing attachment for stirring the putty composition;
- belt sander with belts;
- a set of metal spatulas with a width of 20 to 200 mm;
- dishes for diluting putty;
- brushes and rollers for priming;
- dishes for priming;
- sandpaper with medium and fine grain;
- respirator;
- protective glasses.
The materials you will need are primer and the putty composition itself. They should be used in accordance with the attached instructions.
- Applying starting putty. When starting to apply the starting putty, determine the places where it will need to be applied in two to three layers. The process begins with them. The second layer is applied after the first has dried. The thickness of the putty in one pass is no more than 5 mm. Up to 3 layers can be applied for wallpaper, and no more than 2 for painting. The volume of the composition is diluted at a time, which will certainly be used up before it hardens. It is convenient to work with two spatulas at the same time, transferring the excess putty remaining on the working spatula to the second one, giving the composition the shape required for the work. The corners of the rooms are puttied with great care. Door and window openings are framed with perforated metal corners. Their use makes it easier to obtain high-quality results. A fine-mesh plastic mesh is used to bridge cracks. After drying, the starting layer of putty is treated with sandpaper and impregnated with primer twice.
- Applying finishing putty . The finishing putty is applied using the same technology as the starting putty. In one pass, 1-3 mm of putty is applied. Cleaning is done with fine-grain sandpaper. After drying, the surface is impregnated with soil. It is advisable to apply two layers. The second - after the first has dried.
Please note : When sanding dried putty with sandpaper, use a respirator, safety glasses and gloves.
Putty on a gas block wall
Puttying a wall made of aerated concrete blocks, like finishing any other wall, is done in several stages. The first of these is preparation of the load-bearing surface.
Preparing the base
Irregularities and sagging are removed with a grinder.
To prepare the aerated concrete base, we will need the following tools:
- Sander;
- special plane for aerated concrete;
- plaster trowel and polisher;
- wide and narrow spatula;
- drill with mixer attachment;
- container for preparing putty mixture;
- plaster mesh;
- building level.
Preparing the load-bearing base involves leveling it. Using a sander, we remove unevenness and sagging mortar on the seams. Use a plane to level the surface of the blocks.
It should be said that gas blocks can be processed quite easily with ordinary carpentry tools - a hacksaw, an ax, etc. So, the final cleaning of the wall can be done with coarse sandpaper.
After sanding, the wall is cleaned of dust.
After leveling the wall, we thoroughly clean it of dust and small concrete chips using a vacuum cleaner.
Then we prime the surface of the wall twice: the second layer of primer should be applied 6 - 10 hours after the first, only when it is completely dry.
A deep penetration primer designed for treating concrete and brick bases is best suited for these purposes.
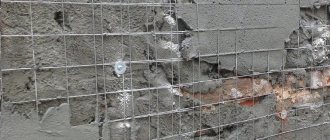
After this, we use masonry mortar to fill all the seams and restore large chips. After the solution has dried, a plaster mesh is attached to the wall.
It would be best to use a self-adhesive fiberglass mesh, but a galvanized flat mesh secured with dowel nails will also work.
Applying cement putty
To prepare cement putty mortar, we need a bucket and a construction mixer. The dry composition should be mixed with water, strictly observing the proportions recommended by the manufacturer. For more information about finishing an aerated concrete wall, watch this video:
Before you start mixing, you should decide on the amount of putty solution required for work. To do this, you should calculate the total area of the walls being treated and multiply the resulting figure by the amount of solution required to process 1 square meter. m. surface.
Putty consumption rate per sq. m. is indicated on the packaging. First, pour the required amount of water into the bucket, into which we add the dry mixture, periodically stirring the solution with a drill with a mixer attachment.
The solution should have a sufficiently viscous consistency so that when applied to the wall it does not flow down and form smudges.
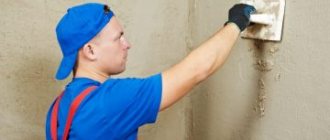
It is more convenient to apply the mixture with a wide spatula.
Apply cement putty with a wide spatula. To do this, use a narrow spatula to scoop the finished putty solution out of a bucket and apply it to a wide spatula. The solution should be applied in such a way that it spreads evenly across the entire width of the instrument.
Then, using wide and smooth movements, apply the putty to the surface of the wall. The tool should be held at an angle of 45 degrees relative to the plane of the base.
The thickness of the applied layer should not exceed 5 mm, but sometimes it is necessary to apply a thicker layer to level the wall. In this case, the plaster is applied in two or more layers, with each previous one always drying.
After the putty is distributed over the entire surface of the gas-block wall, you should wait several hours until it sets slightly. Then we process the surface with a grater, leveling it.
We leave the wall for a day until the cement mortar hardens properly, prime the surface again and begin applying the finishing putty.
Advice from experienced professionals
Finishing work on a building made of aerated concrete blocks should begin 6 months after completion of construction. The gas block supplied to the construction site from the manufacturer has a humidity of about 30%. Therefore, it is necessary to allow the wall material to dry and settle. Haste will lead to the appearance of cracks caused by the process of evaporation of moisture from the core of the blocks.
The use of putty based on cement mortars is justified on the outside of the building. Cement creates a moisture-proof crust that prevents water vapor from escaping from living spaces. Where cement plaster is needed - in bathrooms and kitchens - forced ventilation should be installed. The modern trend of cottage construction involves the installation of building ventilation systems, regardless of the main materials used for its construction.
Craftsmen categorically advise plastering, and not puttingty, a wall made of aerated concrete blocks on which tiles are supposed to be installed!
And finally, advice from the treasury of masters: The Lord did not create spare parts for man. Take care of yourself. While at a site under construction, follow safety rules and do not neglect protective clothing and proper footwear. When returning home, do not forget to remove your mask and wash your hands. Be healthy!
Advantages and disadvantages of aerated block putty without plaster
Puttying walls without prior plastering has a number of advantages:
- saving building materials that are not spent on plastering;
- saving time;
- reduction of labor intensity of work;
- reduction of financial costs;
- improving the permeability of walls to water vapor, which increases the comfort of the indoor microclimate without the use of forced ventilation.
There are also known disadvantages of the described technology, which boil down to applying 2-3 layers of putty in the case of maximum permissible differences in wall surfaces. The complexity and time of finishing work increases accordingly. Another nuisance may be the appearance of traces of gas block joints on a fully finished wall. Moreover, according to the “law of maximum meanness”, this will happen within a short time after the object is handed over to the customer.
Advice: Prevent the occurrence of such a defect by carefully monitoring the sealing of the seams between the masonry elements. The seam is filled without gaps or voids. Such control is necessary before completing finishing work.
Vapor-permeable plaster for aerated concrete. Requirements for internal and external plastering of concrete
Leading European manufacturers of cellular concrete Masa-Henke, Ytong and Hebel, based on in-depth research, have developed the requirements for decorative and protective plaster of aerated concrete walls indoors and outdoors:
- The adhesion of the material to the hydrophobic layer of cellular concrete must be at least 0.2 MPa (the indicator is usually indicated on the packaging of the dry building mixture);
- High level of protection against penetration of atmospheric moisture to the base - water absorption of the finishing layer (W) should be less than 0.5 kg/(m2h0.5);
- Vapor-permeable plaster for aerated concrete must have a low vapor transmission resistance (S) of less than 2.0 m.
Structure of foam concrete block
Each subsequent layer must have a higher vapor permeability and lower water absorption than the previous one. The coefficient is calculated using the formula:
W×S = 0.2 Kg/(mh0.5) – for internal walls and intermediate coverings;
W×S = 0.1 Kg/(mh0.5) – for building facades.
The sequence of applying layers of plaster on walls made of foam blocks with your own hands,
Internal plasters on cellular concrete
Complete leveling of internal walls made of foam concrete and aerated concrete is carried out using cement-lime mortars or polymer-cement mixtures with a large number of plasticizers in the composition. The plaster for indoor foam blocks contains organic plasticizers, which increase the mobility and life span of the solutions. For rooms with humidity not exceeding 60%, use finishing mixtures of the following composition:
- For the inner surface of external walls made of foam concrete, aerated concrete and for concrete floors - a mixture of lime and Portland cement;
- Plaster on aerated concrete for interior work on load-bearing walls, partitions or partitions - uses lime as a binder.
Important! When independently producing plaster mortars, compositions for spraying and soil should be sifted through a mesh of no more than 3x3 mm (provided there are no reinforcing additives); for coating, sifting through a mesh of 1.6x1.6 mm is used.
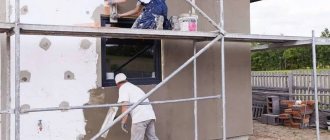
External plaster on aerated concrete blocks
Plaster on aerated concrete for external use must meet the following requirements:
- Bulk weight of the mixture is about 0.8 kg/dm3;
- The size of filler fractions is 2–4 mm;
- Mobility class of the plaster mixture P1 – low-moving, thick solution;
- Compression resistance class CS-1 – has significant strength;
- Fire resistance class A1 – non-combustible material;
- Water absorption properties – less than 0.5 kg/m2h0.5;
- Vapor permeability resistance properties – from 10 to 12.
Before purchasing external plaster for walls made of aerated concrete, you must check the presented indicators with the information indicated on the packaging of the dry mixture.