Artificial brickwork is often used when decorating residential premises. When you want to have a brick wall, but it’s impossible to lay a real one, they resort to imitation. There are several ways to do this. In this article we will look at how you can create a textured decorative finish yourself using polystyrene foam.
What does a foam wall look like in the interior?
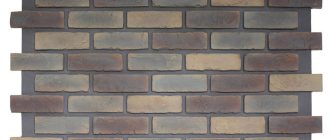
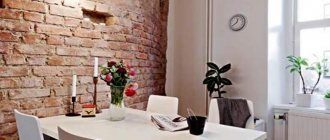
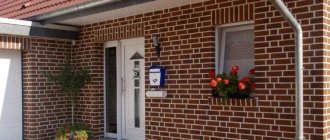
A brick wall is found in styles such as “loft” or “Provence”; it can be painted white or have a natural shade. False bricks are suitable for the interior of a kitchen, bedroom or living room. As a rule, decorative finishing of one wall is carried out, the rest are left for painting or wallpaper.
The calm, repeating texture of the brickwork serves as a good backdrop for various decorative items mounted on the wall.
If there is a wall with a TV in the center of your living room, then polystyrene foam for finishing it as a brick would be perfect, because this material is a good sound insulator. This is important if there is good audibility in the apartment, and you do not want the sounds of the speaker system to be transmitted to the next bedroom or disturb the neighbors.
Design of facade thermal panels
Ready-made blocks of thermal panels are intended for external decoration of buildings. But sometimes designers use them in interior spaces. Ready-made panels do not weigh down the walls and do not create excess pressure on the foundation.
Structurally, thermal panels have the appearance of a layer cake.
- The top layer is decorative. The layer pattern repeats brick or stone masonry. It also performs the protective functions of the main layer from the actions of nature.
- The main layer serves as thermal insulation. Expanded polystyrene and polyurethane foam are used for its production.
The panels are manufactured at the factory using the latest technology, using special matrices. High-precision connection of panels masks possible installation defects. Cold bridges are never created in the panels. The fastening is reliable and can withstand even the force of slanting rain.
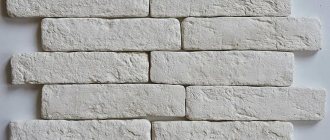
Decorative panels with imitation stone or brick are in demand by consumers due to their decorative qualities. Imitation of natural stone is difficult to distinguish from masonry. And it is easy to care for - just clean it from dust once a year with a damp sponge. The panels have beveled hidden edges that provide a seamless finish. The type of stone finish is resistant to fading in bright sun. There are no scratches on it.
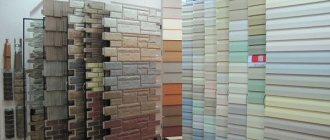
Brick-like thermal panels are popular and considered traditional. They are suitable for many structures and buildings. There are many proposals for choosing the color and texture of bricks. The color of the brick can be white, yellow, gray, red, terracotta. In appearance, aged or burnt, with a rough or smooth surface.
The panels are joined together using the tongue-and-groove method. This ensures the rigidity of the skin, which holds wind loads.
Finishing features
Let's consider the properties of polystyrene foam (polyurethane foam) as a material for decorative finishing.
First of all, it is worth remembering that it is produced for insulation and soundproofing of walls, has different densities and strengths, so you need to be careful when choosing sheets of foam plastic to imitate brick.
The advantages of the material include:
- light weight, false brick adheres well to the wall;
- easy to cut and process;
- does not create dust and dirt, this is important when working indoors;
- polystyrene foam is cheaper than plaster, brick tiles or high-quality wallpaper, but the cost of paint and glue must be added to its cost.
The disadvantage of a foam wall is its low strength. Even if you choose sheets with a high density that hold their shape well and do not crumble, dents may still remain on such a finish from impacts and careless movements. Therefore, it is not recommended to make decorative brickwork from foam plastic in places with high operational load: in hallways, at the table in the dining area, in the children's room.
3d brick
A relatively new material is 3D brick, which, due to its light weight, can be used for both external and internal wall decoration. It is also called Lego brick, which means a brick with a lock, this is what characterizes its main positive aspect - ease of installation. The bricks have tongues and grooves, due to which they are fixed to each other, and the voids inside are filled with ordinary mortar or glue. The material does not require additional finishing work. The rear brickwork is ideal for creating a natural interior with a brick bar counter or interior decorative ceiling. It is not at all necessary to call in craftsmen - you can do all the masonry yourself, just choose the exact brick option that would fit into the interior design and have the required weight.
3D brick, classic version
The most difficult moment in working with 3D brick is the even laying of the 1st row - everything must be strictly level. After laying 5-6 rows, the voids are filled with adhesive mass, and excess glue that has come through the seams is carefully removed. 3D brick is completely environmentally friendly, because natural materials are used for its production: sand, shell rock, cement, water and a number of binding components.
3D brick can have a variety of textures and colors
- Inexpensive way. Such coverage will not require financial investments.
- Eco-friendly. The plaster does not contain harmful impurities.
- Simple. No special skills or tools are needed here. Just a little care and patience.
Marking
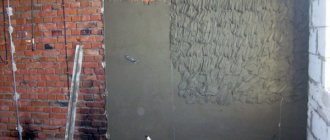
Before starting the main work, it is necessary to prepare the surface - remove the old finish. If it is not level, level it with plaster and cover it with a primer. Another option is to use drywall, this is a dry leveling method. However, if the area of the room is small, this method is unlikely to be suitable, because the sheets will “eat up” the space.
What do you need for work?
To make artificial bricks you will need sheets of dense polystyrene foam. We call it foam plastic in general, it can be:
- "Penoplex" used for insulation of buildings. The thinnest one will do - 20 mm.
- Styrofoam. It is better to take with high density (for example, PPS-35).
- PVC sandwich panels with expanded polystyrene, which are used for finishing slopes. This sandwich brick needs to be cut lengthwise into two parts. On one side there will be foam plastic, on the other there will be a PVC base.
In order to glue foam bricks to the wall, the following is suitable:
Glue “liquid nails” such as “Moment Installation” or “Titanium”. Liquid nails are needed when brickwork is laid out one element at a time, i.e. foam rectangles are glued 1 piece at a time.
Polyurethane foam . With its help, you can glue a whole sheet of foam plastic on which imitation masonry is made. For individual bricks this method will be inconvenient. The foam adheres well to strong, rough substrates: concrete, aerated concrete, plaster, drywall. The polyurethane foam comes off from smooth PVC panels. When purchasing, look at the mass of polyurethane in the cylinder; with the same volumes of foam, it may be less. A good option is “Macroflex” (MAKROFLEX).
Adhesive for insulation . This option is also for installing foam plastic sheets directly under the brick. The adhesive that is used for constructing wet facades is suitable: Ceresit CT 85, Unis Warm Adhesive, Weber.Therm S100, Knauf Sevener.
Glue gun . It is useful for gluing decorative bricks from sandwich panels, i.e. with a smooth PVC base.
DIY brick wall made from tiles
You can find ready-made options in a construction hypermarket. It is very easy to create a brick wall with your own hands using tiles. They produce ceramic and elastic ones based on polyacrylic. The second option is simpler and lighter, since polymer tiles weigh less and cost less.
The main advantage of flexible clinker is the ability to stick to uneven, complex surfaces. This “brick” goes around even sharp corners. The material is intended for interior decoration, however, it is resistant to cold, is not afraid of the sun and tolerates fairly high humidity.
- Preparing a wall for finishing with flexible tiles begins with markings. Use a regular pencil and ruler to outline the surface. There is no need to create a template here.
- Cut sheets of material to size.
- Apply tile or special adhesive to the wall with a notched trowel. Layer thickness is at least 3 mm. There is no need to immediately apply glue to the entire surface: it sets quickly.
- The tile is applied to the wall, pressed and smoothed.
- After installing the masonry, the seams are smoothed with a thin brush dipped in water. Grout to finish the seams is not needed here.
Instead of elastic cladding, you can use hard tiles - made of gypsum, cement. They are cheaper and imitate the texture of stone well. However, gypsum finishing is afraid of water, so it cannot be used in the bathroom and kitchen.
Working with hard tiles or faux bricks is more difficult. The material can only be cut using special tools: a circular saw or a grinding machine with a disc. The seams between the elements must be rubbed down to give the masonry a neat appearance and to prevent water from getting into the joints.
How to make foam bricks
To imitate a brick wall, you need to mark out the foam, cut bricks according to a template or make masonry joints on a sheet, and give the surface a texture. The decorative trim is then glued to the wall and painted.
Let's take a closer look at the entire brick decoration technology.
- Marking . If the expanded polystyrene sheets will be glued entirely without cutting, then you need to draw brickwork on them with a marker or pencil. To cut out individual false bricks, you can make a cardboard template.
The size of a regular single brick is 250*120*60 mm. Those. To mark foam plastic, you need a 250*60 mm template. One-and-a-half bricks are often used for cladding; their height is 88 mm. The thickness of the masonry joint is the distance between the bricks = 1 cm.
- Slicing . Expanded polystyrene can be easily cut with any construction knife with a retractable blade. There are also no problems with cutting sandwich panels; the top PVC layer is cut together with the foam layer, and the bottom plastic layer is then broken along the cut line.
Decorative bricks can be chamfered on all sides with a knife for beauty.
If the imitation of masonry is done on the entire sheet, then the seams are easiest to form using a soldering iron ; the foam melts easily. The soldering iron is guided along the line of the masonry seam, controlling the pressure and depth. First, horizontal grooves are made from edge to edge parallel to each other. There should be a distance between them equal to the height of the brick (60 or 88 mm). Then the vertical seams are burned out and the contours of the artificial bricks are finally formed.
Attention! Expanded polystyrene is toxic when burned. Burn only in a well-ventilated area and wear a mask to protect your breathing from smoke.
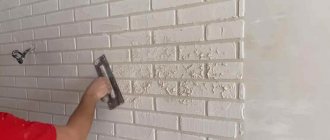
- Creating an invoice . To make a decorative wall look like a real brick wall, you need to give it the same rough texture. This can be done with a brush with metal bristles. It is pressed onto the sheets and passed along the surface, creating pits and grooves on the foam. You can also give relief to bricks with a soldering iron or lighter. This will be shown in more detail later in the video lesson.
- Installation of bricks. To secure the made decor, you need “liquid nails”, foam glue or other glue mentioned above. The prepared rectangles are glued directly to the wall along a horizontal line, leaving a gap of 1 cm - a masonry joint. After laying the first row, move half a brick to the side and glue the second row. Then the process is repeated.
Another installation option is to imitate masonry not on the wall, but on a large sheet, for example, plasterboard or plywood. The advantage here is that the gypsum board lies on the floor, and gluing in this position is sometimes easier than vertically. After finishing the decoration, these sheets are attached to the wall or frame using self-tapping screws.
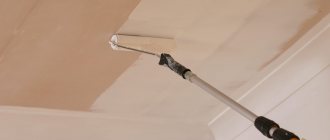
- Painting the wall. To complete the finishing, the decorative coating must be painted. Which color to choose depends on the overall style of the room. A popular option is a pure white wall. If you want to create a brick color, you will have to tint the paint in a red-brown shade. Artificial masonry joints can be made white or the color of gray cement-sand mortar.
Important! To paint polystyrene foam, you need to choose paints without solvents, otherwise they will ruin the material. Water-based emulsions and acrylic paints in jars or spray cans are suitable.
Cardboard brickwork
Imitating a brick wall in the interior does not require much expense. Creating artificial masonry is easy if you have the following materials and tools:
- corrugated cardboard;
- PVA glue;
- hot glue gun with rods;
- brushes for applying it;
- multilayer paper napkins;
- rulers;
- pencil;
- scissors or stationery knife;
- paints;
- varnish
Imitation of brickwork in decoupage
Having stocked up with everything you need, you can get to work. First of all, you should prepare the surface: clean it and coat it with a primer. Bricks cut from cardboard are glued to a pre-marked wall. To firmly fix them to the wall, it is recommended to use PVA and hot melt adhesive at the same time. The main part of the brick is processed first, and the second is applied pointwise only in the corners. Hot-melt adhesive quickly fixes the cardboard to the surface; using PVA allows you to save on expensive rods.
Next comes the turn of decoration. That's what paper napkins are for. The technique is called “decoupage”. To do this, you need to peel off one layer of the napkin, crumple it in your hands and place it on a surface greased with PVA. Carefully apply another layer of glue on top, and at the last stage paint and varnish.
Imitation of brickwork made of cardboard
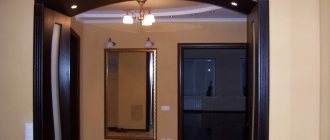
Brickwork can be used in the design of a room in different ways. You can decorate an entire wall with it or use it only as a decoration element. For example, in the kitchen, special tiles laid out like real masonry look great as an apron. False bricks are often used to frame arched openings, fireplaces, mirrors and paintings.
Advantage
One of the main advantages is the affordable price of the blocks. And also the fact that the facade cladding can last for many years and does not require special care products.
List of advantages of facade thermal panels:
- Not difficult installation. In practice, installation can be done on any surface. The only condition is that the surface must be flat. Walls can be coated immediately after their construction and during restoration. Installation does not require special devices or highly qualified specialists. Installation of panels can be carried out at temperatures from +35 to -100C.
- The economic benefit from installing thermal panels is fuel savings of up to 40%.
- The use of thermal panels does not require additional strengthening of the foundation. The weight of the panel is 10 times lighter than brickwork.
- Durability. The appearance remains without visible changes for a long time. The manufactured blocks do not rot, do not decompose and do not change their qualities during the period of operation. Microorganisms do not develop on the surface and inside the slabs. The material is not destroyed by rodents.
- Environmentally friendly building cladding material.
- Sound insulation is provided by the porous structure of the base layer.
- Prevents the development of corrosion of reinforcement and does not allow aggressive substances to reach concrete.
Processing the entire plane of foam sheets
A do-it-yourself “brick” wall is made in this way using the same means that are used when using the previous method. But in this case there is no need to cut blanks from sheets. Foam sheets are laid entirely on the wall.
The procedure is performed like this:
- The surface to be decorated is covered with sheets of polyurethane foam.
- A masonry pattern is applied on top of the material.
- First, the gaps between the “stones” are burned out with a soldering iron, after which the relief appears.
- The surface is treated with paints depending on taste preferences.
At the final stage, you need to apply varnish to the wall, which adds the finishing touch to the natural appearance of the brick. In addition, it protects the masonry from external mechanical damage that may occur during operation.
Comparison of polystyrene foam and polyurethane foam panels
In the production of panels, the insulating layer can be polystyrene foam or polyurethane foam. Each of the materials has positive qualities.
Mold and moss do not grow on polyurethane foam. No structural changes are observed, even with temperature fluctuations. But the material can self-oxidize with further formation of peroxide. If the temperature increases to +80°C and higher, mechanical destruction with the release of phenol is possible. Polyurethane foam can last at least 60 years.
Expanded polystyrene is environmentally friendly for humans. It is used to fill furniture and pillows. It is not destroyed by microorganisms. Fungi do not grow on it and colonies do not develop. The structure of the material is porous. It has a relatively high percentage of moisture absorption, so it can be destroyed by negative temperatures.
Gypsum tiles simulating brick
Elastic gypsum allows you to model the structure of a brick down to very small details. Products made from it are virtually indistinguishable from the real thing. You can choose them ready-made or make them yourself.
For work you will need:
• mold for the production of bricks; • dry gypsum-based mixture; • water; • tile adhesive; • spatula with teeth; • a damp sponge to remove excess glue.
Brick mold
1. Gypsum powder, water and glue
Stir until a creamy mass is formed.
2. The prepared mixture is poured into molds
. It hardens instantly (about 30 minutes), so there is no need to make an excessive amount of solution.
Pouring into molds
Advice.
To ensure that the solution is distributed much more evenly, shake the mold slightly after pouring.
3. If the bricks will be glued specifically to the wall, it must be prepared: level it, knock down the protruding parts, fill it with glue or plaster the largest cracks and dents. It is much easier, just like in the previous case, to glue bricks onto the base
. plywood or gypsum board.
will be primed twice
. By using a primer, adhesion increases and the bricks will hold more firmly.
5. Markings are made on the wall surface with a level. Using a spatula equipped with teeth, glue is applied to it, and then the bricks are laid.
Gluing tiles from bricks
6. Water based acrylic dye
You can add it directly to the solution or paint the bricks after gluing them to the wall. To imitate masonry, the base between the bricks is painted in a very dark color.
Example of plaster brick cladding
Brick-like cladding with plaster
To imitate brick, you can use a plaster mixture based on gypsum.
You can use a gypsum-based plaster mixture as a brick-like decor. This creates an interesting design and hides all the imperfections and wall irregularities. First of all, the wall surface is prepared, all old cladding and peeling parts are removed from it. There is no need to specially level it, as this will be done by the decorative cladding. Then the surface is covered with a primer mixture and left to dry completely. Then the gypsum-based plaster mixture is diluted to the consistency of a loose dough.
The work is carried out in small fragments, and an area of 0.5 m2 in size should be covered. A layer of prepared plaster 10 mm thick is applied to the wall with a trowel. Next, the applied mixture is slightly smoothed with a spatula so that an uneven texture emerges. After that, with a stick you need to apply a pattern simulating a real brick. Its thickness depends on the distance planned between the decorative elements. First of all, a row of brickwork made with one’s own hands, made with 2 lines drawn in a horizontal position, is noted. Then the resulting row is divided into bricks by vertical lines. The entire surface is drawn in the same way.
Once all the bricks are ready, the plaster should completely dry. Then large irregularities are removed from the prepared areas with a spatula, and the seams are also cleaned. Next, you need to smooth out very small roughness using a rag. Finally, every centimeter of the surface must be coated with a primer mixture for gypsum-based plaster mixture and left to dry. And then apply a layer of paint of the required color. To achieve a natural effect, paint of several colors is used at once. To do this, apply the dominant color as the first layer, and then add strokes of either a darker or lighter color using a dry brush.
To follow up on yesterday’s post, for those interested, I’m writing about how I built a naturalistic brick wall with my own hands, which cost me 150 rubles.
I had been dreaming about a brick wall for a long time, while I was dreaming I even changed several of its colors in my imagination, but when it was time to paint it, I settled on traditional white.
I once read how to do it in some VKontakte group. The steps of the work were described there, but there were no such details, for example, that when cutting polystyrene foam the whole house will be in white balls! They quickly electrify furniture and clothing, creating a real electric field and causing electric shock from everything! No one warned me that I would get an electric shock every time I turned on the water or touched the surface of the wall, and I was lucky that no sockets joined the fun action.
First you need to select this very wall. Calculate the area for purchasing expanded polystyrene. I scoured the entire Internet in search of 10 mm thick polystyrene foam and was ready to go to the Moscow region for it, but on the way I stopped at OBI for paint. And there I found ordinary ceiling slabs 3 mm thick. It seems small compared to the intended thickness, but the temptation to not take the train to the region and complete the repairs that night won out.
My 4.5 x 2.7 m wall required 5 packages of similar ceiling tiles costing 30 rubles per package. And in terms of consumption it came out right on par. All it took was for a couple of bricks to be damaged, and you would have to go back to the store.
1. Cut foam sheets to the size of a brick 250x65 mm.
This is a very fun process, as snowballs begin to fly around the apartment! And it even crunches and creaks like the real thing! There is nothing you can do about the snow, so I recommend not to be nervous, let the situation go and enjoy. When there is a lot of it, you can toss it and have fun.
No need to worry! Cleaning up at the end is done quickly: everything that can be collected by hand is collected, put in a bag and tied; everything else is easily vacuumed and does not even stick or electrify the pipe, to my surprise.
2. Glue it to the wall with aerosol glue (this will be the fastest) or any other glue, even PVA will do.
I started gluing with specialized glue for baseboards, but the bucket ran out after only 2 square meters, so I ended up using traditional wallpaper glue. At first I was careful, but I quickly got bored, so I generously smeared a piece of the wall (it didn’t matter whether there was a brick there or a gap between), and then I sculpted 6 bricks at once. I didn’t have time anymore, the glue was drying up.
The process turned out to be long, about 10 hours, and that was without painting. I don’t know if I will ever dare to attempt such a feat again.
3. Giving the foamed polymer the texture of a brick.
Take a soldering machine
. heat it up and “draw” arbitrary holes and stripes on the polystyrene foam board. In general, we do everything to make an imitation stone come out of a flat rectangle.
Attention! The process is toxic! Wear a mask and ventilate the room.
Nobody wrote about this in the vkontakte group either??
4. Painting bricks.
Most likely it will be spray paint. Automobile (will stink for another month) or acrylic. I painted with DULUX wall and wallpaper paint, white-white matte. I bought it in Ob. The paint applied wonderfully, but 2.5 liters was enough for 3 square meters. m.. Then my father also brought me DULUX, but the rest was acrylic, which can be easily washed. And it was a loss. I spent half the night painting the rest of the wall, all the spaces and every corner - to break up the red wall, and when I finished, I noticed that what had time to dry was cracked. It was a pity. can't describe how. But I just repeated the process, also carefully going over the top with another layer and it dried well.
Now everything can be said. The wall is ready. It is necessary not to forget that polystyrene foam is a flammable material, it burns in 4 seconds, so you need to beware of open fire, do not burn candles and do not build near the fireplace.
Hello! My name is Vita.
I am an illustrator, design specialist, fan of orange trees and the color yellow, Spain, travel and flying in the sky on anything.
The only reason I do anything is because it brings me joy. And I am convinced that it may be necessary to live only in joy, appreciate the moments and say YES to the world. I actively promote this idea and am always happy to see like-minded people.
My main rule is here and in the present moment!
Cutting and lining the base from sheets
For this method of making foam bricks with your own hands, it is best to choose a material with a fine grain. It will not crumble, release harmful substances and burn when exposed to heat. To achieve this effect you will need the following arsenal:
- knife;
- finely dispersed foam;
- paint, primer and varnish;
- soldering iron;
- special glue.
Brick imitation is performed as follows:
- Blanks with the required dimensions are cut out of foam plastic.
- The blanks are fixed to the wall with glue. This should be done so that there is a distance of 10-15 mm between the tiles.
- When the entire wall is covered, finishing is carried out. Use a soldering iron to burn out the irregularities characteristic of a brick surface.
- The treated surface is covered with putty.
- When the putty hardens, a primer is applied to the wall.
To make the brick imitation look believable, you need to decorate it.
To do this, you need to cover the entire surface with paint diluted in a primer until it dries. The protruding areas also need to be painted over, but the gaps should not be touched. It is better to apply paint on them the color of cement with a thin brush so as not to affect the protruding rectangles.
5 days after decoration, it is recommended to cover the surface with a layer of aerosol acrylic paint. After another 7 days, the wall should be treated with matte acrylic varnish. (Fig. 1)