Hello to all readers! I recently walked with my wife through a construction supermarket, and she liked the decorative gypsum tiles. She wanted me to decorate the walls of a country house with such tiles: I had to buy the material and meet my wife halfway. True, I immediately noticed that the elements had rough cuts, the texture not resembling stone. I realized that I would have to tinker with masking the defects: I also took textured plaster to avoid the wall-to-stone transition. But I am very pleased with the result, especially after covering the surface with varnish (it formed a thin protective film, allowing the tile to be wiped with a damp sponge). So what should you consider when working with gypsum tiles?
For long-term use of the tile, it should be covered with a protective layer. A special varnish is best suited for these purposes.
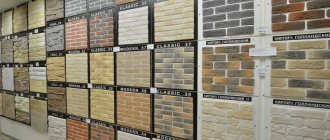
Types and advantages of decorative gypsum tiles
The operation of interiors finished with gypsum tiles is simple and convenient. Simple installation with low weight of elements and a wide range of color variations make gypsum tiles one of the best sellers. Let us also note other useful properties: durability, practicality, environmentally friendly composition and safety for health.
According to their intended purpose, gypsum products are:
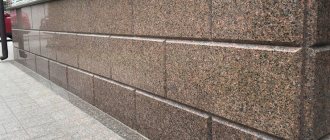
- Finishing – for decorating walls, fireplaces, stoves, ceilings, arches, niches, doorways, wall mirrors and floors.
- Facing - for decorating structures (gazebos, building facades, fences, balconies, protruding corners of houses).
For exterior work, use a frost-resistant adhesive mixture.
The undoubted advantage is that there is no need to carefully level the wall first. Only significant irregularities are removed. Level the walls with putty or plaster.
What composition to choose during installation? The best option is gypsum-based glue. Adhesive gypsum mixtures are classified by density depending on the volume of water, for example, light suspension - 1.25:1. The yield of the mixture is approximately equal to the volume of powder and water.
Less often they try to glue onto cement mortar, silicone sealant, gypsum plaster and acrylic polymer glue. Sometimes they use liquid nails, but this method has a number of significant disadvantages:
- High price;
- The need for preliminary leveling of the base;
- The complexity of filling seams.
How to glue
The structure of gypsum stone always remains the same, only its shape and size differ. This means that the composition of the glue used will depend on the base on which the stone will be installed. Among adhesives, three groups can be distinguished:
- special compositions with a gypsum base;
- compatible styling compounds;
- improvised means.
Each of them deserves special attention, so it is worth considering them in more detail.
Special adhesives
When decorating interior or exterior, you most often have to attach gypsum stone to plaster, pure concrete or drywall. In this case, the best solution would be to use special mixtures. Manufacturers and sellers call these compounds gypsum adhesives. In the original, it is a dry mixture that contains gypsum or alabaster, as well as special additives called a plasticizer. Their task is to make working with glue easier. With these additives it acquires good plasticity and hardens longer. This glue is also used to repair damage in natural stone. When choosing an adhesive, you should pay attention to three parameters:
- presence of quartz sand;
- required amount of water;
- hardening time.
In addition to the main components, quartz sand can be added to the glue. This is done to increase the volumetric mass and reduce the cost of the production process. Quartz sand works well as a filler in ordinary cement-sand mortar. But for gypsum glue it has practically no benefit. That is why it is better to purchase a composition that does not contain sand. It will cost more, but installation of gypsum stone will be easier. The quality of a particular glue sample depends on how much water is required to prepare the mixture. If less than 0.3 liters per kilogram is needed, then we can judge that the percentage of alabaster in the composition has been reduced and the amount of other additives has been increased. It is better not to purchase such glue. It all depends on the fact that for high-quality and reliable fastening of the stone to the surface, a sufficient amount of gypsum is required.
Note! For example, Knauf PERLFIX glue requires water in a ratio of 1 to 2 for proper use, i.e. half a liter of water is needed for one kilogram of dry mixture.
When choosing, you should pay attention to the drying time of the solution. Manufacturers who are responsible for quality try to achieve a target of 30 minutes. This allows the installation of gypsum stone to be carried out quickly, since you do not have to hold it with your hand for a long time near the wall. In this case, the glue can be prepared in smaller portions, which eliminates its overuse.
The recipe for making gypsum glue is usually applied to one side of the package. The dry mixture is measured according to the specified parameters and poured into a container with water. After this, it must be mixed thoroughly. A powerful drill or a special construction mixer will help with this. It is important to achieve a homogeneous mass without lumps. After this, it is important to let the mixture sit for a few minutes to allow the hydration process to occur. Manufacturers may indicate not only different amounts of water, but also the time to reach working condition.
Before finishing the surface with gypsum stone, it must be coated with a primer. In some cases, several layers may be needed. It is important to allow time for complete drying. If installation will be carried out on a brick wall, then the seams need to be aligned. The primer is required to prevent water from leaving the glue too quickly. To work, you will need a flat and notched spatula. Using an even spatula, gypsum glue is applied to the stone. To remove excess it, you need to go through it with a comb. In this case, the thickness of the glue for proper installation should not exceed 1.5 cm.
Advice! Rinse the spatula in water as often as possible. This will allow you to promptly remove any remaining gypsum adhesive. If this is not done, then lumps will form, preventing better adhesion.
To gain full strength you will have to wait a day or more. Everything will depend on the humidity and temperature in the room. In some cases, the time period increases to one week. It is better to wait this period without additional processing of the stone.
Compatible formulations
In addition to gypsum adhesives for facing stones, you can successfully use adhesives for ceramic tiles or liquid nails. There are no special recommendations for using the first one. It is prepared in the same proportions as for use with tiles. In terms of tensile strength, tile adhesives have high performance, but this does not have any practical benefit for gypsum stone. When using tile adhesive, you should keep in mind that it takes longer to dry than gypsum adhesive. In this case, the stone may change color because it will draw moisture from the gray composition. The price of such compositions is higher than that of gypsum glue.
Installation of gypsum stone can also be done using liquid nails. But this applies more to those cases when it is necessary to repair a small area or replace several stones. Liquid nails are applied to the gypsum stone in spots or in stripes. After this, you need to wait a few minutes for partial setting and apply the stone to the surface. Liquid nails are an environmentally friendly material, so they perfectly complement gypsum stone. In addition, this glue does not need to be prepared; just squeeze it out of the tube and use it.
Available means
Alabaster is most often used for putty work. But it can be used for gluing gypsum stone to various surfaces, except metal. Before using this method, it is necessary to prime the surface with latex primer. Alabaster dries quite quickly, so to delay this process, you can add glue or soap to the diluted composition. Another non-standard option for gluing gypsum stone is finishing or starting paint putty. It must be mixed in the proportions recommended by the manufacturer. It is applied to the stone in a layer of no more than 1 cm. This option is also great for gluing several fallen stones.
Tips for installing decorative gypsum tiles
The maximum permissible thickness of the adhesive layer is 10 mm. Before work, the back side of the product and the wall must be primed.
To make laying tiles easier and faster, the elements are laid out in the required order, selected and sorted by size and shades. If the elements are of different sizes, alternate small and large evenly.
The glue is mixed in small portions, enough for half an hour, then the composition hardens. For the same reason, the container and tools used are thoroughly washed before each new batch.
Cold water is used so that the glue does not harden as long as possible. Dilute until a thick and viscous consistency is obtained. Proportions and consumption are indicated by the manufacturer in the instructions.
The glue is applied to the element and the wall with a notched spatula (comb). To achieve even masonry, wedges are used. They start laying from the corners. To ensure that the corners are without flaws, the product is cut at an angle of 45 degrees.
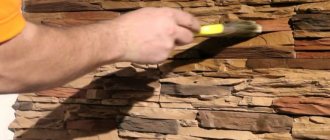
The seams are filled with stone grout or glue is used. To protect the masonry from mechanical damage and to achieve an aesthetic effect, it is coated with facade varnish. The composition is chosen transparent or colored to match the tile. Apply with a brush in several layers.
It is recommended to glue at temperatures from 5 to 35 °C.
Disadvantages of gypsum products: hygroscopicity and fragility.
Types of varnishes and their application
To improve the performance characteristics of gypsum tiles, they should be varnished. The following products are considered the most popular on the market and in construction stores:
- oil-based varnishes;
- yacht varnish for gypsum surface;
- protective acrylic coating.
Oil based varnish
The composition of oily varnishes includes a solution of artificial resins and a collection of plant herbs. The substance is brought to an oily consistency and combined with additional materials, which as a whole form a varnish. Due to its texture, the coating forms a thin film on the surface, which, after complete drying, protects the gypsum tile from physical and mechanical damage.
Oil varnishes can be transparent (colorless) and are also available in a variety of shades. Therefore, when purchasing, compare the color of the original material and its future coating. To give the surface different effects, you can purchase glossy or matte varnish. It should be noted that if you varnish (even colorless) a plaster surface, it may become slightly darker than it was originally.
When covering a wall decorated to look like stone, try to protect your body and face from getting paint and varnish. Wear protective clothing, gloves, goggles and a respirator, as the composition has a specific pungent odor.
On video: varnish for stone.
Acrylic composition
When purchasing varnish for gypsum tiles, most builders want to get a material that will combine “two in one” characteristics. That is, initially it is a protective coating, and only then performs a decorative function.
All desired requirements will be met if you cover the tiles with acrylic varnish. In construction stores or on the market you can purchase ready-to-use material, which, when applied to the surface, forms a durable thin film.
Acrylic varnish is a “protective shield” for artificial stone. It is moisture resistant, reflects UV rays, and is resistant to various detergent compositions and temperature changes. The material has no toxic odor, dries quickly, and if excess needs to be removed, this can be done using a special solvent. If the acrylic varnish is too thick in consistency, it can be diluted with plain water.
Acrylic coating is divided into three types:
- matte;
- semi-matte;
- glossy.
If you use matte acrylic varnish to cover the plaster, the imitation of rough stone will be preserved down to the smallest touch. After application, the composition penetrates into all existing cracks and recesses, and as it dries it takes on a transparent matte texture.
Semi-matte plaster varnish has similar characteristics to the previous material. The coating has only one drawback - after drying, you can notice a light light coating on the finish. Of course, if you choose a varnish that matches the tone of the tile, this effect can be avoided, but colorless compositions can present an unwanted surprise.
When choosing a glossy finish, keep in mind that in a brightly lit room the surface will be very shiny. Consequently, the interior decoration will be distorted due to glare.
If, according to the designer’s plan, the gypsum tile will be painted with water-based paint, then for better adhesion of the material to the surface, add acrylic varnish to the solution. The paint should be applied with two salts, and after complete drying, open with one layer of varnish.
Yacht varnish
The most durable material for treating gypsum surfaces is yacht varnish. Based on the name, you can guess that this material is used to cover wooden surfaces on yachts. Its composition will give gypsum tiles 100% waterproofness.
Before applying to the surface, the product must be thoroughly mixed with solvent. The solution is distributed on the tiles with a thin brush or roller, and the surface should be evenly exposed, avoiding smudges. The material dries in about 24 hours, depending on the room temperature.
To achieve maximum protection, decorative gypsum stone is coated with 2 layers of varnish. But before application, minor cosmetic errors should be carefully sanded with sandpaper. The second coat will take about the same amount of time to dry. After this treatment, the relief surface of gypsum tiles is easier to keep clean. To do this, you just have to wipe it with a damp cloth.
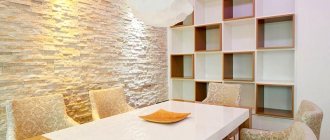
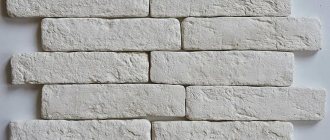
Decorative gypsum tiles
Looks good in various combinations with wallpaper, natural and decorative stone, plaster or when decorating the entire surface. Meets aesthetic requirements and modern interior design trends.
Light-resistant pigments extend the life of the material, and products do not lose color. Gypsum tiles make it possible to imitate any natural material. Allows you to solve architectural and design problems of any complexity. The products are non-flammable and have both fire and heat resistance. They do not smell, do not emit toxic substances.
They maintain an optimal microclimate in the room (breathable material), show high sound insulation and thermal conductivity characteristics.
The method of fastening is determined by the execution of the side edges. To facilitate the installation of gypsum material, the back side is made with blind voids. The most popular finishes are natural stone, brick or wood.
An original, elegant and exclusive interior is achieved by using gypsum panels. This material differs from tiles in the absence of seams. When installed, modules allow you to achieve a repeating pattern. Bas-reliefs and elements during installation make up a complete picture. Mosaic designs are also produced in mass production and to order.
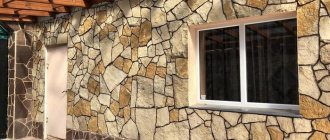
How to lay decorative stone: finishing options
Artificial stone is made in three types:
- Brick - new, aged, gray, red, pink, etc.
2. How to cover the artificial stone after installation in the apartment? Shale – also called rock or “weathered cave.”
3. Natural stone - cobblestones, stone slabs, etc.
Decorative stone can be used to lay out individual elements or cover the entire wall.
For example, wall decoration on the balcony:
Decoration of individual areas:
But even if you make a frame from artificial stone for a jamb, mirror or corner, the room changes beyond recognition. And just because of a few tiles.
Installation of decorative gypsum tiles
Available with a relief pattern on the front side or smooth. Elements can be painted or stained, which is very practical during operation, and treated with water-repellent compounds. The tiles are easily cut with a tile cutter, a baguette saw, or a hacksaw for wood or metal. The grinder is not used for these purposes. The holes are cut with a drill. The edges are treated with medium sandpaper.
There are dry and wet styling:
- When dry, perform vertically on the surface, starting from the bottom. The elements are secured with self-tapping screws and bolts. A version with plastic locks is also available.
- When wet - perform horizontally on the surface.
The verticality and horizontality of the masonry is checked with a plumb line or a laser level, a long ruler or a bar.
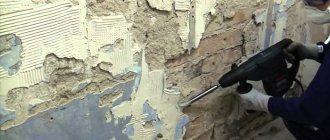
Before starting work, prepare the surface: remove the old finish, wash off the glue or mortar from previous finishes, level and prime.
For large surface defects, drywall is used for leveling.
The adhesive composition is applied to the wall (with a volume of 3-5 elements) and to the back side. It is important that when applying the glue there are no air gaps left, otherwise the gypsum tile product will move away from the surface over time. Press it against the wall and use spacers for adjustment. A new row begins with an offset of half the element. The width, size of the joints and color scheme of the grout is an individual choice, depending on desire.
The last stage of installation is to clean up the emerging glue and fill the seams. The seams are filled using special bags, syringes and carefully processed.
Maintenance of brickwork
The brick wall is easy to maintain. It should be periodically inspected for cracks that may appear in the masonry joint mortar. If any are found, they can be easily treated using a special sealant.
It is recommended to periodically wash the brickwork with warm water and a clean cloth or soft brush. After this, it should be dried well. During the cold season, it is better to refrain from washing.
If you want to emphasize the beauty of a rich shade, then the brick can be coated with clinker oil or acrylic parquet aqualac. This will not only preserve the aesthetic properties of the surface, but also strengthen it and prevent further contamination.
Impregnation of decorative gypsum tiles
After laying and finishing the work with the seams, the tiles should be treated with a special product before applying varnish. Hydrophobization - treatment with a water-repellent agent that contains an organosilicon polymer.
When the product penetrates inside the tile (2cm), the porosity of the tile decreases, while maintaining vapor permeability. A water repellent also reduces the appearance of mold.
This solution is supplied to the construction market in finished form. It can also be a concentrate that must be diluted before use.
The solution should be applied to dry and clean decorative tiles. After applying the first layer with a brush or roller, apply a second layer of water repellent. It does not require drying time. This will protect the gypsum cladding from dust and moisture, as well as from the appearance of fungus.
You should work with this solution wearing glasses and gloves. The product hardens quickly, so drops of it from the surface can be immediately removed with a damp or flexible cloth. High-quality solutions for decorative tiles imitating brick and imitating stone for interior decoration:
- Organosilicon solutions that are water-repellent White Hill.
- Solution with silicone “Optimist S405”.
- “Tiprom” has several solutions with different functionality.
Application of gypsum
Gypsum stone is produced in factories, but, if desired, it can be made from dry powder with your own hands. You just need to mix the product with water, pour the solution into the mold, and let it harden. A beautiful figurine, tile or other product will be ready. To give a certain color, various paints and pigments are added to the mixture; sand and modifiers are added to enhance the strength.
Gypsum stone often looks like artificial bricks or tiles, and is therefore used for cladding walls and doors. It goes well with other materials - wood, tiles, plaster, wallpaper, photo wallpaper. Gypsum is suitable for complete and fragmentary finishing; it is often used to clad fireplaces and highlight the bases of columns. All hardware stores sell gypsum stucco moldings, wall and ceiling moldings.
Gypsum powder is used to create sculptures, garden figures, and figurines. Based on it, building mixtures are made for exterior work and interior repairs. Dry gypsum is an excellent binding component for plasters and putties, adhesives, and other construction and finishing materials. Why do professionals choose it? The material has many advantages:
- attractive appearance;
- light weight combined with strength;
- the ability to create unique decor;
- creating a layer of sound and heat insulation;
- environmentally friendly, harmless to humans;
- no risk of mold or mildew;
- vapor permeability;
- ease of processing and application to different surfaces;
- easy reshaping using available tools.
Oil varnish for decorative tiles
This varnish does not contain synthetic or toxic materials that would be harmful to human health. The composition of the varnish includes herbs and artificial resin. The varnish has an oily base, which creates a film on the surface, which subsequently serves as protection against various influences on the tile.
Oil-based varnish can be transparent and also in different colors. Therefore, when purchasing this varnish, you should pay attention to the shade palette. The varnish can be matte
or glossy. After coating, slate tiles may change shade and become darker.
When working with varnish, you should wear goggles and gloves to avoid contact with exposed skin. This coating has a pungent odor, so you should wear a respirator. The video shows the process of varnishing artificial stone.
Acrylic based varnish
Acrylic-based varnish has 2 purposes:
- protective function;
- decorative purpose.
This varnish coating is sold on the construction market in finished form. He creates a protective film on gypsum tiles from external factors. Acrylic
The varnish is moisture-resistant, reflects ultraviolet rays, and is not affected by temperature changes. This product does not smell. Quick-drying varnish is removed from the surface using special solvents. Thick varnish dissolves with water. Types of acrylic varnish:
- Matt lacquer;
- semi-matte varnish;
- glossy varnish.
When applying varnish to the gypsum surface of the tile, the textured pattern stands out to the smallest detail. This product penetrates into the structure of the pattern, dries, and repeats all the dots and stripes of brick or stone.
Semi-matte varnish has a white tint after drying. This mainly occurs with clear varnish.
Yacht varnish
This varnish is used to coat yachts. It does not allow water to pass through and is a durable coating. Before applying this varnish, it should be mixed with a solvent. When coating gypsum tiles with varnish, care must be taken to ensure that no drips appear. The varnish dries in the room for a day.
To achieve the best possible results, decorative tiles must be coated with two layers of varnish. The next layer also takes 1 day to dry.
Drying oil and shellac for gypsum tiles
Gypsum tiles can be treated with impregnating hot drying oil, after which a mixture of shellac and rosin in alcohol (technical alcohol) is applied. After this treatment, the white brick surface takes on the appearance of old marble.
Sometimes craftsmen use special wax. Coating decorative tiles with wax will preserve its original appearance and also create a water-repellent effect.
Glue for decorative stone: choose the right one
There is one mistake that is often made by those who have glued tiles in the bathroom or done ceiling repairs using ceiling tiles with their own hands, but have not worked with decorative stone. They are trying to glue decorative stone with tile adhesive.
Tile adhesive is not suitable for decorative stone. Stone is heavier than tiles, and it is necessary to coat it with glue thickly so that when gluing, the glue bleeds through to the surface.
Buy special glue for decorative stone for interior decoration. Manufacturers of this stone usually offer it in their showrooms. And they guarantee that the stone will last a long time only if it is glued with a special mixture .
So you got acquainted with decorative stone. How to beautifully paint the walls in an apartment with your own hands? We will cover the installation technology in future articles.
If you want to know more about this unusual finishing material, ask in the comments.
Similar
Buy decorative stone (brick) for laying in Petrovich - https://goo.gl/FkSD5e How to lay decorative stone.
You have glued the stone to your object, rubbed the seams and are enjoying the beauty. Congratulations! However, don't forget.
Leatherman multi-tools and bracelets for you - https://bit.ly/leatherman_ How to apply varnish to decorative stone! Glazing.
How to lay gypsum tiles and decorative gypsum stone in the hallway with your own hands. I'll tell you about the nuances.
Do it yourself or buy ready-made decorative tiles?
This is the question asked by those who have chosen to decorate with gypsum stone. On the construction market, a square meter of gypsum stone costs at least twenty dollars. If we consider that gypsum is a relatively cheap material, then the overpayment for such a product is obvious. Moreover, industrially produced tiles are not always made of good gypsum; they may have empty spaces and uneven edges.
If you have an idea to purchase a mold and create tiles with your own hands, you need to understand how much the real cost is. Forms cost between $30 and $80. The difference lies in the material from which they are made, the number of stones in the fill and their type.
If you calculate the necessary materials, it becomes clear that a square meter of such tiles will cost less than three dollars. And provided that a large area is covered with tiles, your purchase will pay off even at the initial stage of finishing the room.
Let us highlight the advantages of creating decorative stone with your own hands:
- making such material yourself is not difficult;
- the speed of tile production is very high;
- no need to purchase vibrating tables and other devices;
- forms can be placed in any small room;
- the cost of such production is much lower than the store version;
- The tiles are given any desired shade during painting.
If you decide to start making tiles with your own hands, pay attention to the production technology and the gypsum stone molds on the market.
Laying decorative stone on the wall: advantages and disadvantages of the method
Don’t let the natural word “stone” confuse you. Decorative stone for laying on the wall is an artificial material. It is cast in special molds from cement , adding sand and water, or from gypsum .
Below are all the pros and cons of laying decorative stone made of concrete and plaster on the wall. Choose your option.
- The word that can be used to describe gypsum stone is “lighter”. It is lighter in weight, can be easily sawed off, and is easier to install
- The downside of this property is fragility. When purchasing gypsum stone, be sure to open all boxes and check the integrity of the tiles.
- Concrete stone is stronger, but it is heavier. You can no longer glue it to a lightweight wall - made of plasterboard, for example.
- Gypsum tiles can be coated with any paint or varnish; they are environmentally friendly and do not emit harmful substances.
- It’s not for nothing that concrete walls are covered with wallpaper - otherwise concrete dust will settle in the room. After you have glued such a decorative stone to the wall, it needs to be treated with a special coating to avoid cement dust.
- Gypsum decorative stone easily absorbs moisture from the air. Therefore, laying gypsum decorative stone is effective only in rooms with low humidity: corridor, bedroom, living room.
- Decorative stones made from cement mortar, on the contrary, are moisture resistant, so they can be used in the bathroom, kitchen, etc.
- Due to its strong hygroscopicity, gypsum stone cannot withstand frost: the water that the stone absorbs freezes, expands, and the tiles fall off.
- Cement stones withstand frost well, so they can be laid on the external walls of the house and on unheated balconies.
- Gypsum has soundproofing properties (although not very high quality) + it additionally insulates the walls.
- Decorative concrete stone is cheaper!
And now about the advantages and disadvantages that are inherent in both gypsum and concrete decorative stone →
Which form to choose for casting decorative gypsum tiles
Casting molds are made from different materials. The market offers plastic, silicone, polyvinyl plastic and polyurethane options used for the manufacture of gypsum stone.
If we are talking about polyvinyl plastic and plastic, then, according to builders, they are suitable for making artificial stone from white cement. For plaster, it is better to use options made of silicone and polyurethane.
What is the main difference between silicone products and polyurethane products? Silicone is more elastic, it is more convenient to work with and conveys the shape of the stones well. But with its help, only gypsum stone is poured. While the polyurethane analogue is able to cope with the casting of concrete parts for exterior finishing.
Advantages of gypsum
Various building mixtures are made based on gypsum, both for interior and exterior use. Dry gypsum is added to many putties, plasters and glues as an excellent binding component. This material is added to many finishing and building materials because it has the following advantages:
- external attractiveness;
- low weight, which is combined with high strength;
- creates effective insulation of heat and noise;
- it can be used to make attractive, unique products for interior and exterior decoration;
- environmentally friendly and safe material for human health;
- fungi and mold do not settle on it;
- is a vapor-permeable, breathable material;
- very easy to process, it can be applied to any type of surface;
- With the help of accessible, extraordinary tools, you can easily change the shape of gypsum products.
Advantages and disadvantages of molds for casting decorative gypsum tiles
Let's go through the pros of each type of product. So, the advantages of polyurethane forms:
- good elasticity;
- wear resistance;
- resistance to solutions with alkaline components;
- the number of fills of such a capacity exceeds three thousand cycles;
- New types of creating forms are being invented that reduce their final cost.
But they also have disadvantages. Although such products are universal, they are still worse than their silicone counterparts.
Now let's talk about the positive features of silicone molds:
- high elasticity;
- ease of removing the mold from the plaster;
- such products are cheaper than polyurethane analogues;
- suitable for working with gypsum solutions.
Speaking of disadvantages, silicone is not as durable as polyurethane alternatives and is susceptible to alkaline solutions, so careless use or storage will render the filling container unusable.
Laying decorative stone on the wall: advantages and disadvantages of the method
Don’t let the natural word “stone” confuse you. Decorative stone for laying on the wall is an artificial material. It is cast in special molds from cement , adding sand and water, or from gypsum .
Below are all the pros and cons of laying decorative stone made of concrete and plaster on the wall. Choose your option.
- The word that can be used to describe gypsum stone is “lighter”. It is lighter in weight, can be easily sawed off, and is easier to install
- The downside of this property is fragility. When purchasing gypsum stone, be sure to open all boxes and check the integrity of the tiles.
- Concrete stone is stronger, but it is heavier. You can no longer glue it to a lightweight wall - made of plasterboard, for example.
- Gypsum tiles can be coated with any paint or varnish; they are environmentally friendly and do not emit harmful substances.
- It’s not for nothing that concrete walls are covered with wallpaper - otherwise concrete dust will settle in the room. After you have glued such a decorative stone to the wall, it needs to be treated with a special coating to avoid cement dust.
- Gypsum decorative stone easily absorbs moisture from the air. Therefore, laying gypsum decorative stone is effective only in rooms with low humidity: corridor, bedroom, living room.
- Decorative stones made from cement mortar, on the contrary, are moisture resistant, so they can be used in the bathroom, kitchen, etc.
- Due to its strong hygroscopicity, gypsum stone cannot withstand frost: the water that the stone absorbs freezes, expands, and the tiles fall off.
- Cement stones withstand frost well, so they can be laid on the external walls of the house and on unheated balconies.
- Gypsum has soundproofing properties (although not very high quality) + it additionally insulates the walls.
- Decorative concrete stone is cheaper!
And now about the advantages and disadvantages that are inherent in both gypsum and concrete decorative stone →
Advantages:
This is a durable material. If you know how to properly lay decorative stone, its service life will be several decades.
An environmentally friendly material, it is resistant to corrosion, fungal and other bacteria.
Since the surface of the stone is uneven and rough, perfect alignment of the walls and precise adjustment are not required.
Flaws:
How to make decorative gypsum tiles with your own hands
Mixing plaster with water is not enough to create a stone that will not crumble at the first careless movement.
To get started we will need the following tools and components:
- the form itself with a pattern for the future stone;
- gypsum G-14 or G-16 (in rare cases, it is permissible to use gypsum G-10, but then the tile will turn out fragile);
- sand, screenings, marble or other suitable filler;
- plastic container for mixing;
- water;
- construction mixer;
- putty knife;
- pigment solution of red, yellow and brown colors.
The technology is simple, but its observance is necessary to create a quality product at the finish line.
Place the container on a level surface. To do this, use a level so that the plaster is poured evenly. Next, partially paint the form in those places where you see fit.
The next step involves mixing five kilos of gypsum with two kilos of filler in a container filled with water (one and a half liters). Add a pinch of citric acid and fifty grams of yellow and brown pigment to this solution. Mix with a mixer until a creamy mass is obtained.
Video review for clarity:
Pour the solution into the container, tapping it with a spatula to prevent air from entering. After a few minutes, remove excess with a spatula. For adhesion to the wall, make cross-shaped notches on the back of the stone. Remove the tiles about an hour after pouring, after checking them by knocking on them. When the element is ready to be removed, you will hear the characteristic ringing of the stone.
Set of tools
It is necessary to select tools taking into account the method in which the plaster tile varnish will be applied. For varnishing, you can use a brush, roller, foam rubber, or a small spray gun. If you need to apply the varnish solution to small figures and hard-to-reach places, you can use a small brush. To sand the surface, you need to prepare either a grinding machine or sandpaper. After sanding, you will need a vacuum cleaner to remove dirt and dust. In addition, you need to prepare:
- a degreaser such as alcohol, thinner or acetone;
- several rags;
- if necessary, impregnating composition.
Ordinary brushes made of natural material, as well as fluffy rollers, are not suitable for varnishing plaster products. When using them, the consumption of the composition will be too high, in addition, a lot of drips will appear on the base. It is very difficult to work with a brush; when using it, streaks and drips appear, even for experienced specialists. However, you cannot do without a brush if you need to cover uneven, torn areas of the cladding.
The best method, compared to a roller and brush, is to use the spray method. A spray gun or airbrush allows you to varnish with a uniform layer, the gypsum base becomes monochromatic. Only thanks to the spray gun can you make smooth transitions from light areas to dark areas. In addition, by holding the airbrush at different distances from the surface, you can achieve different effects during varnishing. There is no need to use an expensive spray gun; even an inexpensive airbrush will do an excellent job of varnishing surfaces, but its compressor must be of sufficient quality.
Please tell me how to coat gypsum bricks in the kitchen and hallway so that the matte finish remains and the brick does not collect dust? Primer? Varnish? Dye? What exactly did you cover with and what was the final result, what kind of shine or lack thereof? Thanks a lot
Experts answered the question
Best answer
Yes, all 360 pieces))) (not counting the broken ones) bricks measuring 25x7.5 are cut out of plasterboard, soaked, the top layer of paper is removed from them, scraped with improvised means, primed, dried and glued, the seams are puttied, primed again and all this painted. Very tiring and painful. It's better to buy ready-made ones. If you don't have patience, it's better not to start!
At first I painted it unsuccessfully with semi-matte paint for baths and kitchens; the bricks were terribly shiny, so I had to repaint them. Then I painted it with Dulux trade Vinyl Matt deep matte paint. I bought it at Leroy, where the consultants recommended it to me. There I tinted the paint to match the color of the wallpaper. Very pleased. The bricks turned out matte, the paint applied perfectly. Just don’t forget to prime the bricks first before painting.
If you first treat the bricks with primer, let them dry, and then paint them with paint, then there will not be much paint consumption even when applying it with a brush. I painted with a brush. The paint applied very smoothly and evenly, without streaks. My brickwork is 2.60m by 2.80m. I bought a liter jar of paint. It took 0.5 liters of paint, i.e. half a jar.
I made the bricks myself from plasterboard.
Yes, all 360 pieces))) (not counting the broken ones) bricks measuring 25x7.5 are cut out of plasterboard, soaked, the top layer of paper is removed from them, scraped with improvised means, primed, dried and glued, the seams are puttied, primed again and all this painted. Very tiring and painful. It's better to buy ready-made ones. If you don't have patience, it's better not to start!
My bricks are coated with water-borne parquet varnish (as recommended by Leroy), the varnish is inexpensive and covered twice, the result is not disappointing
After puttying, priming and painting, it does not generate dust, does not crumble and remains solid! Yes, it looks good, thanks). But I wouldn’t attempt such a feat a second time).
Covered with Tex primer (necessarily white) 2 times. The appearance is excellent, the matte finish is preserved, nothing gets dirty or dusty. Gypsum bricks from Leroy, photos are on the kitchen blog. 2 years, everything is fine.
primer and paint, everything is correct, but the consumption is not high with a brush.
I didn’t paint, I just primed, I also studied the options, I made the right choice of coating
It's even a shame to paint it. All texture will disappear: surface unevenness and spotty color.
Inexpensive Tex primer. The primer must be white; colored stains will leave stains.
Acrylic varnish, any, matte
Interesting offers
Buy decorative gypsum tiles or make your own
This is the question faced by ordinary people who want to add newness and individuality to the interior of their apartment. Tiles on the construction market
Costs in the average pricing policy 500 rubles per 1 square meter.
Before buying tiles, you should choose a quality manufacturer, check the tiles, and review all technical data and manufacturer documentation. Because if you purchase this product in a hurry, then there may be voids in the tiles, it may be uneven, the edges will be too crooked and rough. If you decide to make the tiles yourself, you should also calculate the cost of the mold for the tiles (500-4000 rubles), as well as the gypsum material.
But, when calculating per 1 m2, it becomes clear that gypsum tiles made by yourself are cheaper than ready-made ones on the market.
Pros of making tiles yourself:
- The work process is not labor-intensive.
- The time spent on producing the material is minimal.
- No special equipment required.
- The mold for producing tiles takes up little space.
- The cost of tiles is minimal.
- During the production process, you can independently paint the tiles in the desired tone.
To make tiles yourself, there are many options on the market for molds with which gypsum tiles are poured.
Brickwork in the interior: 5 tips for care and painting
Receive one of the most read articles by email once a day. Join us on Facebook and VKontakte.
Brickwork has a special charm. It makes a reference to history, sets the character of the room and makes the interior solid. Today it can be increasingly found in Scandinavian, country and loft spaces. How to expose a brick wall, what to paint it with and how to care for it?
Advantages of molds for decorative gypsum tiles
Polyurethane form:
- elastic;
- wear out little;
- resistant to components containing alkali;
- capable of withstanding 3 thousand cycles.
Silicone molds:
- elastic;
- easy to remove from gypsum tiles;
- cheapness of the goods;
- Only for working with plaster.
Flaws:
- the service life is shorter than in a polyurethane mold;
- does not tolerate alkali;
- If treated carelessly or stored, it quickly becomes unusable.
Using plaster varnish
Many people stain plaster products because they are sold in a standard gray and white color. Thanks to painting, the rate of moisture absorption by plaster decreases. In addition to paint, you can use a special varnish to cover artificial stone. Many people believe that varnishing plaster is a very suitable way to decorate stone in an original way.
How to make a mold for decorative plaster tiles from silicone with your own hands
In addition to the fact that you can buy a mold for making gypsum tiles on the market, you can make it yourself. In order to make a mold for gypsum tiles, say, to look like a brick, you will need:
- Silicone Alcorsil 315.
- Catalyst.
- Ordinary plasticine.
- Blank for the mold (full imitation of brick).
- Soap solution.
- For the bottom you will need glass or laminated chipboard.
The mold making process is as follows:
- The walls for the mold are made from plasticine. They should not have clear boundaries and perfectly smooth edges;
- The workpiece should be placed on a perfectly flat and clean surface. If brick-like tiles are required, then the workpiece should ideally be brick;
- Walls are made of plasticine around the false brick. There should be a distance of 1 cm from the brick to the wall;
- And also the wall should be 1 cm higher than the brick. This distance will serve as the bottom of the mold;
- After the walls are finished, the entire border between the plasticine and the base should be sealed. This is required so that the silicone does not spill out;
- Next, you need to treat the entire surface inside with a soap solution. This needs to be processed without skipping places. The mold will not come off in the place where there was no soap solution;
- A mixture of silicone and a chemical composition (catalyst) is made;
- The mixture is poured into the prepared form with the workpiece;
- When silicone hardens, it becomes elastic. This is very important, especially when it is intended to make thin tiles (1cm). Other types of silicone are rough after hardening, which creates a problem during tile production;
- The mold is completely ready for tile production after two hours;
- If the silicone is not cured, it will stick to your hands.
After removing the gypsum tile mold, it can be used. In this form, you can make 2 thousand casts of gypsum tiles. The video shows the process of making a silicone mold for gypsum tiles.
Joining masonry joints
Grouting joints is the process of filling them with a specialized cement grout that imitates masonry mortar.
It is carried out to seal the masonry, preventing dust and dirt from getting under the cladding and giving the masonry an aesthetic appearance.
Filling the joints is carried out using a special grouting bag or a construction syringe gun.
Prepare the grout solution according to the manufacturer's instructions on the package.
Fill a bag or construction syringe gun with the solution. Slowly squeeze out the grout and carefully fill the seams with it.
When the solution has set a little, compact it with a spatula that matches the size of the seam. The joints should be filled completely, it is recommended that at least 5 mm from the back of the tile.
Thus, the masonry acquires a pronounced relief, creating a play of light and shadow on the wall and contrast.
If desired, you can fill the seam to the full depth to the front edge. In this case, the masonry will acquire a smoother texture.
Which method to choose depends on the project and the artistic intent of the designer. To highlight the beauty of decorative tiles, you can use grout of various color shades.
After the solution has hardened a little (after 40-50 minutes), using a wooden or special narrow metal trowel, remove excess grout while leveling it.
For final leveling and sanding of the seams, it is necessary to brush them with a medium-hard brush made from natural materials.
How to paint plaster
Gypsum products must be painted, because... Over time, moisture evaporates from the surface and the plaster becomes yellow, stains remain on it after touching.
To color the gypsum mass, a coloring pigment is added to it during mixing. It must be added slowly, stirring the composition until a uniform color is obtained.
After drying, the product will have a lighter shade. In order to achieve a bright color, additional coating is used.
To paint a frozen product you will need:
- brushes of different diameters and shapes;
- sponge or cotton swab;
- sandpaper to give an aging effect;
- varnish;
- paints and other means to obtain the intended result;
- acrylic primer;
- a solution of wax with gasoline or turpentine to make the surface glossy.
The paint is applied in several layers. The more there are, the more intense the surface shade will be. It can be primed before painting. After painting, apply varnish and give the desired texture using artistic techniques.
What varnish to use for plaster products
The minimum coating for plaster is a layer of varnish. It will fix the natural color of the material, prevent moisture from evaporating, protect the item from destruction and help achieve an attractive appearance. Different types of varnishes can be used.
Shellac
Alcohol based. Can be applied to any paint. It can be transparent and colored. With its help, the effect of aged marble is obtained. The melting point of the varnish is 80-120ºC.
Acrylic
This varnish comes in matte, glossy, and pearlescent. Safe to use, easy to apply, dries quickly. Creates a water-repellent film on the surface that protects against fading.
Resistant to high temperatures: changes color at 180ºC, begins to melt at 260ºC. After drying, it does not change color.
Oil
With the help of artificial resins and plant substances included in the composition, it protects the surface. It comes in matte and glossy. Requires dilution with a solvent before use. After drying, it makes the surface darker than before application.
Glossy varnish brings solemnity to the interior. For those who favor naturalness, matte varnish is suitable.
How can you paint plaster?
By painting a plaster product you can achieve the desired look, stylize natural aging, and perform other effects that make the thing extraordinary.
There are special water-based plaster paints on sale that you can use without any special skills:
They create a protective film on the surface and can be used inside the house, because... non-toxic and dry quickly.
To achieve effects, semi-professional products are used:
- Surik. A natural pigment of red-orange or red-brown color.
- Varnish. It can be applied over paint or soaked into an unpainted product. When using varnish, it is possible to obtain the appearance of aged marble.
- Potal. Used if the surface needs to be given the effect of gilding or old bronze.
- Coloring pigments. They are added to the gypsum solution to obtain even coloring throughout the entire mass. Used in the manufacture of decorative bricks.
How to make plaster stronger
For all its advantages, this material has one significant drawback - low strength.
To eliminate this defect, various additives and substances are used. You can make gypsum stronger in industrial conditions using plasticizer additives and gypsum hardening activators.
At home, you can use PVA glue for these purposes. For 1 kg of dry gypsum mixture you will need 50 g of glue and 0.5 liters of water. Dissolve the glue in water and add gypsum powder to the solution. To give additional hardness, coat the finished figurine with an acrylic primer.