Application area
Often, plastering walls to look like stone with imitation rocks (hewn or rubble masonry) is carried out for the purpose of decorating external surfaces. In this case, the external walls take on a beautiful appearance. In addition, they are endowed with additional strength and become more wear-resistant
Some significant parts are decorated with wild stone plaster:
- foundation;
- facade;
- gazebos;
- fences.
At the same time, such a decorative coating will look great indoors. Especially when there is a row of columns. Only in this case is it necessary to form a thin coating that is light in weight.
Note!
For small spaces, this finishing option is not acceptable, since the size of the room is stolen, which leads to its weight.
Stone decor is an economical way to decorate the surface
Pros and cons of stone plaster
Since decorative stone weighs little, unlike its natural counterpart, less load is placed on the walls. However, this is far from the only advantage:
- Wide scope for imagination in order to create the necessary texture and shape.
- Original decorative effect.
- Long lasting finish.
- “Stone” decorative finishing allows steam to pass through, but in addition to this, air humidity is normalized.
- The plaster is easily applied to any substrate.
- The product contains special components that prevent the development of fungal microorganisms.
- After treatment with a plaster composition, the façade parts of buildings become more resistant to sudden changes in weather conditions.
Among the disadvantages are the following: firstly, the damaged area of the decorative coating is difficult to restore, and a large surface area will have to be replaced. Secondly, the material is capable of accumulating moisture, and in large quantities, which deteriorates the quality of the coating. Thirdly, prolonged exposure to temperatures in an elevated range softens the plaster on external surfaces.
The coating has an increased service life
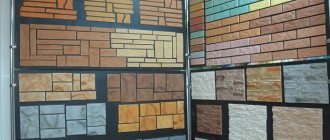
Types of stone imitation
There are several techniques to imitate natural stone - from simple to difficult to implement. They are suitable not only for decorating facades, but also interior surfaces. The choice of a specific method of applying plaster depends on a number of factors. First of all, these are the features of the base and the quality of the composition itself. The experience of the master also plays an important role.
To understand which decoration technique is suitable in a particular case, it is worth familiarizing yourself with the features of each type. Based on this, different depths of the pattern are achieved.
Smooth stone surface
This is a decorative finish that looks like a polished stone slab, but is essentially a multi-layer plaster coating. A striking example of this is Venetian marble, granite, onyx, malachite. This technique is widely used in cases where it is inappropriate to use a rough finish, which applies to the bedroom or children's room.
Pouring stone
Preparation of the workplace
Before pouring the stone, the molds need to be wetted so that the stone is easier to remove. It is best to moisten with water diluted with laundry soap. Take the soap, grind it a little and pour it into warm water. Wait a little, shake and pour the solution into a spray bottle.
The table on which you will be pouring must be level, otherwise the tiles may turn out uneven. Place the mold on the table, spray it with a spray bottle so that it is well wetted, but not too much water. Instead of laundry soap, you can use regular liquid soap, dilute about 2 tablespoons in a liter of water.
Wetting the mold with soapy water
How to calculate the amount of plaster per mold?
If you have purchased molds, you can ask the seller how much plaster and water you need. But it also happens that, following the advice of the seller, you end up with a lot of mixture or the solution turns out to be too liquid or thick. A lot depends on what kind of water you have and the gypsum itself. For example, I work, as I said above, with Magma G6, diluting it with water 1 to 1, i.e. I add 1 liter of water to 1 kilogram of gypsum, the mixture is perfect. A very good friend of mine also works with this gypsum, but he lives not in Russia, but in Kazakhstan and adds 0.8 liters of water to this amount of gypsum. Everyone's water is different and that's a fact.
Read also: Proportions of gypsum and water for decorative stone
Now I’ll tell you how I experimentally determine the amount of ingredients for new forms. I take dry plaster, fill the mold with it, cutting off the rest with a spatula on top. Then I pour it into a bucket and weigh it. I remove about 30% from this amount. I dilute it with water 1 to 1 and fill it. If there is a lot of solution, then approximately “by eye” I remove the plaster and water in equal proportions and fill it again. If there is not enough mixture to completely fill the mold, then I add more, etc. In this way you can find out the required amount, the main thing is not to forget everything and write it down in a notebook.
By the way, I noticed this pattern: if for 1 mold, for example, you need 1 kg of gypsum and 1 liter of water, then it is not a fact that for 2 molds you will need 2 kg of gypsum and 2 liters of water. As practice shows, 2 forms require a little less of each ingredient.
Mixing and pouring process
Once you have determined the amount of plaster and water needed, take a flat bottom bucket and fill it with water.
Weighing gypsum
Then take a screwdriver with an attachment, lower it into the water and turn it on so that the speed is not too high. Then start pouring plaster from the second container. You should not immediately pour out the entire mass of plaster, as it will be impossible to stir it without lumps. Pour in the plaster slowly while stirring. The solution should be fluid and without lumps.
You shouldn’t stir the solution for too long, the plaster sets very quickly and you simply won’t have time to level it on the mold.
After this, take a bucket and pour the mixture into molds, first filling the bottom of all the tiles while the solution is thin. Add the rest on top and level it with a wide spatula. Do not press too hard on the trowel as the back of the tiles will be oval when dry.
After 1-2 minutes, go through the spatula again, because... the plaster begins to swell and the back side may turn out uneven.
Pouring decorative stone
Stripping
After 15-20 minutes you can do the unmolding. To do this, pull the form onto the edge of the table so that part of it hangs in the air. Pull it down until it separates from the stone and remove the tiles. Some specialists turn the mold over on the table and remove, as it were, not the stone from the mold, but the mold from the stone.
Read also: Plasticizer Friplast
Finished stone after casting
Characteristics of types of plaster
Decorative finishing is carried out using plaster based on silicone, acrylic (polymer), lime (mineral), silicate.
Silicone
Due to synthetic silicone, the mixture becomes plastic, but at the same time durable. The service life of silicone plasters reaches up to 20 years, and they also have high adhesive properties to many substrates:
- concrete;
- brick;
- tree, etc.
Silicone plaster easily takes and holds almost any shape, and also repels moisture. Throughout the entire period of operation, the technical characteristics of the material are not lost.
Among other advantages, it is worth noting mechanical stability, vapor permeability, and prevents the development of mold and fungi. The silicone coating effectively resists the effects of solar ultraviolet radiation and low temperatures. In addition, the silicone composition is fire-resistant, environmentally friendly, and safe. After applying the mixture, periodic updating is not required.
However, with all these advantages, there is a significant drawback - high cost. In addition, the coating requires careful care to avoid yellowing.
The coating is resistant to adverse weather conditions
Polymer
Polymer compositions are made on the basis of acrylic resins, which are the main binding component. Often, an acrylic water-dispersion composition is used to imitate stone finishing. The service life is also long - from 15 years and, unlike silicate, silicone analogs, it is cheaper.
Polymer plasters can be firmly fixed to almost any base, be it brick, gypsum block, aerated concrete, concrete, wood and other varieties. In addition, the material consumption is small.
Among the main advantages:
- resistance to mechanical load;
- environmental friendliness and, accordingly, safety;
- the finished coating is easy to maintain;
- resistance to moisture;
- painting the polymer coating does not cause difficulties;
- the mixture sets quickly;
- preliminary priming is optional;
- the surface can withstand low temperatures.
Note!
Acrylic plaster is only slightly inferior to its silicone counterpart, although it is less resistant to ultraviolet rays. Another drawback is that the coating accumulates static electricity, which actually attracts dust.
Polymer plaster is an incredibly elastic material
Silicate
Silicate solutions are based on liquid glass (an alloy of potassium silicate and sodium). The service life of the material far exceeds the presented analogues and other types of finishes - the coating can please the eye for 50 years.
There are brands of plaster to which some components are added:
- mica;
- chit;
- sand.
The mixture is easily applied to embossed surfaces, and goes on sale in a ready-to-use form. The main advantages of silicate plasters:
- heat resistant;
- waterproof;
- vapor-tight;
- granular;
- textured;
- fire resistant.
The coating changes color when wet. However, after the surface dries, the original appearance returns. The solution sets quickly, and therefore prompt action is required. In addition, before covering the walls with a silicate mixture, they need to be treated with a primer on the same basis.
Silicate plaster is simply ideal for external coatings
Mineral
The mineral mixture is based on lime hydrate with the addition of stone chips, colored clay and other components. In some cases, adding dyes to the composition provides the desired effect. In finishing work on the façade of a building, preliminary reinforcement of the surface is required, which is not done during interior work. In the absence of a mesh, impregnation with a penetrating primer in 1-2 layers is necessary.
The advantages of mineral plasters are that they differ in a number of properties and, in particular, this mixture:
- vapor permeable;
- frost-resistant;
- resistant to temperature fluctuations;
- environmentally friendly;
- safe;
- does not contribute to the formation of condensation.
Walls covered with mineral plaster are easy to maintain. In addition, it is a cheap material and does not shrink during the drying stage. But it is worth considering a number of points. Firstly, you must strictly follow the instructions when mixing the solution. Secondly, the choice of shades is limited. Thirdly, the mineral mixture is difficult to apply.
Important!
The service life of the coating does not exceed 10 years; the surface cannot withstand mechanical or vibration effects.
The filler of mineral plaster plays not only a decorative role
What kind of plaster is needed?
You can use any brand of building gypsum. There are expensive brands of gypsum, and there are cheap ones - what's the difference?
Gypsum Magma G6 B3
On the plaster bag it is usually written, for example, “gypsum g-16” or “gypsum g-6”. The number means the hardness of the gypsum after drying, g-16 is a very strong gypsum, products made from it are more difficult to break than, for example, from g-6. If you are planning to make a stone for yourself (not for sale), then use the cheapest gypsum, yes, products made from it will not be as strong, but the gypsum is cheap and once you glue the stone to the wall, you will not break it.
Read also: How to make a polyurethane mold without bubbles
If mass production for sale is planned, then it is better to use gypsum of a higher strength to make the stone stronger. The fact is that a stone can break during transportation, and imagine a situation where you made a delivery, the buyer checks the goods, and there are a lot of broken tiles.
For sale, some stone makers use cheap gypsum, adding various plasticizers and additives, such as SVV-500, to increase its strength. You can read about this here.
I also want to say about the color of the plaster. At first I used Samara gypsum g-16, the tiles turned out gray after drying. Now I use Magma G6 B3 (molding), after drying the color of the tiles is white. I like working with Magma, it is finely ground gypsum, hardens a little slower and costs 3 times less than Samara g-16.
Required Tools
Decorating the surface with plaster indoors or on the facade is the most promising type of finishing. To do this you need to choose the right set of tools:
- a suitable container for mixing the solution (when purchasing dry mixes);
- electric mixer;
- rule;
- spatula with trowel;
- steel graters with a width of 200 to 250 mm;
- building level;
- bush hammer;
- boaster;
- mold or matrix;
- rags.
In addition, for marking you will need a tape measure, a pencil (marker), and masking tape. Also, do not forget about basic safety measures, in particular – overalls, shoes, gloves. If necessary, wear a hat and glasses.
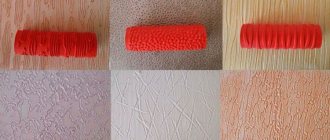
To apply the solution and create texture you will need a set of tools
Application technology
The essence of the technique of simulating natural materials comes down to three main stages:
- Create an external surface texture - blocks, cobblestones, bricks, solids.
- Give the necessary shape to the relief, which is typical for blocks, cobblestones, bricks, as well as surfaces made up of these elements.
- Use paint close to natural shades.
It is worth highlighting some special techniques. With the “Wild Stone” technology, plaster is applied to a small section of the wall, after which it is covered with a finishing coating and then a trowel is used to give the appearance of a stone surface. Upon completion of drying, veins are made by coloring by rubbing into the surface with a sponge.
The Marmorino technique is performed by knocking out rectangular boundaries with a chisel on completely dry plaster. The “Torn Stone” style is designed in an illogical way, but the notches are made in a chaotic manner.
Features of work on the facade
The decor of the façade of the building contains a number of nuances:
- Such a surface should be coated only with durable and wear-resistant mixtures, since the plaster is constantly exposed to external influences.
- Before purchasing the composition, pay attention to the characteristics, since the facade is affected by temperature fluctuations, and in a sharp form.
- Imitation of stones and cobblestones is suitable for external surfaces. This design allows you to create the appearance of a real rock.
- Prolonged heating of facade plaster under stone leads to its overheating, which ends in deterioration of characteristics.
Knowledge of such features allows you to avoid many undesirable consequences, and the facade will serve for a long time.
How to make stone plaster
You can apply a design to the freshly applied plaster. For laying in blocks, you should use a ruler; if the wall should look like roughly processed stones, then the design is applied freely.
Do-it-yourself stone plaster at home:
- If the thickness of the plaster does not exceed 1 cm, then it can be covered with a mesh of “impacts” or “cracks”. Due to this, it is possible to obtain the most believable texture.
- First you need to make a sketch. On the facing material, which must be fresh, you need to apply a contour drawing using a small sharp object.
- Development stage. The line deepens to almost the entire depth of the material, and its edges noticeably widen. You can use a piece of plastic or the corner of a small spatula for this work.
- Alignment. When the solution dries a little, you need to remove all the formed lumps.
- After the material has completely dried, it is worth eliminating minor “jags” using sandpaper or a special sanding mesh.
- Coloring. First, the wall is painted in one tone. When the paint dries a little, the bulges become lighter and the recesses become darker.
You can tint individual stones to get a more beautiful and realistic picture.
What can be used during the workflow
It is worth preparing all the necessary tools in advance.
- Two different spatulas. One should be large and rectangular, the second should be small and trapezoidal.
- Venetian trowel.
- Brushes, rollers, stencils and brushes - these tools will depend on what effect the home owner has chosen.
The first stage is surface preparation
The very first stage of the work process is the thorough preparation of the walls. They need to be leveled and all roughness removed. Small irregularities can be removed using simple plaster, large ones - through the use of sand-cement mortar.
Before proceeding to the next stage, the wall must be completely dry and there are no excess building materials left on it.
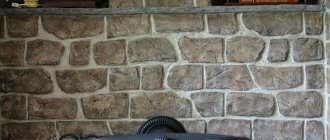
What are the ways to imitate a stone wall?
Plaster can be applied as solid stone or as masonry. Using a block wall, you can imitate more expensive finishing materials, for example, granite, marble, lapis lazuli, or simple ones - limestone, sandstone.
In order for the wall to have the most pronounced texture, the dried plaster is treated with bush hammer. You need to hit it carefully with the tool so that only the top film falls off and the grains of the filler become visible.
Bouchard
To create grooves or grooves, you can use a trojan. It can have different shapes and will allow you to create different recesses. Scarpel is great for drawing large and shaped furrows. To imitate travertine (Roman stone), the plaster must be applied in two layers and smoothed well. After half an hour, a thin layer of cement mortar is additionally applied to the wall.
You can also imitate a small stone. In this case, pre-painted granite, marble or quartz chips will be used as raw materials.
Imitation of natural stone using impressions
In this case, the masonry will be imitated using special molds. First you need to wet the mold you are using so that the plaster on the facade does not stick to it. The mold is then pressed into the freshly applied mortar. Next you need to remove minor distortions or defects using a spatula. If the facing material has stuck to the form, you need to re-process the section of the wall from which it came off.
Possible mistakes
Most beginners who want to give surfaces a decorative look make mistakes. When performing decorative marble finishing, be sure to get rid of roughness and any granules from the surface. These particles spoil not only the appearance, but also the quality of the coating.
As the masonry is created, the depressions between the “elements” should have different widths and shapes. Only in this way is the expressive effect of real rock created. To imitate brick, it is rational to use a special mesh to create strictly horizontal lines.
Decorative plaster under stone requires work skills
Decorative stone finishing requires a certain skill and dexterity, especially when you have to deal with quick-hardening mixtures. You should also choose the right tools. If there is a fireplace, a stone wall will fill the atmosphere of the room with special comfort.
Was this information useful to you? Share in the comments!
Types of stone imitation
To imitate stone during interior decoration, a variety of compositions can be used: gypsum, clay, concrete, lime and others. Both mortar compositions and cheaper putty options can be used. The technique for creating a coating is divided into several types depending on how deeply the design will be worked out.
Flat
Smooth plaster allows you to imitate natural stones such as granite, marble, or polished stone walls. The coating turns out perfectly smooth. The top must be coated with a special wax composition and polished. Usually, it is possible to make the wall not only smooth, but also glossy or semi-matte. In order to get a beautiful pattern, you need to mix different colored solutions or paint the wall surface itself directly.
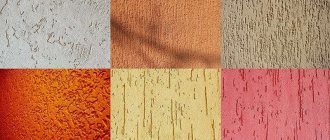
Textured
In this case, in appearance the walls will resemble a large solid stone. The plaster has a pleasant, slightly rough surface that resembles stone. It is very easy to imitate stone in this way and even beginners can achieve the desired result the first time. “Stone” plaster can have a small pattern or a convex one. The appearance of the surface will depend on what material the home owner wants to get.
Flat-relief
The facing material can be designed in the form of masonry. In this case, the seams are not processed deeply and are indicated only by a slight groove. Using flat-relief plaster, you can imitate processed stone, bricks or stone blocks. The wall turns out to be flat, because there are no large depressions or too deep grooves. Thanks to this facing material, the facade of the house turns out to be very beautiful.
Convex
To imitate stone, you can use three-dimensional masonry or 3D plaster. In order to beautifully decorate a wall, you need to use a lot of mortar and layer-by-layer painting. It will be quite difficult for beginners to do it. To make the process easier, you can use special molds that help you get the most realistic drawing possible, especially if you don’t have any drawing skills.
Imitation building stone slab
The stone is quite simple and does not have a shiny surface.
Other characteristics include the presence of a rough surface that is covered with tool marks and natural bumps or grooves. Due to such a complex texture, you don’t have to spend too much time leveling.