People have been able to give various surfaces a stone-like appearance since ancient times. In his description of the restoration of the burnt Winter Palace, Bashutsky mentions the marble-like plaster used in the royal mansions. Petersburg was built quickly, even royalty lived in palaces decorated with “fake” marble and granite. Stone-look surfaces are especially popular today. They are monumental, diverse, interesting in the interior and landscape of any style. Do-it-yourself decorative plaster to look like stone is a task that can be easily accomplished even for beginners.
Imitation methods
There are many ways to create a rock-like surface.
The main ones in application are:
- use of hanging plastic panels for wall decoration,
- wall cladding with gypsum or cement relief tiles,
- creating a dummy cover from foam plastic,
- formation of masonry or decorative layer from mortar.
Stone decor with an individual design can be created using plaster mortars (in the old-fashioned way, stucco).
Imitation of stone on the wall - torn rock, masonry, processed solid marble, malachite, sandstone or granite - is created using artistic methods or using various prints. Different techniques for simulating stone textures provide different depths of elaboration of the design.
The following techniques exist:
- flat with a coating layer thickness close to 1 mm (Venetian plaster),
- textured, having a rough surface (decorative travertine plaster, sand plaster, marble plaster, etc.),
- flat-relief in which the seams of the masonry are barely deepened,
- convex in the form of three-dimensional masonry, otherwise called 3d.
Features of plastering work on the facade
When decorating the facade of a building with decorative plaster, the following features of the work should be taken into account:
- For the facade, you should choose stronger and more wear-resistant materials, since the plaster will be in contact with the external environment.
- It is worth taking into account sudden temperature changes, so before purchasing the mixture you need to pay attention to the main characteristics of the plaster.
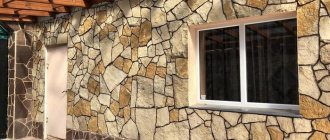
- For external walls, it is recommended to use decoration in the form of stones and cobblestones. This coating will create an imitation of real rocks.
- If overheated for a long time, the composition may dry out, which will lead to a deterioration in its properties. In this regard, it is recommended to periodically moisten the composition while performing work.
Main components of the plaster composition
Decorative coating with a stone appearance is made using plaster mortar.
It, like other plaster solutions, contains:
- Binders – acrylic resins, cement, silicate (organosilicon), gypsum, silicone resins, lime;
- Fillers – calibrated stone chips and/or flour of various rocks, quartz sand;
- Dyes – mineral, synthetic or organic pigments;
- Plasticizers – PVA, soap solution, soap naft, etc.;
- Additives to impart the desired properties, for example, frost resistance, resistance to fungus, mold, accelerated or delayed setting of binders (soap, animal glue), increased water resistance, greater decorativeness (mica chips, mother of pearl).
If you wish, you can purchase a ready-to-use composition, or you can create a mixture and prepare the plaster yourself.
Staining or tinting
During the preparation process, the glue can be given a tint by adding a color for cement compositions. The solvent is selected based on the chemical composition of the tile adhesive mixture. The special color must be resistant to alkaline environments and have good solubility. Instead of dye, you can use a stain that has good absorption; it will emphasize the depressions in the relief.
You can paint the decorative trim after drying. Select modern water-based polymer painting materials that form an elastic film that is resistant to cracking and wear. An uncoated layer of tile adhesive will gradually deteriorate. If desired, you can wipe off the paintwork from the upper parts of the texture with a damp roller or rag. The relief pattern will be clearly visible.
Preparation of the composition
If the decorative mixture is purchased in a store in dry form, it must be diluted with water. Pour the composition into a container with water (¼ volume of dry matter) and then mix it with a drill with an attachment. This must be done exactly according to the instructions. The finished mixture should have a uniform consistency without foreign inclusions or lumps. After a ten-minute break, the mixture is stirred again. It should be so thick that it does not spread when applying a layer and is easy to apply. Immediately after the second stirring, the mixture is ready for use.
How to prepare decorative compositions yourself
You can save money by not purchasing expensive ready-made materials. A few simple recipes from a variety of ingredients that you can prepare yourself:
- By adding clean sand, you create decorative plaster with your own hands from ordinary putty. To do this, take 1.5-2 liter buckets of sand onto a putty bucket. The mixture is stirred with an electric mixer. If necessary, add water.
- For exterior work or for finishing wet rooms (bathroom, etc.): 10 kg of lime, 10 kg of cement, 20 kg of sand, enough water to obtain the mass of the required consistency and 5% of the mass of the solution - liquid glass.
- 20% lime paste, 74% marble sand, 5% Portland cement M400 (white), 1% manganese peroxide, the required amount of water.
- 20% lime paste, 6% white cement M400, 4% pigment, 70% quartz sand.
The nuances of preparing stone plaster are as follows:
- mixing water can be running, but should not be below +10 C,
- to get lime paste from dry lime, you need to mix it with warm water 3:1, leave for a day,
- binders can be used in combination, for example, lime with cement, gypsum with lime.
By using homemade formulations, you can significantly reduce costs and create your own wild stone from start to finish.
Equipment and tools
To perform the job correctly you may need:
- masking tape,
- sanding float,
- steel graters 20 and 25 cm,
- spatulas with rounded edges 6 cm and 20 cm,
- Master OK,
- Maklowitz and Fleitz brushes,
- coarse bristle brush,
- roller,
- rule
- sandpaper No. 120 and 220,
- bubble level,
- tape measure or long ruler,
- containers for solution,
- pencil
- measuring containers or scales,
- electric mixer,
- rags.
Don't forget about personal protective equipment! Gloves, respirator, special. clothes and shoes.
Preparing the base
Imitation of stone for interior decoration using plaster requires high-quality execution at any stage. Including in preparing walls for applying plaster.
To ensure that the layer of decorative plaster lays evenly, adheres well and firmly to the base, and subsequently various dirty spots do not appear through the finishing, the surface of the base is prepared:
- it is cleaned of all mechanical contaminants;
- curved walls are leveled by plastering (using cement-sand or gypsum mixture);
- chips and cracks, large excavations are repaired with cement mortar and sand, using reinforcing mesh;
- if necessary, the base is treated with special degreasing or antiseptic agents;
- dried;
- primed for better adhesion (this is a particularly important step for smooth substrates, such as gypsum panels, OSB, fiberboard, etc.).
If the foundation is to be decoratively plastered under a stone, and the foundation/basement of the house is insulated with sheets of foam plastic, then a concrete “crust” is applied and reinforced with two layers of fiberglass mesh. The mesh is applied to a layer of spray 2 cm thick, the second one is placed on top of a spray of the same thickness on the first mesh. A final layer of 2.5-3 cm is thrown over the mesh.
For relief and semi-relief coatings, it is not necessary to level the surface to perfection. This finish will itself hide some imperfections.
Step-by-step installation instructions
Depending on what material is on the surface of the plinth, there will be several features when laying artificial stone.
For example, if the base is made of aerated concrete, then it must be pre-primed . Then the aerated concrete is plastered with one layer of cement-sand mortar. The layer thickness is 2 cm.
If the base is plastered, then its surface must be leveled with sandpaper or a special tool. If the base is made of sand-lime brick, it also needs to be plastered with a mortar of cement and limestone.
To install homemade stone from concrete and cement, a water repellent and glue are used. Laying is done from top to bottom, with the pattern first laid out on the floor. When using the jointing technique, the finished result will look more attractive.
Types of stone imitation
Imitating stone from plaster using your own means is done using various techniques. There are more complex and simpler techniques that can be used to achieve a stone-effect finish.
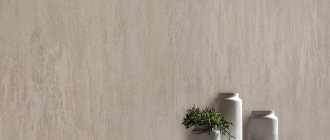
Flat
This type includes decorative finishing finishes, in which the appearance of a polished stone slab is created by using colors on top of the layer or through the components of the finishing composition (multi-colored decorative mortars with stone flour). This is a kind of multi-layer plaster painting. These include Venetian stone plaster. For this purpose, plaster for interior work is used (with marble or other stone flour). To make the surface matte, walls that look like processed marble, onyx, malachite, etc. covered with wax. They are polished to obtain gloss.
Plastering walls to look like stone:
- the base is brought to perfect evenness,
- covered with acrylic putty of a general basic tone,
- apply a decorative layer, doing this in stages (strokes of different colors are applied alternately) or simultaneously (mass of different shades are applied to the edge of the main tool), after which they are stretched along the wall, achieving uneven mixing),
- smooth out uneven surfaces with a trowel after setting begins, achieving maximum flatness of the decorative coating,
- covered with wax,
- polish with a grinder with a soft nozzle.
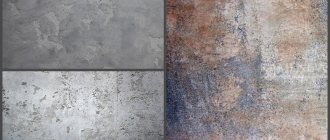
Textured
These finishes include flat surfaces with small indentations that imitate the appearance of a rough stone surface. The textured finish may have a small decorative pattern or rather convex areas. For example, finishing such as travertine or Roman stone can be done in two ways:
- continuous, in which a uniform layer is formed, decorated after partial drying (using tingling touches of a brush, dishwashing sponge, etc.),
- partial, in which the underlying layer is made even, and the proper one is applied partially (with chaotic strokes), without completely covering the underlying layer.
Textured finishes also include decorative stone finishes that imitate facing with stone slabs or masonry with a shallow depth of grooves applied with a sharp tool.
Flat-relief
The next deepest relief layer elaboration technique is suitable for simulating masonry made of blocks, bricks or flat stone tiles. In this case, the recesses imitating seams do not exceed the thickness of the layer, and the texture of individual blocks is set in very fine relief. An example of such a technique is wood-look plaster performed with special silicone molds, or an imitation of a brick wall, in which decorative stone from ordinary gypsum plaster is obtained by creating a grid of shallow joints.
In the convex technique, the foundation is finished with plaster that imitates cobblestone masonry. In this technique, the relief height is more than 1 cm.
Materials for finishing walls under brickwork
Using real brick in interior design has a lot of disadvantages: labor-intensive masonry, narrowing of space in the room, large load on the floors. Replacing such bricks with facing ones solves almost all these problems, but costs several times more. In addition, facing bricks must be properly cared for, otherwise the appearance of the finish will lose all its attractiveness. But there are other ways to decorate walls, less expensive and very effective.
Polystyrene tiles are an economical material with high thermal conductivity and good sound insulation.
The following materials are used to imitate brickwork:
- ceramic tile,
- wallpaper,
- decorative plaster,
- Styrofoam.
Tiles are ideal for a kitchen or bathroom, but only if you have the skills to install them. This type of cladding is not suitable for a living room, nursery or bedroom, so you should pay attention to other materials. The easiest way to decorate wallpaper to look like brick: there is a huge selection of colors in stores, and the gluing process does not require special skills. But there are also disadvantages here: ordinary paper wallpapers always look dull and cheap, and washable ones look too artificial.
Imitating masonry using decorative plaster is the most profitable option. The cost of consumables is relatively low, the finishing technology is simple and straightforward, and the end result is as realistic as possible. When done well, it is almost impossible to distinguish imitation from real bricks. For greater effect, you can add a coloring pigment to the plaster.
It works well to finish a brick wall using thin polystyrene foam or ceiling tiles. This material is easy to use, light in weight and low in price, so making an imitation of masonry on a wall out of it is not at all difficult. Instead of polystyrene foam or polystyrene, many craftsmen use blanks made of wood, gypsum, and even tile adhesive, but wood requires tools, and gypsum bricks require molds.
Wall finishing with decorative plaster
Regular tile adhesive is suitable for gluing decorative stone.
A quick and convenient way of finishing is applying decorative plaster. The main advantage here is that there is no need to level out minor surface defects, because a layer of plaster will completely hide them. To work you will need:
- primer,
- paint brush or roller,
- gypsum plaster,
- spatula 10 cm wide,
- coloring pigment,
- dry rag,
- small stick.
To form seams in real brickwork, a special jointing tool is used, but for plaster, an ordinary wooden stick, a broken pencil, a ballpoint pen without a refill, or something similar is also suitable, which can be used to draw an even and neat seam. They begin work by preparing the surface: remove the old finish from the wall, seal the cracks in it, clean it of dust and thoroughly prime it. The decoration mixture is prepared after the primer has dried: the dry plaster is diluted with water in the proportions indicated on the package, and then the dye is added. If you plan to paint the walls after finishing, then it is not necessary to add pigment to the plaster.
The thickness of gypsum bricks should be about 5-7 cm.
First, mix a small amount of the composition in order to have time to treat a square meter of surface before the mass hardens. The finished solution should slowly slide off the spatula without forming lumps. If this is the consistency, then you can start applying. Using a spatula or trowel, spread the mortar onto a section of the wall, and then level and slightly smooth the surface. You shouldn’t make it perfectly smooth, because natural brick is rough and sometimes even has small defects.
Now the most important thing is the formation of the brickwork. The sizes of the bricks may be different, but it is desirable that they do not differ too much from the standard ones and the wall looks as realistic as possible. You can draw seams under a ruler, creating a clear pattern, or you can do it arbitrarily, it all depends on the preferences of the master. Lines are drawn along fresh, uncured plaster with a dry stick, creating a pattern of brickwork, and excess mortar is removed with a rag. Then the next section is processed, and so on until the end. After this, the surface must be completely dry, otherwise further processing may damage the pattern.
The dried plaster is sanded with sandpaper to remove excess material and straighten the seams, and then wiped with a dust cloth. Before painting, the decorative masonry is coated with a layer of primer, so the paint adheres much better. If you want to give the finish a more realistic look, then individual bricks can be painted a different color. Sometimes they do it differently: first they cover the wall with a layer of gray plaster, level and smooth the surface well. Then a solution is prepared with the addition of red or brown pigment, it is evenly applied over the previous layer, and then the seams are drawn under the ruler. The red plaster is removed at the joints, resulting in neat bricks separated by gray lines.
Imitation of foam masonry
Tools for preparing the wall surface and installing imitation brickwork.
It’s also not difficult to create decorative bricks with your own hands from polystyrene foam or polystyrene foam. First you need to prepare everything you need for work:
- sheets of polystyrene foam without a pattern,
- felt-tip pen,
- ruler,
- sharp thin knife,
- tile adhesive,
- paint.
At the first stage, it is necessary to mark the sheets of foam plastic: draw even bricks with a side of 7x15 cm under the ruler with a felt-tip pen, making sure to make allowances for the seams. Next, use a knife to cut the foam along the markings and begin preparing the wall.
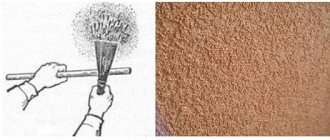
Image 1. To create roughness and cracks, you can use a drill with drill bits of different diameters.
Remove the old finish, eliminate defects, carefully level the wall and cover it with a primer. A layer of ceramic tile adhesive is applied to a cleaned and dry surface and bricks are placed on it; the gaps between adjacent elements should be about 2 mm. When all the bricks are glued, you can paint the wall, filling the seams well with paint and avoiding drips.
For greater decorativeness, small chaotic indentations and scratches are made on the surface of the foam blanks, which, after painting, give the masonry a slightly worn, but very natural look. The easiest way to create such a texture is with a concave tin strip, which can be cut from an ordinary tin can. Correctly selected colors of dark gray, brown and red add realism. IMAGE 1
Blanks made of gypsum and tile adhesive
This finishing method is in many ways similar to the previous one, but it takes more time to make bricks. For the blanks you will need:
- dry gypsum,
- soap solution,
- paints and brushes,
- pouring form.
For the form, you can use moisture-resistant plywood with a smooth surface. From the outside, the structure is held together with wooden glazing beads, and the seams are necessarily sealed with silicone. Gypsum is mixed with water (to the consistency of sour cream), and then poured into a mold greased with soapy water.
The thickness of the workpieces should be from 0.5 to 2 cm.
The mixture is smoothed with a ruler and left for 20-25 minutes, after which the mold is turned over and the workpiece is removed. After painting, the dried bricks can be mounted on the wall.
Making a brick wall starts from the floor. Using a building level, draw a horizontal line on the wall, then apply tile adhesive with a notched trowel and attach the first row of blanks, trying to make the seams between them the same width. Each subsequent row should be laid in a checkerboard pattern. After laying all the bricks, the seams are filled with plaster and rubbed.
Imitation with prints: description + video
Due to the large surface area that needs to be given the required appearance, decorative facade plaster imitating stone is performed using molds (also known as a matrix). Imitation is carried out according to a template. This is the easiest DIY stone wall decoration.
How to make an imitation:
- apply a layer of plaster to the base,
- moisten the mold with water to prevent the mortar from sticking to its surface,
- press the mold into the freshly laid solution and carefully remove,
- eliminate deformations or minor distortions with a spatula, knife or hand.
Wild stone plaster made in this way has a very realistic appearance. Its manufacture does not require special experience or a lot of time. If a large piece of mortar has been removed along with the form, the mixture is thrown onto the wall again, the form is cleaned, washed and pressed in again.
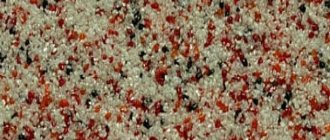
Multicolor plaster
Making a multi-color coating with your own hands is not particularly difficult. The process consists of a number of stages, each of which ends with grinding. This gives the desired texture. In order for the treated area to have the selected colors, the appearance of granite or marble stone, it is necessary to combine different colors and their shades.
To add shades, it is better to divide the mixture into parts. When adding dye, you need to calculate its amount. In order not to make a mistake in the proportion, you need to take a piece of plywood or cardboard and apply the solution to it exactly as you would on a real surface. If you are satisfied with the experiment, then you can begin applying the solution.
The first layer will be the base and it is applied over the entire wall, regardless of its color. This color fills all surfaces or depressions in the treated area. The layer should be applied as thinly as possible to ensure a smooth transition to another color.
The next layer with its own shade is applied on top of the first layer.
DIY plaster stone
The technology here is very simple. The only difficulty is the drawing process.
- Prepare the solution
- Apply the solution to the wall - you can apply it by hand, leveling it very roughly
- Use a knife, chisel, palette knife or other suitable tool to create a pattern of masonry
- Go over the resulting seams with a brush to remove tool marks and make the surface natural
- Smooth the surface, give it a natural look by using a sponge or a lint roller.
- Paint the resulting masonry
In addition to the paint itself, to give an interesting texture, you can use colored sand and other bulk mineral components (crumbs of granite, marble, etc.)
What mistakes to avoid
- Various pellets and roughness only spoil the marbled finish, give it a sloppy appearance and give off a completely unprofessional appearance. It is better to remove them during the work process, without delay.
- Artificial stone with its forms does not have to have a perfect appearance, as, for example, in the amazing masonry in Cusco. It is even advisable to make the depressions between the blocks of different widths and depths.
- Walls with brickwork are characterized by a strict horizontal direction of the rows. The same rule is followed when imitating block masonry.
- The plaster, the imitation of stone, can be of any composition. Decorative techniques can make it stone-like. But the shape of cobblestones or blocks must certainly have a natural appearance. Scale relief does not exist in nature or in masonry. This is a gross mistake that should not be made.
As a rule, such work is done with your own hands for yourself, so shortcomings and some mistakes are forgivable.
Secrets of the masters
When carrying out finishing work, each master has his own rules that must be followed.
Let's note the main ones:
- Decorative putty should not be applied to crumbling surfaces or areas with dirt: the material will not stick to them for long.
- A concrete base with oil paint will cause a lot of problems during finishing - it is necessary to wash off the dye.
- If adhesion to a given surface is questionable, use a sickle mesh (it can be glued to the surface using PVA).
- It is undesirable to dilute the composition with a construction mixer: the better the mixture is whipped, the faster it dries.
- Wash off the remnants of each used portion completely: remaining particles of the old composition will cause the new portion to quickly harden.
- If you are going to paint a finished relief surface, do not do this earlier than a day after decorating the surfaces with plaster.
- Please note an important point: it will take twice as much to create a deep relief of plaster than to create an almost smooth surface (for example, Versailles).
- Strong pressing will not give the desired effect. If you press hard on a roller or other tool, you can expose the base of the wall, which is unacceptable.
- The structural relief of the surface must be the same in any part of the finish, the thickness of the pattern layer must be identical, and the pattern must be applied once (not repeated twice in the same area).
- When creating a design, you can use special stencils (for example, leaf moldings or special forms with which you can even create brickwork).
Advantages of artificial masonry
The main advantages of this decor are:
- Unlimited possibilities for creating the desired texture and shape,
- Original design,
- Can be applied to any base
- Light finishing weight,
- Fire resistance,
- Ease of manufacture,
- Relatively low cost,
- Long-term operation.
The article provides information on how to make decorative stone plaster in the form of masonry or a marble monolith with your own hands using various techniques. Using simple technologies, you can easily make the wall of your house marble with your own hands, and decorate the base, gazebo or fence to resemble an ancient wall made of cobblestones or granite blocks. The main thing is to start. An exciting activity will make work joyful and your home unique.
Advantages of homemade plaster
The main advantage is low cost. Such mixtures are inexpensive and are sold everywhere. They are much cheaper than decorative plaster and are also quite simple to mix and subsequently apply. There are many ways to refine ordinary putty and give it a luxurious look.
Other advantages include:
- long service life;
- wide possibilities for choosing proportions (convenience in applying the solution directly depends on this);
- environmental friendliness, since the putty does not contain harmful or particularly caustic components;
- antibacterial properties;
- has excellent thermal insulation, which is especially important for residents of cold regions;
- characterized by noise-absorbing properties, for which many people value it;
- a properly prepared solution greatly facilitates the covering of surfaces, which increases the pace of work;
- the ability to create an original and attractive pattern on the wall.