Pebble decorative plaster of facades is considered the most effective and economical method of finishing walls. A wide variety of types and unique technological properties for creating various patterns significantly expands the scope of use of the material. Pebble decorative plaster of facades is used on all types of building design, hides certain imperfections, and serves as additional protection for load-bearing walls from the harmful effects of precipitation and large fluctuations in ambient temperatures.
Decorative pebble plaster “Sponge mosaic”
Types of pebble plaster
What is pebble decorative plaster
About 20 years ago, the main problem for plasterers was the presence of stones of various sizes in the cement-sand mortar. During grouting, they left deep streaks on the surface; I had to remove them with my hands and repeat the grouting. To eliminate such phenomena, the sand was carefully sifted through small sieves, which were not commercially available in those days.
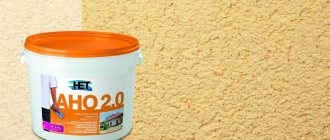
Pebble plaster
Today, building materials technologists have turned the presence of pebbles from a disadvantage into an advantage, however, the pebbles have a strictly calibrated size, and the appearance of the plastered surface depends on their size. Due to the fact that decorative plaster is applied in a thin layer, the use of cement as a binding element is impractical; cement at a small thickness does not provide the required strength of the layer.
Decorative acrylic pebble plaster with quartz sand
Pebble plaster is made using synthetic binders. They not only firmly hold individual elements, but also have great plasticity and elasticity - the appearance of cracks in the plaster is completely eliminated, even in the event of critical deformations and ruptures of the base. Pebble plasters are made on an acrylic, silicate or combined base.
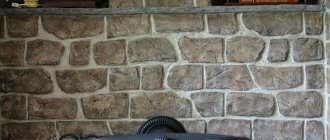
Plastered facade
Depending on the decorative filler, pebble plaster can be marble, granite or artificial stones. The structure of the coating changes depending on the method of finishing smoothing and the size of the stones; taking these indicators into account, such plaster can be called “Venetian”, “fur coat”, “bark beetle”, etc. The material is used both for finishing facade walls and for decorative plastering of internal surfaces .
Decorative plaster of the facade
Application of plaster
Application area
Decorative plaster is used for finishing work both indoors and outdoors. The composition fits perfectly on brick and concrete walls. Some types of plaster mixtures require subsequent painting. For these purposes, silicone, acrylic, silicate paints made on a water base or an organic solvent are used.
The material is also used as a finishing for insulating facades and for cladding decorative objects.
Types of pebble plaster
It is impossible to describe all manufacturers and brands of their products in one article. By and large, there are no fundamental differences between them; we will give brief characteristics of only the most famous brands of the Ceresit brand among professionals. Many domestic companies that have a license from the original manufacturer work under this brand.
| Technical markings | Plaster composition | Approximate material consumption per m2 in kilograms of dry mixture | Approximate cost of a 25 kg bag |
ST 60 | On an acrylic base, pebble fraction sizes 1.5 mm and 2.5 mm | Pebble size 1.5 mm – 2.7 Pebble size 2.5 mm – 3.9 | 1500–2000 rubles |
ST 63 | On an acrylic basis, used to create a “bark beetle” texture | Pebble size 3.0 mm – 3.7 | 1400–2000 rubles |
ST 64 | The base is acrylic, used to create a decorative “bark beetle” structure | Pebble size 2.0 mm – 2.7 | 1500–2000 rubles |
ST 72 | On a silicate base, increased plasticity | Pebble size 1.5 mm – 2.3 Pebble size 2.5 mm – 3.9 | 3300–4000 rubles |
ST 73 | Silicate, universal use | Pebble size 2.0 mm – 2.6 | 3600–4100 rubles |
ST 77 | Acrylic, highly resistant to direct exposure to water, non-hygroscopic | Size of pebbles up to 1.2 mm –3.0 Size of pebbles up to 1.6 mm – 4.0 Size of pebbles up to 2.0 mm – 4.5 Size of pebbles up to 2.5 mm – 5.2 | 2700–3500 rubles |
ST 174 | Silicate-acrylic, combines the positive qualities of both materials | Pebble size 1.5 mm – 2.5 Pebble size 2.0 mm – 3.6 | 2200–2600 rubles |
ST 175 | Silicate-acrylic, universal, can create various external surface structures | Pebble size 2.0 mm – 2.7 | 2200–2500 rubles |
Ceresit Ct 72 2.5 mm
Ceresit CT 60
All mixtures must be applied only at positive temperatures; the time of use from the moment of preparation does not exceed 60 minutes. To increase adhesion, the surface must be primed with two layers; during priming, do not allow any gaps. To prepare ready-made solutions, use clean water at room temperature; you can mix it manually or with an electric mixer.
Construction mixer
Construction mixer price
Construction mixer
The mechanical method of preparing pebble plaster is preferable - it increases the homogeneity of the prepared material. During the work, it is necessary to periodically stir the composition, to prevent sedimentation of solid additives and to prevent the solution from separating into separate fractions.
Before plastering, surfaces should first be cleaned of dirt, wide cracks and large depressions should be repaired. These are general recommendations for applying all types of pebble decorative plaster on building facades.
Prices for popular types of pebble plaster
Pebble plaster
Applying Ceresit plaster
There are quite a few cladding methods; the choice depends on the tools you have available. Let's look at the main types of surface finishing with pebble mortar.
Spatula and trowel
Using a spatula is perhaps the most common cladding method. First of all, apply the solution to the wall and then spread it over the entire surface. Keep in mind that with this treatment, uneven distribution of the layer is possible, so in some places the texture will appear better. However, this can be corrected before the material dries. During processing, if you notice unevenness, simply move the solution to a place where there is less texture and go through the spatula again.
Ceresit plaster is applied from corner to corner and all work must be carried out as quickly as possible so that the mixture does not have time to dry. Finishing is a rather long procedure and you may end up with a small percentage of defects. However, the tools are cheap, so you won’t incur any additional costs. The procedure can be seen in the next photo.
Compressor lining
This method of applying to walls is faster and you will spend much less effort. Also, with this treatment, the mixture will be evenly distributed over the entire plane of the wall and there will be no differences. The texture will be smoother, and the decorative effect will be much brighter.
The only drawback of this finish is the rather high cost of the instrument. For a one-time procedure, its cost is really overpriced. However, you can rent a tool, and you will pay much less, and the work will be done quickly and efficiently. Working with the compressor is visible in the photo below.
Eventually
Pebble decorative plaster Ceresit has a number of advantages. It can be used to decorate facades or walls inside the house. The acrylic base ensures high quality and durability of the coating. Materials from the Ceresit campaign have always been famous for their high quality, so you don’t have to worry about service life. The main thing is to follow the application rules and use high-quality tools. Before starting work, we strongly recommend that you read the recommendations from the manufacturer. Using the photos used in the article, you can see in real life an example of finishing with a Ceresit mixture. We also recommend watching the following video to see the application procedure in practice.
Recommended Posts
Derufa – decorative plaster
Decorative rain plaster for walls
Decorative putty plaster
Decorative plaster: seamless texture
Decorative plaster for the bathroom
Consumption of decorative bark beetle plaster per 1m2
Manual application of three-color decorative plaster
As an example, we will take one of the most complex options for plastering facade walls using three colors and three different sizes of pebbles.
Step 1. Take the dimensions of the facade walls, with the exception of door and window openings. Calculate the total area. This data will be useful when determining the quantity of materials.
Using a tape measure, measure the walls and find out their area
Always buy one 25kg bag of plaster to spare. Having a reserve makes it easier to work more calmly, and it may come in handy later during cosmetic repairs. Keep in mind that the thickness of the layer depends on the maximum diameter of the pebbles; what diameter they have, this will be the minimum thickness. Some increase in the parameter can only be in the recesses.
Pay attention to the grain size of pebble plaster
Buy plaster in stock
Step 2. Prepare your work area and tools. To work, you will need a wide and narrow spatula, a metal grater, a trowel and a mixer.
Tools
Step 3: Install scaffolding. You can make them yourself from lumber or rent metal ones. The second option is better - work is much faster, labor safety is increased, and the quality of plastering facade walls is improved. Wooden ones can only be installed by experienced builders, and then only if the lumber, after dismantling, can later be used in the construction of a house. Buying them specifically for making scaffolding is expensive.
Scaffolding
Step 4. Determine areas for placing different colors and brands of plaster. As an example, we suggest white in the upper third of the building, yellow in the middle and brown in the lower third of the façade wall. These colors were not chosen by chance. The lower brown one gets less dirty, and the two light upper ones visually increase the height of the façade walls - the building takes on a more prestigious appearance.
Shades of plaster
Facade plaster differs not only in color, but also in the size of the stones. The smallest (Ø up to 1.0 mm) in the upper third of the wall, in the middle Ø up to 2.0 mm, in the lower third up to 3.0 mm. The larger the diameter of the pebbles, the thicker the layer of plaster, this is exactly the effect we need to achieve.
Mineral plaster grains
In the lower part of the building, mechanical damage is most likely, and a thick layer has increased physical strength. The color of the plaster is changed by adding powdered mineral dyes to the mixture.
Always start working from the top down. If you do the opposite, then fresh plaster may fall onto the already finished layer, and then it will have to be removed. This is a waste of time that leads to a significant decrease in labor productivity. In addition, multi-colored plasters can leave marks that are difficult to remove.
Step 5. Make markings on the façade wall. It is necessary to mark two horizontal lines along the entire length of the house. First, measure the total height of the walls, divide the resulting value into three parts. This will be the width of each color of plaster. Then, using a level and a rope with blue, mark off two parallel lines. It is better to use a water level; an ordinary one makes a big mistake.
Step 6. Fasten straight, thin wooden slats exactly along the lines. A thickness of within a centimeter is sufficient; take small nails no more than three centimeters long. If they do not completely fit into the base, it is not critical. The main thing is that the rail holds. If you make decorative plaster using foam plastic, then there are fewer problems. If the base is ordinary cement-sand plaster, you will have to suffer a little.
Step 7. Pour water into a container and add the dry mixture. The amount of water per kilogram of mixture is indicated in the instructions for use; strictly adhere to the recommended proportions. Only experienced plasterers can change them, taking into account the characteristics of the surface; beginners are not recommended to experiment. Mix the mixture thoroughly. The presence of dry lumps is strictly prohibited. After mixing, leave the solution to infuse for 5–8 minutes.
Prepare the mixture and water, mix the ingredients
Step 8. Start plastering the upper third of the façade wall. We need to dwell on manual technology in more detail.
- Using a trowel or small spatula, spread the finished mixture onto a large spatula. Instead of a large spatula, you can use a long trowel. The longer the tool, the smoother the surface. But working with such tools is more difficult; we do not recommend that beginners immediately take up large smoothing irons; get your hands on medium-sized tools. For the first time, take approximately 100–150 ml of solution. The more experience you gain, the more plaster you can apply at a time, the faster the work will go.
- Tilt the putty knife at an angle of approximately 30° to the wall surface and start moving it from bottom to top. As the plaster is used up, constantly reduce the angle of inclination; at the very end, the spatula should move almost parallel to the wall.
Hold the spatula correctly
- Repeat the steps until the wall is completely covered with plaster, constantly filling in the gaps. Level the tubercles; it is better not to reuse the collected mixture. The fact is that almost only milk without stones is collected on the spatula. If it is reapplied to the wall, the surface becomes smooth. The milk can be dumped back into the container with pebble plaster and mixed or thrown into a separate bin for further disposal. Both options have the right to life, choose the one you like best.
- Carefully cover the contact areas of the window openings with a narrow spatula, do not leave gaps. Then do the leveling with a large tool.
- Allow the layer to dry for 30–40 minutes, the exact time depends on weather conditions. Final leveling can be done with a metal or rubber trowel. What is the difference between them and in what cases are they used we will describe below. During leveling, periodically wash the working surface of the trowel in a bucket of clean water. Otherwise, the milk will hide the pebbles, which will significantly worsen the appearance of the facade wall, and the pebble plaster will turn into ordinary. How to make different textures will be discussed in separate chapters of the article.
Application of decorative plaster
Applying plaster yourself
Step 9. Before the mixture has completely hardened, carefully remove the slats. Using a clean spatula, press the edges against the wall and smooth out the bump. Hand movements should be directed upward, do not touch a clean wall.
The photo shows how to use adhesive tape instead of slats to differentiate two shades
The tape should be removed immediately after applying the plaster.
Step 10 . Level the plaster or create the desired structure on it. The next day, attach one strip to the end line of the finished plaster, and the second to the previously marked line. Repeat all work according to the above algorithm. The last stage is the lowest layer of brown pebble plaster with large stones.
Smoothing plaster
Application rules
The pebble coating will fit perfectly and last for a long period only if the surface to be finished is first properly prepared for application. The algorithm of actions is as follows:
- the base is cleaned. All dirty stains, dried mortar, bitumen and grease residues are removed. For such work, they use special compounds that are purchased in stores that sell building materials;
- if there are coatings in the form of a plaster layer, paint or wallpaper, they must be removed;
- to ensure that the surface of the wall is as smooth as possible, all chipped areas and cracks are sealed;
- the cleaned wall is primed with a certain type of compound to improve adhesion. After applying the primer, the walls must dry completely, which will take at least twelve hours.
We begin to prepare pebble plaster with our own hands.
If the plaster material is packaged in large containers, then it is recommended to dilute it immediately, since the composition is heterogeneous.
Dry mixtures intended for interior decoration are usually diluted in a proportion of twenty-five kilograms of the composition per 5 liters of water. For small dosages, the plaster is diluted at the rate of two hundred grams of water per 1 kg of mixture.
It is best to mix with a construction mixer or a drill with an attachment. The speed should be low, the work is performed in the “two after two” mode, in minutes. The process is completed after the grains are distributed evenly without forming clumps.
Plaster pebble mortar hardens quickly, so the batch must be used within one hour. Work is carried out at temperatures varying between five and twenty-five degrees Celsius.
Let's look at the rules for applying pebble plaster.
To apply the “fur coat,” the craftsmen proceed as follows:
- Having applied the initial layer with a trowel, give it from four to six hours to dry a little;
- excess mortar removed from the wall is sent to a bucket and mixed with the mixed volume;
- after this, a second layer is applied, which dries for no more than ten minutes;
- smoothing is done with a trowel;
- the next working stage - the surface is ruffled, for which a spatula is used, located at a right angle to the wall;
- After about thirty minutes, the layer is smoothed with a trowel using the “iron” method;
- work is carried out without interruption until the wall is completely plastered. Otherwise, cracks may form on its surface;
- final drying occurs after a day, which significantly reduces the finishing time when compared with the application of other plaster solutions.
The optimal layer thickness is equal to the grain size.
If you have to work with fine-grained mortar, it is recommended to use the services of a master, since such delicate work requires the necessary skills.
An important point is the accurate distribution of the plaster solution over the entire surface. One inaccurate movement and any flaw will be noticeable.
Plaster with coarse filler is quite suitable even for a novice master. It is recommended to first study the application instructions and get acquainted with the advice of professionals.
Application is carried out without much pressure. The grater must be held parallel to the wall
External or internal plastering work can be carried out not only manually, but also by machine. The dry mixture is mixed automatically in special containers, after which, under the influence of pressure from the compressor, it enters a pistol nozzle, from which it is applied to the wall surface. Having applied a certain volume of solution, it is leveled using a trowel.
This option for applying plaster mortar makes it possible to save a lot of time, which is very important for outdoor work performed in large volumes. In addition, you will not have to spend extra money.
Applying pebble plaster with a pneumatic unit
The pneumatic unit allows you to significantly speed up the work process. But it is not practical to buy it specifically for one home; rent it or work manually. Several layers are applied with a pneumatic sprayer, the minimum amount being at least two. The fact is that in one pass it will not be possible to achieve a uniform thickness of the plaster.
Spraying pebble plaster
Important. The wall surface for pneumatic application of plaster must be prepared more carefully. The technology does not allow surfaces to be leveled the same way as with a spatula. To eliminate transitions in height, they need to be leveled with finishing putty, and the junction points should be smeared with a damp sponge. Work very carefully, do not make indentations instead of tubercles.
When working with a pneumatic unit, you should take measures to protect your respiratory system; in addition to a respirator, wear special work clothes with a hood. The distance from the nozzle to the wall is approximately 50 cm, the consistency of the plaster is slightly thinner than when plastered by hand. Be sure to protect window glass and frames, doors and door frames from contact with the solution.
Prices for pneumatic airbrushes, spray guns, texture guns
Pneumatic airbrushes, spray guns, texture guns
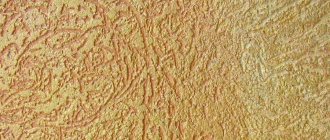
How the bark beetle structure is made
This plaster looks original only on facade walls; it is not recommended to use it when decorating the interior of premises. The first operations of applying plaster are standard; the “bark beetle” is obtained at the finishing stage. For work, you can use metal or rubber grout. The second one is better - pebbles don’t slide on it, it’s easier to make grooves, the direction of the grooves changes without problems.
Rubber spatula for grouting
“Bark beetle” can be done using both vertical and circular grouting movements. Do not press it hard, the main thing is that during movement the pebbles do not slip, but roll. Rolling creates grooves. Don’t forget to periodically rinse the grout, otherwise the grooves will be sealed with milk and the process will have to be repeated many times.
Up and down movements
Spiral structure of the "Bark beetle"
Important. Various textural changes can only be made on surfaces pre-treated with two layers of white primer. In the grooves, the thickness of the plaster is only a few tenths of a millimeter; the base will be visible through. In this case, the primer not only increases the adhesion of materials, but also makes the base uniform, which is very important for bark beetle plaster.
Practical recommendations
No professional can describe all types of pebble plaster finishes. The number of options depends on the skill and desire of the master to experiment.
Finishing with stone plaster - photo
You can make various textured indentations on the surface with a narrow spatula, comb, special embossed rubber rollers, etc. And then, after the solution has slightly set, smooth the surface a little with metal grout. Don’t be afraid to experiment, choose an inconspicuous section of the façade wall and try different options on it. Apply what you like on the facade of the house. Always keep in mind that it’s not what designers recommend that’s good, but only what you like. The house was built not for various advisers, but for you.
Structural rollers
Implementation example
Never apply pebble plaster directly to brick walls for two reasons. The quality deteriorates significantly, no primers will help. The fact is that brickwork, in principle, cannot be perfectly flat. Where the plaster is very thick, it will still be too soft for finishing leveling. In the meantime, while it dries, thin areas will dry out, the brick will absorb all the moisture or it will evaporate naturally. In addition, consumption increases many times, which will significantly increase the cost of plaster.
Plastering external brick walls
Before applying pebble material, cement-sand plasters must dry for at least 14 days. One day of rain increases the drying time of the base by two days. Concrete bases must dry for at least three months.
If the consistency is too viscous, then you can add no more than 150 ml of water per 25 kg of dry mixture. Pour water in portions with constant stirring. It is prohibited to work with tools and containers made of rusting sheet steel.
Proceed with the final leveling of surfaces or the formation of a structure only after the plaster stops sticking to the trowel. But do not allow the solution to completely set.
Plaster leveling
Try to completely finish one section and only then start the second. If there is a need to interrupt, then stick adhesive tape along the line where the work ended, apply plaster and make a texture. Remove the tape immediately. The next day, continue work from the unfinished area.
Use adhesive tape to transition colors
Never moisten hardened plaster with water, this greatly reduces the strength of the coating. If fresh plaster gets on a dried area, it can be washed off with water. It takes three days for pebble plaster to dry completely. A film appears on the surface within 15–20 minutes. The coating is not afraid of rain 24 hours after completion of work.
To increase strength, the outer layer of plaster after complete hardening can be coated with a protective varnish. Use soft rollers. Such coverage is desirable, but not required.
Plaster coating with varnish
Finish varnish for plaster
To maintain color uniformity, buy materials from only one batch, the number is indicated on the packaging. The fact is that the technological features of manufacturing pebble plaster allow for minor deviations in the percentage of components for each batch.
When performing work, adhere to the axiom of “wet on wet” application. Do not apply plaster to sunlit façade walls. Try to work on shaded walls, taking into account the time of day. If there is a danger of rain, then fresh plaster must be covered with plastic wrap. The film, by the way, will also prevent excessively rapid drying, which is very important for following the manufacturer’s recommended technology for using the material. The best option for covering fresh plaster is to protect the scaffolding with cheap plastic reinforcing mesh.
When purchasing material, pay attention not only to the time, but also to the storage conditions. If the plaster was stored under sheds, then it is advisable not to buy such material; the temperature during storage cannot drop below zero. And you can work with the material only at positive air temperatures. There is a risk of night frosts - do not apply plaster.
Pebble plaster - photo
Prices for construction finishing varnishes
Construction finishing varnishes
Technology of using pebble mixture
Plastering is available for DIY. You can achieve good results by adhering to certain rules and following a sequence of steps. The composition can be applied manually or by machine.
Tools required for manual application
Preparation for plastering
The quality of the finished coating depends on the preparation of the wall. Before work, you need to level the surface and clean it from dust/dirt.
The curvature of the plane is leveled using corrective beacons using plaster mortar. The set solution is primed.
Repair measures are envisaged on old facades/walls:
- removal of old coating;
- sealing cracks, potholes, seams;
- cleaning from paint, bitumen, grease stains.
To improve the “setting”, a primer is applied. The type of soil is selected according to the material of the walls. It is recommended to paint a dry surface and create two layers.
Preparing the walls will help you apply a thin layer and save on material.
Decorating a house to look like “lamb”
Preparation of plaster mortar
The durability of the coating depends on the quality of the solution. The packaging contains instructions for preparing the solution.
Any type of pebble plaster must be thoroughly mixed. Particular attention is paid to dry mixtures: you need to strictly follow the proportions and mix well.
A high-quality mixture is obtained by using a construction mixer. Using a drill with a whisk attachment will have the same effect.
The work is carried out at low speeds in two stages: stir for 2 minutes, break for 2 minutes, and so on twice. Your goal is to evenly distribute the rocky fraction throughout the solution.
Mixer for mixing
The prepared solution should be homogeneous and free of clots. Plastering work takes place in a warm environment: in the temperature range 5... 25 ° C.
Some mixtures harden quickly (ceresite sets in an hour), so the amount of the prepared mixture must have time to be sold. Calculate your capabilities based on the speed of continuous installation.
Working together is easier and faster
Technique for applying pebble plaster
The strength and uniqueness of the coating depends on compliance with the application technology.
Manual plastering method:
- The first layering is done with a metal trowel/ float using the throwing technique. The excess removed from the wall is immediately sent to a container with the solution and stirred.
- Drying is carried out within 6 hours.
- The second layer is created similarly to the first. You can achieve the desired texture by using a textured roller. The tool moves parallel to the plane without pressure.
- After 10 minutes, check the degree of setting. It is enough to touch the surface with a trowel; if the solution does not stick, then you can move on to the next step.
- The set mortar is smoothed with a trowel.
- Using a spatula, “ruffling” is performed. Place the tool perpendicular to the wall and run it, cutting the veins.
- Pause for drying 20 minutes.
- The “ironing” stage is performed with a float or trowel without stopping until the entire plastered area has been processed.
Applying the first layer of pebble plaster
Each layer is applied depending on the size of the pebbles. The thickness of each layer corresponds to their dimensions. For self-application, choose a coarse grain size, as all surface defects will appear on a thin layer and problems with smoothing will arise.
Smoothing without pressure
Adviсe
- When using tools, do not put pressure on them. Make minimal effort.
- To prevent the solution from sticking, wet the trowel more often, this will eliminate the sticking effect.
- The stony texture is formed before the solution hardens/thickens - work in small areas and do not apply plaster to the entire wall at once.
- Distribute your forces correctly. A wall that has been started must be completed on the same day, otherwise the line between yesterday's plaster and today's will stand out.
- If the surface is large and you do not have time to complete the work in one day, apply a “border” using masking tape. Glue a vertical line - such a transition will be smooth and the connection will not spoil the appearance.
- Do not plaster in hot weather. The solution quickly loses moisture and cracks. On the sunny side of the house, carry out work in the evening.