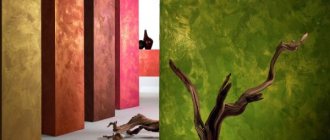
Varieties
Acrylic. Allows you to work with any materials, easy maintenance, but relatively short-lived.
Silicone. It makes it possible to obtain steam-waterproof surfaces that are pleasant to the touch, and to create unusual effects similar to “silk fabric”.
Mineral. Essentially ordinary plaster, to which cement is added for greater viscosity. Perfect for exterior decoration; indoor use is questionable, but it will be appropriate in industrial styles. Also the cheapest solution.
Silicate. A relatively new guest on the market and not the most budget option. Used for treating cement-lime surfaces.
For those who cannot find a suitable option to suit their taste, there are dry mixtures into which you can add the necessary dyes and fillers to obtain the desired effect. Let's look at this in more detail.
Application options
What tools should be used to work with embossed paintwork materials? List:
- Trowel. The paint is applied as decorative plaster. Depending on the application technique, the pattern also changes. To get a “fur coat”, just press the trowel against the wall and then tear it off. Large irregularities are smoothed out. If there is filler inside, you can get a bark beetle effect.
- Brush. Thanks to it, lines are formed on the surface. If the pile is long, then the lines are thin and long. A short-haired brush is convenient for applying strokes in different directions, making circles and patterns.
- Sponge and piece of foam rubber. The porous surface creates small irregularities. The textures will resemble the surface of stone. And due to the presence of quartz sand in the paint, the coating will be rough.
- Textured silicone roller. It has its own pattern, which allows you to create a texture by rolling the tool over the surface. The patterns are repeated.
- Roller with lint. They are painted to look like a “fur coat”. Most often it is used for the basement or facade of the room, and not inside.
This is a basic list of tools, but if you show your imagination, you can make the wall original using other available tools.
Options for possible reliefs
After application, textured paint can manifest itself in different ways. There are some popular effects used for indoor decoration.
List of basic reliefs:
- Mizuri. To achieve the effect, you need to add acrylic-based modified starch to the paint. It's not difficult to make the effect. The resulting surface can be smooth or textured.
- Marseille wax. The base is practical and can be used for any room. Often used as a protective coating in the kitchen or bathroom. Additionally, it is opened with wax, which adds shine.
- Atacama. The peculiarity of creating paint based on quartz sand. Thanks to it, the patterns turn out to be embossed. The reflective effect is possible due to the metal component. The result is a velvety surface.
- Craquelure - artificial aging. After applying craquelure varnish to the paint surface, it begins to crack, creating an original and unique effect.
- Wet silk. Pearlescent particles called glitters are added to the composition. After applying the paint on the wall, a silk effect of different shades is obtained.
Much depends on the tools used. Even with ordinary textured paint, an original effect is created on the surface if you choose the right tool.
Features of water-based paints
Water-based paint is, first of all, an opportunity to paint walls in a wide variety of shades.
Although its base color is white, it is perfectly colored with color additives, which create shades of varying brightness.
Coloring services are provided in many construction supermarkets, where specialists will offer several shade options of the same color and show how they will look on the wall. It will be possible to choose the most suitable one, taking into account the fact that the dried painted surface differs by 1-2 tones from the paint itself.
Expert advice! The color is introduced immediately into the entire required amount of the coloring composition, since it is almost impossible to repeat an already created color.
In addition to design possibilities, the water-based paint composition has several more advantages:
- absence of a pungent odor, and the one that exists “goes away” within a few hours;
- environmental friendliness;
- quick drying of painted walls;
- ease of application to the surface.
The disadvantages are minor, but they exist:
- work is performed at a temperature not lower than +50C;
- preliminary surface preparation;
- You need to immediately paint at least one wall completely, or better yet the entire room, so that everything has the same color.
They choose paint not only by color. There are several types of water-based paint mixtures:
- acrylic based on acrylic resin with good resistance to water. With the introduction of latex, this paint becomes resistant to treatment with simple detergents;
- silicone ones are obtained by introducing silicone resins and have high vapor permeability and adhesion;
- silicate ones are formed based on a combination of liquid glass and an aqueous solution;
- mineral ones, used for work on concrete and brick, have a short service life.
Note! You should not paint walls with a water-based emulsion based on slaked lime (mineral) in rooms with high humidity or in places where contamination with grease and soot is possible. Acrylic and silicone paints are better suited for such rooms.
Textured paints: features
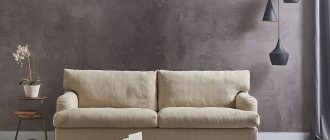
A big plus is the ease of use of the building material. To create a real masterpiece, you don’t need any professional knowledge at all. Even people without construction experience can try themselves as designers; all you need is a little patience and imagination.
When getting started, you can practice on an unnecessary piece of plywood, and then feel free to start creating. It is worth noting the uniqueness of the design, a person comes up with everything on his own, which means that it will definitely not be possible to come across the same design among friends. Textured paint can transform any interior. It looks great in living rooms, hallways and kitchens.
Thanks to the material, you can create masterpieces - unusual patterns. This is achieved thanks to the special composition and density. The finishing material has gained great popularity due to its ability to hide possible wall defects.
Creating Effects
Applying a pattern is difficult for beginners, so an inexperienced person in this matter needs patience. You can test your strength on a small fragment of the surface, which in the future will not be very noticeable or will be blocked by furniture after the renovation is completed. You can create an unusual texture by following a certain algorithm of work step by step. Use a paint roller to roll the leveled surface. Then another paint is applied to the resulting dried texture, its remains are removed with a sponge, and in the recesses of the relief it remains saturated. As a finishing touch, the enamel is applied using a soft bristled roller. Additional texture can be created by wrapping the roller with thick rope or leaving marks on the paint from impacts with a damp cloth.
Marseille wax provides many decorative options. This plastic material is applied over paint and can be given any relief.
If you scratch patterns shallowly with a sharp object into the not yet hardened layer of the coloring matter, you can trace a stencil on this heterogeneous surface. Using a rubber roller can set the rhythm of the relief pattern; the surface of the tool will contain bulges and depressions in a repeating order. Its imprint will be placed over the entire surface of the walls after they are rolled with a roller. To apply the pattern, a notched spatula can be used, then the surface will be decorated with figures of lines.
The resulting pattern depends on the angle at which the spatula was moved; it can be made in the form of semicircles or waves. A newspaper wrapped in polyethylene will allow you to create with your own hands irregularities on the wall of your apartment that resemble the shape of flower buds, each of which will have its own unique pattern. They can be given any color - red, pink, burgundy.
Watch the following video for a master class on applying textured paint.
Applying structural paint to a wall
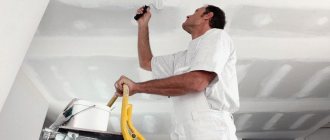
Surface preparation
Like any other type of finishing coat, applying textured plaster requires preparation of the base. True, there is no need to level the walls to perfection, as we have already discussed above.
However, if the walls are too crooked, then plastering is indispensable. You can find out how this is done on our construction portal.
After the plaster layer has dried, the base must be coated with a primer. For these purposes, Betonokontakt is most often used.
Preparation of structural paint
The primer should be applied in an even layer using a roller, while avoiding drips of the solution and its accumulation on individual sections of the walls. You can start painting only after the surface has completely dried. Typically this takes about 24 hours.
Tools
Before you start applying paint to the walls, you need to prepare the following tools:
- Wide spatula.
- Paint roller. To make the surface truly structural, the paint roller must have a pattern. The structure of the roller is selected in accordance with the desired pattern on the wall.
Roller for textured paint
Applying paint
Now you can proceed directly to painting.
The instructions look like this:
- First of all, you need to get the desired color of the composition. To do this, you need to take a small part of the mass and gradually add color to it until the desired color is obtained. In this case, you should remember the proportions in order to dilute all the paint in the bucket in the same way.
- Then the composition must be mixed well. If the manufacturer allows, you can add a little sand to the paint, which will make the surface rough.
- Then a small amount of the mixture is applied to a spatula and rubbed over the surface of the walls. Thus, this process resembles conventional puttying.
- Next, you need to moisten the structural roller for painting walls with water and then roll it over the surface treated with the composition. It is more convenient to do this work together, so that one master applies the composition to the wall, and the second one then gives the surface a structure using a roller.
Of course, you can make a design on the surface not only with a roller, but also by hand or using a stencil. For example, to obtain the effect of a scratched surface, you can use graters or combs. However, using a roller is the simplest method.
Since the coating will begin to set within 20-30 minutes after application, the work must be done fairly quickly.
- To prevent color variations on one wall, you should finish the surface from corner to corner in one go.
- After 48 hours, when the coating has hardened well, it can be treated with decorative wax, varnish or acrylic enamel.
Note! You can only apply paint in one layer.
The complete drying period of the paint is from 8 to 12 days. After this, the surface can be subjected to various mechanical loads and washed with water.
In the photo - applying the structure with a roller
Note! Before you start applying paint to the walls, it is necessary to eliminate drafts in the room, and also protect the wall from exposure to direct sunlight. In addition, the temperature in the room should be between + 25 - +30 degrees Celsius.
Double structural roller
The basis of textured paints
Many people, purchasing an option they like in a store, in practice get the complete opposite. Instead of beauty and sophistication, the result is an unpleasant misunderstanding. The interior is ruined - it requires new repairs, money has been spent and all that remains is disappointment. Therefore, in order to prevent this from happening, it is recommended to carefully approach the purchase of goods.
It is necessary to understand what the buyer wants to receive in the end. For example, those who want to add deep, defined texture to their walls should choose grainier textures. The only problem that often occurs is that each manufacturer labels the compositions differently. To avoid awkward situations, it is better to seek advice from the seller.
However, for textured coatings, the base is important. There are several types:
- Mineral. Typically used to decorate exterior walls. The most budget option of all, it comes in the form of a dry powder;
- Silicone. Popular because of its versatility. Can be used on any surface. Tolerates temperature changes and excess moisture well;
- Silicate. The most expensive base, which is used only in combination with a primer of a similar composition. Can be used for any finish. It withstands weather conditions well and is easy to clean;
- Acrylic. Of all those presented, it is considered the most convenient and easy to use. This is a ready-made composition to which anyone can add the desired color and fillers.
Textured paint is the raw material that is used to create an incredible effect. If it is difficult to work with this mixture, you should take a closer look at photo wallpaper.
Choosing interior paint
The composition is chosen taking into account which element of the interior it will be applied to. There are paints for walls or ceilings. If it is necessary to paint all surfaces in one tone, it is recommended to choose universal options.
For walls
A water-based product is suitable for decorating plastered surfaces. However, when treating bathroom walls, it is recommended to use silicate or alkyd varieties. These types of paints resist moisture better.
For the ceiling
The type of composition is not important, but thixotropic agents characterized by a thick texture make coloring more convenient. When stirred, the paint liquefies; after stopping the procedure, the solution acquires the consistency of sour cream.
The product is convenient for working with horizontal surfaces; it is not advisable to use it for decorating walls. Thixotropic paint requires careful distribution over the substrate.
It is better not to use ceiling paint for painting walls.
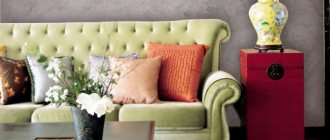
Advantages and disadvantages
Textured paint, like any other type of finish, has its advantages and disadvantages. One of the qualities for which the material is so highly valued by craftsmen is its decorative effect. The variety of colors and textures allows you to implement the most sophisticated design solutions. The second advantage is the long service life of the coating. Wallpaper, an alternative option for decorating walls, can last about 5 years on average, and textured paint has a 10-year service life. Application of the material occurs relatively quickly, saving the technician’s time.
It is worth noting that the harmful effects of sunlight on textured paints do not apply, as a result of which the material does not fade. This type of coating is plastic and will not develop small cracks during the natural shrinkage of buildings. This finishing option is monolithic, which implies a continuous continuous coating without any adhesions or overlaps that cannot be avoided by using other materials. Their presence is subconsciously perceived as a defect that visually violates the integrity of the wall. The textured coating is unpretentious; dirt can be easily removed from its surface using a foam sponge. The material has an antistatic property, which prevents dust from settling on it.
The use of this material is also permissible when arranging the interior of a nursery. To decorate a child’s room, the choice falls on water-based paints, which do not contain irritating components and do not cause allergies. Textured paints are suitable for covering a room for any purpose, including a bathroom, since they are highly moisture resistant and do not deteriorate from exposure to water vapor. Lack of sensitivity to dampness plus prevents the formation of mold. Textured coating is used when decorating kitchen premises, because it practically does not absorb odors.
The disadvantage of using textured paint is the mandatory preliminary preparation of the walls. The surface should be as smooth as possible, but the presence of small irregularities is not critical; the paint can cover them. The disadvantage of textured paint is its high consumption. A large amount of material can be consumed per unit area, which indicates the high cost of this finishing method.
Which decorative paints are better: main types
Decorative paints presented on the modern market are so diverse that it is difficult to divide them into specific groups. There are several main types:
- mosaic paints;
- special effects paints;
- flock paints.
Modern decorative paint is created on the basis of aqueous dispersions of polymer film formers using copolymers of vinyl acetate and acrylate. The filler is calcium carbonate, the particle size of which is no more than 10 microns. To achieve the required consistency, thickeners and structuring additives are also added to the paint. Thickeners are acrylate or polyurethane based associative substances or water-soluble cellulose ethers. And structured additives are represented by kaolin, bentonite, amorphous highly dispersed silicon oxide and water-soluble silicates. Matting additives regulate the gloss level of the product. The decorative effect of coatings is due to the addition of high-viscosity silicone with organic solvents, original pigments or fillers.
Shades of decorative paint are very diverse. Some of them are produced in only one white (base) color and are intended for further tinting
When choosing which decorative paint is best, it is important for novice craftsmen to know about one more feature of such compositions: they should not use electric mixers and special mixers to mix them, as this can disrupt the unique structure of the paint. In addition, it is not recommended to tint white coatings yourself, as inept actions can lead to a decrease in their quality
Look at the photo - decorative paints for walls are very diverse, and the resulting coating is unique:
The material dries quickly, so painting the surface can be completed within 24 hours. The resulting coating can be subjected to wet cleaning and cleaning.
The composition can be applied to both latex and oil paint, but it cannot be mixed with latex-based materials.
Before painting the surface with decorative paint, it is necessary to clean existing cracks and thoroughly fill them with non-shrink putty - this will prevent the appearance of new cracks and chips in the future. After this, you need to sand the surface, apply primer and stick the serpyanka, and then apply primer again and sand it. At the last stage of preparation, a primer of the same color as the main coating is applied. Such careful preparation is required to ensure that the wall to be painted is perfectly level.
When using a sprayer, the final result depends on the chosen spraying technique and the spray pressure. You can experiment with applying different layers. An interesting result is obtained if you apply layers of paint without waiting for them to dry completely. A wide flat brush is used to apply antique paint, and the coating is shaded using a hard brush, sponge or a special plastic trowel. The final drawing will depend on the direction of shading.
Decorative wall paint, texture paint pictures
[hana-code-insert name='yandex' /]
Textured mixtures are used to obtain a variety of colored reliefs on vertical surfaces. These solutions are suitable for concrete, brick, cement, gypsum, plaster, wood and other types of walls. The main thing is that before applying decorative paints, the base is properly prepared: cleaned and leveled.
The structure of the facing mixture is a viscous dispersed mass, the main component of which is acrylic. Typically, textured decorative paint is white and is diluted with one color or another, but there are ready-made solutions. You can order the desired color from consultants in the store. In this case, the professionals will do the mixing themselves, handing the client a ready-to-use product.
Textured mixtures are not inferior in quality to other modern paints. They provide not only a beautiful textured surface, but also protect the wall from moisture and dirt. As a rule, all decorative solutions are resistant to water, and therefore suitable for use not only in living rooms, but also in utility rooms. This property also allows you to carry out wet cleaning in the room without fear of ruining the finish. You could see a photo of the walls after finishing with decorative paints just above.
The cost of this type of product is about $20 for a 9-liter bucket. This price may seem very high at first glance, but subsequently the costs quickly pay off, because finishing walls with structural paint requires applying the solution in only one layer.
Decorative interior paints with various special effects and their photos
Decorative paints with various special effects are colorful compositions with a special structure that are applied to the surface using special tools and can imitate the appearance of certain materials, as well as ancient coatings.
A special effect is achieved due to the chemical composition of the paint. In addition, the application technology and the tool used are important. When creating the desired appearance, some tools are required for applying paint (curly spatulas, texture rollers).
There are several types of paint with special effects.
Luminescent paint.
When applied to a surface, luminescent paint glows in the dark. It is not necessary to use this composition to paint the entire surface of the wall.
As you can see in the photo, sometimes it is enough to use decorative paint with special effects to highlight only a certain part, draw a line along the border or accentuate individual elements and designs:
Pearlescent paint.
To achieve a pearl effect, it is possible to use paint with a translucent structure. The color of the painted surface changes depending on the angle from which you look at it. What the pearlescent effect will be depends on what tools are used for coloring. The paint can be applied using a roller, sprayer or plastic spatula. Mother-of-pearl compositions can also be used to color some decorative elements.
Leather effect paint.
This effect can be achieved using a special paint application technology. When applying the first layer, a base paint is used, and after it dries, a paint of a different color is applied as the next layer. Then, without waiting for it to dry, a plastic film is applied to the surface so that numerous folds and creases form on it. After some time, the film is removed, and a pattern remains on the surface, its texture reminiscent of leather.
Metal imitation paint.
For apartments decorated in high-tech style, the use of such paint would be ideal. It must be applied in several layers, since the decorative effect is created by combining the base and finishing layers. When starting to work with such decorative paint for interior wall decoration, you need to use a spatula, and then use a brush or metal spatula. The finished surface has a metallic tint.
Antique effect paint.
This paint contains lime, which produces a picturesque design on the walls. To apply paint, use a long-bristled brush. To achieve the antique effect, you need to make circular movements with the brush, sometimes pressing on it. After painting with a brush, sponge or cloth, the surface must be cleaned, and after final drying, additional lint can be applied to the paint.
Paint with watercolor effect.
To achieve the watercolor effect, you need paint in two shades, a special roller covered with suede, fabric, brush, sponge or polyethylene. The base layer of decorative paint for interior work is applied in one color, and after it dries, a second layer of a different shade is applied. Without waiting for the second layer to dry, you need to wash it away with light erasing movements using a sponge or crumpled polyethylene. As a result, the base layer will show through in some places, creating a unique watercolor effect.
See how the interior looks after painting with decorative paint with special effects:
Selecting a roller depending on the material
Decorative paint tools are divided according to the type of material used for the roller:
- Tree. The material is hard enough to leave well-defined imprints, but the ornament does not contain complex or small patterns. This type of device is extremely rare and is used primarily for decorative work with fabric.
- Rubber. This is the most popular option. Such a tool can have a convex pattern of varying complexity; this type includes an applicator roller with a needle-like structure. An alternative is plastic, but it has a more rigid base.
- Leather. Master class on decorative painting of walls video? The surface of the fur coat consists of numerous assemblies of different sizes. There are products where the leather is stretched over a soft base and tied with a cord.
- Pile. This is the traditional option. Due to the different lengths of the pile, a variety of textures is achieved. Even the usual foam variety can leave a simple relief.
The quality of application of the ornament depends on the choice of material from which the roller is made.
When choosing a tool, you need to pay attention to the ornament: it is best if samples of the resulting surface are presented.
Technology of applying textured paints
It consists of surface preparation and direct application. The preparation includes:
- Inspection, tapping with a hammer. If the plaster does not adhere well, fix it.
- Large cracks are filled with putty.
- Application of primer to improve adhesion and reduce consumption.
Immediately before application, the composition is mixed. Afterwards you can start working. However, there are some rules:
- To give the desired texture, you need to apply a thick layer of dye.
- Treat the entire surface at once to avoid the formation of joints. You can't take long breaks.
- The working tool is prepared in advance.
- After the coating has dried, the surface can be varnished or additionally painted with acrylic paint.
If everything is done correctly, the quality of the treated surface will be at a high level. Textured paint is a modern finishing material, thanks to which you can diversify the interior of your home. It is based on a filler that forms a pattern on the surface. And using different tools and application techniques, a variety of reliefs are created on the wall. Although such coloring will not be cheap, it will surprise guests and family members with its beauty, originality and luxury.
Painting technology
Painting work with water-based paints is technologically simple. If you plan to get smooth walls, they need to be prepared. The preparation includes the following stages:
- removing the old coating completely. Painting walls with water-based paint over oil-based paint is not done; such paint is scraped off to the base with a brush or solvents are used. New ones are also not applied to the water-based base. The old one is usually washed off with water or removed by any mechanical means;
- sealing cracks, depressions, irregularities;
- impregnation with antifungal compounds;
- leveling using putty, which is best done using a starting and finishing mixture;
- priming to increase adhesion and obtain a more uniform distribution of the coloring composition over the surface.
Use paint rollers, brushes or a spray gun to apply paint. You will also need a tray and a bucket. You should stock up on protective equipment if you plan to paint walls with water-based paint using a spray gun.
The spray gun has certain advantages over manual painting methods:
- reduces material consumption by obtaining a thinner layer;
- work is carried out much faster;
- Small dust particles and lint do not get in and the surface is absolutely smooth.
The main disadvantage is splashing. Therefore, it is necessary to close everything that does not require painting and take out the furniture. Only masters can create drawings using a spray gun.
Anyone can handle a roller, the main thing is to choose it correctly. You need to have not one roller, but several, so that it is enough to apply the coloring composition at once to the entire surface in one layer. Otherwise, the strips that have dried at different times will differ from each other.
Expert advice! You should not use a foam roller, which will slip and leave glare. It is better to opt for a fur roller.
Brushes are rarely used to paint the entire surface. Usually these are hard-to-reach places or corner joints. If a brush is chosen as the main tool, it should have a width of at least 10 cm.
Paint is poured into the tray so that it fills it by a third. In order not to contaminate the adjoining walls, it is better to seal the joints with masking tape. The roller is immersed in the bath and soaked in water emulsion, while wrung out several times so that the impregnation is uniform.
Painting work begins from the corner, which is pre-painted with a brush. The paint is applied from top to bottom in strips about 70 cm wide. Each subsequent strip should be applied overlapping the previous one with an overlapping width of about 2 cm. The most ideal option is if the entire room is painted in one layer at once. if this is not possible, then you need to paint one wall completely with the first layer and not start the second until the other walls have been painted the first time, and the second layer is also applied. Usually a third one is also necessary. The first and third have a horizontal direction, and the second has a vertical direction.
It is necessary to begin applying each layer after the previous one has dried. You should not use any devices to speed up the drying process, as this can lead to cracking of the paint.
Painting work involving specialists is not a very cheap pleasure. But you can watch a video of the technological process of painting walls with water-based paint with your own hands, learn how to work with this composition and save your family budget by doing all the work yourself.
About the author: vremont
« Previous entry
How to create different texture effects
Decorative textured paint allows you to create various reliefs not only with the help of fillers, but also thanks to various ways of applying it to the wall. There are many options and tools for this:
- Creating relief using a hard brush or brush. With their help you can create patterns from stripes; they can be horizontal, vertical or wavy depending on your preferences.
- Using a comb, you can use the same method to make more pronounced stripes.
The photo clearly shows how to create interesting effects using textured material.
Creating a stone texture using a spatula. Strokes of material are applied to a thin layer of paint on top with a spatula at different distances from each other, then with the back of the spatula they are smoothed to the desired effect. This texture is further emphasized with the help of tinting varnish or water-based paint. This method is quite difficult to implement.
Fur or foam roller. The rough texture on the wall is formed by running a regular roller over the paint. Creating patterns and relief using a figured roller. Special raised patterns on such a roller are imprinted on the freshly applied finish.
It is important to run it along the wall from the ceiling to the floor so that the pattern is not interrupted.
A sponge with large pores, crumpled paper or fabric will also help create an interesting relief on a painted wall. The pattern is made using stamping movements. The photo clearly shows how using different techniques in working with textured finishing materials you can enliven your interior.
You can even draw various patterns with your own hands, the main thing is not to forget to put on rubber gloves before doing this.
The technology for applying textured paint is not complicated. First of all, you need to take care of accuracy and do not forget that this finishing material dries within 15 minutes after it is applied to the wall. In this regard, it is recommended to paint the surface in small areas, immediately giving them the desired texture. The following videos will help you understand this process.
How to apply the composition to the surface yourself?
As when working with other paints and varnishes, the textured composition must be applied to a clean and previously prepared surface. The following stages of finishing with this type of coating are required:
- Level and prepare the surface for painting.
- Remove any inclusions, dust, debris or dirt from the surface and dry.
- Apply a special primer, which will increase the adhesion of the base to the paint mixture, reduce the consumption of expensive textured paint, and ensure that its properties correspond to those declared by the manufacturers.
- Direct painting using the selected technology and a set of tools.
Important
If the coating is not prepared, then even the presence of a textured relief will not hide defects in the plane of the walls, which will lead to unnecessary costs and loss of time.
Preparation
You need to determine the type of texture, the main pattern or texture of the coating, the color and design of the room in order to select textured paint, the necessary set of tools and devices to realize your plans. If this stage has been passed, you need to start preparing the surface. Let's look at what to do to prevent interior items from being damaged during painting and how to prepare the walls for the procedure.
Instructions for preparing the room and surfaces to be painted:
- Use durable, lightweight oilcloth to protect the ceiling, floor, door, window frames and other interior elements from accidental splashes. You can secure the film with masking paper tape or small pushpins that will not make large holes in the surface.
- If there were finishing materials (wallpaper or lime whitewash) on the previous wall covering, they must be completely dismantled. If this is not done, then different areas of the surface will have different physical and chemical properties. This may cause stains or other visible defects to bleed through the textured paint layer.
- Then treat with anti-mold and mildew agents.
- Level the surface with dry gypsum plasters, putties, reinforcing mesh (if necessary, if the walls may crack), applying the final finishing layer before final painting.
Applying primer
Before painting the surface, it should be treated with a primer for several purposes:
- A deep penetration acrylic primer will best bind dust and reduce wall absorption.
- The consumption of textured compositions in the future due to surface priming will be significantly reduced.
- It must be applied to a dry wall in an even layer, followed by drying for at least 6-12 hours.
- It is necessary to ensure an optimal microclimate in the room, temperature conditions (in the range from 5 to 30 °C) and the absence of drafts.
- During the drying period of the primer, exposure to sunlight or moisture on the walls is unacceptable in order to maintain the uniformity of the properties of the drying coating.
Advice
The color of the primer should be as close as possible or completely match the shade of the paint so that the visual effect matches the manufacturer's data.
Painting
Rules for working with textured compositions:
- All surface preparation and painting work is carried out under the type of lighting that will be used after the repair. This will allow you to correctly navigate the selection of the color of the textured composition and the method of its application.
- Only paint heated to room temperature is used, since this way it will have plasticity and will allow you to create a textured surface of the decorative layer.
- To dilute the coloring composition to the desired consistency, you only need clean warm water, but in a ratio of no more than 1% of the paint volume.
- If the color is created as a result of adding tints, then special mixer attachments and a drill are used for uniform mixing. The speed should be low or medium so as not to disrupt the structure of the material or splash it. Stir the composition before adding the coloring pigment to create color and after a few minutes to even out the structure of the material impregnated with the additive.
- The coating can be applied in different ways. It is mainly done with a spatula: wide for planes and narrow for working with corners. You can create texture with sponges, rollers with an openwork coat or pile up to 1 cm long, and other available means and devices.
- The minimum recommended thickness of the textured coating layer is 3 mm.
- The material is applied from one corner to another in quick continuous strokes with minimal pauses (how to paint walls quickly and professionally?). If part of the coating remains motionless, it hardens and cannot be formed. Any irregularities can ruin the work. When working with a roller, you need to make movements in one direction to maintain the uniformity of the pattern. A diluted portion of the textured composition retains plasticity for no longer than 1.5 hours.
- If a spray gun is used to apply paint, it must be set to a pressure of 5 ATM and a nozzle diameter of at least 3 mm. The coating should be done in several layers, each requiring approximately 3-10 hours to dry, depending on the brand of paint used.
- Complete polymerization of the textured coating structure is completed after 2 weeks from the completion of wall finishing.
- If work is completed in the middle of the process, then all containers with textured material must be tightly closed so that reaction with air does not lead to hardening of the composition.
Attention
Tools must be thoroughly cleaned of the substance with warm running water. Otherwise they will deteriorate and become unusable.
Preparing the walls
One of the main stages of work is surface treatment before applying the coloring composition. Before this, the previous coating must be removed and wall defects will be erased. Then you should clean the surface from dust.
Many people, before purchasing a color scheme, are interested in the question of how to prepare walls for painting. Puttying the walls will be a mandatory operation. It consists of two stages.
First, starting putty is applied to a special mesh. After drying, it needs to be rubbed. Then the finishing putty is applied.
Then the surfaces are primed. It is necessary to fill defects and strengthen the adhesion of the composition to the wall. After applying the primer, you should wait for it to dry completely.
Technique of applying a two-color pattern
You can make a pattern with your own hands using two different colors. This option of painting walls with relief paint is very popular. To do this, use a sharp object to make various strokes on the fresh paint. Then immediately, before it hardens, use a solution of a different color and use a stencil to make a new pattern on the coating. The resulting result will significantly improve the appearance of the wall.
USEFUL INFORMATION: What is Venetian plaster: do-it-yourself application methods
A geometric pattern with clear outlines will also look good. In order to do this yourself, you need to take masking tape and apply it to the fresh solution so that it imprints. Then you need to apply a solution of a different color to the tape without waiting for the previous layer to dry.
The simplest and most effective example of a two-color coating can be called scratching the not yet dried layer with the teeth of a comb or stiff bristles. The best result is obtained precisely from the chaotic direction of the “scratches”.