Causes of destruction of masonry
First you need to determine why the ceramic tiles are coming away from the adhesive. There are a huge number of reasons for this defect. Let's look at the main reasons for tiles peeling off the wall and floor:
- Emptiness. If, during installation of the tiles or after drying, voids have formed in the structure of the adhesive layer and their area is more than 10% with local accumulation, the tile will most likely fall off.
- Violation of technology. To maximize the service life of the coating, ceramic tiles must be laid according to a special technology, its requirements relate to temperature conditions and humidity levels, rules for applying glue, leveling, etc.
- Poor adhesion. If the base is not properly prepared or is represented by a specific material, it will not adhere to the glue and mortar.
- Uneven surface. This is especially true for tiles on the floor. The presence of serious differences in the height of the base leads to deformation and loosening of the cladding elements.
- Low quality glue. Using poor quality raw materials to produce the mixture and violating the proportions when mixing it worsens the final result.
- Insufficient layer of solution. Sometimes there simply isn't enough glue to secure the trim element.
- Excess glue. If there is a lot of solution, it may separate and crumble.
- Water penetration. Constant contact of the solution with water leads to its softening, which is why bathroom tiles often fall off.
- Strikes. If the tile is mechanically damaged or repair work is performed that involves contact with this surface, even from the opposite side, the mortar becomes loose and breaks.
- Temperature changes. With a sudden change in conditions, a “shock” may occur, including cracking of the tile itself.
- Dynamic base. The wood content increases the dynamism of the base when humidity and temperature conditions change.
- Presence of contamination. Any material comes off the glue if there are particles of dust or greasy deposits.
- Huge pressure. Heavy furniture and high traffic are also the reasons why tiles move away from the wall or crack on the floor over time.
- Old masonry. Old tiles cannot be used indefinitely without repair; the masonry also gradually wears out.
- Shrinkage of the building. This is especially true for new buildings, when the surfaces have not yet taken their final position.
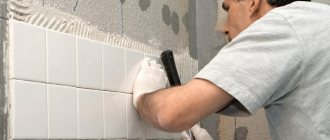
The tile may fall off due to a violation of the cladding technology
How to glue a loose tile on a wall
Sometimes, for a number of reasons, tiles can fall off. Trouble may occur due to the following factors:
- Shrinkage of the building. If the steel inside of a building is repaired without maintaining the required period, the structure will deform, causing cracking.
- The product is incorrectly glued to the surface or the wall is poorly prepared for masonry work.
- Variety of mechanical loads.
- Water and dirt got under the tiles because the seams between the tiles were poorly sealed.
If an entire masonry element has fallen off, you just need to glue it to the wall. Before this, the back surface is cleared of glue. Then the wall is primed, glue is applied and the tile is pressed for 1-2 minutes.
Tap adjacent fragments. If a dull knock occurs, you should try to peel off poorly adherent parts and then stick them back on.
If small fragments fall off, the structure should be reassembled. To prevent the defect from being visible on the wall, the surface can be painted in a suitable color.
If an entire masonry element has fallen off, you just need to glue it to the wall.
Way out of this situation
What should you do if a tile falls off? Glue the tile back! Of course, there are many conditions under which this is not possible, for example, the poor condition of the ceramics. However, in most cases the product is suitable for further use. Therefore, to restore the interior, it is necessary to thoroughly clean the surface where the tiles were attached. Then apply the adhesive and glue the product to the appropriate place.
This method is only applicable to tiles that are in excellent condition, otherwise they will need to be replaced. Although a nuisance may occur in the form of a missing element. Then you can play with contrast or add bright colors to the overall design. To do this, you should purchase several ceramic products and replace them with outdated tiles, which will significantly refresh the bathroom.
If for some reason it is impossible to glue the tiles or pick out others, then it is best to approach the problem in an original way. Try creating a mosaic design, i.e. crumble the ceramics, and then collect it and paste it into the old place, but already thoroughly crumbled. This procedure must be done carefully to eliminate the possibility of an unpresentable appearance.
To prevent repeated peeling, it is necessary to establish the cause of the defect and then eliminate it. In practice, this is relatively easy to achieve, but you still need to try. For example, voids can be identified by ordinary sound by tapping each element separately. Various irregularities are visible to the naked eye, as is crumbling mortar. The detected defective area will have to be remade conscientiously, otherwise problems cannot be avoided.
Video description
How to glue broken ceramics.
Important! Adhesives for ceramic products, as well as earthenware or porcelain, set very quickly - 10-15 seconds after application. But, for the product to dry completely it will take from several hours to several days. Therefore, do not use a refurbished product immediately after repair.
Universal adhesive suitable for ceramic restoration Source riomaterialy.ru
Preparation for tiling work
After dismantling the tiles in the bathroom, including the floor tiles, it is recommended to waterproof the floor, which overlaps the walls, the overlap is from 20 to 30 cm. After that, the surface of the wall on which there is no waterproofing should be treated with a deep penetration primer. Then you need to check the floor level, determine the slope if there is a drain, and, if necessary, bring the floor to the desired level while maintaining the plane. The same applies to walls, only taking into account that large (more than 2 cm) areas are coated with tile adhesive.
After this, it is necessary to check the materials, their expiration date and quantity, so that the work is completed immediately, and not dispersed due to a lack of materials.
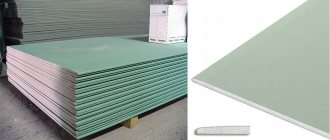
As for wooden houses and structures, the tiles are laid on special compounds such as elastic glue or liquid nails.
Reasons for tile peeling
The main reason why the tiles in the bathroom fell off or moved away from the base is violations of the installation technology:
- There are voids left in the glue layer. If the total area of such voids is 15% or more, the risk that the tiles will fall off over time increases.
- The adhesive mixture was applied too thin or thick. The optimal layer thickness is indicated by the manufacturer.
- Using low-quality glue. Dry mixtures have a limited shelf life, after which it is not recommended to use them. Also, do not use mixtures that have absorbed moisture and formed lumps.
- Failure to comply with proportions when preparing glue. The recommended amount of water for mixing the dry mixture differs from each manufacturer, so before mixing the solution you need to read the instructions.
- The base was not treated with a primer, as a result of which adhesion to the base was insufficient. This happens especially often when laying tiles on concrete and plastered bases that have not been dust-free.
- Failure to comply with the temperature conditions during laying of tiles, as well as during the process of setting and drying of the glue. During the work and when the glue dries, the temperature in the room must be maintained at least +10 °C and there should be no drafts.
- Weak foundation. For example, laying directly on paint or whitewash.
- Mismatch between glue and base. For example, a wooden base requires special highly elastic compounds.
In addition to non-compliance with the basic rules when finishing a bathroom with tiles, the finishing can collapse for other reasons:
- Shrinkage of a building (wooden house or new building).
- Sudden and significant changes in room temperature.
- Mechanical load on the cladding: strong impacts, vibration.
Most often, the cladding comes off or falls off from the base due to poor installation.
Selection of the necessary tools and materials.
To work on tiles you don’t need as many tools as you might think:
- notched spatula, cap (10 cm) and regular (25 cm);
- a hammer with a rubber head (mallet);
- a pair of buckets (for solution and water);
- rags;
- paint brush;
- crosses and other fastening materials;
- fugue.
As for buying new tiles, it all depends on the budget, desire and safety of the previous tiles, which can be cleaned of glue. In any case, the old tile will have chips and cracks from falls or physical impacts, so it will have to be replaced. But restoring tile masonry is the same method, which is the same for both old tiles (provided they are cleaned) and new tiles.
The second thing that is required for purchasing materials is the adhesive component.
Adhesion to the surface also depends on its type; there are different types of adhesive components for different types of surface material.
- Bulk materials. Or ordinary tile adhesive. One of the most popular materials for this type of work. There are several varieties that differ in composition, affecting fixation and setting speed, frost resistance.
- Liquid Nails. Elastic, easy to use, quick option. But this type of material can be used to glue single fallen tiles, since it glues, but does not cover the surface with a protective layer.
- Mastics. Practically not used in civil engineering. They have high resistance to compression and deformation. They are used in the mining industry and industries with unstable seismic conditions.
- Cement mortar. Very high strength, low elasticity. Mainly used in outdoor applications, in floor tiles.
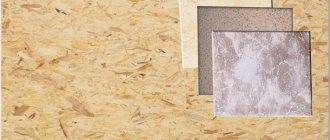
Don't miss: Is it possible to lay tiles on plywood? Laying rules. Is it possible to glue tiles to a plywood base? Instructions for installing them on such a floor yourself
What is the best tile adhesive?
Almost all types of adhesives currently sold in stores can be used for both interior and exterior use. There is no such thing as the best adhesive for tiles, but in exterior finishing, preference should still be given to dry adhesive mixtures with enhanced properties. Also, almost all adhesives are suitable for use with underfloor heating systems. Although in each case you need to carefully study the manufacturer’s recommendations or consult with a specialist about which tile adhesive is good and which one you should refrain from buying.
The evolution of facing materials, their quality, as well as the expansion of the range of applications has led to the need to abandon the traditional cement-sand mortar. Different types of base require different adhesive mixtures. The goal of the best tile adhesive is to ensure a strong connection between the two surfaces being glued for as long as possible. Thus, the strength of the connection is largely determined by the similarity of the properties of the adhesive mixture and the base surface. The emergence of new types of tiles also had a significant impact on the expansion of the range of adhesives. Its formats, thicknesses and weights are now available in a very wide range. Manufacturers of ceramic tiles produce less hygroscopic and more durable products than was the case some time ago, which also affects both its performance characteristics and the quality of the cladding.
Surface preparation
Before gluing fallen tiles in the bathroom, you need to carefully prepare the surface. Otherwise, peeling of the wall finishing may occur again in the future.
- If the tile comes off in parts, then it is necessary to remove the remaining fragments from the wall. This can be done using a chisel. The remains must be broken off carefully so as not to damage adjacent fragments.
- Check the strength of the fastening of adjacent segments. To do this, press on the elements adjacent to the defective area. If there is displacement, you need to dismantle the cladding around the entire perimeter.
- Also, using a chisel or spatula, clean the area of the wall from old primer and glue.
- If you are installing the same tile, you need to clean off any remaining installation materials from its back side. If the layer of adhesive material is difficult to remove, use a grinder. In addition to mechanical stress, you can soak the finishing elements for 3–4 hours in warm water. Sand small irregularities with fine abrasive material.
- If there are any uneven spots on the wall, smooth them out with putty and leave them to dry for a day.
- Apply a coat of primer. To avoid the formation of mold and fungal deposits in the bathroom, the surface of the wall can be treated with a solution containing fungicides.
- For further installation of tiles in the bathroom, allow the prepared area to dry completely for 36 hours.
Tile restoration technology
Only consistent and thoughtful work will guarantee that the masonry fragments will be firmly fixed and will never fall off again.
What do professionals recommend on how to carry out cladding:
- The first step is surface preparation. If the tile is cracked, remove its remains with extreme caution, taking care not to damage nearby elements. To do this, use a chisel and a small spatula. The base is cleaned, eliminating the old adhesive composition. If the layer is thick, it is first softened with a solvent. Irregularities are removed using putty and degreased. You can make a millimeter screed on the floor to eliminate roughness.
- For better adhesion, the walls are treated with a primer. When using cement mass, the base is moistened with a small amount of water; for other products it must be completely dry.
- Next, make an adhesive gasket. The mixture is applied to the tiles, zigzags are formed with a spatula, which should sag when fixed and adjusted. This is necessary for better grip.
- The height accuracy is checked with a level, crosses are used to maintain the size of the seams, they can be removed only three hours after strengthening the fragment. When the tile is inserted into place, it is lightly tapped with a rubber mallet to shrink it.
- It is better to start grouting the joints every other day to allow the glue to completely harden. Half an hour after applying the mixture to the joints, begin smoothing with a rubber spatula and an ordinary household sponge. To eliminate all stains you will need three to four approaches.
You should measure in advance the area that will need to be covered and buy the appropriate amount of consumables.
Coating restoration
When the wall is completely prepared, you can begin finishing, having previously treated the surface with an antiseptic. The process of performing the work is quite simple if you follow the instructions:
- It is more convenient to apply the adhesive directly on the floor. It is important to use a sufficient amount of mortar, but not to coat the fragment with too thick a layer of glue, as this will cause the tile to stand out from the rest.
- After the fragment is pressed against the wall, you can lightly tap the tile with a hammer with a rubber nozzle. This will help the glue spread better.
- Excess adhesive is cleaned off, and the distance at the seams is fixed.
- As soon as the cladding has dried, a grout mixture is applied to the seams.
If there are no crosses for the seams, you can use regular matches.
Video description
How to glue ceramics securely and easily.
"Force"
Composition prepared on the basis of ethyl cyanoacrylate. The adhesive liquid itself is colorless and does an excellent job of eliminating breaks and chips on ceramic products. Creates the most reliable fixation, and is also completely safe for humans and does not corrode the skin.
Instant setting adhesive composition “Strength” Source stroysamnt.ru
However, it is not advisable to inhale glue vapors, and work on restoring the product should ideally be carried out in a well-ventilated area.
Gluing tiles
Undamaged tiles can be easily mounted back onto the wall. And in order to subsequently prevent the finishing material from peeling off, it is worth considering the possible causes of this defect.
If the solution crumbles a lot after drying, then the reason is its low quality. You should not use this adhesive mixture again, so as not to encounter a similar problem again.
If the problem lies in the unevenness of the walls, then fixing the tiles in their place will eventually lead to the ceramics coming off again. It is best to carry out the repair work again, first leveling the surface.
Before starting finishing, it is recommended to check the adjacent tile elements, as they may also be damaged. In this case, the old part is removed, the adhesive material is removed from it, its remains are removed from the wall, and then the fragments are glued again.
Reasons for tiles peeling off
The decorative coating falls off for the following reasons:
- Wrong technology. Some craftsmen, in order to save money, do not apply glue in a continuous layer, but in dots. When the product is evenly distributed, the tile adheres to the surface. If there are too few points, the tile will fall off after mechanical impact or spontaneously. The defect is identified by tapping. There should be no voids under the decorative coating.
- Insufficient preparation of the base. If the glue is applied in a continuous layer, but the tiles fall off, it means that the master laid the tiles on gypsum plaster. Such mixtures do not adhere to tile adhesive, so the cladding lasts no more than a year. To eliminate the defect, you need to clean the wall until the base layer appears. Partial restoration in this case is ineffective. All tiles are removed and reinstalled.
- Use of low-quality materials. Expired tile adhesive does not have good adhesion. Under the influence of its own weight, the tile begins to fall off. Solutions that were incorrectly diluted or stored after mixing should not be used. The defect is eliminated by dismantling the decorative coating and then laying tiles cleaned from the old mortar.
- Failure of tiles. The cladding elements, after gluing, fall off under the influence of high temperatures. The heat-resistant composition can withstand heat, but the ceramic itself begins to crack.
Removing cracked tiles.
Grouting joints
After the adhesive solution has dried (about a day), start grouting the joints. To do this, you will need moisture-resistant grout, matched to the color of the old joints, and a rubber spatula. After the grout has dried, thoroughly wipe the restored area with a damp sponge, then with a dry cloth.
Restoration and repair
We start with preparation, which includes: cleaning the surface of old material, tiles, and insulation. Using a spatula or a hammer drill with a spatula, we clean the surface of old glue or other materials, after which we go through the spatula again, cleaning the surface as much as possible. In cases where pebbles or part of the old adhesive composition still remain, some advise soaking in warm water, but the most effective method is still a hammer and carefully beating off the material.
It also happens that the glue or composition that the repairmen used is non-standard, and neither a hammer nor a hammer drill can remove it properly. More precisely, you can spend quite a lot of time on these areas. It would be more rational to use a turbine with a special disk, although a regular disk for concrete will do. But you should use it carefully so as not to damage unnecessary elements, such as wiring, pipes, or accidentally saw through the partition.
Almost all types of adhesive material are also removed, with the exception of special glue. For example, there was a case when, in Soviet times, tiles were glued with glue for helicopter blades. Of course, it was possible to dismantle it only with the help of acids, but the likelihood that you will come across such material is practically reduced to nothing.
After cleaning the glue to a smooth surface, you need to go over it with sandpaper, removing small elements. Once these steps are completed, we begin priming. It is recommended to use deep penetration primer to improve adhesion to the surface and create a protective film. Leave the composition for 24 hours, after which you can begin installation.
Cleaning old tiles in the bathroom from the composition is done carefully, with a spatula or turbine, the main thing is not to disturb the special relief of the tile and not to destroy the tile itself. It is sanded to remove residues with sandpaper, but you can also use a special attachment on the DShM (it is worth wearing safety glasses when working with this technology).
If the tile comes off again, it is better to contact a specialist.
Step-by-step installation:
- After making sure that the primer has set, we prepare the adhesive solution and tiles.
- Using a notched trowel, apply the solution to the tile and apply it under the comb. The layer thickness should be 3 - 4 mm.
- We lay out the first row in a circle (the lowest row) under the level and under the plane. The floor tiles should already be ready by this point, since we take the level from there.
- We insert crosses between the tiles, two in each slot, one should be closer to the top, the second closer to the floor.
- Leave for a day to set. This is necessary so that the tile does not float and maintains both its plane and level.
- After the time has passed (24 hours), we proceed to laying the remaining layers, but for greater quality it is not recommended to lay out more than 5 rows at a time, due to the fact that there is a risk that the row will float. This time we insert the crosses into the crosshairs.
- When all the material is laid, we pick out the crosses and start sealing the seams. To do this we need a fugue, a plastic spatula and damp rags. We get rid of fugue residues on the tiles using this rag immediately after application.
Don't miss: Ceramic floor tiling
If everything is done in compliance with technology and with high-quality materials, the tiles will last even longer than the shelf life of the materials.
Repair using a mirror
In the case where the area with collapsed cladding is at a height of 150–180 cm, you can glue a mirror, diversifying the interior:
- The section of the wall where the mirror will be glued is leveled with a layer of tile adhesive so that, compared to the level of the surviving cladding, a niche with a depth of 2–3 mm is obtained.
- After hardening, the adhesive base is rubbed with sandpaper until a smooth surface is obtained.
- Use a brush to sweep away the dust from the base, after which a primer based on liquid glass (2 parts) and water (5 parts) is applied.
- After the soil has dried, a mesh of silicone glue is applied to the back side of the mirror, cut to the size of the niche, and the mirror is pressed tightly, but without excessive effort, to the base. While the glue is setting, the mirror is additionally fixed to the tile using masking tape.
Advice! To make it more decorative, decorative molding or mosaic can be glued around the perimeter of the mirror.
Bonding ceramics: algorithm
In this section, we will figure out how to glue ceramics step by step, so as not to miss important nuances that can cost the strength of the restored product. Having dealt with the materials, you can begin to work. The step-by-step instructions consist of several steps:
- Take the damaged product and clean the gluing areas from the remnants of old glue (this is in case the structure was once restored); if not, just rinse thoroughly in warm water with the addition of a soap solution or dishwashing detergent. This will help you achieve perfect cleanliness.
- Then let the moisture drain well; you can even place the parts on a windowsill that is well lit by the sun’s rays so that the product is sure to dry. Next, treat the parts to be glued with alcohol or white spirit to degrease them.
- Next, prime the places where the future seam will go. Lay out all the parts that need to be connected in the correct order, so that later, after coating with glue, you don’t have to look for the right element.
- Next, take the brush and make sure its bristles are securely attached. Carefully squeeze the adhesive onto it and coat the joint with it, apply the glue to the opposite fragment and merge them together. Hold in this state for two to three minutes without unnecessary movements. This time is given for the product to adhere.
- Then choose a place where the item can be placed in the correct position and leave it untouched for a period of 1-3 days. Afterwards you can continue to use it as before.
Restoring ceramic dishes using glue Source egocreo.ru
How to glue the fallen part
To properly carry out the restoration, you need to purchase a high-quality adhesive composition.
Which glue to choose - criteria
A bathtub is a source of high humidity, so materials for its finishing require special attention.
The adhesive for fixing tiles must have the following properties:
- Moisture resistance. The glue should not be water-soluble and create a porous adhesion of surfaces. If the glue contains dispersed particles, they should be as small as possible.
- High degree of adhesion. Tile is a fairly heavy type of cladding, so installation materials must provide the maximum level of fixation.
- Elasticity of the connection. The hardened composition must resist the formation of microcracks and peeling as a result of surface deformation.
- Quality. When purchasing an adhesive component for bathroom work, carefully check the expiration dates, storage conditions and integrity of the packaging. Ready-made mixtures should not be stored at temperatures below 0⁰C.
A mixture of cement and sand
The solution can be prepared at home. PVA glue is added to the mixture of cement, sand and water to improve adhesion. The same solution can be used to pre-level the wall. The disadvantage is the possibility of violating the technology for preparing the composition. The universal mixture is compatible with all types of tiles, including floor tiles. The proportions of the components are determined by the brand of the product. Add 200 ml of PVA glue to 10 liters of the finished composition.
Mastic
Mastic is supplied in plastic buckets of different sizes. It is a ready-to-use adhesive composition. Before starting work, mix the mass thoroughly.
Laying tiles using mastic adhesive.
Adhesive compositions
Several types of glue are used to restore tile cladding. They are divided into 2 groups:
- Dry mixes. To prepare the adhesive, the powder is mixed with water, following the proportions specified in the instructions.
- Ready pastes. The products do not require adding water.
The adhesive composition is selected taking into account the type of tile:
- Cement mixtures. Used for gluing decorative elements of small and medium weight. Adhere well to concrete or brick bases.
- Dispersive for laying tiles on the floor or wall. Suitable for lightweight materials.
- Polyurethane. The elastic composition is used for installing tiles on any base.
- Epoxy. Used for decorating smooth surfaces: wood, ceramics, metal. The glue is resistant to moisture.
Polyurethane tile adhesive.
Liquid nails can be used to temporarily restore the integrity of the cladding.
The composition is applied pointwise to the underside of the tile. The edges are covered with solid lines.
Other solutions
When partially restoring ceramic cladding, it is allowed to use materials that have the properties of tile adhesive. These include:
- Silicone sealant. The product does not need to be diluted with water before use. The elastic composition protects the connections from moisture penetration. Sealant is used in cases where 2-3 tiles have fallen off.
- Dye. Used for gluing tiles onto a smooth base. To improve adhesion, it is given a thick consistency.
- Bitumen mastic. The viscosity of this substance allows it to be used for local repairs. The resin is impervious to moisture, but is sensitive to high temperatures.
Bathroom tiles have fallen off: what to do?
When you discover that the tile laying has lost its stability, you should quickly resolve the issue of repairing it. The problem is not so much aesthetics as the increasing scale of destruction. Deformed areas often affect nearby ones.
You can glue the tiles yourself, without involving qualified specialists in this task. In this case, you need to follow clear instructions in order to correctly stick the fallen ceramic tiles or tiles back.
So, in some situations, you can quickly seal the resulting hole. For example, if the tile covering is not broken, then nothing will prevent you from returning it to its place. If the bathroom tiles are damaged, then it would be more advisable to replace them. For this reason, during renovation, the right decision would be to purchase a spare amount of tiles. If there is no spare cover, you can try to find a similar one in stores. When this fails, it is recommended to try inserting some kind of contrasting variation or decorative insert. It will look very original and unusual.
When you don't want to create such a contrast, we recommend trying to glue broken tiles together. Try to do this so that the sections fit together with the most minimal, barely noticeable seam. Below are step-by-step instructions for high-quality gluing of tiles.
Preparation of tools and materials
Now let's figure out how to tile a bathroom.
Before doing this, it is important to navigate the materials used:
- Remaining glue. If, after carrying out routine repairs, you have some powder glue on hand, you can mix just enough solution to glue the fallen tiles. We advise you not to use any remaining liquid glue. After sitting idle it probably thickened and lost its adhesive properties.
- DIY solution. Add water to the bucket and mix the cement mortar with construction sand in a ratio of 1:3. For the best effect, add a tablespoon of PVA to the mixture.
- Seals. Sealing agents are used for gluing small pieces of tile covering. However, this leaves the possibility of them peeling off from the wall or floor again.
- Dye. When specialized substances are not available, the tile covering can be glued using viscous paint.
- Bitumen or resin. They are distinguished by their thickness and sticky properties, which means they are suitable for small restoration work with finishing.
- Mastic made from cement and casein glue. It is also positioned as a good replacement for ordinary glue.
- Cement “dough”. The inside of the tile is initially wetted, then this composition is applied. Quickly and permanently adheres cladding to both wall and floor surfaces.
- Liquid Nails. Apply to the entire back part. This product helps to fix fallen tiles in the shortest possible time.
- Broken ceramic tiles are glued with a silicone-based product, liquid glass and other mixtures of a similar type. Resins also differ in that they can be easily disguised to match the color of the tile itself due to the use of grout.
Preliminary processing
Laying tiles should be done only after preliminary surface treatment has been carried out. First you need to remove the remnants of the old cladding. When tiling a bathroom, be careful to clean it with your hands so as not to affect the nearby tiles. To do this, it is recommended to use a spatula and chisel. The seams must be cleaned, and the damaged area must be slightly pryed.
Next, we clean off the excess adhesive mixture. If the adhesive layer has become too dense, it is recommended to soak it first. If you find any irregularities, remove them. Also treat the wall with a thin layer of putty. On the floor, a millimeter screed will be enough.
After this, remove any dirt from the surface, so apply the adhesive only to the cleaned surface. The base should be primed and degreased, because this will ensure high-quality adhesion. If you decide to use cement mortar, moisten the tiles with water before applying it. The remaining mixtures will require a completely dry surface.
Laying tiles: step-by-step instructions
Tile peeling most often occurs in food preparation areas and bathrooms. In other words, rooms with a high accumulation of moisture and combustion products are most susceptible to damage to the cladding. Therefore, it is recommended to pre-treat the walls with antiseptic agents. Only after this process has been completed can restoration of the cladding begin. This is done like this:
- Apply glue. It is recommended to do this task on tiles. It is important that the thickness of the layer should be oriented towards the additional screed so that the tile lies flat.
- Next, lay each tile against the floor or wall, tapping it with a mallet. This will help ensure even distribution of the adhesive mixture.
- Clean excess glue from the joints and set the optimal spacing on the seams.
- Wait until the tiling is completely dry. Then grout each tile seam.
How long will it last?
The service life of tiles that have been correctly laid is not limited by time. The service life of the coating is reduced if the installation technology is violated, if materials with an expired shelf life were used.
In order for the cladding to last as long as possible, it is necessary to avoid installation errors and distribute the adhesive evenly over the entire surface, thereby eliminating the possibility of voids forming and deformation of the coating.
What to do in this case
What to do if the tiles on the floor or wall still fall off? There is no need to despair, because there is far more than one way out of the situation. The first thing that comes to mind is to glue back the old tiles. To do this, you need to clear the space for its installation and clearly install it in its proper place, level with the rest.
Be sure to first clean the grout from both the old tiles and the wall or floor.
This method is acceptable only if the tile remains intact, otherwise it is best to replace it with a new element. Surely after the repair you still have several tiles from the same batch. If not, then try to find the same one on sale. If this is not possible, then you can choose tiles of a different color. You can link this contrast with any interior item. Use a decorative insert with a similar shade of detail or a completely different tile structure, even a colored mosaic. It will look very original and interesting.
If this option is not for you, and the old tiles are not very damaged, try gluing them together. This must be done in such a way that the fragments are joined end to end with minimal seam.
If the tile is not damaged, it can be glued again
To prevent further destruction of the masonry, try to determine the possible cause of the tiles peeling off. In principle, this is not difficult to do. Voids are immediately noticeable, and their presence under the rest of the tiles can be checked by tapping - by sound. The irregularities are also quite noticeable. If the solution is easy to clean off and crumbles, most likely this is the problem. Analyze all possible reasons. Be sure to check the adjacent elements; they may have come loose when removing the damaged tile or for the same reason that it came off. If you find a large area of defect, you may have to completely redo the cladding and first level the base.
If the tile cracks
The tile may crack due to mechanical stress on it. If the crack is small, it can be easily repaired with putty or grout. In case of significant damage, the fragment is completely dismantled and replaced with a new one.
- Dismantling begins with removing the old grout.
- If the cracked tile holds well on the base, several holes are drilled in it, then it is easily broken with a hammer.
- Small fragments of tiles are knocked out with a chisel.
- The old mixture is removed.
- Primer is applied to the base.
- A solution is applied to the back of the material, the fragment is pressed against the primed, dried base.
Step-by-step instructions for installing tiles in place
- Remove any remaining old mortar from the wall using a chisel, hammer and putty knife.
- Apply primer and antiseptic (to prevent the appearance of fungus) over the prepared area of the wall.
- Apply adhesive to the tile joint in an even layer using a notched trowel.
- Press the tile firmly against the wall and hold for a while.
- Carefully remove any remaining glue remaining on the surface and insert construction crosses into the seams.
- After a day, treat the seams with grout of a suitable color.
Lightly moisten the cleaned surface with water and treat with a construction trowel.
How to prevent peeling - quick tips
To avoid having to regularly carry out minor repairs to the bathtub, it is better to take measures that will allow the tiles to last as long as possible.
- When laying finishing materials, strictly follow the technology requirements. A minimal deviation from the instructions can lead to serious defects and rapid peeling of the cladding.
- Lay the tiles on carefully leveled and primed walls.
- For each type of wall (brick, concrete, wood, metal) there is a special adhesive composition that provides the greatest adhesion. Use mounting mixtures suitable for a particular type of surface.
- After installation is complete, treat the joints between walls and floors, as well as corners and protruding areas with waterproofing sealant.
How to make repairs?
After the surface is cleared of glue residues and leveled, you can begin priming. Use a small brush or kitchen sponge for this. The primer must get into all the cracks to ensure maximum quality work. Do not apply glue before the primer has dried. All instructions for laying tiles indicate that the adhesive is applied only to a dry surface. Check the label for drying time. If necessary, you can apply 2 layers of primer.
The next stage is the direct application of the adhesive mixture. The technology allows it to be applied to the base and tiles. Here the choice is yours - apply it as conveniently as you like. Can be applied to floors and tiles to increase durability. Glue the fallen tile, while controlling the gaps: they should be the same on all sides. After pressing, a small amount of glue appears between the seams, which must be removed. After the mortar on which the tiles were glued dries, you need to grout the seams.
Video review
Sources
- https://gidpoplitke.ru/remont-i-uhod/kak-prikleit-otvalivshuyusya-plitku.html
- https://sovety-vannoy.ru/delaem-remont/ukladka-plitki/otvalilas-plitka-v-vannoj-chem-prikleit.html
- https://stroy-podskazka.ru/nastennye-pokrytiya/plitka/chem-prikleit-v-vannoj/
- https://VseProKley.ru/vannaya/kak-prikleit-plitku-v-vannoj-na-stenu-esli-ona-otvalilas
- https://rebathroom.ru/otvalilas-plitka-v-vannoj-chem-prikleit.html
- https://OPlitke.com/montazh/chem-prikleit-plitku-v-vannoj-esli-ona-otvalilas
- https://MasteraVannoy.ru/plitka/chem-prikleit-esli-ona-otvalilas.html
- https://stroitelniportal.ru/svoimi-rukami/plitka/chem-prikleit-plitku-v-vannoj-esli-ona-otvalilas/
- https://plitkahelp.com/ukladka/chem-luchshe-prikleit-plitku-v-vannoj-esli-ona-otvalilas
- https://KraskaGuru.ru/klej/plitka/esli-otvalilas-v-vannoj.html
[collapse]
How and with what to glue ceramic tiles to concrete
When gluing tiles to concrete, craftsmen use both a paste-like type of glue and a dry mixture.
The first type with a thick consistency contains water; when it evaporates, the material adheres to the surface. This is an easier way of gluing.
The dry mixture contains cement and sand. It is used in various works and is considered more reliable than the ready-made mixture.
The following types of glue are used for laying on concrete:
- Universal. A popular option because it is multifunctional.
- Base. Used for cladding large slabs.
- Reinforced. Also used when working with large slabs, and when gluing peeled parts.
- Highly specialized. Suitable for work with high temperatures and humidity.