How to properly slak lime for whitewashing: instructions
The choice of lime for whitewashing walls is due to the fact that this coating has antiseptic properties and does not deprive the surface of its ability to breathe. Whitewashing is quite simple without the involvement of a specialist, and the material is quite easy to work with. Lime whitewashing of walls allows you not to worry about the formation of fungus or mold. The only nuance that should be taken into account is the preparation of the composition in compliance with all the nuances. The most popular is considered to be fluff. It is a white powder that has undergone a quenching process and requires the addition of liquid and various fixatives before application. Lime is sold in two versions - slaked, in the form of a dough (paste) or powder, quicklime, produced in the form of small or large lumps, as well as granules. The latter variety cannot be used for whitewashing. And if only this is available, the mixture is first extinguished. Quicklime is used as an additive in plaster and cement mixtures to improve plasticity properties and bind the components together.
Advantages of lime as a finishing material
First of all, simplicity attracts attention. The solution of this material is prepared very simply, and even a person who is very, very far from repairing can cope with its application. Indeed, for most people, the question of how to make whitewash from lime is not even worth it, because any special knowledge is completely unnecessary.
Lime is famous for its disinfecting properties, so that mold and mildew do not appear on the treated surface. In addition, the surface painted in this way is not subject to abrasion, so its repair can not be carried out for a long time. Finally, lime is very cheap, and finishing the same walls with it becomes a very budget-friendly way to update the interior.
How to properly slak lime?
Hydrated lime, that is, slaked lime, is formed during the interaction of lumps or granules with a catalyst, which is water. A correctly carried out procedure is crucial, since, depending on the specific technique, you can get completely three different compositions: lime water, fluff - dry calcium hydroxide, suspension - lime milk.
The extinguishing process is accompanied by the release of a large amount of heat and is, in fact, a chemical reaction when a substance passes from one state to another. A person pouring calcium oxide with water must take all precautions to avoid getting burned. Along with a lot of heat, there is usually splash, so wearing personal protective equipment is a must.
To carry out cancellation according to all the rules, you need to follow a clear algorithm of actions. Each stage requires thorough execution, since it ultimately allows you to obtain high-quality fluff for whitewashing the surface of the walls. The difference between the compositions is not significant, but it does affect the quality of the work performed, so the recipe should be followed.
First stage
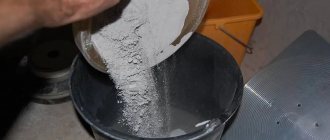
It is necessary to prepare the container. It should be washed well. It's best to take a saucepan. Water should only be used when cold. It is taken in large quantities. Limestone is poured into a prepared clean container and filled with water. For 1 kg of potassium oxide you need 1 liter of liquid. Additives are not always introduced, but it is thanks to the additional components that it is possible to obtain a better quality whitewash. Extreme caution must be used at this stage. The mixture will begin to heat up, bubble, and splash. Therefore, you should initially work with gloves and glasses. Otherwise, the hot solution may burn your skin and get into your eyes. The reaction takes more than half an hour. You cannot touch the composition until it completely “calms down”. Next, it is mixed with a previously prepared stick. The latter should be wooden.
Second phase
Slaked lime is not used immediately. It must be left to infuse in a cool place. The longer the preparatory solution sits, the better the adhesion properties become. The optimal holding time is considered to be from 5 to 10 hours. Some sources say several weeks, which is quite a long time. Usually a few hours are enough to get a fairly good whitewash, which will then fit perfectly onto the wall surface.
Rules for using slaked lime
Depending on the purpose of use, slaked lime must be properly diluted and, if necessary, mixed with other materials:
- For fertilizing and neutralizing soil acidity. In order for calcium from lime to be better absorbed by plants, calcium acetate must be prepared from the prepared raw materials. For this, 2 tbsp. l. the fluffballs are poured with 0.5 liters of 9% table vinegar. The composition is stirred and left for 1 hour. The concentrate is added to 12 liters of water. Apply 0.5 liters of solution under each root.
- For whitewashing country houses. For the fence or walls of a house, take 1 kg of lime powder per 3 liters of water. The resulting solution is enough for 12 square meters. m.
- For whitewashing tree trunks from pests. To prepare the solution, 2.5 kg of fluff is poured into 10 liters of water. For better attachment of the whitewash, add 2-3 tablespoons of flour paste, PVA, 10 tbsp. l. shavings of laundry soap or 1 kg of clay.
Fluff is a necessary material in a subsidiary farm. In order not to purchase it in the store, you can prepare slaked lime at home without spending a lot of effort.
Extinguishing rate
Lime is divided into varieties not only according to the recipe, but also according to the time of the procedure. The quenching period is calculated depending on when the temperature subsides, that is, heat ceases to be produced when combined with water:
- fast pace - from 5 to 12 minutes;
- average pace - from 13 to 22 minutes;
- slow pace - 25 minutes or more.
The extinction period has a direct impact on the quality of the resulting solution; it is prepared with some differences. It is necessary to decide in advance at what rate the extinguishing will take place. Otherwise, the quality of the whitewash may suffer.
Slaked at fast and medium rates
The pan is filled halfway with limestone and then filled to the brim with water. Lumps or granules begin to dissolve when steam appears. Stir it with a wooden stick and add a little more liquid. They continue to dilute the substance to obtain the desired consistency even when the extinguishing has already been completed. It is recommended to pour the resulting composition into a working container in which it will be used for whitewashing. Lime that is slaked at an average rate is no different from lime that is slaked quickly. The proportions are also one to one. The difference is that dilutions are not carried out until the chemical reaction process is complete.
Slowly produced lime
The pan or other container is also half filled with potassium oxide, and water begins to be poured rather slowly. When the lime finishes cracking, continue to add liquid in small portions. The result is milk, which is carefully mixed. The disadvantage of this preparation is that not all the pieces will dissolve. It is quite difficult to eliminate lumps after the end of the chemical reaction, so they are simply removed. If this is not done, firstly, the amount of “useful” whitewash will be difficult to calculate, since lumps will create the misleading impression of a larger volume, and, secondly, the quality of the work performed will sharply decrease, since the mass will not be homogeneous.
Self-lime extinguishing
When slaking lime, it is necessary to follow basic rules so that there is no metal oxide residue, otherwise the quality of the material will deteriorate. It takes about 36 hours for the extinction to occur fully.
- First you need to prepare a container for lime; metal products with no corrosion are allowed. Lime is poured into the prepared container.
- After this, the powder is filled with water to obtain fluff, add 1 liter of liquid, for lime dough, half a liter per kilogram of material.
- Then they begin to mix the entire composition, doing this gradually until the steam begins to disappear.
Basic requirements for slaking lime:
- When using slow slaking lime, water is added in several portions.
- If work is carried out with quick and medium slaking lime, then water is added until steam ceases to be released, so the powder will not burn out.
- You need to know that for whitewashing walls and treating trees, lime is diluted and settled in different ways.
- When spraying plants with lime to get rid of pests, the mixture is made two hours before use. Add a significant amount of water and add copper sulfate.
- When working with lime, it is necessary to protect your eyes and hands from burns, so you should wear goggles and rubber gloves. When preparing the mixture, do not bend low over the container to prevent burns from the vapors.
What should a high-quality whitewash be like?
You can check the resulting composition with a wooden spatula. A thick white film should remain on the instrument. This mixture is diluted with cold water, if necessary, so that the solution is homogeneous and opaque. From a kilogram of potassium oxide after slaking and diluting with cold water, approximately 10 liters of whitewash are obtained.
Be sure to check that there are no lumps in the lime. To ensure that there are no remaining small particles that did not dissolve during the slaking process, you should pass the whitewash through a mesh. You should also take into account what tool is supposed to be used to apply the composition. If you decide to use a spray gun, then the solution is passed through gauze. Otherwise, it will not be possible to carry out high-quality whitewashing.
Related article: How many layers of drywall do you need on a wall?
Lime whitewash
Despite the fact that using chalk is the simplest and most affordable way to prepare a composition for whitening indoor surfaces, lime is in great demand. This is due to the fact that walls and ceilings treated with lime whitewash are not susceptible to the formation of mold and mildew. The most popular composition for whitewashing walls is fluff. White powder that has undergone the quenching procedure and is ready for use after adding water and fixatives.
Read also: Do-it-yourself barn for a cow, drawings
Modern manufacturers sell lime:
- Slaked, supplied to places of sale in the form of powder or paste (dough).
- Quicklime, sold in the form of granules or large lumps.
After filling the lime with water, close the container with a lid.
For whitewashing, only slaked lime is used, for the preparation of which you will need:
- water and lime itself, taken in a 1:1 ratio;
- clean metal utensils without chips or corrosion;
- lid for container;
- wooden spatula for mixing the solution.
After quicklime is poured with cold water, it begins to boil, heating up to 130 ° C. The reaction is very violent, the liquid bubbles and splashes fly in different directions. At this point, it is better to cover the container with a lid to avoid getting the mixture on bare skin.
You cannot use plastic containers, since the solution gets very hot during the quenching process, and you can stir the composition only after the reaction is complete. Now the container needs to be closed with a lid and put in a cool, dark place for 20-25 days.
At the end of the specified time, the composition is thoroughly mixed.
There should be a thick white film left on the wooden spatula. The mixture required for whitewashing is diluted with cold, clean water to achieve a homogeneous, opaque composition. The approximate amount of the finished solution prepared from 1 kg of quicklime is 10 liters.
During quenching, all lumps and granules must be completely dissolved in water, but before use, the contents of the container must be thoroughly mixed, and before use, strain through a special mesh.
The tool for performing whitening can be selected taking into account the wishes of the average person or the characteristics of the surface being treated:
When using a spray gun, the resulting mixture will have to be filtered through cheesecloth to remove even the smallest remaining lumps.
How to increase the durability of the resulting whitewash?
To ensure that the whitewash not only adheres well to the walls, but also does not crumble for a long time, soap or wallpaper glue is introduced into the solution. Lime is also used for exterior wall finishing. Facades are exposed to the harmful effects of atmospheric precipitation, so it is necessary to increase the durability of the composition, which can be achieved by drying oil, which prevents the whitewash from quickly being washed off, repelling moisture. Another disadvantage of lime that worries many is the ability to stain anything that touches the whitewashed surface. To eliminate this disadvantage, ordinary table salt is added to the solution. Its quantity is 1 kg per 10 liters. The amount of drying oil is about 100 ml per bucket of ready-to-use whitewash. Laundry soap must be passed through a grater and then poured with hot water to obtain a solution, which is poured in during the preparation of the mixture. If you don’t have wallpaper or PVA glue, you can use carpenter’s glue. It should be pre-cooked in a steam bath. A similar hot admixture is added before the actual whitewashing, that is, into the already prepared lime whitewash.
Buying lime - which one to buy and how much ↑
Before going to the store, you need to find out what kind of lime to buy for whitewashing - slaked or quicklime, how much of it is required and what other components will be needed. This will save you from going to the construction market again if suddenly the solution is not enough or its properties do not meet your requirements.
How to make slaked lime with your own hands ↑
As you already understand, slaked and quicklime are completely different substances, which are united only by the consonant name and the presence of calcium in the composition. For household repair work, slaked lime is used. It is sold by weight in any hardware store or agricultural department.
However, there are often situations when the farm has a fairly large supply of quicklime and it is advisable to use it rather than buy slaked lime. In this case, you can extinguish it yourself, especially since this chemical process does not require the skills to conduct such experiments in the laboratory.
So, how to prepare lime for whitewashing from lumpy quicklime. First you need to worry about personal protection. Since you will be dealing with a rather aggressive alkali, take care to protect your eyes (goggles), respiratory organs (respirator), and exposed skin (closed clothing and gloves). This must be done in the air.
Video: How to prepare a whitewash solution
You will need a deep container, such as a bucket, and a mixing tool - traditionally a stick. The list of ingredients is also short:
- lump quicklime;
- water.
The water must be cold, this is the only condition. Even a first-grader will remember the proportion – 1:1.
- For 1 kg of calcium oxide, take 1 liter of cold water.
- Combine all this in a container and mix. Almost instantly you will be able to observe the beginning of a powerful chemical reaction with the release of a large amount of heat. When extinguishing, the mixture sometimes heats up to 150 degrees; it is not for nothing that the substance is popularly called boiling water - the solution literally boils.
- When the reaction stops, heat and gas cease to be released, the lime can be considered “fluffy”, that is, slaked. However, it is not yet suitable for whitewashing.
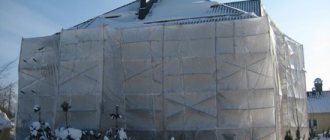
- The solution should ripen for 2-3 weeks under a lid in a cool, dark place.
Solution proportions and consumption per square ↑
To start whitewashing with lime yourself, you need to prepare at least the following set of materials:
- powdered fluff or lime paste;
- water.
In addition, various auxiliary substances are often added to whitewashing, which give it certain properties. The base solution is prepared in a ratio of 1:3. For every kilogram of fluff, take 3 liters of water. As a result, 4 liters of solution can be prepared from 1 kg of substance.
The consumption of lime per 1 m2 during whitewashing directly depends on the type of surface on which it is applied:
- The largest consumption - about 1 liter of ready-made mortar per square - will be used when whitewashing untreated brickwork.
- A flat prepared surface requires approximately 0.5 liters per square meter of area.
Another criterion that affects consumption is painting tools. More often they use a regular flat brush or a round brush. These tools are wasteful, the mass is applied in a thick layer, and drips and drops can form. The spray gun can significantly reduce material consumption and operating time. Often, instead of a spray gun, a vacuum cleaner with reverse airflow and even hand-held tree sprayers are used.
Read also: How to connect a pump to a boiler
How to calculate the amount of fluff and water ↑
Before diluting slaked lime for whitewashing, you need to perform some calculations. An approximate calculation of consumption is as follows.
First you need to calculate the area of the walls and ceiling that you plan to whitewash. For example: a room 3 by 5 m, ceiling height 2.5 m. It was decided to treat the ceiling and part of the walls from mid-height to the ceiling with lime whitewash.
Wall area: (3*2.5+5*2.5+3*2.5+5*2.5)/2=20 m2.
Ceiling area: 3*5=15 m2.
Total area: 35 m2.
Based on the average consumption of 1 liter of solution per 2 m2 of surface, it is easy to calculate the required amount for whitewashing - 17.5 liters of lime mortar. You can round up to 18, or better yet, to 20, because average consumption is a fairly flexible concept.
That is, 20 liters of solution are required, and this is 5 kg of slaked lime powder. It is worth noting that ready-made lime dough, which is sold in construction stores, is diluted in the same proportion, which means the calculation is correct for it as well.
Supplements to increase durability and combat deficiencies ↑
Since lime has been used in construction for a very long time, there are many “folk recipes” and methods that improve the properties of this substance. After all, modern water-based paints appeared not so long ago, and craftsmen were forced to practice chemistry right in their dacha or home.
The first problem that is solved by adding a secret ingredient to the lime whitewash solution is shallowing. A dried surface tends to stain everything and everyone who touches it. What to add to lime to prevent it from smearing? This ingredient is found in every home - table salt. It has a good bonding effect. Add 100 g of salt per liter of solution.
Another problem, especially when using whitewash for exterior work, is that the composition is quickly washed off with water. It has long been known what to add to lime so that it does not wash off - a fatty component is introduced into it - drying oil. Drying oil repels water and allows whitewash to last longer. Proportion 1:10, 100 ml per liter of solution.
They practice adding laundry soap, grated on a coarse grater, PVA glue, wallpaper glue, and acrylic primer. All this is done in order to ensure maximum adhesion of the whitewash to the wall, to prevent its swelling and bubbling.
White is not the only possible color ↑
To prevent the lime coating from becoming yellowish, an ordinary blue dye is added to it - methylene blue. You will need 10-20 g per liter. The whitewashed ceiling will become snow-white. But sometimes it becomes necessary to obtain lime mortar of other colors. This mass can no longer be called whitewash, and not every dye is suitable. Only those pigments that are resistant to an alkaline environment are used - mineral, but in no case organic.
Pigments used for lime paints:
- ocher (yellow tint);
- umber (greenish brown);
- red lead (orange);
- mummy (red-brown);
- chromium oxide (green);
- titanium dioxide (white);
- lithopone (white);
- ultramarine (blue).
To prepare good quality lime paints, it is not recommended to add pigment in its pure form - powder. It is first diluted with water to obtain a paste. Then the pigment paste is allowed to infuse for about 24 hours. And only after this the dye can be added to the solution. This is because grains of pigments often do not dissolve well and can drag on the brush, forming unsightly streaks of color.
Lime for whitewashing a house
Lime has been used for whitewashing a house for a long time and is one of the cheapest materials for decorating the walls of buildings. And not only at home. Lime can be used to bleach the surface of the walls of a cellar, shed, stove, or chicken coop. In addition, everyone knows that slaked lime is used to whiten garden trees in order to protect them from temperature conditions and insect invasion. But despite the simplicity and cheapness of the material (lime), you need to know some nuances when using it.
How to dilute slaked lime correctly?
The process of preparing whitewash is not complicated, but requires following certain recommendations:
- You need to mix the lime in small portions. At a time, you need to dilute no more than 2 kg of powder or batter per 1 liter of water.
- It is better to pour the mixture with cold water, since as a result of the chemical reaction that occurs, heat is released during mixing.
- The first portion is thoroughly mixed, poured with a liter of water, and stirred again. Repeat this step until the required amount of water has been used.
- The resulting solution is left for a day.
After 24 hours, the whitewash is completely ready for application.
Lime slaking
Three types of lime can be purchased in stores and warehouses: slaked, unslaked, and soda lime (a mixture of slaked and unslaked lime). But for whitewashing walls it is best to use slaked lime.
Why? Because for finishing work the so-called “lime milk” is used, which is obtained by slaking unslaked lime. We will consider below how to carry out the extinguishing process correctly and safely:
- After purchasing lime (not slaked), you need to break up too large lumps, but not to the powder stage.
- Place all this in a metal container (galvanized bucket).
- Pour clean cold water into the container. After contact with water, the lime will begin to bubble and splash, so you need to close the bucket and move away.
- After 20 minutes you will need to mix the composition. At the same time, protect all exposed parts of the body, wear glasses and rubber gloves. If drops of the solution do get on your body, you need to quickly rinse the area with water.
- Complete dissolution of the lime occurs after six hours.
- After which the prepared solution is filtered through gauze (or through a nylon stocking).
- The result is lime milk, ready for use.
Some whitewash masters add salt and drying oil to the solution to increase strength and to prevent the walls from getting dirty later. The proportion is as follows: for 10 liters of solution, mix 100 g of drying oil and the same amount of salt. It happens that the solution turns out to be too thick and in order to correct this, you need to add water to the desired viscosity. In addition, you can add a little blue, which will give the house whitewash lime a snow-white hue.
As you can see, slaking lime is not very difficult. However, it is necessary not to neglect personal protective equipment, so as not to burn your skin and eyes.
Safety precautions when slaking lime at home
Quicklime and the process of slaking it pose a threat to human health.
The interaction between calcium oxide and water is characterized by a violent reaction: a lot of heat is released, the water boils, and the mixture begins to splash in all directions. Before extinguishing lime, it is necessary to protect the skin, mucous membranes of the eyes and mouth, and protect the respiratory tract. To avoid burns, wear safety glasses, rubber gloves and long sleeves.
The procedure cannot be carried out in a room with closed windows and doors. If it is not possible to check the room, you should use a respirator or gauze bandage. To avoid getting burned by the steam, it is best not to lean over the container.
Whitewashing surfaces
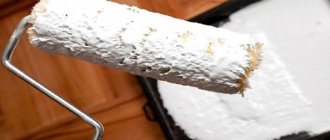
Before you start whitewashing, you need to decide on the tool for the job. Application of milk to the surface is carried out in two ways: with a brush and with a spray bottle. In the old days, whitewashing was carried out exclusively with a brush, but with the advent of modern technologies, the process is increasingly carried out using a spray gun.
Although, if the whitewash area is small, it would be more rational to use a brush, but large areas are better treated by spraying the material. This makes it more beautiful, more uniform and more economical.
The spray gun can be replaced with an ordinary spray gun: electric or mechanical. Since the spray gun is smaller in size than a spray gun, it will be easier to direct the whitewash jet into hard-to-reach places.
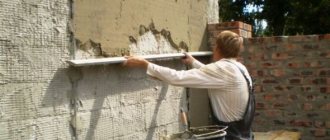
An equally important step will be preparing the surface of the walls for whitewashing. The evenness of the whitewash layer, its strength and aesthetic component depend on this. Dirt, grease stains, rust and old paint with which lime has poor contact are first removed from the surface of the walls.
All cracks are also sealed and bumps are smoothed out. Before whitewashing, all windows, doors, and interior elements are protected with waterproof materials in any available way.
Three useful tips:
- If you bleach with a brush, it will be tedious to soak it in water for a couple of hours. This will prevent brush hairs from falling out and getting on the wall, reducing the quality of your work.
- Lime milk will have better contact with the wall surface if the latter is moistened with water.
- When whitewashing the ceiling, the first layer is applied from the window perpendicular to the light. The second layer is laid parallel to the light (sun rays). This ensures coverage and prevents streaks. The lime layer does not get dirty after drying. What can’t be said after whitewashing with chalk.
Features and recommendations for whitewashing walls with lime
In order to whitewash walls and ceilings, you do not need to have special skills: almost every package of lime contains instructions for use. However, in order to get a smooth and beautiful white surface, you need to know some features of applying lime. So, before whitewashing, the surface of the ceiling and walls must be carefully prepared: remove the old coating and wash thoroughly.
In addition, in order for the lime to lie evenly and not swell, you must use the following recommendations:
- To get the best result, you should use a spray gun. In this case, it is necessary to hold the tool at a right angle. It is better to choose a spray gun that has a compressor.
- The nozzle of the sprayer or spray gun should be kept at a distance of 150-200 mm from the surface. Apply lime from a sprayer using circular, smooth movements.
- Brick walls can be whitewashed with a natural brush. Before whitewashing, the brush must be soaked in warm water for several hours.
- When working with a brush, the second layer of whitewash must be applied in the direction of the light: this way the streaks from the tool will be less noticeable.
- It is highly not recommended to use it for applying whitewash: when rolling the second layer of whitewash, the first one may not hold up, and the lime will move away from the surface.
- It is best to treat surfaces with lime in cloudy weather. So, bright sun rays will not be able to distort the perception, and the coverage will be uniform.
In addition, it is necessary to work in protective equipment. So, you should wear safety glasses over your eyes, cover your hair and skin with a cloth, put a respirator or gauze mask on your face, and protect your hands with rubber gloves.
Advantages and disadvantages
pros
- Low cost of material. Good value for money.
- Kills harmful bacteria.
- Excellent moisture resistance.
- Protects walls from the formation of fungus and mold.
- Does not crack due to temperature changes.
- Environmentally friendly.
- Can be applied to old whitewash.
Minuses
- Caution is required when extinguishing.
- A thin layer of lime is very durable when hardened. Therefore, if it gets on furniture, windows, doors, it is difficult to wash off.
Lime selection
It is known that this rock can be used in slaked or unslaked form. Each of them has its own priority purpose. Quicklime, undiluted lime is in demand in construction, in particular for plastering work, the production of slag concrete, all kinds of coloring compositions, and sand-lime bricks. If you dilute it with water, you get slaked lime, which is used in agriculture to whitewash trees or added to the soil to reduce its acidity.
Related article:
Autumn application of fertilizers on the site
In total, three main compositions on this basis are most often used in gardening:
- fluff;
- lime dough;
- lime milk.
How and why to slak lime for whitewashing
The content of the article:
An excellent building material with excellent characteristics became popular many years ago - lime, or as it is also called limestone. To this day, she whitewashes the house: ceilings, walls and other surfaces. Lime is the most accessible cheap building material intended for repairs. However, you can’t just take it and start working with lime; first of all, you need to extinguish it... It is on this action that the entire further process depends.
Related article: Tiles on a concrete wall
The basis for making whitewash can be different types of stone, for example, limestone or chalk. Disinfecting ability is a unique feature of limestone whitewash. Use of limestone in construction. Limestone is an excellent binder that gives limestone mortar its plasticity. Lime whitewash has made a good reputation for whitewashing various types of premises, these include rooms in a private house, garages, sheds, outdoor toilets, chicken coops and so on. It’s nice to see when the places you visit are white and clean. Lime whitewash helps us with this.
Don’t forget that even curbs and trees are whitewashed with this miracle product. By the way, it spreads perfectly on the surface; if, for example, it rained after the whitewashing process, it was thereby able to level out the layers of chalk. In order for the film to have the property of moisture on the surface, you need to know how to extinguish lime without errors and how to dilute lime for whitewashing. This process is very important, since without it bubbles, stains and all kinds of spots will appear on the whitened area.
"Upgrading" of lime
To make whitewashed walls look impressive and beautiful, especially when work is carried out in rooms, hallways, on the veranda and other places where decorativeness is important, various additives are added to diluted lime before application. Along with blue, which gives the walls a bluish tint in the light, soap, egg whites, glue, salt, liquid glass, and flour are used.
Whitewash can have absolutely any color. To achieve the desired shade, a pre-selected color is introduced into the prepared solution. The introduction of linseed oil into the composition allows lime to be given increased adhesion to surfaces with a poor level of adhesion to paints and varnishes. Thus, lime can be used where other types of finishing are not suitable.
The glue, similar to saline solution, makes the whitewashed wall surface completely non-marking. To eliminate all the shortcomings, which often lead to the fact that whitewash is rarely used in bedrooms, living rooms, and the kitchen, components such as color, salt or glue are introduced into the lime.
Features of limestone, so often used in repairs:
1. Capable of imparting viscosity and strength to ready-made walls of premises.
2. Increases the resistance of concrete to moisture.
3. The low price of lime allows it to be used in various rooms, both at home and outdoors.
4. It is a good antibacterial agent in the cellar, chicken coop and other livestock habitats.
5. Protects trees from the burning rays of the sun.
Reasons why it is necessary to extinguish whitewash.
How to dilute lime for whitewashing? Why turn it off? And is it necessary to do this at all? - these questions, which are often asked by inexperienced home owners, after a while they understand the meaning of all these actions. Limestone can be slaked in several ways. The main thing is to do everything slowly, thinking about every action, then the lime will be extinguished correctly. However, first you need to understand the meaning of the concepts themselves: slaked lime and quicklime. After all, from the second solution a variety of substances are obtained, which differ in their composition and purpose. Often, when we come to the store, we purchase rather large pieces of burnt stone - limestone.
This stone has not yet completed its chemical reactions, so at this stage it is quicklime, but not lime. If you add water to the stone, a new chemical reaction will occur and carbon dioxide will be released, which will be accompanied by a considerable amount of heat. It will not cause a big fire or a small fire, but be careful as there may be burns. Observe fire safety measures one hundred percent. Construction can use fluff and limestone dough, also called milk.
Lime slaking algorithm according to the rules:
1. Prepare a wide, washed pan. We place a large amount of cold water nearby. To get fluff, pour limestone into a container and fill it with enough water. A chemical reaction will occur - the mixture will begin to bubble, splash and become very hot. This is exactly the moment when your accuracy and safety must come first so that you do not get burned. An excellent way out of this situation would be to immediately put glasses on your eyes and protect your hands with gloves. In total, this process can last more than 30 minutes. After which this substance will calm down, and it can be safely mixed with a specially prepared wooden stick.
2. Slaked lime has a special formula in which it is left untouched for several weeks in a cold room. During this period of time, it significantly increases its properties, and subsequently fits perfectly onto the desired surface.
3. According to its preparation algorithm, milk made from lime is no different from fluff milk. However, the most important thing is to choose the right proportions for mixing. In this case, it is necessary to use about 40% water for 1 part of lime from the stone. Its quantity is much less than in the 1st option. Water needs to be poured in slowly, but the main thing is that the extinguishing does not end.
Types of lime by slaking rate
Varieties of lime are divided into 3 groups. The period is calculated from the process of combining with water until the temperature subsides. Kinds :
1. Extinguishing at a fast pace - 5-12 minutes.
2. Extinguishing at an average pace - 13-22 minutes.
3. Extinguishing at a slow pace - more than 25 minutes.
Correct work with each variety separately.
1. Extinguishing at a fast pace. Fill half a pan with limestone and fill it with water to the very edges. When steam appears, the lumps will begin to dissolve. The resulting substance must be mixed with a special wooden stick that has already been prepared and a little more water must be added. When the quenching process is complete, continue to dilute the substance with water until smooth. Afterwards, pour everything into a previously prepared large saucepan or another large container.
2. Extinguishing at an average rate. The process is identical to the first grade in a one to one ratio. The pieces will also begin to dissolve, but do not stop the process, continue slaking until a homogeneous condition is obtained.
3. Extinguishing at a slow pace. Fill a little more than half of the pan with limestone stone, and slowly fill it with water. After the long process of cracking the stones, we also add water in small portions. The result is limestone milk, which needs to be mixed carefully. Unfortunately, not all parts of the limestone will dissolve in the total mass; some will remain; the best solution would be to throw them away. During this action, it is necessary to ensure that there are no calcium and magnesium oxides left in the substance, since their presence will significantly reduce the quality of the whitewash. With direct whitewashing, the result will not be a homogeneous mass, but a mass with pieces, which as a result will worsen the whole picture.
Lime in the field of protecting trees from sunlight. Lime whitewash is not just a product for indoor use; it is used in another interesting area. It serves as a protective substance for the bark of various trees from burns caused by the sun in early spring. As you know, whitewash is white, and it completely reflects the sun's rays, no matter whether it is on the north or south side of the trunk.
Building supply stores sell ready-made mixtures that are notoriously bad when used with wood. After the bark of a tree is whitened with this substance, it is protected for a short period, because after heavy rains it is completely washed off. Therefore, people who care for trees strive to make this solution themselves next time.
Related article: How to install a toilet closer to the wall
For this process, you need to prepare limestone and cold water. The extinguishing should be carried out a couple of hours before the whitewashing. Do not forget to pass the substance through a fine sieve before starting whitewashing. If you use an unstrained mixture, the sprayer will clog almost the first time. But if you use an ordinary brush, there is no need to strain it. In addition to limestone itself, white clay can also be added to the solution. Lime whitewash can further protect the bark from the sun in the spring. In the case of whitewashing with milk, you can add a spray gun to it, but this is not at all necessary, so if you don’t have it, you shouldn’t run to the store. It is not for nothing that lime is the most popular material for repairs; it has also found its use in gardening. The miracle substance is added to various mixtures to increase their properties. Wood trunks are lubricated with milk, protecting them from harmful insects.
Video:
Composition and properties of lime
Lime is a product of calcination of limestone, chalk, dolomite and other minerals, which are based on calcium and magnesium oxides. Previously, heat treatment of rocks was carried out manually to obtain raw materials. Today the material is produced industrially.
Related article:
An old method of propagating trees and shrubs
Slaked (fluff) and quicklime are sold in stores. The latter is a substance that, when in contact with water, releases a lot of heat. Quicklime raw materials are rarely used in gardening: they are too caustic and explosive.
In the process of slaking with water, lime acquires a neutral composition. The material has insecticidal and antifungal properties. It negatively affects the activity of pests, fungi, and pathogenic bacteria, so it is used for spraying and watering plants, whitewashing tree trunks and buildings on the site.
The raw material is alkali and is excellent for neutralizing soil acidity.
For work on a summer cottage, you can purchase the material in the form of a paste or powder, but it costs 2-3 times more than quicklime. If it is not possible to obtain a finished product, you can slak the lime at home.
Good to know: Rules for whitewashing garden trees
How to slak lime for whitewashing
How to slak lime? To answer this question, you first need to understand what the substance is, what types it is and what it is used for. In the periodic table of Mendeleev, this substance is known as CaO - calcium oxide or quicklime. Limestone is one of the popular natural resources in the earth's crust deposits, used by people.
Why do you need whitewashing for trees?
Coating the bottom of the barrel with a protective white layer is used for the following purposes:
- Protection in cold weather from adverse weather conditions and changes in night and day temperatures. In whitened trunks, icing of the bark, leading to the appearance of microcracks, occurs much less frequently.
- The lime component in the whitewash solution prevents pathogens from penetrating into the bark and repels garden pests.
- White color reflects light well and serves as protection against sunburn, including in winter, when the ultraviolet effects of sunlight can be quite aggressive. Overheating of the bark, as well as its icing, often leads to the appearance of microcracks and further destructive corrosion.
- Decorative function, neat well-groomed appearance.
Related article:
How to choose a garden sprayer
How to slak lime: tips and tools
When quicklime reacts with a small amount of water, lime paste is obtained, to which sand and other materials are added. The resulting substance is used in construction to hold bricks together as a binder.
If the mass is diluted with a large amount of water, you get a lime suspension or milk of lime. In agriculture, the suspension is used to treat the bark of fruit trees against sunburn and to destroy the embryos of parasitic organisms that cause diseases. The solution mixed with other substances is also sprayed on fruit trees and shrubs, and whitewashed borders and building walls.
To extinguish lime, do not forget about safety precautions and follow these tips:
- During slaking, lime releases heat. To prevent the container from melting, use enamel cookware.
- The fumes released are toxic to the body and can also cause atrophy of the respiratory tract, so wear a respirator.
- When slaking lime, an ebullient reaction occurs, accompanied by splashing of the substance. To avoid burns, use goggles, rubber gloves and work clothes that cover exposed areas of the body.
- Suppress lime outdoors. If there are windows in the room, open them to create conditions for ventilation.
- During the procedure, stay away from the container until steaming ends.
- When preparing the substance, use a wooden spatula.
The method of extinguishing depends on the purpose of use.
During this procedure, lime paste is used. It is obtained by mixing lump lime with tap water.
The solution is prepared in a ratio of 1:4. Water is added in small, even portions. After the rapid boiling stops, the substance should be stirred well and filtered. After 1 hour, the solution should be left in a dark room for 1–2 weeks.
To whiten trees, a lime slurry is prepared. For this purpose, lime dough is diluted with water. For 1 kg of lime take 10 liters of water. The solution is used immediately.
When slaking lime, the following tools are used:
- enamel container;
- wooden spatula;
- bucket or watering can for water.
Make sure that during the extinguishing process there are no lumps left and the substance of the ball is homogeneous. You can use a sprayer to treat walls, trees, and shrubs. In this case, do not forget to wear a respirator.
In what water should quicklime be slaked?
Water is a catalyst for a chemical reaction that begins after combining with lime. It is necessary to prepare a container suitable in volume, since water is added in a proportion of 1 liter per kg of substance.
Bucket for slaking lime
The reaction is accompanied by intense heating of the mixture and splashes.
Water is used as cold as possible.
Tree trunks can be treated with lime to protect them from ultraviolet radiation and insects. In this case, white clay is added to the solution. Milk is used to treat pests in the garden.
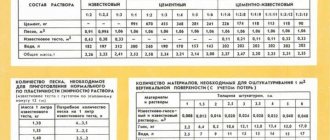
How to prepare a solution for plastering walls with your own hands. How to dilute, composition and proportions
For plastering walls, ceilings and external facades using “wet” technology, various solutions are used, which are usually classified as:
- simple (one-component): lime, clay, cement;
- complex (multicomponent): lime + clay, lime + gypsum; cement + lime.
The components of any plaster mixture are binders, fillers and a thinner (water). In order for the plaster to have sufficient operational strength and be convenient to apply, it is necessary to follow the sequence of preparing the mixture and mix the components in optimal proportions.
Tips for working with lime
Lime is applied in a variety of ways. These can be rollers, brushes, or a spray device. The latter is especially effective if you need to cover a large surface. When working with the latter, you need to take care to protect your body and face, as you can get burns.
Before applying lime, the surface must be completely cleaned of old whitewash, grease, efflorescence, dirt and rust. If necessary, the surface is plastered and primed, cracks and irregularities are covered, and everything that should not be treated, for example, radiators, is covered.
Lime is usually applied in several layers. Moreover, it is much better to apply the next layer if the previous one has not yet completely dried - after one and a half to two hours. This will give you better grip. It is recommended to wet the surface itself before applying the first layer.
Variety of compositions
Lime plaster is a composition that can be prepared with the addition of sand, gypsum or cement. In each individual case it will have its own distinctive features and qualities:
- To prepare a cement-lime composition you will need not only sand and lime, but also M300 cement. Taking 1 part cement, 1 part lime and 3 parts sand and mixing them thoroughly, all that remains is to add water until you obtain a mixture whose consistency resembles thick homemade sour cream. This is a very elastic composition that takes a long time to dry and is not highly resistant to various types of damage. It is easy to work with such a solution, but you need to take into account that it is better to apply it on a solid base. This could be a concrete or brick wall. This solution is used for interior work, but for plastering facade walls the proportion should be changed. You will need 1 part cement, 4 parts sand and only 10% of the amount of cement should be lime. Plaster with lime will be very plastic and quite resistant to the negative effects of precipitation and changes in ambient temperature.
- Lime-gypsum plaster is used when carrying out work exclusively indoors. This is due to the fact that gypsum absorbs moisture well, and a composition made on its basis will not provide effective protection for external walls. The composition applied to the walls is characterized by a high degree of strength, quick drying, and elasticity. Gypsum is added to the mixture in small quantities. Thanks to this additive, the hardening time of the mixture is significantly reduced. However, when preparing the solution, you need to remember that it will have to be worked out no later than in 3-5 minutes, so mix it in small portions and try to finish the work as quickly as possible. It is much easier to carry out all manipulations with a liquid solution, but this reduces the strength of the finished coating.
This plaster is suitable for both interior and exterior use.
- Lime plaster with the addition of clay has been used for many years to create a coating on walls both indoors and on the external walls of houses. Most often, this mixture is used in country estates. Plastering walls with lime mortar and clay is not very durable, so the facade walls of private houses are plastered by adding cement, sand, and gypsum to the solution. This increases the reliability and stability of the coating, reducing the hardening time.
The use of lime plaster to create a coating on interior walls is justified by the ability to perform work on any surface. Wooden walls will not be damaged by rodents and insects, and a mixture with the addition of cement or gypsum will be quite durable.
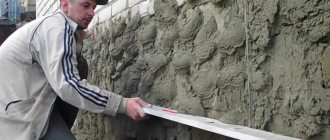
Plastering walls with lime mortar: lime slaking, mixture proportions, application
Mortars based on cement, gypsum or clay with the addition of lime have been known for a long time. With its help, plastic and inexpensive compositions are obtained, which are used for both external and internal work. In this article we will tell you how to make milk from lump lime, in what proportions to make the mixture for plastering and whitewashing, and also consider the application technology.
Using lime dough
In this case, the composition is not made liquid, ready for use, but dough-like. For a standard 10-liter bucket, take 3 kg of quicklime and fill it with 4 liters of cold water. The preparation time for the “dough” is about a day. After this, it is diluted in the required consistency with water and used for its intended purpose.
Related article:
How to drive away uninvited guests: 6 effective ways to protect your country house from rats
How to dilute bleach
Bleach is a well-known disinfectant called bleach. It is widely used in domestic conditions, in industry, medical institutions and in public places that require high-quality bacteriological treatment. Bleach is diluted in different ways, it all depends on the purpose of its use.
To disinfect premises during cleaning, add 30 g of bleach per 1 liter of water. This solution cleanses dirt, fungi and mold, and the surface washed with this solution will become sterile clean.
Bleach is also effectively used to remove the smell of urine from cats and dogs. But it is necessary to take into account that bleach negatively affects the health of animals; its smell irritates the sensitive receptors in the respiratory organs of four-legged pets and disrupts the sense of smell. Therefore, it is not recommended to use bleach in areas where animals live permanently. But if a pet “inherited” it in the wrong place, then safely use bleach. To do this, it is diluted with water in a ratio of 1:10 and the source of the odor is wiped with this solution. It is necessary to work with gloves to protect the skin of your hands from chemical burns. Before work, check the reaction of the coating to a chlorine solution in an inconspicuous place.
Bleach is used to bleach laundry. Bleach effectively removes yellowed items and difficult stains, but can only be used on white items. In this case, there is no need to dilute the powders, since special liquid products are sold for whitening. They are used in the proportion indicated on the package. The laundry is pre-soaked and then washed in the usual way - by hand or in a machine.
Caution: When working with bleach, all safety precautions must be observed. This substance burns the mucous membranes and skin, resulting in ulcers and swelling. If bleach gets on the skin or mucous membranes, you must thoroughly rinse the affected area with water and consult a doctor if significant wounds appear on it.
Preparation of mixtures
The use of lime-sand plaster deserves special attention. A mixture of sand and slaked lime is a classic recipe for lime plaster.
It is necessary to follow certain rules for preparing the solution to obtain a high-quality mixture:
Water is added to the mixture at the last moment.
Knowing how to prepare lime mortar for plaster, you can create a high-quality, reliable, durable environmentally friendly coating on the walls of your country house. Sand-lime mixture is widely used when performing plastering work on clay and stone surfaces.
For plastering brick walls, a cement-lime composition is better suited, even if these are external walls. When performing interior work, choose a lime mortar for plastering walls with the addition of gypsum.
When starting to prepare the solution, first of all, dry mix all the necessary components, adding the required amount of slaked lime.