Manufacturers of building materials offer a large selection of plaster mortars based on different binders and fillers. But the classic cement-sand mixture is still a favorite among both professionals and novice builders.
In order for the work to be productive, you need to take into account some nuances when purchasing CPR components, preparing the solution and applying it to the wall. Let's talk about how to plaster walls with cement-sand mortar quickly and efficiently.
Areas of application of cement plaster
Cement mortar adheres well to brick and concrete, filling even small potholes. The coating is quite smooth, without cracks or large defects.
Cement-based plaster is used for the following work:
- facade finishing;
- plastering and leveling surfaces in rooms without heating (balconies, loggias) or rooms with high humidity (bathrooms);
- sealing seams and cracks of external and internal walls;
- leveling surfaces with large defects and large dips;
- preparing walls for tiles.
By the way, in damp rooms mold or mildew may appear on unfinished cement plaster. In this case, the walls are etched with a neutralizing solution.
For stone and wooden surfaces it is better to use cement-lime mixtures. Ordinary sand-cement ones will not stick to them well.
Why use the thickest layer of plaster?
We plaster the wall of the house with our own hands
When it comes to plastering during construction work, the question arises of how large a layer of mortar can be applied and what thickness is most suitable.
So, the maximum possible layer of plaster mixture is 8 cm, and this thickness is used in the following situations:
- with strong unevenness on the surface of the walls;
- if you need to create an angle of 900;
- if the walls are not parallel.
If, nevertheless, during the work you understand that you cannot do without a large layer of plaster, lay an exhaust or welding mesh, and after each dense tier, give it time to dry, and only then apply the next one.
Advantages and disadvantages
The main advantages of cement compositions include:
- increased durability of the coating: unlike gypsum, it is not so easy to chip or crumble such plaster;
- resistance to temperature and humidity fluctuations;
- durability: even when finishing facades that are most exposed to adverse weather conditions, waterproof cement-sand plaster can last up to 15 years or more without repair;
- high adhesion to most types of surfaces, including concrete, brick, cinder block, stone;
- ease of making the solution: it can be prepared even at home by simply mixing cement with sand and water in the required proportions;
- affordable price: ready-made DSP plasters are 15-20% cheaper than gypsum plasters, and if you mix it yourself, the price will be 2-3.5 times lower.
But cement-based coatings also have a number of disadvantages:
- it is difficult to work with heavy viscous mortar and level it;
- the surface turns out to be rough, so it requires applying an additional finishing layer of gypsum if you plan to paint the wall or wallpaper;
- cement-sand mortar makes the walls heavier, so the load on the foundation will also increase;
- poor adhesion to painted and wooden surfaces;
- It is not recommended to apply cement plaster to plaster - a heavy layer will simply tear it off;
- it shrinks, so if you apply too thin a layer it can crack; The minimum layer is 5 mm, the maximum is 30 mm. If a thicker leveling coating is required, it is applied with mesh reinforcement, plastering 2-3 times, drying each layer.
Tools to get the job done
If plastering technology is chosen for repairs, it is worth considering a number of issues: how to properly mix the components of the solution yourself, what the walls should be like so that the material lays firmly and how best to apply the material and avoid mistakes common to beginners.
Tools for plastering walls
To plaster walls with cement-sand mortar, it is important to prepare tools. Among the things that must be at hand during such work are:
- plaster ladle or trowel;
- spatulas;
- as a rule, a wooden lath is used instead;
- grater and grater;
- building level;
- lighthouses;
- container and shovel with which the plaster components are mixed;
- bucket for water.
Instead of a container for concrete and a shovel, you can use a concrete mixer. In addition to the mandatory ones for some types of work, additional tools are prepared. So, a spray bottle will be more convenient for wetting the wall.
A measuring line or line is required for evenness, and in preparation the craftsman sometimes uses a chisel or hammer to remove ridges and a brush to apply the primer coat.
Composition of cement-sand mortar
The composition of an ordinary cement-sand mortar includes water, sand and a binder - cement, mixed in a certain proportion . The strength of such a coating directly depends on the brand of cement used. Cement M150-200 is used only for interior work, and the more durable grade M300 and higher is used for plastering facades.
Maintaining proportion is very important. If there is not enough sand, the mixture will dry quickly and be less durable after drying. You can use cement without sand only for filling small cracks; this composition is not suitable for leveling coatings.
Using sand that is too fine is also undesirable, because such plaster may crack. The presence of large amounts of impurities in the sand, for example, clay and soil fragments, can lead to weakening of the finish and its cracking.
The quality of the surface also depends on the type of sand used. The ideal option is river or washed quarry sand with a fraction size of 0.5-2 mm. The presence of large grains of sand will make the surface excessively rough. Sand with a grain size of 2.5 mm is used only for brickwork, and coarser sand, up to 5 mm, is used for the installation of reinforced concrete structures.
In addition to the usual CPS, there is light cement plaster, which contains lime and mineral fillers. Due to its porous structure, it has lower thermal conductivity.
To impart plasticity to the solution and increase adhesion to the surface, various plasticizers are added to it. Usually their share in the solution does not exceed 1%. Lime paste also improves the properties of cement.
Specifications
Density. The strength and thermal conductivity of the plaster mixture directly depend on its density. Cement-sand mortars in their pure form, without additives, are classified as heavy and have a density in the hardened state of 1600-1800 kg/m3. This is a fairly durable coating that is used not only for facade or interior decoration, but also as a floor screed.
Thermal conductivity . Due to its high density, the thermal conductivity of cement-sand screed is high. Unlike the more porous gypsum, which stores heat well and has a thermal conductivity coefficient of 0.3 W (m*K), the thermal conductivity of plaster based on cement and sand is 0.9 W (m*K).
Vapor permeability . To avoid the formation of condensation in the room, the walls must absorb excess moisture and remove it outside. Therefore, when choosing a material for wall decoration, such an indicator as vapor permeability is also taken into account. For gypsum and cement mortars it is approximately the same and is equal to 0.11-0.14 in the first case, and 0.09 mg/mhPa in the second.
Drying time . At a temperature of +15-25°C, a layer 2 cm thick will dry in 12-14 hours. As its thickness increases, the drying time naturally increases, so to be sure, it is better not to touch the plastered surface for a day.
This article provides a comparative review of cement-sand and gypsum plaster. It also talks about a mixture of cement and gypsum.
For clarity, we summarize all the characteristics in one table.
Plastering walls in difficult places
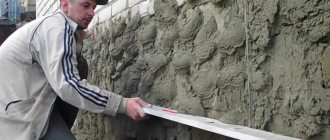
Anyone who decides to plaster walls with cement mortar with their own hands should remember that the most difficult areas need to be worked on last, after the main mortar has dried. Such areas include corners, sections of the wall closer to the ceiling, spaces near pipes and the battery.
When working with a solution with your own hands in the corner of a wall, you must first apply the composition in the usual way. Then the applied plaster should be pressed down with a rule with a cut corner. The reference point in this case will be the first lighthouse. The mixture is applied into the narrow openings between the pipes with a spatula or trowel. In this case, grouting is done with the same tools.
To ensure that the wall covering under the ceiling is even, it is also better to do it the next day after the main plastering work. When leveling the layer, the rule is to place it vertically, and it is better to take as a basis not the lighthouse, but the already dried layer of plaster.
To prevent plastering of walls with cement-sand mortar from cracking during rapid drying, you should use the following methods:
- it is necessary to exclude excessive heat and drafts in the room;
- during work, it is worth moistening the wall and working tools with water more often;
- perform grouting more than once;
- You can cover the plaster with a waterproof layer.
All these techniques increase the drying time of the wall, but at the same time the coating remains smooth and is now able to withstand any adverse influences.
Consumption of cement plaster per 1 m2
When calculating repair costs, you should pay attention to the consumption of plaster. Despite the fact that dry cement-sand mixtures are cheaper than gypsum mixtures, their consumption per 1 m2 is greater and amounts to 17 kg/m2 with a thickness of 10 mm. For example, gypsum per square meter with a thickness of 1 cm requires only 8-9 kg, that is, half as much. The manufacturer must indicate information about how much material is needed to create a layer of a certain thickness per 1 m2.
Let's calculate how much cement, sand and water will be needed to plaster 1 sq.m. The solution consumption rate is 17 kg/m2 (with a thickness of 10 mm). The amount of mixing water per 1 kg of dry mixture is 0.15 - 0.17 l. If for plaster we take a ratio of cement and sand of 1:4, then the mass of the necessary components will be equal to:
- Cement - 2.9 kg
- Sand - 11.7 kg
- Water - 2.4 kg
Preparing the walls
To avoid peeling of the heavy cement mixture from the walls, it is necessary to pre-prepare the surface.
There are several ways: Apply a small layer of tile adhesive to the wall . It is used as an intermediate layer between cement plaster and the wall. Thanks to the additives in its composition, the adhesive has good strength and adhesion. A plaster mesh is placed on top of it, completely covering it. The edges of the mesh should overlap 10 cm. Next, use a notched trowel to smooth out the mesh and embed it in a layer of tile adhesive. After this, horizontal grooves are left with a spatula. When the adhesive solution dries, it will become a solid base for leveling cement-sand plaster.
Reinforcement with metal plaster mesh , rigidly fixed to the wall with self-tapping screws. This is done when it is necessary to plaster fragile surfaces, as well as wooden and clay walls, with a thick layer.
On concrete walls, notches are made over the entire surface . For this, a hammer drill or an ax is usually used. After this, an adhesive primer is applied, for example Betonokontakt.
Wire sheathing is another option for strengthening the wall. Self-tapping screws are screwed into the wall at equal distances or nails are driven in and tied with wire. It turns out to be something like a metal mesh, which is then plastered. This is an inexpensive but labor-intensive method that is more suitable for repairs in small areas.
Before plastering, the old plaster is tapped, loose pieces are removed, and the pits are cleaned with a brush.
The walls of their aerated concrete and other cellular concrete blocks are usually smooth and do not require special preparation. They are treated with a deep penetration primer to reduce the absorption of water from the plaster mortar. Dehydration of cement plaster will lead to its accelerated setting, and this will reduce the strength of the hardened layer.
Preparation of the solution
To finish small surfaces, it is much easier to buy a ready-made dry cement-sand mixture. For larger amounts of work, it is more profitable to prepare it yourself. The most important thing is to accurately observe the proportions.
First, sand and cement are thoroughly mixed without adding water. The mixing proportions will depend on the brand of cement. The resulting cement plaster according to GOST is divided into several grades:
Even the cleanest sand must be sifted through a sieve to remove small inclusions. It is undesirable to use cement that has been stored and caked for too long. If necessary, it can be sifted, removing hardened lumps, and the amount of sand in the solution can be reduced by 1/4.
The liquid is added after mixing the dry ingredients. It is added in small portions, thoroughly mixing the solution each time.
To increase its plasticity and mobility, plasticizers are introduced into it. We have already mentioned this above. The finished solution should be collected in a slide and not spread, while being well distributed over the surface.
Read more about preparing sand-cement mortar for plaster here.
Wall plastering technology
Now let's look at the basic rules for leveling walls with cement mortar:
The walls are pre-treated with a primer to improve adhesion and dried thoroughly;
To create a plane, beacons - guides - are placed on the wall. In small areas they can be replaced with slaps of mortar, the height of which is adjusted according to the level.
A special metal profile can be used as beacons. It is attached to the wall using putty. You can also make beacons from wooden slats or bars; they are attached to self-tapping screws. The main thing to remember is that the distance between the beacons should be 10-20 cm less than the width of the rule that will be used to level the plaster.
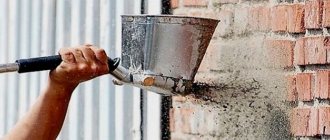
The plaster is applied to the walls with a trowel; to create a layer of greater thickness, you can use a ladle. This first layer is called spray - the basis for subsequent layers.
The second layer should be applied a couple of hours after the first has set . It is placed in the direction from bottom to top, completely covering the previous one. It is more convenient to plaster in small sections of 1-1.5 meters. Then they begin to stretch the plaster and level it with the rule. It is pressed tightly against the beacons and lifted up, while the rule is slightly moved from side to side. Excess mortar is removed from the rule with a trowel.
In this way, they plaster the entire area between the two beacons and move on.
To level small defects, beacons do not need to be used. Plastering in this case is carried out using a different technology. After spraying, the solution is distributed with a large spatula from bottom to top.
A smoother surface can be obtained by additionally covering it with a liquid mixture (second layer). The proportion of the solution in this case will be 1:1 or 1:3 (cement, sand).
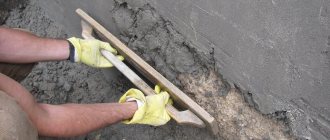
After setting, while the cement-sand plaster is not yet hardened, it is rubbed down . Using a grater in a circular motion, remove small irregularities, grooves and protrusions.
The wall leveled in this way, after drying, will be ready for finishing. Cement plaster dries from 4 to 7 days at normal indoor humidity. For facade work, this time can increase to two weeks.
Beacons can be installed in two ways
- Heaps of cement-sand plaster or putty are thrown onto the surface in a vertical direction. We install a perforated profile on top of them and level it using a level. You can also use the rule to which the level is attached for this purpose. This is done if you have a short level.
- It is necessary to drill holes in the wall, the diameter of which is about 10 mm. The holes are located exactly vertically. Special conical flats made of wood are hammered into them. Now we check their level and, if necessary, level each one. We mount the profile onto these pads, using 25 mm screws. Don't forget to fill the areas between the patches with the solution. This is necessary so that the profile does not sag when you work with the rule. The second method is used if the wall has too serious irregularities.