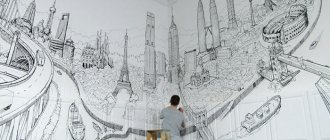
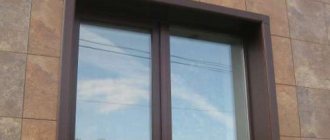
The technology of painting on wet plaster has been used for many hundreds of years; such paintings are called frescoes. In ancient times, they were painted in churches and monasteries, then they could be found in the most prestigious buildings, including palaces. Then it was forgotten and was used only by restorers during the restoration of works of art.
Nowadays, such decor is used in the design of various interiors, including residential ones. How is painting on wet plaster done, and is it possible to do it yourself?
Painting on wet plaster
Features of the work
Despite the high decorative value of such decoration, it is not used too often, even when decorating modern churches. There are several reasons for this phenomenon.
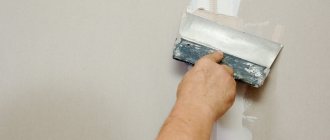
- Difficulty in preparing a special base. Not everyone can plaster a wall with high quality and taking into account all the requirements. Here they use a special recipe for preparing the mixture; in addition, there are subtleties in its application.
- The process is very slow, artists cannot work from a square meter. Painting on wet plaster differs significantly from traditional painting; it is much more complex and requires compliance with many special technological conditions.
- High cost of finishing the premises. One wall costs significantly more than the complete finishing of all surfaces of the room. This makes the use of such drawings inaccessible for the vast majority of our compatriots.
Drawing such pictures on the walls requires great skill and experience.
As you can see, professional painting on wet plaster (frescoes) can only be done by a limited circle of people. But for the decoration of residential premises, all these requirements are not fundamental, so to perform such work it is enough to have a talent for drawing and basic plasterer skills. Well, if funds allow, it is best to hire a specialist for this. Now you can briefly get acquainted with the features of the technology.
The essence of painting
In ancient times, due to the rapid drying of plaster, artists had to act very quickly, but today such painting allows for thoughtfulness and leisure.
Now you don’t need to give the wall a pattern “by eye” at all, since you can slowly come up with a design, draw it on paper, and then transfer it to the wall.
How? To do this, you will need to cut the drawing into separate parts, identical in size to the area being prepared for work for one painting session. Next, you transfer the outline of the sketch onto the newly applied plaster using a needle using the extrusion method.
There is a second way to transfer a design to the wall, using the dusting technique: you pierce holes with a needle along the contours of the design, which leaves marks on the fresh plaster. If you want the base for the image to be white, like a sheet of paper, you can apply a little diluted lime mortar to the finishing primer.
Painting on wet plaster, photo
When you have applied the outline of the design to the finishing area, start working with a soft brush, lightly pressing the bristles so as not to damage the thin layer of plaster.
If you squeeze the brush, there is a chance that some of the lime will rise and mix with the paint, which will turn white when dry.
But a thick layer of paint is completely unacceptable, since it will not be able to be absorbed into the plaster and then, after complete drying, it will certainly crumble and spread. So remember all these points and follow the work process more closely.
Features of plastering
Specific proportions are chosen by the master. In this case, the size of the building, the microclimate in the room, and the peculiarities of using the structure according to the seasons are taken into account. All these factors have a direct impact on the operating conditions of the building and the microclimate parameters in it. These characteristics, in turn, influence the specific composition of the plaster. On average, about four parts of sand are needed for one part of lime, but this is not a specific recipe, but only an approximate recommendation without taking into account fillers and other individual additives.
Preparation of plaster mortar
Plaster is applied in several stages.
Step 1. Wetting the wall. You need a lot of water, the brick must absorb the maximum amount and to the maximum depth. In some cases, this requires several days; the time is determined by the master based on personal practical experience and intuition. The more water the wall absorbs, the longer the plaster will be damp, and this is a very important condition.
Using a wide brush, generously moisten the surface of the wall with water.
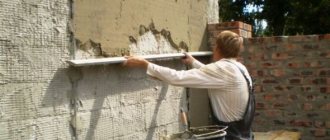
Step 2. Two or three rough coats. They are applied one by one, the total thickness is within 3 cm. Why do you need to make several thin rough coats? This is due to the physical characteristics of the plaster solution. If you immediately apply it in a thick layer, the coating will have many air pockets of various sizes; no amount of trowels can remove them. Air bubbles have an extremely negative impact on the strength and durability of the plaster. According to these parameters, it is already much inferior to cement-based compositions.
Apply a rough coat of plaster
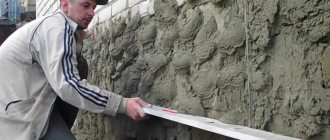
Step 3. Make a finishing leveling layer no more than 4 m thick. Here a solution of only sand and lime is used, there are no fillers. This layer acts as a base; it should be as smooth and uniform as possible. The presence of hemp and brick chips in it does not allow the paints to be evenly absorbed into the damp surface of the wall.
Apply a leveling layer
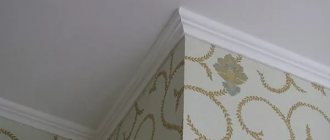
Step 4. Several layers of whitewash with high-quality lime. Such work is carried out by painters immediately before painting. Lime whitewash will replace the canvas for the painting.
The final stage of preparation is whitewashing with lime
Important. The room must be completely free of drafts. While the drawing is being created, windows and doors are tightly closed.
Next, the creative process of painting the mural begins.
Painting on dry plaster
This type of painting is used much less frequently than fresco. Drawing on a dry wall is called Alsecco. For a detailed master class on painting, watch this video:
Paints for painting are based on casein dough
Since the artist does not depend on surface drying processes, this type of work does not require speed of execution.
For painting, paints based on lime and casein dough are used. They are completely safe for health and suitable for decorating children's rooms.
This kind of work can be done by a professional artist or a person who knows how to draw well. Handmade work is unique, it costs more than drawing a picture from a finished sketch.
The surface that is the basis for drawing must be perfectly flat. Be sure to prime the walls before painting.
Before applying the image, the wall surface is moistened. Paints are applied in several layers. Each subsequent layer is applied after the previous one has dried.
Drawing a picture
Step 1. Preparing a sketch. Before starting work, a sketch of the composition is drawn, the details are not drawn, only the outline of objects and people is drawn.
Option sketch for a fresco
Step 2. Transfer the sketch. First, the area is marked and the scale of transfer is determined. The main anchor points are drawn, and the initial drawing is made on them. If the image is small in size, then the sketch is transferred using the pinching method: the paper is applied to the surface of the wall, marks are made with the sharp tip of a pencil.
When transferring a sketch to the wall, the proportions must be strictly observed.
Step 3. Preservation of the drawing. After the transfer, the so-called process of preserving the condition of the wall surface is carried out. The fresco is completely covered with a thin technical film; it adheres perfectly to fresh whitewash. Air bubbles are removed with a sponge or rollers, thereby ensuring a tight fit. This method allows you to keep the plaster damp for a long period of time, and open for painting only those areas that can be completed relatively quickly. Of course, the features of the composition are taken into account; it is necessary to work on the whole image, and not its parts.
Part of the wall is covered with film to prevent the plaster from drying out.
Step 4. The master determines which piece of the picture he can paint in a day and frees the corresponding area of the wall from conservation. The film is cut very carefully with a sharp blade; no marks should be left on the wall. The surface under the film is constantly damp, but not so wet that it interferes with the application of paint. Only an experienced painter can determine whether a wall is ready for work.
To draw the next fragment, part of the film is carefully removed
Practical advice. If for some reason the humidity is insufficient, then it must be moistened with a spray bottle and whitened with whitewash. They are transparent, the outline is clearly visible.
As work progresses, the drawing may change and be adjusted slightly. The writing process must be done quite quickly, the brushes must be soft and not leave marks on the wall. The consistency of the paint depends on the style of the fresco. In some cases it is paste-like, while in others it is liquid and is applied in three or four layers. The total thickness can reach several millimeters.
Paints for painting on wet plaster
On a damp wall, the paints adhere perfectly, and when calcium comes out of the lime, it covers them with a protective film. Russian traditions of painting frescoes involve the use of thick dyes; claims that the drawings are thin and translucent are misleading. The method of work is chosen by the painter; he makes decisions as he works. Drawing frescoes has its own requirements and rules; the master studies them for many years and only after that has the right to engage in such work. You should not hope that you will be able to create a real drawing on a damp wall the first time. Apprentices learn their skills from experienced artists over a long period of time.
Video - Painting on wet plaster
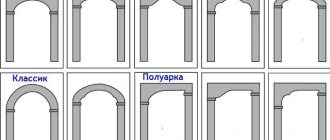
Painting on wet plaster is the most expensive method of finishing a room, and now you have an understanding of the technology of the process. Such work can only be done by professional artists; you can apply only the simplest compositions yourself using simplified technology. Painted walls require an exclusive design of the premises; it should resemble ancient buildings. It is advisable to make all window and door openings arched. On the pages of our website there is a detailed article on the technology of making plasterboard arches; we recommend that you familiarize yourself with its contents.
Technique of wall painting with paints on dry plaster.
Wall painting on dry plaster is called Alsecco. They use paints mixed with raw eggs, glue based, and water. Painting on dry plaster is more resistant to polluted air and dampness. This way you can paint the walls of buildings from the street side.
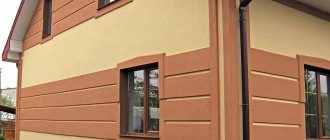
The technique of wall painting with paints on dried plaster appeared later than frescoes. Compared to light translucent frescoes, painting on dried plaster looks bright, colorful, and does not lose its original appearance for a long time.
Wall painting on dry plaster is carried out by artists. Therefore, the facade of a house with such decoration or the interior of a room looks elegant and chic.
What is unique about the alsecco technique?
Recently, wall painting on dry plaster has begun to decorate many buildings, and masters have appeared who are fluent in the specific features of this work. Unlike a fresco, painting an image on a dry wall does not require fast work, since the artist is not involved in the process of drying the wall. After all, the fresco must be applied to a damp surface, which means you need to have time to finish the painting before the surface dries. It is more convenient to paint on a dry wall. Can be done by one artist or a group. This painting technique originated in Europe in the Middle Ages and is still used today. What attracts such pictures?
- Paints are based on natural materials: water, lime. They can be used to paint walls even in a nursery. They are absolutely safe for health.
- Durability. Colors based on natural ingredients adhere well to plaster, do not crumble or fade.
- All details of the picture are carefully recorded.
- Resistant compositions are not afraid of exposure to natural factors or sudden changes in air temperature. The alsecco technique is used to decorate plastered exterior walls and building facades, painting blank walls and solid brick fences.
The technique of wall painting with paints on dried plaster should be well mastered by a person who approaches the matter with soul and has an artistic vision.
Disadvantages of painting wall art on dry plaster.
The complexity and responsibility of the work requires its execution by a real master - an artist. This kind of work is unique, exclusive, and cannot be exactly repeated. Therefore, the cost of finishing will be higher than stencil images. The work will take a long time to complete. Therefore, you can’t count on quickly completing the decoration of a room with wall painting on dry plaster. In order for the artist to work calmly, without haste, discuss with him in advance how long you need to focus on. The functionality of the room may vary. Therefore, such expensive design projects should decorate offices, living rooms, and libraries.
How to prepare a wall surface for an artist's work.
If you want to get the perfect picture on the wall, prepare it well. The wall must be cleaned of old paint or wallpaper. Carefully repair dowel marks or other defects with putty. After this, coat the surface with a primer and plaster again. Achieve a completely flat surface. Once it's dry, prime it again and let it dry. The place for the masterpiece is ready! The subtleties of working with dry plaster are that the material is applied in several layers. Each subsequent layer is applied to the dried previous one.
Types of artistic plaster
Under the definition of “artistic plaster” we need to consider various types of plaster coating:
- decorative;
- textured;
- coating using artistic painting.
Their execution techniques differ slightly, but they all have common performance characteristics that relate to their protective properties:
- this type of coating has the property of repelling moisture without absorbing it from the environment on its surface; easy to clean with water, detergent and a foam sponge or an ordinary rag;
- under the influence of direct sunlight, the color and color scheme do not change, the appearance retains its original state for a long time;
- can be used both for interior wall decoration and for covering building facades due to high frost resistance;
- has a variety of textured coatings both in structure and in decoration;
- decorative plaster is distinguished by its adhesion strength to almost any materials from which walls are made or covered - concrete, plasterboard, bricks, primary plaster based on lime or cement, and others;
- consists of environmentally friendly components without harmful impurities;
- When exposed to open fire, it does not ignite and does not emit toxic smoke.
Application of decorative plaster
You can make paintings from decorative plaster with your own hands. They are placed on the walls and ceiling of the apartment. To work you will need:
- level;
- plumb line;
- different spatulas;
- grater;
- Master OK;
- rule;
- tool for applying relief.
You can apply artistic plaster to the surface with your own hands in the following way:
- the surface is wetted with clean water;
- use a spatula to throw a little plaster onto the wall;
- after filling the entire area, the solution is leveled with a grater;
- Using a level, the correct application of the solution is monitored.
The wooden surface is pre-filled with shingles, which act as cladding. Its cells are 4x4 cm. Before applying the material, they are moistened with water. In some cases, shingles are replaced with mesh to save time. It can be made of various materials: steel, copper, galvanized iron, plastic, twisted wire. The plaster is applied using the usual methods. If you plan to apply a panel of decorative mixture to a section of a wall or ceiling, there is no need to level the last layer. But there should be no large bumps or depressions on the surface.
To make paintings from plaster, you need to have certain tools. The most common of them is a roller, on which there is already a simple pattern or relief. It is moistened in water and rolled over the plastered area. If, after the wall has dried, you also apply paint, you can get a beautiful plaster panel.
The next tool for obtaining relief is a stencil. It can be made in the form of stamps and combs. The design is applied in approximately the same way as with a roller. But these tools cannot be called the only ones. It is quite possible to create a pattern on plaster with your hands, a plastic bag or a foam sponge. The surface must be damp. Artistic plastering of walls can be done using special compounds, which themselves leave their own pattern on the surface. The plaster composition of the bark beetle has a pattern in the form of traces left by the beetle of the same name. Such patterns look great on walls and are especially resistant to temperature changes, humidity conditions, and mechanical stress.
Marble plaster leaves relief paintings on the wall. This method has the following features:
- high strength and durability;
- fire safety;
- resistance to environmental influences.
Fur coat-like surface finishing is often used. It is done by spraying using a brush or broom. As a result, a certain picture or panel of decorative plaster is formed on the wall. Any of the above methods can be used on external and internal wall surfaces. This will not be a painting on the wall, but creating something like this with your own hands is quite simple.
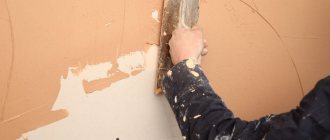
Preparing the surface for painting
Surface preparation is considered the first stage of painting. Its goal is to level the wall with lime plaster and smooth it to almost perfect condition. Traces of the old coating must be completely removed. Old paint or poorly adhering plaster, wallpaper, whitewash - everything that was previously on the wall must be removed.
Today, frescoes are made using a lime-sand mortar, it is diluted in a ratio of 1:4 (1 – slaked lime, 4 – sand). But the finishing layers adhere to different proportions - 1: 2.5 (instead of sand, it makes sense to take powdered grated brick).
Why you shouldn’t take cheap lime for the plastering part of the work:
- it is made from waste and is considered lean, since it contains less calcium oxide and is extinguished more slowly;
- Due to such a slow slaking, as well as a large number of impurities, such lime will cause efflorescence, which means it may subsequently fall away from the wall, forming unattractive smudges in plain sight.
Previously, it was natural for artists to thoroughly wash and stir the lime to achieve complete slaking. But today it is possible to immediately buy pure lime and slak it at home.
The sand that will be part of the solution must be clean. The same river sand is perfect for this. It is advisable to sift it through a medium-sized sieve, because plaster compositions love fine sand, this way you can achieve a more plastic composition.
Plaster surface preparation takes place in 3 stages:
- Spray For lime mortars, a brick wall is considered the ideal base; a concrete one is a little worse. If the wall has wallpaper, everything needs to be removed; if the wall is crooked, it must be reinforced. The spraying itself is carried out either with a trowel or with a pump. The rule is to remove excess. It happens that you can see that the spray will be thick. It needs to be stretched 2-3 times to avoid cracks. And in this case, the reinforcing mesh is placed here (but first you need to get the beacons).
- Primer. Prime the wall when the spray has set a little. The thickness of the solution is important; it is applied to the wall with the same trowel, and it should be ground with a trowel. Excesses are also removed by the rule. This completes the geometric leveling of the surface.
- Cover. For the covering layer, you need to make a more liquid solution; grated brick or fine sand work well as a filler. Moreover, grated brick will still be preferable, since it retains moisture well (and this is advantageous for high-quality setting of the solution). The covering layer itself is small, no more than 2-5 mm, it is applied with a grater.
Hint: in one fresco painting technique you need to apply as much cover as you can cover with the fresco. So, for example, an experienced artist can paint about 7-9 squares (taking into account the complexity of the composition, of course). If there are many small details in the composition, productivity will be lower, which must be taken into account when applying the covering.
Decorative artist Sergiy Gusev talks about preparing the wall and painting.
painting
As you know, lime solution has an alkaline reaction, therefore, when mixing paints, alkali-resistant pigments are needed. What kind of pigments are these: ocher, cinnabar, ultramarine, this will also include manganese peroxide, lemon, umber, as well as burgundy, scarlet, etc. Although in relation to today there is no point in even listing the pigments: there are many more of them. The main thing when buying paints is to look at their solubility in water and their resistance to alkalis.
Attention! The pigment needs to be tested. It needs to be diluted in the composition with which you will work.
For example, in water and lime. And then the pigment is applied to a previously prepared piece of plaster. For beginners, it makes sense to conduct such testing with all pigments.
How the painting itself happens:
- If you are doing wall painting for the first time, it is advisable to make a full-size template on paper. A troublesome measure, but not at all superfluous. The template is subsequently applied to the wall and the master pierces the contours of the main figures of the picture with a needle. This is done so that an imprint of the image appears on the wall.
- After the print appears, you can trace the contours. Usually they start working with light tones, gradually moving to dark ones. Layer-by-layer application works well - this way the finishing layer shows itself more clearly.
- If there is a need to whiten light areas, this can be done with slaked lime. Only then will the primary colors be applied to them.
- If the working day is already over, but you didn’t have time to do everything (and this happens most often), the plaster, which has not yet been filled with painting, needs to be cut off diagonally with a stationery knife. Cut exactly to the thickness of the covering layer - this is done for subsequent masking of the seam.
And a little more about paint. If you decide to paint the external walls, then the best option would be paints based on liquid glass. They are spread on the palette. In contact with lime, liquid glass will give a stable, insoluble texture, very durable. Such paints outperform traditional compositions in many respects.
Old style fresco painting technology
The fact is that fresco as a form of art has not been used in decoration in its classical form for a very long time; instead, so-called “decorative plasters” have become fashionable.
Their advantage was that they did not require special qualifications of craftsmen or a lot of time.
This is due to the complexity of its execution, starting from preparation and ending with the final stages of painting.
We can highlight the following list of painting stages:
- surface preparation;
- transferring the contours of the design to the surface;
- preparation of paint compositions;
- coloring (“cutting”) areas of the picture and background;
- detailed painting (painting of small details, shadows, highlights).
An important point among all this is that at all stages of painting the surface must be damp, that is, the surface of the plaster is not allowed to dry, protecting it from drying by the sun, draft, etc., curtain it with damp burlap after the end of the working day. So, let's talk further about how to paint a fresco, and more specifically, how to paint a fresco on the wall.
Surface preparation
for old-style fresco painting is to level the walls using lime plaster and smooth them almost to perfection (high-quality plaster with plane deviations of up to 2 mm/2 m). After leveling the walls, they are smoothed using sifted lime milk, which is called sandless plaster coating.
Transferring the contours of the design to the surface
performed using the so-called “cardboard” or fresco card.
To produce it, the full-size original drawing is taken (usually consisting of many sheets, since the drawing is large), and the main contours are transferred to carbon paper, after which punctures are made along these contours with an awl.
The finished canvas with pierced contours is leaned against the surface, and by pressing with a cotton swab with coal dust, the contours are interrupted along the pierced holes.
Preparation of paint compositions
happens in advance, before painting the frescoes. To do this, an alfresher (a master of fresco painting) takes the original in color and rubs certain pigments on water, obtaining a different, required tonality/color of paint.
The finished mixtures are poured into sealed containers, designating each main color with a number; the number is also affixed to sections of the contours.
The pigments themselves are natural/artificial alkali-resistant compounds, and they are rubbed exclusively in water, sifted through a sieve No. 0.071 and 0.06 with 6400 and 10000 holes/cm2, respectively, in a ratio of 1:3.
Cutting sections of the drawing
- This is the first stage of painting, which involves painting with primary colors the areas marked with contours on the surface.
To do this, take paint and paint with soft brushes (so as not to damage the wet plaster), first the largest areas, then the smaller ones in descending order.
The important thing in this process is that the started area must be painted at once, excluding breaks; in addition, the work needs to be done in an orderly manner and in stripes if the areas are very large (to prevent overlaps as a result of the paint setting).
Detailed painting of areas
performed over cutting; its essence is the application of small details, highlights, shadows, textures, etc.
Again, soft brushes (squirrel or kolinsky) are used for this purpose. As with cutting, each element must be applied without interruption; the work is such that the possibility of correction is excluded, so you need to work carefully and impeccably.
As for shadows and highlights, in fresco painting there are 3-4 tones of each, that is, the shadow can be deep, medium and shallow. The same is true with lighting effects; there are several tonalities of lightening.
There is another type of fresco - “fresco a secco”
, the essence of which is painting on dry plaster (from Italian Secco - dry) with the same pigments rubbed on water mixed with milk of lime.
The technology is almost the same, however, after the plaster has dried, it is moistened with water and primed with grade 1 lime-lime mixture (MgO2 no more than 3%) – 1; water – 9. The primer is again moistened with water before painting.
The only advantage of this type of fresco is that it is possible to make adjustments and other corrections; for this, the corresponding area is moistened, a primer is applied and painted again. It is worth noting that such a fresco has duller, bleached colors (due to the presence of lime in the paints), and is also less durable than a raw fresco.