Areas of application of cement plaster
Cement mortar adheres well to brick and concrete, filling even small potholes. The coating is quite smooth, without cracks or large defects.
Cement-based plaster is used for the following work:
- facade finishing;
- plastering and leveling surfaces in rooms without heating (balconies, loggias) or rooms with high humidity (bathrooms);
- sealing seams and cracks of external and internal walls;
- leveling surfaces with large defects and large dips;
- preparing walls for tiles.
By the way, in damp rooms mold or mildew may appear on unfinished cement plaster. In this case, the walls are etched with a neutralizing solution.
For stone and wooden surfaces it is better to use cement-lime mixtures. Ordinary sand-cement ones will not stick to them well.
Advantages and disadvantages
The main advantages of cement compositions include:
- increased durability of the coating: unlike gypsum, it is not so easy to chip or crumble such plaster;
- resistance to temperature and humidity fluctuations;
- durability: even when finishing facades that are most exposed to adverse weather conditions, waterproof cement-sand plaster can last up to 15 years or more without repair;
- high adhesion to most types of surfaces, including concrete, brick, cinder block, stone;
- ease of making the solution: it can be prepared even at home by simply mixing cement with sand and water in the required proportions;
- affordable price: ready-made DSP plasters are 15-20% cheaper than gypsum plasters, and if you mix it yourself, the price will be 2-3.5 times lower.
But cement-based coatings also have a number of disadvantages:
- it is difficult to work with heavy viscous mortar and level it;
- the surface turns out to be rough, so it requires applying an additional finishing layer of gypsum if you plan to paint the wall or wallpaper;
- cement-sand mortar makes the walls heavier, so the load on the foundation will also increase;
- poor adhesion to painted and wooden surfaces;
- It is not recommended to apply cement plaster to plaster - a heavy layer will simply tear it off;
- it shrinks, so if you apply too thin a layer it can crack; The minimum layer is 5 mm, the maximum is 30 mm. If a thicker leveling coating is required, it is applied with mesh reinforcement, plastering 2-3 times, drying each layer.
Rules for determining the required grade of sand-cement mass
The technology requires that the brand of mortar matches the brand of material used (brick, blocks). For example, if the masonry is built from brick of grade 100, then the cement mass should be M100. If you follow this rule, the result will be a solid, homogeneous brick structure.
If the grade of material used is high, for example 350, then you should not strive for a match, as this will significantly increase the cost of construction. The generally accepted proportions are 1 part (for example, a bucket) of cement and 3 parts of sand (1 to 3). When preparing concrete for pouring the foundation, 3-5 parts of crushed stone are added to this proportion.
There is a huge range of different types of cement on sale, differing in brand, manufacturer, properties and shelf life. Portland cement is especially popular among professional builders because it is characterized by a high level of water resistance, frost resistance and strength. It hardens well in almost any weather.
Composition of cement-sand mortar
The composition of an ordinary cement-sand mortar includes water, sand and a binder - cement, mixed in a certain proportion . The strength of such a coating directly depends on the brand of cement used. Cement M150-200 is used only for interior work, and the more durable grade M300 and higher is used for plastering facades.
Maintaining proportion is very important. If there is not enough sand, the mixture will dry quickly and be less durable after drying. You can use cement without sand only for filling small cracks; this composition is not suitable for leveling coatings.
Using sand that is too fine is also undesirable, because such plaster may crack. The presence of large amounts of impurities in the sand, for example, clay and soil fragments, can lead to weakening of the finish and its cracking.
The quality of the surface also depends on the type of sand used. The ideal option is river or washed quarry sand with a fraction size of 0.5-2 mm. The presence of large grains of sand will make the surface excessively rough. Sand with a grain size of 2.5 mm is used only for brickwork, and coarser sand, up to 5 mm, is used for the installation of reinforced concrete structures.
In addition to the usual CPS, there is light cement plaster, which contains lime and mineral fillers. Due to its porous structure, it has lower thermal conductivity.
To impart plasticity to the solution and increase adhesion to the surface, various plasticizers are added to it. Usually their share in the solution does not exceed 1%. Lime paste also improves the properties of cement.
Thin-layer facade plasters for insulation
Thin-layer facade plasters are used for finishing external walls on top of a layer of insulation .
This method of insulating and finishing external walls is usually called “light wet insulation” or “bonded thermal insulation system”. Thin-layer plasters are lightweight and place less load on the base they are applied to than others.
The thin-layer plaster solution contains calibrated filler grains. Plaster of one name usually has several composition options, which differ in grain size (caliber). The solutions use grains with a caliber of 1 - 6 mm. The caliber of grain in the solution determines the thickness of the plaster layer. The grain size is indicated on the plaster packaging.
Thin-layer plasters are suitable for finishing other surfaces, both outside and inside. They create a light but wear-resistant protective and decorative layer on the surface.
Thin-layer plaster is often applied over less decorative plaster - cement-lime, cement or heat-saving.
Plaster solutions contain various additives that color the plaster and give it antiseptic properties - preventing the appearance of mold and green algae.
Thin-layer plasters dry quickly. After 2 - 3 days, their surface can already be painted.
Thin-layer mineral plaster
The binder in thin-layer mineral plaster is white cement. The plaster composition is sold in bags, in the form of a dry mixture.
The plaster mixture may contain microfiber fibers, which increase the strength of the coating, as well as hydrophobic additives, which increase the moisture resistance of the plaster.
Mineral plaster is the cheapest thin-layer plaster. The average solution consumption is 1.5 - 4.5 kg/m2.
Thin-layer mineral plaster has the following features:
- Less elastic (prone to cracking) compared to plaster with an organic binder.
- Creates a vapor-permeable coating.
- It gets dirty easily and is more difficult to clean compared to other thin-layer plasters.
- A poorer color palette for painting.
Thin layer acrylic plaster
The binder in acrylic plaster is acrylic resin. The plaster composition is sold as a ready-made solution in buckets. Simply mix the mixture in the bucket and it is ready to be applied to the wall.
The solution contains pigments and mineral fillers of a certain size - caliber in the range of 0.5 - 6 mm.
The consumption of the finished solution of acrylic plaster is 1.5 - 4 kg/m2.
There are acrylic and silicone plaster solutions on sale. The plaster layer from such a solution is more vapor permeable.
The plastered surface may not be smooth, but have a relief (texture), for example, it looks like finely laid pebbles.
Acrylic plasters have the following advantages and disadvantages:
- They have good elasticity - less risk of cracks.
- The coating is resistant to mechanical stress.
- Easy to clean from dirt.
- Paints well with rich, long-lasting colors.
- In conditions of prolonged moisture they easily become overgrown with mold and algae.
- They do not allow water vapor to pass through well.
Silicate plaster
Silicate plasters, also called silicon plasters, contain liquid potassium glass as a base. Ready-made plaster mortar is sold in buckets.
It should be borne in mind that the silicate solution has an alkaline reaction, that is, it can corrode your hands. Plastering work with such a solution is carried out wearing protective gloves and goggles.
Products for construction and repair
⇆
The consumption of silicate plaster is 2 - 4 kg/m2.
Silicate plasters have the following features:
- Create a coating resistant to mechanical damage.
- They allow water vapor to pass through well.
- They have a rich color palette.
- Easy to clean from dirt.
- Resistant to mold, fungi and algae.
- Difficult to apply to the wall; experience is required to obtain a uniform, smooth surface.
- The liquid solution, due to its alkaline reaction, poses a danger to humans.
There are also silicate plaster solutions with the addition of silicone resin - polysilicate (polysilicon) plasters . Polysilicate plasters are more elastic, UV resistant, easier to apply to the wall and safer to use. But they have lower resistance to mold and algae.
Silicone thin layer plaster
The main binder in silicone plasters is silicone resin. Silicone plaster has all the advantages of mineral and acrylic plasters.
The consumption of silicone plaster solution is 1.7 - 2.4 kg/m2. The composition is sold as a ready-made solution in buckets.
Silicone plasters are characterized by the following properties:
- Create a layer resistant to mechanical damage.
- They allow water vapor to pass through well.
- The surface is easy to clean from dirt.
- Easy and convenient to apply to the wall.
- They have a very rich range of colors.
How to choose thin-layer plaster
Final table comparing the properties of different types of thin-layer plasters:
| Property of plaster | Mineral | Acrylic | Silicone | Silicate |
| Porosity | **** | *** | ** | **** |
| Vapor permeability | **** | * | *** | *** |
| Elasticity | — | *** | ** | * |
| Mechanical strength | * | *** | * | * |
| Resistant to dust contamination | ** | * | *** | ** |
| Resistant to mold and algae | ** | * | *** | ** |
| Resistance to chemical air pollutants | * | **** | *** | ** |
| UV resistance | *** | * | ** | *** |
| Color fastness | * | *** | ** | * |
| Resistant to efflorescence and stains when dried | — | *** | *** | * |
| Easy to apply to the wall | ** | *** | *** | * |
When choosing plaster, as mentioned above, be sure to take into account the vapor permeability indicator . The vapor permeability of the plaster layer should be higher than that of the base.
For plastering over mineral wool insulation, plaster with high vapor permeability is chosen. The table shows that mineral, silicone and silicate plasters have good vapor permeability. It is impossible to finish a façade insulated with mineral wool with acrylic plaster.
For plastering on insulation made from foam boards or extruded polystyrene foam, plasters with low vapor permeability can be used. Any thin-layer plaster is suitable for such a façade in terms of vapor permeability.
If thin-layer plaster is applied to smooth walls made of neatly stacked blocks of aerated concrete, gas silicate , then it is necessary to use a composition with high vapor permeability.
Thin-layer plaster is often applied as the top finishing layer for finishing mineral plaster surfaces. In this option, for application, for example, on vapor-permeable light mineral plaster, it is also necessary to use thin-layer plaster with high vapor permeability .
Thin-layer plaster with a high strength index should not be applied to less durable substrates .
When choosing thin-layer plaster, other properties are also taken into account. But this choice is not so critical. For example, a house near a road with heavy traffic is better to be plastered with a dirt-resistant compound with an easy-to-clean surface, for example, silicone plaster.
Or a house on the shore of a reservoir or with a facade heavily shaded by trees can be advantageously finished with plaster that is resistant to mold and algae.
But you can choose other types of plaster. Only then will it be necessary to take additional measures to protect the facade from dust or mold.
Specifications
Density. The strength and thermal conductivity of the plaster mixture directly depend on its density. Cement-sand mortars in their pure form, without additives, are classified as heavy and have a density in the hardened state of 1600-1800 kg/m3. This is a fairly durable coating that is used not only for facade or interior decoration, but also as a floor screed.
Thermal conductivity . Due to its high density, the thermal conductivity of cement-sand screed is high. Unlike the more porous gypsum, which stores heat well and has a thermal conductivity coefficient of 0.3 W (m*K), the thermal conductivity of plaster based on cement and sand is 0.9 W (m*K).
Vapor permeability . To avoid the formation of condensation in the room, the walls must absorb excess moisture and remove it outside. Therefore, when choosing a material for wall decoration, such an indicator as vapor permeability is also taken into account. For gypsum and cement mortars it is approximately the same and is equal to 0.11-0.14 in the first case, and 0.09 mg/mhPa in the second.
Drying time . At a temperature of +15-25°C, a layer 2 cm thick will dry in 12-14 hours. As its thickness increases, the drying time naturally increases, so to be sure, it is better not to touch the plastered surface for a day.
This article provides a comparative review of cement-sand and gypsum plaster. It also talks about a mixture of cement and gypsum.
For clarity, we summarize all the characteristics in one table.
Exterior plaster of the house - types of smooth finishes
Plaster compositions are divided into the following groups:
- Special - such mixtures boast thermal insulation and shielding qualities. Additionally, they protect the house from frost and moisture, have sound insulation properties, and guarantee a decorative appearance.
- Conventional - this finishing composition allows you to make the walls smooth and subsequently treat them with paint, varnish, putty. Most often used for buildings made of block materials. They provide weather protection.
- Decorative – is a finishing layer, used for decorative purposes to add color and/or the necessary structure. Embossed plaster requires experience when applying.
Plaster mixtures are purchased both in finished form and in the form of a powder that requires preliminary dilution.
As for the choice of the composition of the mixture, it depends on the type of finish and conditions of further use, so you can choose either mineral or polymer plaster.
Consumption of cement plaster per 1 m2
When calculating repair costs, you should pay attention to the consumption of plaster. Despite the fact that dry cement-sand mixtures are cheaper than gypsum mixtures, their consumption per 1 m2 is greater and amounts to 17 kg/m2 with a thickness of 10 mm. For example, gypsum per square meter with a thickness of 1 cm requires only 8-9 kg, that is, half as much. The manufacturer must indicate information about how much material is needed to create a layer of a certain thickness per 1 m2.
Let's calculate how much cement, sand and water will be needed to plaster 1 sq.m. The solution consumption rate is 17 kg/m2 (with a thickness of 10 mm). The amount of mixing water per 1 kg of dry mixture is 0.15 - 0.17 l. If for plaster we take a ratio of cement and sand of 1:4, then the mass of the necessary components will be equal to:
- Cement - 2.9 kg
- Sand - 11.7 kg
- Water - 2.4 kg
Preparing the walls
To avoid peeling of the heavy cement mixture from the walls, it is necessary to pre-prepare the surface.
There are several ways: Apply a small layer of tile adhesive to the wall . It is used as an intermediate layer between cement plaster and the wall. Thanks to the additives in its composition, the adhesive has good strength and adhesion. A plaster mesh is placed on top of it, completely covering it. The edges of the mesh should overlap 10 cm. Next, use a notched trowel to smooth out the mesh and embed it in a layer of tile adhesive. After this, horizontal grooves are left with a spatula. When the adhesive solution dries, it will become a solid base for leveling cement-sand plaster.
Reinforcement with metal plaster mesh , rigidly fixed to the wall with self-tapping screws. This is done when it is necessary to plaster fragile surfaces, as well as wooden and clay walls, with a thick layer.
On concrete walls, notches are made over the entire surface . For this, a hammer drill or an ax is usually used. After this, an adhesive primer is applied, for example Betonokontakt.
Wire sheathing is another option for strengthening the wall. Self-tapping screws are screwed into the wall at equal distances or nails are driven in and tied with wire. It turns out to be something like a metal mesh, which is then plastered. This is an inexpensive but labor-intensive method that is more suitable for repairs in small areas.
Before plastering, the old plaster is tapped, loose pieces are removed, and the pits are cleaned with a brush.
The walls of their aerated concrete and other cellular concrete blocks are usually smooth and do not require special preparation. They are treated with a deep penetration primer to reduce the absorption of water from the plaster mortar. Dehydration of cement plaster will lead to its accelerated setting, and this will reduce the strength of the hardened layer.
Heat-saving plaster for facade
Heat-saving plaster is a cement or cement-lime plaster in which, instead of quartz sand, perlite sand or foam granules are used as a filler. Perlite is a volcanic porous rock, like pumice.
Due to the thermal insulation properties of the filler, the plaster layer has a low thermal conductivity coefficient in the range of 0.07 - 0.15 W/m*oK. For comparison, a layer of ordinary cement-lime plaster has a thermal conductivity coefficient of about 0.8 W/m*oK, and for insulation made from mineral wool slabs this coefficient is about 0.055 W/m*oK.
For the heat saving effect to be noticeable, the thickness of the plaster layer must be significant , up to 10 cm. The heat-saving plaster solution is applied in layers of 2 - 4 cm in several passes.
It is necessary to ensure good adhesion of such a thick heat-saving plaster layer to the base of the wall. To do this, a bottom layer is applied to the wall - spray, and reinforced with a fiberglass mesh.
Fiberglass mesh 5x5 mm. It is used to strengthen the plaster layer, protect the applied mixture from delamination and cracking, and prevent deformation of the finish. Its installation significantly reduces the influence of mechanical, humidity and temperature influences. Increases the quality of adhesion of solutions to bases.
Heat-saving plaster is not recommended to be applied to weak foundations or old plaster.
The layer of heat-saving plaster has low resistance to mechanical damage. Finishing with such plaster is not recommended for basement walls and other places that are subject to mechanical stress. Or it is necessary to provide additional protection for such places.
To increase decorativeness and resistance to external influences, it is recommended to apply thin-layer plaster over heat-saving plaster.
The average consumption of heat-saving plaster mortar is 11 kg/m2/cm. To dry, heat-saving plaster needs to be left for about one week for each centimeter of thickness. After which, the facade can be painted.
When using, the following features of facade heat-saving plaster should be taken into account:
- Less resistance to mechanical stress.
- Good permeability to water vapor.
- A thick plaster layer allows you to level very uneven walls.
- The surface of the plaster layer is not decorative enough and often requires additional finishing.
Preparation of the solution
To finish small surfaces, it is much easier to buy a ready-made dry cement-sand mixture. For larger amounts of work, it is more profitable to prepare it yourself. The most important thing is to accurately observe the proportions.
First, sand and cement are thoroughly mixed without adding water. The mixing proportions will depend on the brand of cement. The resulting cement plaster according to GOST is divided into several grades:
Even the cleanest sand must be sifted through a sieve to remove small inclusions. It is undesirable to use cement that has been stored and caked for too long. If necessary, it can be sifted, removing hardened lumps, and the amount of sand in the solution can be reduced by 1/4.
The liquid is added after mixing the dry ingredients. It is added in small portions, thoroughly mixing the solution each time.
To increase its plasticity and mobility, plasticizers are introduced into it. We have already mentioned this above. The finished solution should be collected in a slide and not spread, while being well distributed over the surface.
Read more about preparing sand-cement mortar for plaster here.
Dry mixes
Cement mortar for plastering walls is sold in the form of dry mixtures. The product contains:
- Sand. Individual particles must have a size (or fraction) not exceeding 1–1.5 mm. Mountain sand is ideal.
- Cement. It must be sifted before preparing the mixture.
- Additives that help improve performance properties, including a plasticizer. With their help, the setting time and wear resistance of the coating increase. The plasticizer imparts plasticity to the mixture so that it flows well over the surface.
Kneading
Each dry composition has its own brand, for example, M400. The indicated figure 400 is the compressive strength, that is, it shows the maximum load acting on a square centimeter of the prototype.
Wall plastering technology
Now let's look at the basic rules for leveling walls with cement mortar:
The walls are pre-treated with a primer to improve adhesion and dried thoroughly;
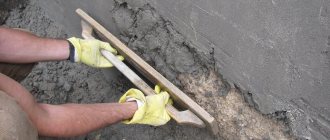
To create a plane, beacons - guides - are placed on the wall. In small areas they can be replaced with slaps of mortar, the height of which is adjusted according to the level.
A special metal profile can be used as beacons. It is attached to the wall using putty. You can also make beacons from wooden slats or bars; they are attached to self-tapping screws. The main thing to remember is that the distance between the beacons should be 10-20 cm less than the width of the rule that will be used to level the plaster.
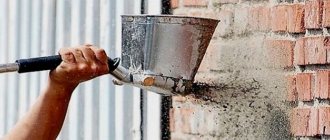
The plaster is applied to the walls with a trowel; to create a layer of greater thickness, you can use a ladle. This first layer is called spray - the basis for subsequent layers.
The second layer should be applied a couple of hours after the first has set . It is placed in the direction from bottom to top, completely covering the previous one. It is more convenient to plaster in small sections of 1-1.5 meters. Then they begin to stretch the plaster and level it with the rule. It is pressed tightly against the beacons and lifted up, while the rule is slightly moved from side to side. Excess mortar is removed from the rule with a trowel.
In this way, they plaster the entire area between the two beacons and move on.
To level small defects, beacons do not need to be used. Plastering in this case is carried out using a different technology. After spraying, the solution is distributed with a large spatula from bottom to top.
A smoother surface can be obtained by additionally covering it with a liquid mixture (second layer). The proportion of the solution in this case will be 1:1 or 1:3 (cement, sand).
After setting, while the cement-sand plaster is not yet hardened, it is rubbed down . Using a grater in a circular motion, remove small irregularities, grooves and protrusions.
The wall leveled in this way, after drying, will be ready for finishing. Cement plaster dries from 4 to 7 days at normal indoor humidity. For facade work, this time can increase to two weeks.
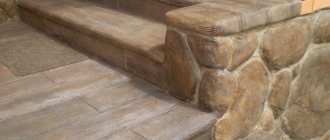
The plaster is beautiful, well-maintained and colorful
Do I need to paint the facade?
Facade paint must be used on walls finished with any mineral plaster - traditional, light, heat-saving, thin-layer.
It is also recommended to paint walls covered with thin-layer plasters. A facade finished with acrylic thin-layer plaster does not need to be painted if the solution was tinted to the desired color before application. The color of the thin-layer plaster solution should be chosen as close as possible to the color of the façade paint.
Painting the plaster makes the color of the facade uniform and more saturated. A layer of facade paint additionally protects the wall from external influences and also makes it easier to clean the walls from dirt.
It is not recommended to paint the facade in a rich dark color. This especially applies to walls with thin-layer plaster over insulation. Dark facades heat up more in the sun, and this causes additional stress in the plaster layer. The plaster on such a facade may crack and peel off from the base.
For information about the correct choice of the type of facade paint, as well as what color to paint the facade and how to paint the facade yourself, read other articles on this topic .
In order for the wall to have an attractive decorative appearance, the surface of the plaster is often given a relief texture.
For mineral-based plaster, using a variety of tools: a spatula, trowel, smoother, brush, broom, board with nails, etc., one or another relief is applied to the surface of the plaster that has not yet hardened.
Using templates or stamps, an elongated relief can be formed on the surface of unhardened plaster: imitation of seams, rustications (parallel grooves), as well as geometric shapes, or any other decor.
To apply relief decor, the thickness of the mineral plaster layer must be at least 1 - 1.5 cm.
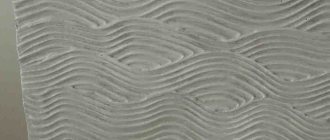
The surface of thin-layer plaster is decorated in a different way. The composition of the solution at the factory includes special additives that allow you to form a decorative texture on the surface, for example - bark beetle, lambskin, fur coat, pebble, shagreen or smooth.
Decorative plasters contain various granular fillers with a diameter of 1 to 4 mm: marble chips, quartz sand, glass chips, mica, which gives the coating an expressive structure.
The texture is determined not only by the size of the grain (crumbs), but also by the technique of applying the composition.
So, for example, a “fur coat” is a lumpy, heterogeneous surface, a “lamb” is smaller “lumps” formed during rubbing with a roller, trowel, whisk or twisted rag.
The effect of grooves eaten into wood by bark beetles is achieved by circular, horizontal or vertical rubbing of plaster containing small pebbles - it is these that create shallow, picturesque grooves.
“Scratches” occur when grouting plaster containing fine gravel; it “crawls away” from the surface, revealing a homogeneous mosaic of densely packed grains of deeper layers.
Thin-layer plasters are more decorative , have a varied surface texture, rich and saturated colors - examples in the figure. For this reason, they are often used as a topcoat for less decorative mineral plaster.