Tile
Not all tiles are suitable for the stove! You need to choose a material that will have heat-resistant properties.
They usually use glazed, terracotta, porcelain stoneware. Tile is strictly prohibited, since it does not adhere to the brick due to the difference in expansion when heated. Tiles are a universal choice, since you can choose different patterns, textures, and surface types. Some types of work can even be done independently, without involving a specialist, since it is simply installed on various surfaces.
Tiles (including ceramic)
Glazed tiles have an attractive appearance; maintaining their surface in proper condition is not difficult. A significant disadvantage of this finish is that during use, the geometric parameters of the stove change during heating and cooling. This means that if installed incorrectly, the tiles will either crack or come off completely. To eliminate such shortcomings, tiles are applied exclusively to plastered surfaces. The firebox must be lined, that is, the inner surface of the furnace is lined with refractory baked bricks, which leads to a decrease in the temperature difference across the outer surface of the furnace.
To cover the stove, you can use both ceramic and tiles: both types of finishes will be an excellent decor for the stove
Recommendations for finishing the stove surface with tiles:
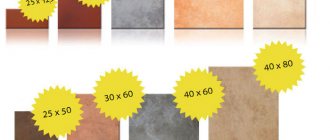
- To reduce the influence of temperature changes, it is advisable to use smaller tiles.
- On the plastered surface, using self-tapping screws and wide washers, you need to attach a metal mesh with 10x10 mm cells.
- To attach the slabs, you should use special adhesives designed for use in such conditions. The price of such adhesive compositions is higher than usual, but they have the necessary properties for operation under the required temperature conditions, while possessing sufficient ductility.
- Grouting the joints between the plates can be done with a regular mixture with the addition of a selected inorganic dye.
When working with tiles, the main thing is to be careful when laying them.
Video: example of decorating a stove with tiles
Facing brick
Kiln facing brick is a fairly heavy and expensive material. The masons who will do the façade masonry also have to pay a lot.
Before starting brick cladding, make sure that the stove has a solid reinforced foundation.
Brick cladding is perhaps the best option if it is possible to make a foundation. It's easy to do and the effect will be amazing. This is a reliable and durable design that will last for many years.
Clinker tiles (like brick)
If you want the stove to be decorated with the design of facing bricks, but you cannot afford it because of its high cost or the absence of a foundation under the structure, you can use special ceramic clinker tiles. It is especially popular in Northern and Western Europe.
This product is made from a mixture of different clays and fireclay with the addition of the necessary dyes. Next, the solution is pressed into molds and subjected to high-temperature firing. Thanks to this, a beautiful low-porosity facing tile is formed, the thickness of which is 9–12 mm. For your stove, you can choose different types in shape and color, since the range of products is huge. Laying is done in the same way as for simple ceramic tiles.
Tiles
This material was first invented by the ancient Babylonians, who also decorated stoves with it. Each tile is prepared individually from ceramics and then covered with glaze with a pre-selected pattern. As a result, you can get a very beautiful and unique stove that will look exquisite. It is believed that tiles produce the most environmentally friendly heat.
Covering a stove with tiles is very expensive and difficult, so you need to call special craftsmen for this, who are not so easy to find. But it’s worth it, because tiles have the highest heat transfer - 0.3 kW more than other materials.
If you have already built a stove, it will not be possible to cover it with tiles, since this must be done simultaneously with its construction.
Another disadvantage of the material is that you need to wait about a month until the solution completely dries and the oven is suitable for use. Thus, tiles are a choice only for those who want to stand out and create a unique interior.
Whitewash
Whitewash is used for decorative finishing of plastered surfaces. The peculiarity of this method is that the stove body can be left white, painted in any color (only heat-resistant paints are used), and an exquisite painting on any theme can be created manually.
Materials and tools
To whitewash a Russian stove you will need:
- rubber gloves, protective clothing;
- mask for the face;
- metal container for solution;
- rollers and paint brushes;
- brush;
- broom.
There are two options you can use as a whitewash solution.
Option 1 of whitewashing requires the use of the following ingredients:
- fluff lime – 400 grams;
- regular table salt – 5 grams;
- clean water – 600 milliliters;
- drying oil - 0.3 tablespoon.
Ready whitewash
Mixture option 2:
- regular salt - 100 grams;
- clean water – 10 liters;
- lime dough - 3 kilograms.
Expert opinion Nikolay Davydov Stove maker with 15 years of experience
Additionally, blue or crushed chalk can be added to the solution, which gives the walls of the structure the necessary shade. Salt also has a strengthening effect on the mixture; it protects the surface from rapid crumbling. This recipe is most often used by stove makers for decorative and protective finishing along with special heat-resistant paints. But, unlike classic whitewash, painted stoves can be washed if the need arises.
Instructions
- Whitewash is applied to cold walls; the main surface must be covered using a wide brush with a length of 230 mm. During work, small areas are treated with water, then they are painted so that there are no streaks left; it is recommended to whiten in horizontal, wide lines.
Tool for the job
- The second layer is applied immediately after the first; there is no need to wait for the solution to dry. But the movements of the second layer must be vertical, this is how maximum density and uniformity of whitewashing is achieved. When working, the oven should be protected from direct sunlight; doors and other metal elements should be covered with paper when whitewashing.
Whitewash application process
- After whitewashing and drying the walls, the doors can be painted with heat-resistant spray paint, protecting the surrounding surface with ordinary newspapers. But this is not necessary and the cast iron can remain its natural black color, which gives the stove more charm and attractiveness. For decoration, the whitewashed structure can be hand-painted using special stencils that do not require artistic abilities.
Whitewashed Russian stove
For painting, you can use silicate paints based on liquid glass, which are applied with ordinary brushes, water-dispersed acrylic compositions, silicone varnishes and enamels. For metal elements, thermovarnishes and fire-resistant paints containing aluminum shavings and silicone resins are recommended.
Use of stone (artificial and natural)
Natural stones used include sandstone and shell rock. They look no worse than tiles, but are much cheaper, and besides, you can do the work yourself. And artificial stone is very affordable.
Some people choose natural stone for this purpose, others prefer artificial stone because it is cheaper, has more variety of options, and the right colors. But the principle of installing them on a brick oven is the same.
We improve the stove in the house: finishing it yourself, photos of finished projects
You are viewing the Finishing , located in the large Stove section.
The finishing of the stove gives it an aesthetic appearance , allows it to retain more heat , and serves as additional protection from external damage .
Various materials can be used as cladding: from plaster to artificial stone. The home owner makes a choice based on personal preferences and financial capabilities.
How to decorate stoves and fireplaces in a private home with your own hands? Finishing methods
A folded stove does not always look complete and in almost all cases requires additional intervention with the help of finishing materials. If for one owner the functionality of the device is enough, and he does not want to cover it with anything other than plaster, then for another, it is important that the guests of his house are amazed by the elegance of artificial stone or correctly selected tiles.
Plaster
This type of finishing involves covering the stove with the same mortar that was used for masonry .
It not only loses to other materials in terms of external components, but also reduces efficiency by 5-10% , reducing the thermal conductivity of the furnace.
The time for heating the walls increases by 20—30%.
Therefore, before applying plaster, you need to think about whether it is worth saving or whether additional investments are possible.
Reference. Plaster without the use of top material looks dull, but it will save significant money if the task is only the practical use of the stove, that is, heating the room.
Whitewash
Our ancestors also whitewashed the stove for each season, since expensive materials were not available to all people. In order to whitewash a stove, you do not need to have great skill. This is the simplest finishing method : lime or chalk mortar . It is important to remember that this type of coating requires a careful attitude on the part of the residents, since the white color is easily soiled.
Coloring
Modern manufacturers produce various heat-resistant paints . It is this type of material that is necessary when covering the surface of a folded stove, since its wall will often be exposed to thermal stress when ignited. If desired, the painted surface can be coated with a special varnish.
Photo 1. Painting the stove with white paint. When lining such products, it is necessary to choose heat-resistant materials.
Is it possible to coat it with clay?
The use of clay mortar to strengthen the stove is justified by the fact that it contains sand , which strengthens the surface of the walls and provides additional protection against chips and other cracks. This type of finishing is not original and is used mainly for practical purposes that do not involve giving the house individuality and implementing design ideas.
Decorative artificial stone: gypsum, acrylic. Photo
Many homeowners want to see their stove lined with stone. But not everyone can afford to buy expensive materials. For these purposes, artificial stone for decoration, which in many properties is not only not inferior to natural stone, but also has additional positive characteristics:
- simple masonry , which even a novice craftsman can handle;
- the laid out stove will not be bulky, because the material is light in structure ;
- saving money when choosing finishes;
- wide choice of shapes and colors ;
- the opportunity to realize various creative fantasies when decorating the interior.
In addition, the material differs in structural diversity:
- Gypsum dough. Externally it resembles natural sandstone and has good strength characteristics.
Photo 2. Finishing the fireplace and the walls next to it with artificial stone based on gypsum dough.
- Acrylic stone . Even more durable than the previous version.
Photo 3. Fireplace with acrylic stone cladding, the color of which resembles natural marble.
- Artificial stone with the presence of natural stone chips.
- Porcelain tiles. It consists of several types of clay, mineral salts, marble chips and pigments. Great resistance to mechanical damage and high temperatures.
Photo 4. Fireplace covered with black porcelain stoneware tiles.
- Heat-resistant composite. The material is made based on concrete, quartz or minerals. In terms of strength it can be compared to granite.
Finishing materials for the kitchen with stove
To transform the kitchen walls, you can paint them with light paint. Gluing washable wallpaper is also becoming popular.
The choice of wallpaper pattern depends on the overall design idea of the kitchen space.
In addition, plastic panels can be a popular finishing material. They are moisture resistant and durable. They do not require special care or installation.
Ceiling finishing
As for the ceiling, you can paint it with water-based paint. You can also cover it with ceiling tiles. Tile patterns come in a wide variety, ranging from simple to complex. You can hang a small chandelier or hanging lamps in the middle. Now this is becoming relevant. Everyone can choose at their own discretion.
Beams on the ceiling add a special effect and are great for a rustic style.
Wall decoration
The walls can be painted any color. The use of drawings made by artists is becoming popular.
Floral patterns on the walls of a rustic kitchen fit harmoniously into a rural interior.
The white color of the walls will fill the kitchen with airiness and create a feeling of large space.
The walls can also be decorated with plaster.
An unusual option is plaster and stone for walls in a country house.
How to line a brick oven
A brick stove in the house can be:
- Paint;
- Plaster;
- Cover with tiles or stone;
- Apply combined methods.
There is a detailed article on how to paint a brick stove in a house. And today, we’ll look at all the other methods of lining a brick oven.
In principle, there are not so many ways to line a stove. The fact is that the facing material must meet technical characteristics and certain requirements.
First of all, the cladding must be resistant to high temperatures. Good conduction of heat. Since we install a stove to heat the room, and not so that it heats itself.
Plastered stove
Previously, our ancestors used to plaster Russian stoves in huts. Even now, in villages they prefer plaster over other finishes.
First of all, because it is the simplest and cheapest way. The oven is covered with a thin layer of mortar. Then whitewash and finishing is ready.
However, if your interior does not copy an old Russian hut, then a stove covered with plaster is not suitable.
Since it is short-lived, too simple, and does not look presentable. So, if you want something more modern, then move on to the next options.
Tile or finishing stone
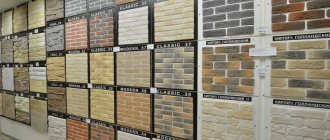
Nowadays, there is a huge selection of decorative finishing materials that have heat-resistant properties.
- Glazed tiles, terracotta, porcelain stoneware, clinker;
- Natural and artificial stones;
- Ceramic tiles.
Tiling
The tiles are quite easy to install and do not require special knowledge or skills. Therefore, if you don’t know how to decorate a brick stove in your house, then tiles are the best option.
Firstly, because there is a large selection of different colors and textures. You can easily select a material that will harmoniously fit into any interior.
Secondly, the tiles are light, strong, and durable. This coating will last a long time. Especially if you purchase a suitable, ready-made mixture for laying tiles on the brick surface of the stove.
Thirdly, if you lay the tiles yourself, you can save a lot of money. The costs will only include tiles and laying mixture.
Natural and artificial stones
Since ancient times, stone has served as a “finishing material” for fires. It is no less popular now.
Natural stone is heat-resistant, conducts heat well, and is durable. Stone is a noble, reliable, practical, environmentally friendly material. Speaks of good taste and high status.
The following stones are used as lining for a brick kiln:
- Sandstone;
- Shell rock;
- Soapstone;
- Marble;
- Granite and others.
Laying natural stone is a little different from laying tile. To ensure that the final result pleases with beauty and durability, it is recommended to hire specialists.
However, now there are many tiles made of artificial stones that imitate natural stone. Artificial stones are much cheaper than natural ones and are easy to install.
They are much lighter than natural stones and in many ways even surpass them in technical characteristics.
Second only to energy and environmental safety. However, when lining the stove with marble or granite, you must prepare for the fact that you will lose some of the heat.
Ceramic tiles
Heat-resistant tiles are made by hand from fired ceramics. Lining a brick oven with tiles is a creative process. At the first stage of work, it is difficult to even imagine what the end result will be.
Such stoves are amazingly beautiful, but the main thing is that they remain functional and retain all the parameters of a good heating device.
The only disadvantage of tiling is the high price and complexity of the work.
Combined furnace cladding options
By combining different materials for finishing stoves, you can get excellent results.
If you still haven’t decided what you can use to cover a brick stove in your house, then think about this method.
By using different materials, combining expensive with cheap, you can save a lot. And at the same time, your stove will have a unique, unique look.
In addition, through the use of various materials, it is possible to increase the heat transfer of a stone stove.
Adhesive materials
As soon as you decide what you can use to line a brick stove, the question of choosing an adhesive mixture immediately arises.
It is recommended not to skimp on glue for facing material. How long the stove will last without repair depends on this factor.
Now in stores there is a wide variety of means for fixing tiles to a brick base.
However, pay attention to products that are resistant to high temperatures. They are specially designed for attaching facing material to stoves and fireplaces.
Methods for diluting the composition may vary. Therefore, before use, carefully read the instructions on the package.
How can you line a brick stove, preparatory stage
The brick oven should be prepared for lining.
- Prime with primer;
- Level with a thin layer of plaster;
- Glue on heat-resistant fiberglass mesh.
After this, let the stove dry thoroughly. After complete drying, you can begin lining the stove with the selected material. Video - how to improve a brick oven in a house.
Decorative or natural stone
Professional stove makers recommend heating and drying the stove thoroughly before covering the stove in the house. The house will be decorated with an evenly laid stove, so it is necessary to strictly maintain the distances between the joints. For stone, this is a width of 1.5 - 2 cm. Laying with stone facing material is no different from tile finishing. There is a difference in the preparatory period.
- Place the stone on the floor in a pattern or design that you would like to see on the surface of the stove.
- Mark the stone.
- Write its number large in the center of each stone.
- Along the edges write small numbers (numbers) of the joining stones.
This approach will prevent confusion in the drawing and will significantly save not only your time, but also your nerves.
In this article we looked at the most basic and common types of stove cladding work. We hope that we have helped you make your choice in finishing the stove in your home.
Stove in a private home - interesting design ideas
There was a time when the Russian stove seemed to disappear from our lives and even began to be considered almost an antique. However, it is impossible to give up good things forever, and now the kind beauty has again found her place in the environment of residential buildings, warming households and giving them the opportunity to cook food, the taste of which cannot be compared with anything else.
Such an object in the house is very impressive, and if the stove looks unsightly, it has a bad effect on the perception of the entire interior. But when it is clean, neat, and even beautifully decorated, a special mood is created in the home. In this case, the owners of the house can only be praised for their hard work and good taste. There are a number of materials suitable for lining a wood stove. All of them are durable and meet fire safety requirements.
Let's take a closer look at the possible finishing options.
Furnace decoration using tiles
There are a lot of varieties of the mentioned material. Let's look at some of them.
Tiles
This finishing method is suitable for those who have the opportunity to spend money. We are not talking about standard flat tiles, but about a special kind of material. Each tile has the form of a plate, complemented on the reverse side by a tiller. This protrusion ensures very reliable fastening of the tile to the base and allows you to retain the heat generated by the stove for longer.
Tiles are a material that was held in high esteem by people back in Rus'. A variety of shades, an interesting relief, an original design (usually done by hand) - all this cannot but attract. A tiled stove adds an element of luxury to the interior
Tiled stove - chic in the interior
Majolica
The tiles came to us from the distant Mediterranean, those places where painting masters create magnificent masterpieces. The raw material for making plates is colored clay. After pressing and two-stage firing, it becomes very durable. The top of the blanks is then covered with glaze and decorated with a spectacular design. A stove decorated in this way will indicate the wealth of the owners.
Terracotta tiles
The material allows you to upgrade the stove at a lower cost, but it has many advantages. Terracotta tiles, in particular, are not inferior in strength to the option described above - majolica. It is also renowned for its exceptional resistance to extreme heat. The tiles are not glazed. Meanwhile, the pores in its structure perfectly store stove heat. The color of this material - from beige to orange - is pleasing to the eye, as it echoes natural shades.
Terracotta tiles on the stove facade
Clinker
This is another worthy material for decorating a home stove. The tile has a very dense structure, so it is resistant to damage. Decorative flaws such as scratches and chips are not a problem for this material. Among the properties of clinker tiles is slow heating, but it also takes a long time to release heat into the room. From a design point of view, the decorative qualities of clinker are important. And this is a variety of colors and a variety of textures. Among the products offered you can find smooth glazed, rough and untreated clinker.
Clinker tiles – strength and charm
The stove is not always completely covered with tiles. Often, only the part where ignition is performed is decorated in this way. Beautiful stove design - a few more ways From tiles, let's move on to other facing materials, each of which is remarkable in its own way.
Stone
This is an excellent option for lovers of antiquity and even primitiveness. In short, a stove with such a design always looks very original. If you decide to settle on a stone, you can choose its type: natural or artificial. The first option is more prestigious, but will be more expensive - it is expensive to extract natural material. At the same time, imitation has its advantages in the form of a wide range of colors and textures.
Lining the stove with stone
Covering a stove with stone will be more difficult than doing the same job using tiles. After all, here it is necessary to adjust elements of different shapes and sizes. But when the labor-intensive process is completed, it will be possible to admire the beautiful design, and, most likely, it will bring joy to more than one generation of the family.
The use of stone in cladding
Whitewash
Treating the surface of a structure with a lime or chalk composition is an old tradition. Such a stove looks snow-white and is a standard of cleanliness and exemplary order. You need to whitewash the stove using dried plaster, which is a clay mixture or a special composition that is sold in stores. To make the whitewash stronger, craftsmen recommend adding salt to it. To ensure a rich color of the stove coating, the solution is applied in layers.
Preparing the furnace walls
Regardless of the material of the oven, the first step is to prepare its surface. There is often damage to the walls. If they are far from ideal proportions, then you will need to level them with plaster. You can use a regular cement-sand mixture in the proportion: 1 part cement - 3 parts sand. To make the solution plastic, asbestos is added to it.
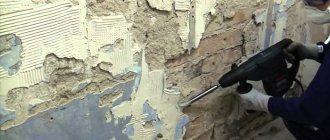
Grease stains and dirt are removed from the oven walls. If the stove has been previously painted, remove the paint with a wire brush. Then the walls are sanded, the seams are rubbed, wiped with a clean sponge, and primed. When facing a Russian stove, it is necessary to unstitch the masonry seams to a depth of about 1 cm. This is necessary in order to fill the seams with glue and improve the adhesion of the materials.
After the primer has dried (5-6 hours), cladding begins. To do this, you will first need to prepare an adhesive solution. To play it safe, some craftsmen use glue that can withstand more than 500 degrees. At home, such temperatures do not exist, and heat-resistant material is expensive.
Focusing on average indicators, it is not at all difficult to choose high-quality, but not too expensive glue. It is prepared according to the manufacturer's instructions. Experienced experts recommend adding table salt to the solution in an amount of 1 kg per bucket. Thanks to the salt, the water will evaporate less and it will be easier to work with the solution.
Laying a metal mesh will help improve the adhesion between the tiles and the wall. It is fixed to the surface with dowels located at a distance of 0.5 m from each other. In those places where there will be strong heating, you can strengthen the fastening. After wetting the wall with water, apply a solution of clay and cement to the mesh: 1 part cement, 3 parts clay and 1/5 part sand. To ensure that the wall is level, the verticality of the lines is constantly monitored with a level. It is recommended to heat the stove after finishing the plastering. Tiling begins after it has cooled.
What is the best way to line a brick stove?
In private households and dachas that want to be habitable all year round, but there is no possibility of central heating, stoves are installed. Modern developments make it possible to create stoves not only for wood heating. But the main material, even now, is brick.
Often such an object occupies a fairly significant area of the house. Accordingly, you want everything to look as attractive as possible. Therefore, a logical question arises: how to reliably line a brick stove? This is not an idle situation that requires a balanced and serious approach.
Cladding materials
In general, the stove is considered the most important object in the house, rightfully occupying a special place. Being a source of warmth, it serves as a keeper of traditions and creates indescribable comfort. That is why you need to make every effort to ensure that the stove acquires an attractive appearance and is not subject to destruction.
The finishing material must be selected with many positive qualities. First of all, it must be heat-resistant and heat-intensive. That is, to keep the surface from heating, but at the same time, to evenly distribute the heat inside the room.
The walls of the stove can be decorated with various types of materials. These can also be coating elements known from ancient times made of special types of clay, which undergo long processing. As well as more modern materials, which are made on the basis of previously used components, but subject to more significant preparation. Let's take a closer look.
A natural stone
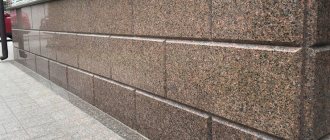
It has been known for a long time and has proven itself as a finishing element for brick stoves. The stone has good performance properties, many of its types are quite cheap. The most commonly used are shell rock and sandstone. Finishing the stove with decorative stone allows you to refine the heat source. The decorative component is very original. The walls of the stove have a very natural look.
In addition to cheap materials, others are also used. Among them is marble. Lined walls, thanks to its external properties, acquire an individual and quite respectable appearance.
Soapstone chlorite
It has several other names (soap stone, pot stone, stove stone). It is a natural material that is formed from a combination of magnesite and talc, subjected to long-term exposure to high temperatures and pressure.
In terms of its appearance, soapstone chlorite is very attractive. The stone does not require additional finishing.
Ceramic tile
This material is a certain type of clay that is processed.
It acquires the following qualities:
- density;
- durability and strength;
- heat resistance.
Ceramic tiles have a significant thickness, reaching eight millimeters. The most commonly used variety is the terracotta variety. It is preferable to choose one that has not been covered with glaze.
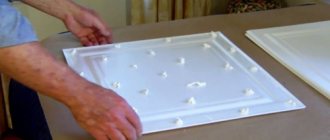
Tiles
Covering the stove with tiles has been used for quite some time, in many countries around the world. Tiles can be classified as ceramic tiles, but they have a significant difference. The fact is that on the reverse side of such material there is a bowl (rumpa). It is due to this that it is possible to obtain a kind of thermal pillow. It is attached to special points reserved for this purpose. The appearance of stove tiles varies greatly.
Minerite or fiber cement boards
This material is suitable for those cases when there is no desire to waste time on laying tiles or assembling a complex protective structure. The plates are mounted directly on the wall or on a specially prepared metal profile structure. In the first option, the plates are simply attached with self-tapping screws or using clamps. With clamps, a ventilation gap of three to five millimeters remains between the wall and the assembled surface, which further increases safety.
The second method is more complicated, but such finishing of the walls near the stove in the house will protect them much better from the heat. On the surface, using a construction stapler, basalt cardboard with a foil coating is attached, with foil inside the room. Metal profiles are attached through the cardboard to fix the external decorative panels. Decorative slabs are attached to the profiles in such a way that they do not reach the ceiling a few centimeters. This gap is necessary to compensate for possible shrinkage of the house. Ventilation holes are made in the bottom of the slabs, which can be covered with a decorative grille.