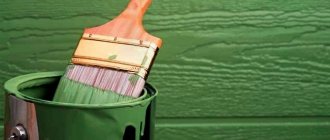
Sometimes, due to basic ignorance of which roller is best to paint the ceiling, beginners take up a brush, consuming even a regular water-based solution per square meter much more than they could. After all, pay attention to how much finishing composition remains between the bristles of the brush, and how much work it takes to transfer at least part of it to the wall. In addition, the roller is different in that it does not smear the paint over the surface, in some places a large layer, in others a smaller one, but simply leaves a mark, an imprint. You just need to choose a tool according to the scope of work.
Required tools and materials
What tools do you need when using a paint roller for a ceiling? When planning to paint, prepare the following materials and equipment:
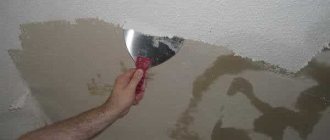
- metal spatula - for puttying work;
- spray bottle - for wetting the base during whitewashing;
- paint container;
- puncher - to remove the old layer of finishing;
- primer – provides better adhesion of finishing materials to the surface;
- putty (finishing and starting) - allows you to eliminate defects and level the canvas;
- a piece of cloth - for wetting small areas when removing whitewash;
- primer – provides better adhesion and prevents the putty from swelling.
Choosing acrylic paint for the ceiling
The best option is a water-based composition based on acrylic resins. The main advantage is the elasticity and good covering ability of the layer. There is a large selection of water-dispersion, vinyl acrylic, acrylic silicone, and other mixtures on sale, the components of which are various copolymers.
You need to choose the composition according to its intended purpose - this is indicated on the packaging of the material. There is also information on product consumption per 1 m2 of surface, and other data necessary for the master. Colored compositions are sold ready-made, but the owner does not always know the shade in advance, so it is easier to buy white paint and tint it with the chosen pigment. To ensure perfect coloring, the pigment is purchased in liquid form.
Based on the type of mixture, they are divided into matte and glossy:
- Matte acrylic paint has the property of visually enlarging a room. Hides minor defects and surface imperfections.
- It is more convenient to cover large areas with a glossy composition and to highlight areas of the ceiling space for zoning the room. In this case, it is important to perfectly level the surface, since gloss emphasizes but does not hide defects.
What else to consider when choosing products:
- The compositions vary in density, decorative, and performance qualities. It is necessary to pay attention to the manufacturer's instructions: paints for dry, wet rooms, rooms with variable humidity.
- The degree of whiteness is determined: super white, white, milky white. It is customary to paint ceilings with a super white composition, but each manufacturer has its own shade of white. To avoid mistakes, you can ask the seller to open the lid slightly and look at the tone; it should match the tone of a sheet of office paper.
Advice! Colored ceiling coverings look advantageous in a glossy version.
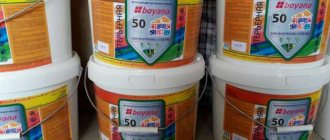
Time-tested product manufacturers: Tex, Innetak, Dulux, Tikkurilla, Caparol, Supermatt.
Preparing the ceiling surface for painting with water-based paint
Before proceeding directly to painting the ceiling with water-based paint using a roller, you need to prepare the surface. To do this, you will need to clean the area of old paint and putty and level it if necessary. Leveling is carried out with plaster.
How to paint ceilings with a roller? Let's look at the step-by-step instructions for preparatory work:
- Cleaning up. The first step is to remove the old finish using a metal spatula and a hammer drill. Cleaning is done down to concrete. If the coating was previously covered with whitewash, then you first need to moisten it well using a spray bottle and a damp piece of cloth. It is recommended to carry out cleaning an hour after wetting the base.
- Padding. Antiseptic substances help protect the base from mold and mildew. Priming also makes it possible to provide the putty with a smoother and more even coating. In this work, you need to go especially carefully in the corners; it is in them that the largest number of moldy fungi and moisture accumulate. The cheapest primer option is white, but you can choose any composition to suit your taste.
- Primer treatment. For better adhesion, experts recommend using polymer primers before filling. If this is not done, the putty may swell and peel.
- Puttying. At the first stage of putty, a starting composition is used, which, after complete drying, must be sanded well. Then apply a second layer of starting mixture and sand the base again. In the same way, puttying is done with a finishing compound, which is rubbed down after drying. If you do not putty, the surface will have defects and irregularities that will be visible in good lighting.
Note! When you paint the ceiling, think about protecting the walls and floor. For these purposes, you need to purchase large polyethylene, which should be used to cover all non-paintable surfaces, and then painting with a roller will be much easier.
Types of emulsion - how does the material affect the choice of tool?
The paint composition is considered one of the first important factors influencing the choice of roller. There are several types of emulsion paint on sale: silicone, acrylic, mineral and silicate. Acrylic paints are considered the most popular. They contain many acrylic resins and latex. The surface treated with this paint is not exposed to moisture, it is easy to wash without fear that the appearance of the coating will deteriorate.
Silicone compositions include resins of the same name. They easily cope with small cracks no more than 2 mm deep. Often such paints are used for coatings that are constantly exposed to moisture. If you paint a damp surface with an emulsion roller, you will be able to get rid of mold and mildew. The only negative is the high cost of silicone paints.
The choice of roller depends on the type of paint
Water-dispersion mineral paints contain calcium hydroxide or cement. They are ideal for painting walls and ceilings, but the service life of this composition is much shorter than that of other materials. The main component of silicate compositions is colored glass. Paints of this type are widely used for facade work. They fit perfectly on brick and concrete walls, as well as plaster. Throughout its entire service life, the paint reliably protects the surface from bad weather conditions.
Types of water-based paints and preparation of the solution
How to paint a ceiling with acrylic or water-based paint using a roller? Before answering this question, you need to consider what types of paints there are. There are the following types of paints and varnishes:
- silicate – not used for treating rooms with high humidity;
- mineral - used for facade work;
- latex - contains special non-toxic resins that give the base shine and gloss.
Water-based emulsion for ceilings is used much more often than oil and acrylic compositions. Such paints and varnishes are less toxic and will need to be diluted with solvents; for this, ordinary running water is used.
The water-based base is resistant to steam and moisture and does not require special care. When dirty, it is enough to remove the dirt with any detergent.
How to properly apply paint to a surface: algorithm
Regardless of the chosen type of coating, the ceiling must be painted in several layers - this is a mandatory requirement. Two or even three layers will allow you to achieve the effect of a uniformly painted surface without bald spots or shade differences. Painting work is carried out according to the following scheme:
- The paint is mixed using a construction mixer or a drill with an attachment, and if necessary, diluted with water.
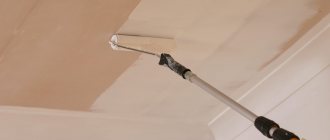
- Prepare a brush, it is better to choose one with a width of up to 80 mm. With its help, the initial painting of the plasterboard ceiling with water-based paint is carried out around the perimeter of the room in the areas where the walls adjoin the ceiling. This is necessary for the convenience of working with a roller in the future.
- The paint is added to the painting tray using a roller, and the composition is evenly distributed over the surface of the ceiling in the direction opposite to the window.
- After the first layer of paint has dried, apply a second one perpendicular to the first.
Following simple rules for performing painting work will allow you to paint the ceiling correctly even for those who are doing it for the first time. Experts recommend:
- paint a surface of more than 40 meters in square strips with a working width of up to 80 cm;
- do not touch the areas where the paint begins to dry out with the roller;
- start each new layer by finishing the joints of the walls and ceiling around the perimeter.
You can evaluate the result of the work carried out just a few hours after the last layer has dried. A flashlight or portable lamp is suitable for this. By illuminating the surface at an angle, even minor flaws can be seen. Especially obvious ones will require correction with localization and repainting of the surface in problem areas.
Correct selection of roller
What is better to paint the ceiling: with a roller, brush or spray gun? If we compare these three tools with each other, the roller has the following advantages:
- the roller does not leave streaks or streaks;
- the roller allows you to carry out repair work in a short time;
- the roller does not absorb a lot of decorative liquid;
- the roller allows you to paint a large area;
- When using a long handle, it eliminates the need for a stepladder.
How to choose a roller for painting the ceiling with water-based paint? It is necessary to understand that not every tool is suitable for this type of work, because when using a roller to paint the ceiling without streaks, it must have certain characteristics.
Which roller is best to paint the ceiling with water-based paint? Nowadays, there are many different paint rollers available on supermarket shelves. One of the most important characteristics of the tool is the size of the fur coat and the material of the pile. The pile of the device is made from sheepskin, plush, synthetics, foam rubber and terry.
When deciding which roller to paint the ceiling with water-based paint, you need to take into account the coating of the tool. A roller with a sheepskin coat is most suitable for these purposes. It allows you to minimize liquid consumption and create an even and smooth coating.
Note! The sheepskin roller is suitable for all types of surfaces and all types of paint. Their only drawback is their high cost. A budget option is terry and plush. Although such rollers are short-lived, they are much cheaper.
An important role in the question of how to choose a roller for painting the ceiling with water-based paint is played by the length of the pile. Long pile makes it possible to create a smoother surface, small fibers form bubbles and a relief texture on the base.
Which roller is best for creating a high-quality finish when painting a ceiling with water-based paint? In this case, it is not recommended to use foam rubber devices. They are affordable, but have a high consumption and are short-lived. However, you will not be able to avoid splashes and streaks when painting the ceiling using a foam roller.
The most durable is considered to be a roller with reinforced bristles that are not subject to deformation.
Determining which roller is best for painting the ceiling
In order to immediately cover all the materials from which the nozzles installed on the clasps are made, let’s look at how the rollers are classified by Finnish manufacturers, this will be more clear. So, there are only 4 main groups. The first includes all polyester-based materials: the familiar foam rubber, vestan or faux fur, as well as the more durable yellow vestan. The second group consists of natural materials: felt, rubber, mohair, velor, as well as goat, sheep or llama fur. The third group is polyacrylic products: modacryl, Kanekaron, Meryl (many people are even unfamiliar with these materials). The fourth and last group contains polyamides: nylon and perlon.
Secrets of perfectly even coloring from professionals
How to properly use a water-based paint roller when treating a ceiling? In such repair work there are some nuances, the observance of which allows you to achieve an ideal result. In order for the base to be streak-free, it must be painted correctly; the roller also has its own instructions for use:
- The last layer of paint and varnish composition must be applied in the direction from the wall to the window. This measure will allow you to completely avoid the boundaries of the stripes, since the light falling from the window will make them inconspicuous.
- If you missed an area when applying a layer, you should not paint it separately, as this will only make the surface look mottled. In this case, it is better to treat the base with an additional layer over the entire area.
- To avoid the appearance of unpainted areas, when applying a layer, it is enough to examine the surface with additional lighting - a flashlight or light from a chandelier. The best solution to this problem would be the help of a second person who can regularly review the quality of the finish and monitor your work.
- No need to skimp on primer. In this way you can avoid peeling and strong absorption of the finishing material.
- You should paint quickly so that the paint composition does not have time to dry. The average duration of application of one layer of the mixture over an area of twenty square meters is twenty minutes. Otherwise, the paint will dry quickly and absorb tool fluff, which will certainly affect the appearance.
- To create a coating with a beautiful pattern, you should use a device with a pattern. This measure is also suitable for areas with defects; due to the pattern, they can be smoothed out and ensure a fairly even coating. But that's up to your taste.
There are practically no difficulties in such a process and even a beginner can carry it out if he follows the recommendations outlined and has a competent approach to the matter. But if you doubt your abilities, it is better to turn to professionals who will ensure the coating quality, durability and aesthetic appearance.
Choosing a paint roller
Choosing the right roller helps prevent streaks. The design includes a clasp that holds the handle and a cylindrical nozzle. The length of the part may vary. Sometimes the clasp is supplied without a core. This roller is used to apply paint from a short distance. The user can select the handle of the required length.
When choosing a means of distributing finishing material, the following parameters are taken into account:
- Pile adhesion force. If, when you try to pull the threads, they are pulled out, you should not buy such a tool. When using the attachment, lint remains in the paint.
- Diameter. A large cylinder can capture a large amount of coloring composition. At the same time, the weight increases, which makes repair work difficult.
- Presence of joints. Nozzles made of artificial materials have evenly spaced pile. Products with large distances between threads cannot be selected. When using them, dark streaks remain.
Roller classification
Tools for applying water-based material are made from different materials, including:
A long-pile synthetic roller is the best choice in terms of price/quality ratio.
- Foam rubber. Nozzles are used to distribute thick finishing materials. When using liquid compounds, they get wet, which causes smudges to appear.
- Synthetic with long pile. The cylinder absorbs a small amount of paint, evenly distributing the composition over the surface. When using this material, spots or streaks do not form. The finishing agent is applied in a thick, even layer.
- Natural fiber. The nozzles have a long service life. They do not leave lint or smudges. A sheepskin cylinder has a higher cost.
Video: Painting the ceiling with water-based paint without streaks or streaks
You can watch a video about painting the ceiling with water-based paint with your own hands using a roller at the link:
How to properly paint a ceiling using a roller? To ensure an even coating, you need to choose the roller wisely, taking into account all the nuances of the base. Also, do not forget about some tricks that will allow you to create a perfectly smooth and aesthetic canvas. To do this, you must follow the following recommendations:
- When processing, windows must be tightly closed to prevent warm or cold air from entering the liquid;
- The corners must be worked with a brush;
- Apply paint quickly but carefully;
- Do not skimp on primer and putty;
- Apply the finish evenly with a roller;
- Carry out all preparatory work carefully and strictly according to the instructions.
Only in this case will you be able to create a canvas that will please the eye and serve you for many years. After all, painting the surface with a roller is quite simple; you just need to follow the instructions provided and follow the recommendations of specialists.
Painting a plasterboard ceiling - 4 aspects for an ideal result
Before painting a plasterboard ceiling, it must be prepared very carefully. The appearance of the structure directly depends on this, so this part of the work must be treated responsibly. We will analyze the process in detail so that you can not only carry out the work, but also choose high-quality paint and good tools. There are no small details in the work, every nuance has an impact on the final result, so mistakes and miscalculations are unacceptable.
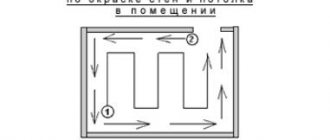
First, I’ll tell you about such an important aspect as correct application of paint; the last layer should always lie along the direction of natural light. But at the same time, it’s not worth applying all the layers in this way; it’s better to alternate directions, then the surface will be covered much better and much faster
To make it clearer, below is a diagram in which everything is shown clearly;
If you just paint over them, then ten layers may not be enough, especially if the ceiling is light, to cope with such troubles, you need to use a special composition - “Dulux Trade Stain Block Plus”, this is a special primer that is very easy to use: When it comes to painting work, then the question of what paint is best to paint the surface comes to the fore. Let's look at the most popular and popular options; for clarity, we present the information in table form.
Preparatory activities before painting
Preparing the surface for painting
It is necessary to prepare the room by covering the remaining furniture and floor with film or other available materials, securing them with low-adhesive tape.
Prepare the ceiling surface by freeing it from any remaining wallpaper or whitewash.
In order to clean the whitewash, you need to thoroughly moisten it, and then scrape it off with a spatula, and then rinse it with a sponge.
If the ceiling was previously painted with water-based paint, only the peeled off areas are cleaned.
After cleaning the surface, you can proceed to leveling it and priming it to ensure the paint adheres to the surface.
It is necessary to select a container for pouring paint into it according to the size of the tool.
If a stepladder is not provided for work, you need to prepare an extension of the roller handle in the form of a telescopic tube. With its help you can reach anywhere.
To paint corners and other hard-to-reach places, use a flute brush with a thickness of 3 cm. Just like a roller, it does not leave streaks or streaks, providing a high-quality result.
Having completed the preparation, we move on to the next stage, this is painting.
Tricks for carrying out painting work
For beginners, experienced painters can give some advice:
- Corners should be worked with a brush, since only specialists can easily operate a roller on any surface.
- If you stay in one place for a long time, it will turn out that one path will already begin to harden, and when you hit it with a roller with fresh paint, swelling may form, so your actions must be clear and fast.
- To keep the layer clean, it is better to call a second person who will ensure that all areas are processed without gaps.
- If you notice that you overlooked an area somewhere and did not paint it, then under no circumstances apply paint to one place. Wait for the complete layer to dry and go over the entire area. This way you will protect yourself from a stained ceiling.
We recommend: How to choose a protective mask for painting?
It is no secret that it is not so difficult to carry out finishing work yourself without calling a team. A certain amount of skill and patience is enough. If this is your first time deciding to do a home renovation with your own hands, then before moving on to painting the ceiling with a roller with a built-in extension, practice on a piece of wallpaper or on the wall. This way you will find out a comfortable handle length and learn how to hold the tool correctly.
Paint the ceiling with a roller
Most often, the ceiling is painted with a roller: it takes too long to do it with a brush, and not everyone has a spray gun. Painting with a roller is moderately convenient, not expensive, and such painting does not take much time. By choosing the right roller, you can paint any ceiling evenly and without smudges. Convenience and quality of work largely depend on the tool, and therefore you should choose a roller for painting the ceiling very carefully. By what criteria it is selected, and the intricacies of working with it, you will learn in this article.
Main characteristics
Roller dimensions
Paint rollers are intended not only for painting, but also for whitewashing, as well as priming various surfaces. This tool is very lightweight, easy to use, and convenient. The size of the rollers is large, medium and small. Professional painters usually use large rollers, since such a tool requires a certain dexterity and skill.
The most common are standard rollers of medium length, about twenty centimeters. Anyone can use them, be it a professional or an amateur. And the smallest rollers are designed for painting places where it is difficult to reach: behind pipes, along joints, in the corners of the room. Although a regular brush is more often used for this. If you have never painted a ceiling yourself, feel free to choose a medium-sized roller; with its help you will do an excellent job with any painting.
Types of nozzles
The attachment of a paint roller can be different:
- foam;
- velor;
- thread;
- fur.
Each material is different in its own way, for example, painting a ceiling with a fur roller will be completely different than with foam rubber. The properties of materials need to be known for a more accurate choice when purchasing.
Foam rubber nozzles are now considered the least popular, although not long ago they were very popular. Their problem is that when applying paint, small bubbles appear on the ceiling, and this greatly spoils the appearance. In addition, they strongly absorb paint, which begins to drip during operation, and the foam itself quickly wears out. They are best used for varnishing surfaces or applying glue.
Velor roller attachments paint well, are suitable for any paint, do not wear out for a long time and are resistant to solvents. Their disadvantage is that the material absorbs some of the paint, which means the roller has to be dipped into the paint often. Thread rollers are the most stable and comfortable, they are of the highest quality. You just need to work with them carefully - they splatter paint. Fur tips are the most popular. This material absorbs paint perfectly and completely releases it when stained, while it is stable and creates an even, monochromatic coating. The disadvantage of fur attachments is the lint remaining on the ceiling.
Other criteria
But choosing the roller size and nozzle material is not enough. When deciding which roller you need to paint the ceiling, immediately pay attention to the quality of the tool. The nozzle should hold firmly on the handle, not dangle or fly off. There should be no visible seams, thickenings, or heterogeneous inclusions on the coating itself. It is unacceptable if threads or individual fibers stick out from the cover of the nozzle.
We recommend: Spray gun for powder painting. Diagram, technology of operation of the sprayer and several examples of such equipment.
Having selected a suitable roller, be sure to hold it in your hand, this will help you understand how convenient the tool is. Then lightly pull the lint - a high-quality roller will not pull out the lint. In addition, it is worth squeezing the nozzle a little in your hand; if it is deformed, such a roller is not worth buying. By the way, professionals always recommend buying not one roller, but several, or even better, buying one handle and several attachments for it of different sizes. If suddenly one nozzle begins to paint the ceiling poorly, becomes clogged with paint or leaves lint, you simply replace it with another.
Preparing the surface
In order for the roller to leave an even, uniform mark, the surface of the ceiling must be as smooth as possible. You cannot paint directly over whitewash or old paint, otherwise, when painting, the old coating will get wet and begin to stick to the roller in whole pieces. High-quality painting of the ceiling with a roller requires the same high-quality preparation.
So, first the old coating is removed. It must be removed very well so that the remaining pieces do not protrude from under the new paint and spoil the entire look. After this, a primer is applied and the resulting voids and cracks are sealed with plaster. The next stage is puttying, with which the ceiling is completely leveled and smoothed. The preparation of the ceiling is completed with another primer, after which the ceiling can be painted.
Process technology
Since the ceiling surface is completely prepared, all that remains is to paint. For this you will need:
- roller with spare attachments;
- paint bath;
- a piece of clean rags;
- dye;
- ladder;
- telescopic handle for roller;
- paint brush.
If the ceilings are not very high, you can do just fine without a stepladder; you will only need it when painting corners and hard-to-reach places where you need to paint with a brush. We will paint the rest of the area with a long-handled roller. This will save time and a lot of effort, because the stepladder needs to be moved often, which means you will often have to get down and get up again. Of course, when the ceilings are too high, the long handle will not be so comfortable, it will be difficult to hold, and it will not always be possible to see the surface well. Painting defects may appear, and this is undesirable.
There are tricks to painting the ceiling with a roller. Firstly, proper coloring starts from the corners, where you need to use a brush. The joints between the surface of the ceiling and the walls are also brushed. It is inconvenient to work with a roller in such places; stripes or stains may appear. If there is stucco on the ceiling or other decorative elements, we also use a brush here. And only after all the difficult places have been painted, we take a roller.
The roller should never be completely submerged in paint. After this, the paint splashes, drips and leaves streaks and smudges on the ceiling. First, the paint is poured into a paint bath, then you need to dip the roller halfway and carefully roll it over the grid so that the pile is evenly saturated and the paint does not run off. When the roller is saturated, put on a long handle and begin applying the first layer.
High-quality painting requires applying paint in even, parallel stripes. Each strip overlaps, covering about ten centimeters of painted space. It is not recommended to be distracted and delay the work, otherwise the paint will dry out and marks will appear at the joints of the strips. Therefore, each layer of paint is applied as quickly as possible. The paint needs to be rubbed well with a roller so that it applies thinly enough. As a rule, the ceiling is painted in several layers, and the next one can be applied only after the previous layer of paint has completely dried.
In order for painting the ceiling with a roller to be flawless, the layers of paint must be perpendicular. That is, the first time we apply the paint in the direction of the windows, the second layer is made perpendicular to the first. Thus, the entire area of the ceiling is carefully painted over, acquiring a uniform shade. If during painting you see streaks of paint, carefully blot them and go over with a roller again. If such a defect is noticed late, and the paint has dried out a little, you need to leave it until completely dry, and then sand the area.
By following these recommendations, you can paint the ceiling well without outside help. This process is not at all complicated: after the first painting you will have the necessary skills and you will be much more confident in your abilities. Good luck with the renovation!