Gypsum tiles for brick interior decoration: advantages and disadvantages
Gypsum is a lightweight material that, if necessary, takes on the required shape, structure, and relief. The use of this material in decorating the interior space of a room is a simple, financially feasible and physically feasible task.
Advantages of gypsum stone finishing inside a building:
- A wide range of products differing in texture, price, size and appearance.
- Relatively low pricing policy.
- Natural compositions.
- The ability to customize finished tiles to suit the surface features.
- Simple design, wall mounting.
- Light weight of the finished product, which allows it to be used on any surface without the risk of wall deformation.
Disadvantages include such features as moisture absorption, lack of resistance to mechanical damage and crumbling. However, such disadvantages are insignificant, and during operation the material will not require labor-intensive care. If necessary, you can replace damaged burst tiles with new ones without compromising the integrity of the wall.
Gypsum tile design
Interior gypsum wall tiles complement the chosen style and help give the room personality. Visually, the material is divided into the following categories:
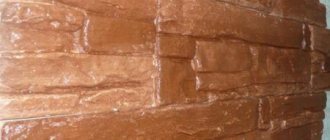
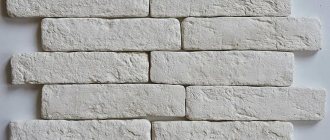
- Under the brick. The more carefully designed the shape in which the tile is made, the more realistic the tiled surface will be. Thanks to its small thickness, imitation brick saves space, and the variety of shades allows you to choose decor to suit any style and any size room.
Variety of brick decor Source pinimg.com
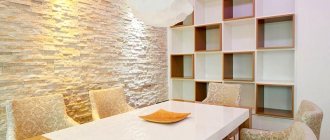
- Under a stone. The tile reliably replicates the relief of hewn natural material and is externally indistinguishable from natural minerals. For internal cladding, a material that imitates wild stone, slate or quartzite from various deposits is often chosen; This is why the offerings on the market are so varied in surface appearance and shades.
- Under the tree. Material with the texture of tree bark looks expressive in the decoration of living rooms. Here, not only the surface detailing is important, but also the choice of color palette.
Stone decor in the dining area Source remontbp.com
- 3D tiles with geometric, mosaic or abstract front surface. Material with a three-dimensional effect is used to create accent surfaces, while the interior acquires a touch of unusualness and exclusivity.
- In addition to materials that imitate natural textures, tiles with a smooth surface or with a pattern are available for sale. Unobtrusive geometric or floral patterns are used as a pattern, which are easy to fit into different interior styles.
Wood accent wall Source aviarydecor.com
How to properly lay gypsum artificial stone under a brick
Installing gypsum tiles on the wall is not a labor-intensive process that will only require time and patience. The main thing is to follow the recommendations for decorating a wall or part of it.
Leveling the base
The first thing you should pay attention to before laying a gypsum wall is the evenness of the surface. Of course, you can also lay it on uneven walls, filling the holes with an adhesive mixture, but in this case, the consumption of expensive glue increases, and it is also possible for the tile itself to crumble, which bursts when pressed.
Therefore, before laying gypsum bricks, it is worth leveling the wall with putty. After applying the putty and letting it dry, you should sand the surface and apply a primer for better adhesion. After all the work, you can start gluing the gypsum tiles.
What to glue on: choosing an adhesive mixture, what to glue with
Depending on the area to be treated, the size and color of the gypsum tiles, it is worth choosing a separate version of the adhesive mixture on which the tiles are attached to the base. Today there are several options for fixing gypsum on walls:
- Dry semi based on gypsum and cement. If you choose dry mixtures for preparing a solution for gluing yourself, then you should pay attention to the composition of the material: cement is not recommended for use on light-colored tiles without varnish treatment for the reason that they will absorb moisture, take longer to dry, and possibly become deformed during work . The gypsum base is safer to use, but will require certain skills on the part of the worker. If the technology is not followed, the tiles will absorb water, becoming soggy over time. Popular manufacturers of dry mixes for gypsum tiles are Perlfix, Litokol K, Satyn PKG-28.
- Liquid nails or sealant. It is possible to glue gypsum tiles to sealant or universal glue such as “Dragon”, but the process is unreasonably labor-intensive. In addition to the fact that each tile needs to be sanded to form uneven surfaces for better adhesion to the wall, it also needs to be held for at least 2-3 minutes, which unnecessarily increases the duration of installation of the entire wall.
- Ready-made gypsum-based mixtures are the best option out of all existing ones. This glue has the outward consistency of very thick white sour cream, is applied with a special small spatula, adheres to any surface in a few seconds, and dries for up to 24 hours. In terms of price, such mixtures are more expensive than all previously mentioned ones, but the advantages of working with them are much greater:
- quick adhesion to the surface;
- no need to hold one tile for more than 3 seconds;
- the seams of light-colored tiles can be sealed without using special grout;
- powerful adhesion after complete drying;
- there is time to correct already attached bricks: if within 10-20 minutes after gluing it is necessary to correct a set brick, then this can be done without effort.
Can it be combined with wallpaper?
The advantages of finishing with gypsum bricks are not only the attractive appearance of the room, but also the ability to combine materials for wall decoration. The tile, chosen for combination with wallpaper, emphasizes and shades the walls, complements the room with accents, and, at the same time, is a self-sufficient material that looks on any surface.
How to lay decorative bricks on a flat wall
A smooth, ideal wall is the best surface for decorating with artificial plaster stone. The tiles, having an average size of no more than a standard brick, when laid out on the wall, create a holistic image, a single canvas without seams or gaps.
To glue decorative bricks to the wall, you need to:
- Rub the inner smooth surface of the tile with sandpaper to remove irregularities and protrusions from the hardened plaster. A peculiar relief surface is formed, which is better attached to the wall, holding the glue.
- Apply a thin layer of glue with a special spatula (which usually comes with the finished mixture inside the jar). The layer of adhesive solution on the tile should not exceed 0.2 mm, otherwise it will take a long time to harden.
- Place the tile against the wall, pressing it slightly with your hands for adhesion, hold for 3-5 seconds and release.
- Spread the side seam of the tile on the wall for adhesion to the subsequent brick.
Thus, make the design of a brick wall from gypsum in the quantity in which it is necessary. Bricks can be cut, combined, matched and broken to create an uneven edge on the wall.
Installation of stone: sealing joints
After the wall is completely decorated and frozen, you can begin decorative work to give integrity to the canvas. To prevent gaps between the bricks from being visible from different angles, it is worth using grout for the seams. There is a huge amount of colored grout in the store, but if there is any glue left that was used for installation, you can use it. To prevent the adhesive solution from standing out and hardening into white spots, you can add the color of the required shade to it. In this case, it is worth remembering that the color when drying will be several tones lighter than that of the wet mixture.
Related article: Installation of heating radiators in houses and apartments
It is recommended to seal seams with your fingers without using a spatula. To do this, apply a small amount of glue to the seam, rub it, and wipe off the remaining residue with a cloth. Do all the grouting in this way.
Gypsum tile manufacturing technology
An assortment of shapes and colors of cladding is presented on the building materials market by various manufacturers. In industrial production, plasticizers are added to the raw material mixture to ensure the strength of the products; The gypsum solution placed in the molds is subjected to additional firing.
When purchasing cladding, pay attention to the composition of the products: gypsum should be marked G-16, G-18, G-19, and the presence of plasticizing additives is also desirable.
Insufficient strength is indicated by the shedding of material on the back side of the product with little friction.
You can make decorative elements yourself: the technology is not particularly complicated, and the materials are affordable.
The home manufacturing process includes the following steps:
- preparation of forms;
- mixing raw materials;
- pouring and drying;
- finishing of products.
Preparing forms
Matrices for pouring raw materials can be purchased in specialized stores or made with your own hands:
- assemble the base and formwork from laminated chipboard, secure the connected elements with self-tapping screws and coat the cracks with silicone;
- apply markings and glue to the base of the model (in the form of stone or brick) so that the distance between the sides and forms is at least 15-20 mm;
- cover the surface of the models and the wooden base with two layers (with an application interval of 1-2 minutes) of Vaseline or special lubricant;
- mix the silicone compound with the catalyst and fill the model with the composition;
- within a day the form is ready for use.
Instead of a compound, you can use silicone sealant, but workpieces made from this material quickly lose their appearance and stretch. Acrylic sealant is not suitable for making molds.
Mixing raw materials
- prepare the components in the following proportions: gypsum (6 parts), slaked lime (1 part), warm water (at the rate of 0.7 parts of liquid per part of gypsum);
- Combine dry materials in containers and gradually pour in water, continuing to thoroughly mix the solution with a construction mixer (at low speed) until it acquires a paste-like consistency.
Pouring, drying and finishing
- coat the mold with grease and fill it with the resulting mass, level the surface with a spatula;
- place the matrix with the blanks in a dry, ventilated, darkened room for a day;
- remove the frozen tiles and sand their surface with sandpaper.
REFERENCE! If during the mixing process a large number of air cavities have formed in the mass, carefully move the template several times from side to side, when the bubbles come to the surface, remove the top layer of the mixture with a spatula.
Advantages and disadvantages
Surface cladding made from gypsum tiles has the following advantages:
- the low weight of decorative elements allows installation on any surface;
- environmental friendliness of the material;
- soundproofing properties;
- simplicity and ease of installation;
- if necessary, it is possible to replace individual elements;
- possibility of self-production;
- the thermal conductivity coefficient of gypsum elements is low, which gives a feeling of pleasant warmth upon tactile contact;
- creating a comfortable, soft interior color.
Flaws
- the material is highly susceptible to impact loads and requires careful handling;
- low moisture resistance;
- impossibility of installation on wallpaper.
How to glue gypsum stone: ideas for the interior
Interior design in an apartment using plaster walls allows you to decorate a room without using unnecessary furniture. At the same time, they began to increasingly use stone finishing instead of the previously familiar walls and wardrobes.
How to lay it in the hall
If the room is not spacious enough, then you should not clutter it with unnecessary furniture. In the living room it is enough to place a large corner sofa, a coffee table, and decorate one wall with brick in warm sandy shades.
It looks interesting to decorate with plaster stones on one wall with design elements for the side corners of the hall. You can also decorate the side corners near the entrance by decorating the entrance to the hall with conventional stone columns.
Ideas on how to glue stone in the hallway and living room
Decoration with artificial stones is possible not only in the hall, but also in the corridor and living room. You can use individual design elements as several bricks along the edge of the wall at the entrance, and also decorate a small amount above the door. The stonework looks interesting in the form of baseboards near the floor.
Design options for the bedroom and nursery
In the bedroom and nursery, partial decoration of one wall is used to contrast with the main shade of the space. It is important to take into account such features as the predominance of calm, soothing shades for the rest room. It is better to use a combination of light sand stone and yellow shades, light green walls and white bricks with an antique effect.
How to care for stone
Caring for gypsum stone will not require much effort on the part of the housewife. All that is required is to periodically wipe off the dust from the varnish base. It is worth noting that if bricks with an aging effect were used in the interior, then the dust on them is not visible as on dark varnished bricks. The varnish, in turn, protects the plaster from moisture.
Gypsum bricks for decorating a room are the best budget solution. With the help of such inexpensive materials, you can create a cozy interior in any corner of the house, and all that is required to design an interior solution is imagination, time and compliance with installation technology.
Material advantages
Decorative gypsum brick is practically no different from natural stone. In its production, only environmentally friendly materials are used: sand, cement, water, gypsum. Therefore, this material does not emit harmful toxins and does not cause allergic reactions in consumers.
Its advantages include:
- light weight. This makes it possible to use it even on fragile interior partitions;
- simple processing. If necessary, decorative stone can be easily sawed with hand or electric tools;
- resistance to negative factors. It is resistant to direct sunlight, high humidity, and sudden temperature changes;
- ease of care. It is easy to clean with various means, dust and dirt do not settle on its surface;
- high sound insulation qualities;
- long service life;
- bending and compressive strength;
- pleasant texture that is soft to the touch;
- wide color palette.
Using decorative gypsum bricks, you can decorate a room in any style. The positive qualities of decorative stone include its appearance.
Advantages and disadvantages
The popularity of gypsum tiles for interior decoration is due to its following advantages:
- Light weight. Gypsum tiles are lighter than other finishing materials. This means that it minimally loads the base and can be used for cladding the thinnest partitions; When laying it, you do not need to use reinforcement.
- Availability. Gypsum is a common mineral in nature, relatively easy to process, so the tiles are cheap.
Ceiling plaster decor Source design-homes.ru
- Easy installation. The tiles can be laid on any surface and do not require adjustment; if necessary, it can be easily trimmed with a hacksaw or jigsaw. For masonry, glue or liquid nails are used.
- Environmentally friendly. The material is based on natural ingredients, so the tiles do not emit substances that affect human and animal health.
- Microclimate adjustment. Gypsum is a porous material, so it is able to absorb excess moisture and release it if the air in the room becomes dry.
- Performance characteristics. The tile has good soundproofing qualities, it is durable and fire-resistant.
Modern style bedroom interior Source hzcdn.com
- Design possibilities. A significant advantage of the material is its realistic surface texture and variety of colors and textures. On the market you can find products that imitate any type of stone and brick.
The main disadvantage of gypsum decorative tiles to look like stone or brick is their poor tolerance to moisture, temperature fluctuations and mechanical influences (a careless blow can cause a chip or crack). The surface lined with relief material is quite difficult to care for. To protect the decor from dust and dirt, it is coated with a layer of special varnish, which means additional expenses.
Wall design in the living room Source archilovers.com
Tools and accessories for installation
Having decided to use gypsum bricks in the interior of your home, you need to prepare the following tools and materials:
- plastic container;
- pallet;
- hacksaw or grinder;
- plain and notched spatula;
- building level;
- roulette;
- paint brushes;
- file;
- pencil;
- primer;
- electric drill.
Now you can proceed directly to preparing the surfaces to be treated.
Preparing walls and laying gypsum bricks
Preparation of the working surface is one of the most important stages of work.
- The treated surfaces are inspected for the presence of: stains, dust, old finishes, moisture, fungus.
- Next you need to get rid of all large irregularities using putty.
- The surfaces are coated with several layers of primer for better adhesion to the material.
- According to the instructions, the tiles are dipped into the primer solution for a certain time.
- A composition of tiles is laid out on the floor in advance. It is better to use bricks from different boxes, mixing them during installation.
- If necessary, we adjust the material to the required size, cutting off excess edges.
Before you begin laying decorative stone, you must carefully read the manufacturer's instructions. All work is divided into the following stages:
- Surfaces are prepared.
- The amount of material is calculated.
- The adhesive composition is selected.
- The material is prepared (sawed and adjusted to size). All cuts are cleaned with a file.
Decorative bricks must be laid only on clean and dry walls. Old finishes are removed and cracks are repaired.
Primer of walls
Before decorative treatment of walls, they must be primed. To do this, the base surface is cleaned of debris, dust and dirt. All cracks and defects are sealed with putty and cleaned. You can apply the material to surfaces using:
- paint brush;
- roller;
- spray bottle.
When working with primer, your hands should be protected with gloves. It is also recommended to wear safety glasses, a respirator or a medical mask.
When choosing a primer, you need to pay attention to the type of base. Walls can be made of various blocks, bricks, monoliths. On top they are treated with cement mortar or putty. For brick, monolithic or block walls, as well as for surfaces treated with putty, universal materials are suitable:
- acrylic;
- perchlorovinyl;
- based on minerals.
The advantages of mineral primers include:
- environmental friendliness;
- quick drying;
- ease of use.
Perchlorovinyl primers are suitable for working with concrete, plaster and metal. They fit well with tiles and gypsum materials. The material is applied to the surfaces to be treated in 2 layers. The drying period is from 15 minutes to an hour.
Acrylic-based primers are universal, suitable for treating surfaces of all types.
Before applying the mixture to the walls, the bottle with primer should be shaken well. Priming is carried out carefully and carefully. After applying the first layer, the material should dry. Then you can apply subsequent layers.
Choosing a mounting mixture
The construction market offers a wide selection of mounting mixtures for decorative bricks. This can be either ready-made glue or special dry mixtures:
- silicone glue;
- acrylic sealant;
- gypsum mixture with PVA;
- liquid Nails;
- cement dry mixtures;
- putty;
- mastic;
- polyurethane foam.
Experts in the construction industry recommend using special gypsum glue or putty for installing decorative stone.
When choosing a mounting mixture, you should consider the following factors:
- wall type;
- tile composition;
- type of masonry;
- scope of application.
Related article: Maximum layer of putty on the wall
If you choose glue, then it is applied to the base of the decorative tiles and to the wall. Thus, better adhesion to the surface is achieved. The gypsum brick is glued with glue within a few seconds.
To glue gypsum stone to brick, concrete or plaster, it is worth using special gypsum assembly adhesives. Their composition is dominated by alabaster and plasticizing additives.
When choosing an adhesive, pay attention to the ingredients from which it is made. It is better to choose mixtures that do not contain white quartz sand. Because it impairs adhesion.
Preparing the mixture
If you purchased a dry mix for styling, it must be prepared according to the manufacturer's instructions. Pour the mixture into a container with water and mix thoroughly with a construction mixer or drill with a special attachment.
The ratio of water and glue should be as specified by the manufacturer. If the proportions are not observed, the consumption of the mixture increases and the strength of the connection decreases.
It is necessary to stir the glue until it becomes homogeneous so that there are no lumps in it. The finished mixture should resemble a thick paste.
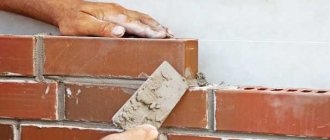
Installation technology
U
The laying of gypsum bricks is carried out according to the following scheme:
- Before laying gypsum bricks, preliminary markings are made on the walls. To do this, use a pencil, ruler and level. To lay the material on the walls evenly and neatly, horizontal lines are drawn.
- It is recommended to lay the cut material at the bottom of the walls.
- The installation process starts from the corner and gradually moves to the center of the room. Laying can begin either from the top of the wall or from the bottom. If the stone is laid from top to bottom, the material is less dirty with glue.
- After marking, the adhesive solution is applied to the walls and tiles using a notched trowel. Its layer should be no more than 4-7 mm.
- After this, the material is applied to the working surface and aligned with the markings.
- The brick is pressed to the surface, the remaining glue is wiped off.
- All cracks are sealed with the same adhesive.
The following tiles are covered with glue and attached closely or at a short distance from the rest.
According to the installation technology, gypsum bricks can be laid with or without gaps. If you decide to leave gaps, you will need to use special liners. They can be purchased at the store or made independently from scrap materials.
Sealing seams
Joining the joints gives the wall a finished appearance and protects the masonry from destruction. Since the grout prevents moisture from entering, leading to peeling of the tiles. To seal joints, you can use grout from different manufacturers. It can be colored or white. To seal the seams, it is recommended to use a special gun or you can use a plastic bag. The seams are filled with a thickness of 6-10 mm.
After the composition begins to dry, use a spatula to level the seams to a perfectly flat surface. The grout is left until completely dry, and the residue is removed with a dry cloth or brush.
In conclusion, it can be noted that gypsum brick is an attribute of almost every design renovation. To do the work on your own, you need to stock up on materials and tools, learn installation technology and have some free time.
How to prepare a surface for laying gypsum tiles
Laying decorative gypsum tiles for interior decoration requires preliminary work aimed at preparing the surface with which to work. The procedure must be carried out in stages with mandatory adherence to the order of the stages and all recommendations that are provided:
- The first thing to do is level the surface. To eliminate defects, you can use putty, which can effectively eliminate even the smallest cracks;
- then the surface is cleaned of dust and dirt with water and left until completely dry;
The process of laying gypsum tiles is carried out in stages, with mandatory compliance with all recommendations
- after this, you can move on to working with tiles, first of all, paying attention to the issue of sorting them and removing defective products whose shape does not meet the requirements.
Important! During the work, it is recommended to refuse to use elements that have any defect: chips, cracks, etc. Otherwise, this may negatively affect not only the appearance of the installation, but also its strength.
If only solid gypsum tiles are not enough to decorate the surface, you can cut out the missing elements yourself. To do this, you can use a hacksaw.
Among other tools that may be needed in the process of laying decorative tiles is a drill, which is necessary in order to make the holes necessary for laying communications. And also sandpaper, if you decide to resort to the wet installation method. It is used to increase the level of adhesion of the back side of the tile.
Due to its relative lightness, the tiles do not create a strong load on the walls
Technology and nuances of laying decorative bricks on the wall
For several years now, decorative stone, namely brick, has been used in the interiors of apartments and country houses for wall cladding.
This material is sold at any hardware store. Customers have access to tiles of any color and size, which allows them to decorate the walls in the room. The main advantage is that the material can adhere to any wall made of any material, and the result will be similar to real brick.
The artificial material contains perlite, sand and expanded clay, although there are other types. Before you start decorating the walls in your house, you need to know what to glue gypsum bricks to and how to glue decorative bricks correctly.
Finish coating
In order to ensure a long service life, it is worth applying a topcoat.
This can be done after 24 hours from the end of installation so that the glue has time to set. If the room is damp, you should wait a little longer. After this, you will need to wash the stone with a wet sponge and clean the seams. Next, you will need to dilute the grout of the required shade and grout the seams so that they do not stand out against the background of the overall picture. It is better to take the grout a little darker than the stone - this way you can create an interesting and unusual design.
If something goes wrong during grouting, the coating can be washed off with a damp sponge. At the end of the work, wipe the surface with a dry cloth. After this you can enjoy the result.
Today you learned what to glue gypsum decorative stone to and how the methods of gluing it differ depending on the surface. This is not too difficult to do, so even if you are not an expert in repair work, the result will not disappoint you, and the process will be exciting and interesting.
Features of the material
Decorative masonry material is in great demand, because it has many advantages over natural brick. Artificial bricks are created from different materials, which are presented in the table:
| Material: | Description: |
| Clinker: | The clinker material is durable and the surface is wear-resistant. Sold in different colors. Can be used as a finishing material for interior and exterior work. |
| Gypsum: | Gypsum bricks are fragile, but they are light in weight, which makes it possible to stick the material onto plasterboard sheets, plywood and other weak materials. The blanks are made white, but during production they are painted or the person himself will paint the brick in the desired color. |
| Polyurethane: | This brick is lightweight and is often used to decorate walls in a house or apartment. Often sold in white, but pigmented materials are also available. |
| Styrofoam: | Foam materials are intended only for cladding inside buildings. The material is very light and fragile. |
To decorate the walls inside, it is recommended to choose the best option - gypsum brick. It will be cheaper than clinker and even more so than porcelain stoneware. Gypsum is stronger than other polymeric materials and is natural. Gypsum tiles are easy to make with your own hands by mixing water, gypsum and PVA glue. After pouring into the mold, the facing material should dry and it can be used for work.
Plaster in modern design
Gypsum is a natural mineral that has been used in construction for thousands of years. It is known that the ancient Egyptians already held together the blocks of the pyramids (including the pyramids of Cheops) with gypsum mortar. Later, gypsum began to be used for castings and impressions, making surfaces of any shape: ceiling cornices, bas-reliefs and other decorations.
Today, the use of gypsum has become more diverse. Natural material is mined in quarries, subjected to heat treatment and crushed into powder. Depending on the fineness of grinding, construction (alabaster) or molding gypsum is obtained; Medical gypsum is obtained from highly purified raw materials.
Beige brick in a classic living room Source pinwin.ru
In the design of premises, gypsum ceiling parts, cornices and chandelier sockets are widely used, but decorative gypsum tiles are the most widely used. It is used for finishing walls and ceilings and is called decorative artificial stone.
Tile decor is suitable for decorating any room, from the living room and office, to the kitchen and corridor. With its help, they create furniture elements, decorate fireplaces, niches and arches. The material is interesting because it is able to accurately convey the relief and texture of natural surfaces. Therefore, varieties that imitate stone and brick are especially successful.
Design of a doorway Source design-homes.ru
Tools and material calculations
Before gluing gypsum bricks to walls, you need to prepare tools and calculate the amount of material. To calculate, it is necessary to measure the length and height of the walls on which the installation will take place and multiply the resulting values. Door and window openings are removed from the resulting number in order to reduce costs. After calculation, about 10% is added to the total value for the reserve. Knowing how much material is needed, it is necessary to take into account that it is flat and angular, which is used at the corner of the room.
Tools for laying decorative stone
To work you will need:
You may need a hand tool in the form of a saw for cutting bricks. The adhesive composition is sold differently, depending on where the brick walls are being finished: inside, outside. The glue can be dry or liquid, in the form of a paste. Additionally, crosses are purchased so that the seam is even everywhere.
Laying decorative bricks with your own hands (video)
Wall decoration with gypsum decorative bricks
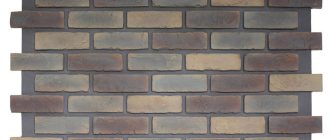
One of the most popular interior finishes today is surface cladding with the effect of imitation building bricks. Decorative stone comes in different types and differs in texture and color palette. Types of decorative bricks:
- Glossy tiles;
- Matte products;
- Relief brick;
- Convex stone;
- Concave product.
Laying gypsum bricks on the wall allows you to create an individual interior design for an apartment or house. In addition, gypsum boards are quite strong and moisture-resistant, thanks to these qualities the cladding of the room becomes practical and durable.
Laying gypsum bricks on the wall allows you to create an individual interior design for an apartment or house.
Advantages and disadvantages of gypsum stone
Gypsum products have a number of advantages, but they also have disadvantages. The advantages of the material are:
- Environmental friendliness;
- External attractiveness;
- Ease of processing;
- Thermal insulation;
- Fire safety;
- Easy installation;
- Acceptable price;
- Light weight.
Despite many advantages, this material also has disadvantages, the most important of which is the risk of mechanical damage. However, with certain skills they can be eliminated through restoration.
Gypsum products have a number of advantages.
Choosing adhesive for gypsum tiles
Plaster bricks should be laid with the correct glue; there are several options for this:
- Cement tile adhesive. Used for tiles. Used to glue any cladding.
- Plaster based on gypsum. Excellent for interior work. The mixture is white and will not be noticeable under the brick.
- Silicone sealant. The method is unusual, but effective. Allows you to place the brick tightly against the wall.
When using glue for external masonry, frost-resistant compounds should be selected, otherwise the mixture will crumble and fall off with the brick. Only fresh glue is used and prepared according to the instructions on the package.
Types of decorative brick masonry
Cladding with artificial brick is not complicated, the brick material is made in the form of a panel, and can be laid out on the walls in different ways. The technology depends on the type of brick used:
- The long edge is spoon.
- End - butting.
Spoon laying includes 4 rows of spoons and 1 row. When using the bonding method, the entire masonry will be made only from bonded parts. Types of masonry can be different, the most common are:
- Gothic - work is carried out using long and short rows of bricks, alternately. An offset is made between the rows by half a brick.
- Brandenburg - made from a pair of long rows and one short one. Glue the brick so that the butt side is a couple of rows above each other. Each row will be mixed by half a brick.
- Cross is a complex type of masonry. Decorative bricks are glued to the walls alternately with different sides. Between the rows there is an offset of half a brick.
In general, there are quite a few options for laying decorative bricks; it is recommended to look at photos on the Internet and decide on the desired type that will suit the specific decor of the house. After that, you can lay out everything yourself.
Advantages and disadvantages of the material
Interior finishing does not imply the presence of negative factors affecting the building material, such as temperature changes, changes in humidity levels and other atmospheric phenomena. But even in such conditions, I recommend choosing the facing material as carefully as possible.
Related article: DIY patterns for curtains and lambrequins
Laying brick tiles has some significant differences from working with ordinary tiles. Firstly, there is always a need to first select a pattern on the tile: it can be in the form of one brick or in the form of several bricks laid out in a row at once. You need to choose in the process of thinking through the design of the room. Tiles with imitation rows greatly simplify the installation process due to their large sizes. But there are also some disadvantages - possible discrepancies in the “chess” principle according to which the brick is laid. Naturally, this does not mean that you should completely discard this option, because sometimes imitation of masonry without traditional design can look quite impressive. Also, do not forget that in places where seams are imitated, the material can be quite thin, which makes it fragile.
However, the strength of the tile largely depends on what materials were used for its manufacture - gypsum mortar, ceramics, clinker or polymer cement. Clinker tiles are more often used for finishing facades, but recently they are no less popular among craftsmen involved in interior cladding. Due to its original use, its strength can even resemble a brick, so clinker is most often used in cases where the room needs to be finished with high quality and for a long time. This type of tile fits perfectly on any surface and holds up well. Among other advantages of its use is a wide range of color and texture solutions.
Unfortunately, it is impossible to equate brick with other types of tiles. They are significantly inferior to clinker both in price and in basic characteristics, although they retain a fairly good appearance in the interior. Gypsum or ceramic tiles with imitation, for example, are used when you need to quickly and inexpensively decorate a room with your own hands. Don’t forget that old brick is quite difficult to imitate, so don’t be surprised that the most realistic tile copies are quite expensive. But this is the case when quality is worth paying for.
Related article: White tulle - nuances of choosing material
Laying decorative bricks on the wall
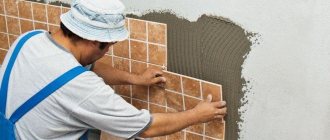
Those who know how to install regular floor or wall tiles can easily lay decorative bricks on the walls. Initially, you need to draw a guide strip on the wall using a level. The work must be done along this line, otherwise the walls will be visually uneven, because the brick will float to the sides.
Work begins from the bottom point. It is better to lay out the tiles on the floor in order to select a diagram of all the parts. The laying is carried out initially in even pieces, and then you can glue the trim. The glue must be applied in a thin layer, both on the wall and on the decorative material. It is best to apply the glue using a notched trowel. The excess is immediately removed from the front part with a rubber spatula. If the glue dries, removing it from the surface will be a difficult process.
Applying adhesive solution to the wall
During work, it is not recommended to apply the adhesive composition to most of the wall; the material will dry out, and it will be more difficult to glue the decor. The material will look good on the walls if you follow some rules:
- You need to insert crosses or a nail between the tiles so that the seam is the same throughout the entire wall.
- At the end of the work, the seams should be rubbed. A special grout or plaster is used for this. Grout correctly - using a rubber spatula.
- To preserve the coating so that it is not dark, if the material is glued in the corridor, it is necessary to apply a layer of varnish, which is used for wood.
- You can create a living room interior using paint, which is easily applied to the material.
- Artificial material can be glued to wallpaper, making the lower part of the hallway made of stone and the top of wallpaper.
- Before carrying out work, it is better to level the walls using plaster or gypsum board.
Laying decorative bricks on the wall
When the material is laid on the walls, grouting and finishing can be done within a day so that the glue dries. The grout can be applied not only with a spatula, but also with a syringe, or from a bag, like a pastry bag. All excess grout is removed immediately. After the glue and grout have completely dried, the material is painted or varnished to make the interior look beautiful.
The paint coating layer must be at least 2, with a gap of 2 hours between layers. Imitation of natural stone looks good in the kitchen, hallway or living room. A good master class can be seen in the video, and you can also follow the video of laying decorative bricks on the wall:
How to lay decorative bricks
In this article we will examine in detail the three main methods of laying decorative gypsum bricks and will touch a little on the topic of preparing walls and choosing adhesive. For those who don't like to read, there is a detailed video on the topic below.
Preparing the walls
The complexity of preparing walls for laying artificial stone directly depends on its type and the material of the walls. For heavy tiles (concrete, clinker), you may even have to nail down a reinforcing mesh, plus there are limitations on the strength of the supporting structure.
Here we will discuss laying gypsum tiles, using the example of Old decorative brick, the weight of one square meter is about 9.5 kg. In our situation, it is enough to treat the surface with a deep penetration primer.
In any case, the walls must be fairly smooth - plastered or puttied, wallpaper in places of installation must be removed, areas painted with enamel paints must be covered with concrete contact.
Laying decorative bricks without jointing
This method is the fastest, simplest and cleanest and therefore very popular. It consists in the fact that the seams between the bricks are not filled in any way. The wall must be painted in the desired color, for example, gray if you want gray seams, or any other color. For clarity, our wall is black.
With this method, it is optimal to glue the brick with liquid nails, silicone sealant or foam glue. The use of polymer adhesives is better here, because they leave a very thin adhesive seam and visually the tiles will adhere closely to the wall. The main thing is not to apply too much glue, so that its remains are not squeezed into the spaces between the bricks and do not spoil the appearance of the masonry.
We make several points no closer than 1 cm from the edge of the tile and immediately lean it against the wall.
Liquid nails can be acrylic or synthetic rubber based (this is always written in the composition on the tube). It is better to use rubber ones; they (like silicone) when dry leave an elastic adhesive seam and penetrate deeper into the surfaces being glued, which guarantees reliable, long-lasting fixation of the tiles. The elastic seam allows you to glue the tiles even to wooden surfaces - OSB, plywood or lining. Liquid acrylic nails become hard when dry and the tile may fall off.
Foam adhesive also leaves a strong elastic seam, but its use is complicated by the fact that after applying it to the tile you need to wait a while and only then glue it to the surface. You will also need a special gun and a means to wash it.
To maintain the same distance between the bricks, it is advisable to use special seam clamps. They come in different sizes, in our example - 1 cm.
One hour will be more than enough for the glue to set, now the clamps can be removed and reused. Our brick wall is ready.
Laying gypsum bricks with jointing with tile adhesive
In this method we will glue the brick to the wall using regular tile adhesive. It can be either gypsum or cement based, from any manufacturer.
To work, you will need a notched spatula of any size; we will work with a spatula with a 0.5 cm notch.
Mix the adhesive mixture; the solution should not be very liquid, otherwise it will be difficult to work with. Using a notched trowel, apply the glue evenly to the wall. Approximately 1-2 m², otherwise you may not have time to lay out the bricks and the glue will begin to set.
Now we lay the brick on the wall, using the same seam clamps to maintain the distance. The glue remains in the seams, plus a little of it is squeezed out from under the tile.
The clips can be removed after about 20-30 minutes, depending on the type of glue and its consistency. We select the time so that after removing the fasteners the brick does not “float” down, but the glue should still remain in “working” condition.
After removing the fasteners, we trim the remaining tile adhesive in the seams, thereby rubbing them. You can do this with your finger or some other tools; a wooden ice cream stick works well. Be careful during the process, try not to stain the tiles with excess glue.
Depending on the glue color you choose, the seams will turn out white or gray. With the described method of laying decorative bricks, it is better to use cement glue, because its “lifetime” is much longer than that of gypsum.
After complete drying, the brick wall can be painted (as is often done with white brick) or coated with a protective interior varnish. This procedure will allow you to maintain the neat appearance of the masonry for a long time.
The second method is popular with many craftsmen - it is not very labor-intensive, but as a result you get a very believable imitation of a brick wall.
Laying tiles under brick with grouting joints
The third method is in many ways similar to the second. The difference is that the glue is not applied to the wall, but to each tile separately.
The seams remain empty and quite deep. It is not advisable to use polymer glue (as in the first method), because The depth of the seam is important.
After the glue has dried (usually the next day), we remove the fasteners and begin to unstitch the seams. To do this, we will use grout for decorative bricks. It should not be confused with tile grout, and especially the method of its application!
We fill the seams with grout using a special bag or a gun, when it dries a little, we level it.
There is no need to apply too much mortar, this will complicate its leveling and “eat” the wall relief. It is enough for the final grout layer to be about 3-4 mm. You don’t have to level the grout, but leave it as is, but this is a matter of taste.
The advantage of this method is that you can get almost any color of the grout, since manufacturers produce a fairly wide range of grouts. Also, the grout mixture has a slightly different (coarser) texture than tile adhesive, which has a positive effect on the final appearance of the wall.
After completing all the work, it is advisable to varnish the tiles, if this was not done in production.
Laying gypsum tiles under brick as a way to decorate walls
The modern construction market today offers a lot of finishing materials for interior walls. Almost anyone can choose for themselves exactly the products that meet not only their aesthetic and environmental standards, but also the price factor. One of the options for decorative wall finishing is laying gypsum tiles under brick.
How to prepare?
Materials and tools
Before you begin tiling the interior of the room, you need to calculate how many tiles you will need to finish the walls. To do this, calculate the area that will be finished. If there are elements on it that do not require decoration, find out their area and then subtract it from the total. Facing is carried out using the following materials:
- deep penetration soil solution;
- gypsum brick tiles;
- special glue for fastening;
- grout mixture and acrylic paint;
- varnish, which at the end needs to be coated with the finished masonry.
It is convenient to lay the material using the following tools:
- notched spatula;
- hacksaw for cutting;
- level, plumb line, ruler, tape measure, pencil;
- rollers, a wide and artistic brush for decorating seams.
Preparing the wall
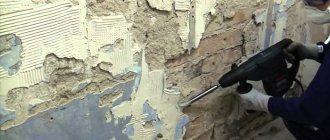
Before you start gluing tiles to the wall yourself, it is recommended to prepare the surface so that the material holds firmly. To do this, the wall or other area is thoroughly cleaned of old decor and then leveled. Next, the surface is treated with a primer, and after that you need to wait a little until the liquid dries.
If the wall is plastered, you should carefully check the strength of the plaster and when there are fallen areas, you need to plaster them, let them dry and prime them. When the wall is covered with a layer of paint, it is worth getting rid of this coating; if this is not possible, frequent notches are formed on the surface, which will ensure reliable adhesion to the brick. If the wall is wooden, fiberglass is attached to the surface, after which everything is plastered and primed. The plasterboard wall does not require any pre-treatment. Before installation, it is covered with a primer solution, and when it dries, they proceed directly to the masonry.