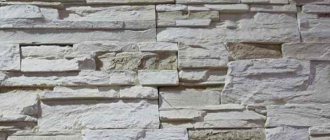
Corners in a room have always been the most difficult surface elements to finish. If gluing wallpaper or other materials somehow managed to ensure their uniform coverage, then laying decorative stone has many difficulties. Special elements are produced in some series of stone finishing for corners, but such elements are more expensive and more difficult to install.
Cladding in the apartment and outside the house
Most often, it is the outer corners of rooms that are lined in this way to protect elements from mechanical damage. After all, it is often the outer corners that are involuntarily affected by clothing, interior items when rearranged and in other ways. Stone cladding is characterized by high abrasion resistance, strength, and other important characteristics.
Two finishing technologies:
- cutting individual straight tiles to the required size at the joint;
- complete masonry with special corner elements.
You will have to practice so that the cladding turns out neat , beautiful, without flaws or irregularities.
Internal corners also require similar skills, since maintaining a certain thickness of the seam is a whole skill. Most often, stone fragments are laid asymmetrically, that is, not like ceramic tiles in a bathroom or kitchen with even longitudinal or transverse seams. Then mandatory trimming with a grinder with a diamond blade will be required.
When is this required?
Previously, in order for the corner to have a completed beautiful shape, it was trimmed with plastic or other special corners. Today this method is considered outdated and is viewed with doubt. A more sophisticated, organic solution is required. Similarly, tiles of adjacent walls placed end to end on the outer corners do not give the desired picture.
It is best to use special corner elements . Even if their price is slightly higher than standard material, the visual effect will be much richer and more refined: it will suit any interior style. In addition to the beautiful appearance, the absence of seams in such problem areas will ensure a long service life of the cladding and will protect the ends of the tiles from destruction.
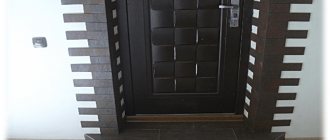
In the photo below you can see what a hallway looks like with this cladding:
These are other photos of the internal corner cladding:
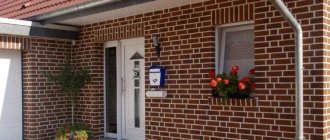
Photos of the design of the external corners of the house:
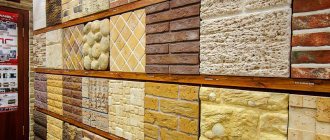
Selection of material
Recently, stone finishing has become even more popular. Therefore, the question of choice is becoming increasingly acute for consumers. Among the many types and types of finishing in this class, it is necessary not to make a mistake with the texture, origin, size, and other qualities of decorative stone cladding.
Popular materials: stone slabs and artificially made blocks.
- The first category includes granite, marble, dolomite, sandstone, dense-textured limestone, quartzite and others.
- In the second - flexible, gypsum, cement and other materials.
When choosing, you must adhere to the following rules:
- Compliance with the chosen interior style and color scheme.
- Reliable protection against mechanical influences.
- Moderation, since the abundance of stone on the walls makes the room heavier, making it more like a crypt or utility room.
Natural
Various natural materials can be used to decorate these areas of the wall surface.
It is necessary to note the high price of the elements that create a continuous corner, which are carved from a larger workpiece. Therefore, when facing, they often use ordinary straight slabs, but with trimming the contacting elements at 45°. When two adjacent slabs are connected to each other at the cutting points, their outer layer creates the impression of a monolithic stone surface.
Such work is a highly complex installation and requires the use of an electric tile cutter . But it is still cheaper than purchasing special corner monolithic elements made from natural material.
Artificial
Cladding with artificial decorative stones is significantly cheaper than with natural analogues. First of all, this is due to the lower price of raw materials, since even special corner elements are cheaper than direct analogues of natural origin. But attaching them to walls is a little more difficult. It is necessary to correctly and evenly apply the mortar to the surface of the tile or wall so that a minimum of voids is formed.
More convenient options for artificial stones are available as flexible ones. They can be used to cover even sharp corners, without damaging the decorative layer as a result of bending the fabric base. The strength of the elastic coating is not much lower than its harder counterpart, since the outer layer contains up to 90% marble, granite chips or other mineral particles.
Operating procedure
It is important to know that cladding must always begin with the design of the corners. It does not matter what technology will be used to finish them.
If factory profile parts are used, they can be immediately attached to the wall. If it is necessary to trim the end parts, you should take careful measurements, then trim the number of tiles needed to finish the corner.
The parts are attached to a uniform layer of working mortar, the thickness of which should not be more than 1 cm. Each part is covered on the reverse side with a layer of mortar (or adhesive mixture), then gently pressed against the wall surface. It is recommended to remove excess working solution from the surface of parts and from seams immediately.
Important! The seams are filled with the mixture through a special syringe for construction mixtures. This must be done within 24 hours after finishing the corners and walls.
How to do styling - step by step instructions
Preparing the walls
Before installation, the following conditions must be met::
- level, plaster, prime the surface to be finished;
- the area must be finished in a certain order and volume so that the finish does not sag under the weight of the glue and coating;
- the appearance of individual stone tiles depends on the viewing angle;
- Smooth surfaces will create an artificial finish, so a certain asymmetry must be maintained in the horizontal and vertical directions.
Preparation of materials
The material is fixed with different adhesives depending on the type of decorative stone:
- special mixtures for stone;
- adhesive composition for tiles;
- silicone glue;
- liquid nails.
When using conventional cement-sand mortar, a small amount of plasticizer is added. Most often, PVA glue is used for this purpose. Then the adhesion of the decorative stone to the surface being finished will be stronger.
The adhesive composition should have a homogeneous creamy consistency.
How to lay out the walls?
Instructions for installing decorative stone at corners:
- The prepared, cleaned walls are covered with a deep penetration primer until completely dry.
- If there are several packages, they need to be mixed so that there is no difference in color.
- The adhesive composition is mixed in the required proportion with an electric drill with a mixer attachment until a homogeneous consistency.
- Finishing is done from the very corner, using corner elements or trimmed tiles. The thickness of the applied adhesive layer should not exceed 1 cm.
- The tile should be slightly pressed when placing it on the wall to create an even surface layer, then the remaining adhesive mixture will come out. They must be immediately removed from the walls and decorative parts of the tiles.
- When laying in joints, regular tile crosses are used, but thicker ones.
- The jointing is done with a construction syringe for adhesive mixtures, and the joints are filled with a solution of no more than 5 mm. This work must be completed no later than 24 hours from the date of installation.
If there are special ready-made adhesives for a particular material, it is necessary to use them, since they contain elements in specified proportions that will ensure reliable adhesion of the coating to the wall.
What difficulties may arise?
To ensure easier and more reliable installation of corner elements, it is necessary to extend the finishing coating in this area. If the linings are heavy or made of natural stone, then you need to use special adhesives and prepare the surface more responsibly.
Finishing corners with decorative stone is the most difficult part in installing decorative stone. If natural materials are used, then specially made corner elements are not always used. This makes installation slightly more difficult, since it requires an electric tile cutter and the ability to operate it. If all the requirements for finishing with decorative stone are met, you can install such cladding on the corners yourself.
Wall cladding with tiles that look similar to natural stone is extremely popular today. This practical, easy-to-clean and wear-resistant material is especially appropriate for decorating entrance areas - after all, this is where a lot of street dirt is carried in from the street. Moreover, decorating the hallway with decorative stone is quite simple - even a non-professional can easily handle it.
Useful tips
Finishing corners with decorative stone requires care and precision. It is necessary to constantly monitor the uniform placement of parts and check the seams, otherwise distortion cannot be avoided.
It will be easier to level the surface of individual tiles at the corners if you prepare a solution of the correct consistency. It should not be too liquid, otherwise the tiles will begin to move. A thick mixture will prevent the parts from moving during the alignment process.
The use of decorative finishes of natural origin involves the use of high-quality fixing mixtures recommended by the manufacturer. Equally important is the quality preparation of the foundation.
Finishing corners is the most difficult stage in working with decorative stone. High-quality preparation of the working surface, the use of working solutions with the appropriate technical characteristics, attention and accuracy will help to successfully cope with the task.
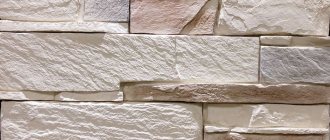
Varieties of decorative stone
Cladding tiles, which are similar in appearance to natural stone, have a wide variety of textures. It can imitate brick, shell rock, cobblestone, sandstone, onyx, marble, granite. But the methods for its production are similar: the solution is poured into a mold, and after firing or drying in the open air, it is covered with a special glaze or impregnation.
Before you start decorating the hallway walls with decorative stone, you should select its shape, color and texture. Based on the type of base, it is divided into:
- cement : materials based on it have more weight, therefore they are often used for finishing facades or cladding rooms in the loft or minimalist style; Curbs, baseboards, cornices, and paving slabs are often made from it
Cement based tiles
- porcelain stoneware made from a mixture of clay, minerals, feldspar: similar in appearance to colored glass; products made from it are used for laying heated floors, finishing kitchens, and street facades
- gypsum (gypsum polymer): due to its low weight, it can even be used for cladding light interior partitions; due to high porosity and low moisture resistance, it requires additional coating with impregnation and varnish
- agglomerate with the addition of quartz, marble and granite chips : a high-strength, heat-resistant material that can be used to decorate not only walls, but also fireplaces, steps, kitchen sinks; durable and wear-resistant; its cost is higher, but walls and floors decorated with this stone look more presentable
- acrylic : a polymer material that is resistant to various types of damage; it is used not only for wall cladding, but also for the manufacture of countertops and furniture finishing
Acrylic products
- clinker based on baked clay coated with glaze: initially used only for decorating facades, today they are often used to decorate doorways indoors, as well as areas of high humidity
Finishing a window opening with artificial stone
Decorating windows with stone looks no less impressive than decorating doorways. An important condition is the size of the elements. It is necessary to trim the window slope with a small facing stone so that the finished window opening does not look massive.
It is recommended to use small products for window cladding
Window slopes must be leveled and primed outside and inside. When using artificial material, reinforcing the surface of the slope, even if it is made of plasterboard, using reinforced mesh is not required.
The material is laid on the windows using the monolithic method, starting from the bottom of the slope. When the lower fragments are securely fixed, you can continue laying out the upper rows. Corners should be formed by trimming the end sides of the facing products at an angle of 45 degrees.
The most characteristic part of the house, from the point of view of architectural decoration, is the corner of the house. In this part of the building you can see all, or almost all, elements of the facade stucco.
The roof overhang is decorated with a large or small, complex or simple, single or composite under-roof cornice. An additional dividing strip on the facade may run slightly lower, allowing for color zoning of the facade of the house. The corner of the house itself is designed in many ways in order to visually reduce or increase the height of the structure. Rusts, pilasters, combined options - these are the main types of facade decor for the corner of a house. A separate and most important part of decorating the exterior walls of a house is the façade window decoration.
The main task in decorating a window opening is also to equalize the overall proportions of the building through the decor. You can see more detailed and detailed information about the design of window slopes Also a very important part of the façade decor is the interfloor dividing strip. With the help of this decorative element, the issue of separating different materials for decorating the walls of the facade of the house is easily resolved.
Also, with the help of interfloor molding, we visually reduce the not always proportional height of the house. And the final piece in the set of façade decorations for the walls of a private house is the plinth strip. This element is primarily a logical separator between the basement part of the structure and the main wall. The base profile can also perform technical functions - smoothing out the difference between the protrusions of the wall and the base, drip edge, etc.
Below are several examples of facade decoration on the corner of a house. You can see more ready-made design options for the entire house facade HERE.
Types of cladding. Selection of colors and textures
Decorating the hallway with massive decorative stone in combination with wallpaper in contrasting colors or matching colors is one of the unusual ways of decorating. This material, which is similar in appearance to natural material, can also emphasize the natural texture of wood and highlight the nobility and beauty of the fabric. It goes perfectly with modern types of suspended ceilings. This material looks very impressive next to climbing green plants, as well as mirrors.
Note that decorative stone is used more often only for placing accents - framing corners, door and window openings, protrusions, and individual interior elements. It makes sense to completely cover the wall with it only in spacious rooms with high ceilings. But even in this case, it is better to cover one of the walls.
Plaster and marble are often used to decorate rooms in a classical style. Sandstone and granite are more suitable for decorating hallways in chalet or rustic country styles. Imitation of brickwork will look more appropriate in rooms decorated in minimalist or loft styles.
Coloring individual elements
If desired, individual elements can be painted with special coloring compounds. To add volume, the contours can be highlighted with darker paint.
Options for using corner profiles for finishing corners
The corner profile is used to decorate the following elements:
- “Natural” joints between walls that are in a vertical plane;
- Door and window slopes;
- Places of “convergence” of ceilings, floors and walls in horizontal planes with a concave shape;
- Corners of decorative partitions, including arched openings;
- Joints between shower cabins, fireplaces and other “monumental” (not involving movement) interior objects and walls and floors.
A decorative element can be used to “smooth out” any “seam” at the junction of finishing materials. If previously it was necessary to carefully process the cuts so that they retained a beautiful aesthetic appearance, now they are allowed to have irregularities and chips, which will be masked by the corner.
Finishing door and window slopes
Double-glazed windows usually come with special corners that complete the installation of the window. Door sets also often include trims and trims. If the corners are left without additional protection, then you will have to select and glue it yourself. The element will protect the slopes from damage and smooth out the junction of two different materials. For example, the end of the wallpaper will begin to wear off and peel off over time. No matter how smoothly you cut the finishing material on the slope, it will look untidy without additional coating. Slopes in doorways can be scratched by furniture carried through them.
The best option would be to use polyvinyl chloride corners. If necessary, it is easy to replace, and the surface texture can imitate any natural materials. By choosing a special shade, you can create an illusory transitional border between the color of the wallpaper and the window frame or doorway. Corners made of veneer or bamboo are less commonly used.
Arched doorways
Arched openings, as a rule, have one of the classic shapes: with a semicircle on top. Not every material can replicate its contours. For example, solid wood corners can only be used to decorate straight lines. Smooth transitions are decorated with elements made of flexible plastic, MDF, veneer or bamboo. All of the above options will easily follow the contours of the arch and complete the design of the doorway.
“Laying” decorative stone
Gluing this material to the wall is quite simple - it is laid in exactly the same way as regular tiles.
Required Tools
Tools required for work
For installation you will need:
- building level, tape measure, ruler, marking pencil
- saw or hacksaw: most types of this material are cut quite easily, no special tools are required for this
- sandpaper for processing cuts
- container for diluting glue
- notched trowel: its teeth allow you to distribute the solution more evenly over the surface
- rubber mallet for tapping tiles together
- small rubber spatula for filling joints
- plastic crosses for aligning seams
Selection of adhesive composition
To lay this type of tile, it is used as special adhesives, putty or “liquid nails”. But it is the glue that is most convenient to use.
Adhesive for acrylic products
When decorating a hallway with decorative stone that has significant weight, it is better to purchase a special composition. To attach concrete products you will need ceramic tile adhesive. “Liquid nails” are more suitable for gluing small items or light plaster stones.
Surface preparation
In order for “stone” tiles to look perfect on the walls, their surface needs to be leveled using plaster or drywall. And it will be much easier to glue this decorative material to smooth walls.
The walls are carefully leveled
Old plaster should be checked for voids and ensure that it will not fall off under the weight of the artificial stone. To improve adhesion to it, it is better to additionally treat the walls with a primer. You can replace the primer composition with glue diluted to a liquid state, which you plan to use to attach the tiles.
Before starting repairs, you should immediately consider the location of electrical wiring and switches. When leveling walls with plasterboard, it is possible to use built-in lamps - with good lighting, the stone will sparkle with new colors.
Layout of the picture
When using tiles of an unusual shape or partially finishing walls, corners, openings, it is better to first lay the stone on the floor to see the future masonry with your own eyes. When determining the size of the “pattern”, be sure to take into account the height of the cornices and baseboards.
If you plan to lay out the entire wall, open several boxes at once. After all, the shades of the stones may differ slightly. Sort them by color and then distribute them evenly throughout the design.
Each tile should be numbered starting from the bottom. Then the drawing is transferred to the wall using a pencil.
Main stages of work
Decorating the hallway with original decorative stone is not at all difficult:
Cement glue or gypsum-based glue dries quite quickly, so you shouldn’t dilute it too much
Laying begins from the bottom up from the corner. Typically, the solution is applied only to the tiles with a notched or regular trowel, and then evenly distributed over its surface.
Work starts from the corner
Place the stone against the wall, move it slightly from side to side so that the mortar is evenly distributed, and a small amount of its excess comes out on the sides and fills the seams. But, if you plan to grout the joints (joint) with a contrasting composition, you should not fill them with glue
When laying without jointing, adjacent elements should adjoin each other as tightly as possible, without gaps. The squeezed out solution will be enough to fill small seams
How to lay a corner with decorative stone. How to lay decorative stone
Decorative stone is a wonderful natural material that serves as an element of wall decor in many rooms. It is also suitable for kitchens.
Its use is relevant for dividing the kitchen into several zones, placing accents and creating interesting interior details.
Due to its natural properties, decorative stone is a durable, wear-resistant material; it does not accumulate dust and dirt from the process
With the death of a loved one, the world often falls apart and their life must be reorganized. Dealing with grief for the loss of a deceased person is a long learning curve. Therefore, it is all the more important to express this pain and give the deceased an appropriate assessment. As a mason and sculptor, we also specialize in the production of tombstones and related accessories over time. Individually and deliberately, we will advise you on this, the results are works of high artistic creativity and perfect technical implementation.
Together we figured out the characteristics of the deceased and with the grave we erected a memorial for him that expresses love for this person - or, in other words, a sign that suits him. We would like to advise you on choosing the material and stone work, font design, desired decorations and a wide range of accessories. Just come up and convince yourself.
By properly decorating kitchen walls with decorative stone, you can create stunning design masterpieces and add an atmosphere of comfort and coziness to the room.
Decorative stone for walls in the kitchen is good to use in the area of the apron, to highlight an area of the bar counter (if it is planned), and to decorate the window and door area.
Each individual case of its application has its own key points.
A window panel made of natural stone is a decorative overlay with many edges. The length, depth, thickness, surface treatment and edges of the window panel are determined according to your wishes. A wide selection of natural stone materials in different colors and thicknesses makes it easier for you to find the right design solution. Made for precise measurement and perfect for craftsmanship.
Benches made of natural stone. Enjoy life. Advantages of granite window sill. In the interior: – decorative – easy to maintain – can be well matched to furniture. – Give your window a special touch. Outdoors: – resistant to frost and weather – easy to maintain – resistant to environmental influences – no unpleasant noise when the weather is unstable in all weather conditions. - inexpensive natural product.
Where is it more rational to use decorative stone finishing in the kitchen?
Depending on your preferences and wishes, you can choose a section of the wall or an area of the room to decorate it with stone.
Natural stone floors – natural stone floors. Natural stone flooring is playing an increasingly important role in modern interior design, among other things because it is a 100% natural building material and does not contain harmful substances. The varied and almost limitless design possibilities of natural stone floors reflect the individual style of the builders incomparably. Because of its naturalness, it can be avoided by any short-lived trends. As a conscious contrast to artificial and fast times, natural stone provides peace, reflection and relaxation in private and public spaces.
At the same time, you should adhere to the combination of colors and shades of stone with kitchen fittings and maintain the overall style of the kitchen.
Ideally, if the interior contains things in an antique or classical style, simple modern style, which are in perfect harmony with decorative stone.
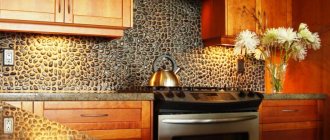
It is rational to use decorative stone in the area of the apron or the so-called work area.
Natural stone flooring defines the atmosphere and style of the room. Whether shiny, matte, light, dark, discreet or energetic colors, contrasting or harmonious tone on tone – the design possibilities are not limited to natural stone floors. Thanks to the latest technology, we can satisfy almost all color and structure requirements.
Natural stone flooring is stable, durable, easy to maintain and naturally energy efficient. When combined with underfloor heating, limestone, slate, travertine, quartzite, granite, sandstone and marble can fully turn on their thermal conductivity. Natural stone floors release accumulated heat slowly and evenly, thus providing a pleasant radiant effect. The representative of charisma emphasizes the value of office and residential buildings. There are many choices: limestone, slate, travertine, quartzite, sandstone, granite and marble provide the right finish for every room.
This is due to the fact that:
- decorative stone can withstand high temperatures and its fluctuations, so its place is next to the stove;
- decorative stone is not affected by grease stains, is not afraid of moisture and is resistant to household chemicals, which means it will perfectly fill the space above the sink;
- decorative stone is not susceptible to ultraviolet radiation, it will preserve the appearance and color of the kitchen apron for a long time when exposed to direct sunlight;
- decorative stone is easy to clean and wash; any dirt and dust can be wiped off with a cloth or damp sponge, and traces of grease can be removed with a coarse brush;
- decorative stone will favorably highlight the kitchen set, creating a separation between wall and lower cabinets; it will separate the work area from the dining table and relaxation area.
Zoning the kitchen with decorative stone - dining table
Natural stone baths are clean, noble and simply beautiful. The bathroom is becoming more and more like a lake. Here you start on the same day, here you let it finish. That's why more and more people are paying more attention to the design of this space. Natural stone in the bathroom is more than an alternative to other materials and is versatile - be it flooring, wall cladding, sinks, bath coverings, barrier-free shower floors and shower trays or floor coverings.
With a wide range of colors and shapes, natural stone offers a wide range of design possibilities and gives your bath a modern, lived-in, natural feel. The size and shape of the room are decisive in wall design. The general rule is that the smaller the space, the smaller the elements that should be used.
In addition to using decorative stone for the apron area, it can be used to decorate the walls in the dining area. It will create a kind of visual boundary between the working part of the kitchen and the table.
Special moments can be made with translucent natural stone such as alabaster and onyx, which already make the light translucent with a thickness of two centimeters. Transform your bath from a “utility” into an oasis of well-being and a place of relaxation. Treat yourself to this natural luxury and feel comfortable in your bathroom every day. Visit us, we will help you.
I look forward to stair coverings in the life of many examples of everyday Hardness: approximately high heels, wet soles, melt and heat installed for sensitive materials such as wooden stairs in particular, how they will work due to the interaction between heat and cold, as well as in combination with moisture, squeaking and crunching to start.
In order for the finishing stone to fit harmoniously into the dining area, you should adhere to the following rules:
- if you have a small kitchen, try not to overdo it with stone decoration of the walls; interior items will be lost against its background, and the room will be loaded with unnecessary details and uncomfortable;
- with decorative stone, symmetry is inappropriate; if your dining table is located in a corner, then decorate one wall with slightly less stone than the second, this will make the room more spacious and create the right emphasis on the dining table area;
- try to lay out the material from the floor to the ceiling; the stone laid out to the table level will be almost invisible, and the kitchen will have an unfinished look.
Additional possibilities for using decorative stone in the kitchen
However, not only because of scratch resistance, moisture resistance and heat resistance, natural stone stairs will not fade or scrub. Thanks to a suitable surface treatment, natural stone stairs can also be used outdoors, as this makes them slip-resistant. Natural steppes are not only much more elegant than natural stone stairs, but they also have the huge structural and physical advantage of being constructed in one piece, with no joints, and therefore no risk of water penetration.
A bar counter is a great way to emphasize the originality and presence of a kitchen, especially if it serves as a kind of transition from the kitchen to the living room. It can be very successfully filled with decorative stone, giving it strength and stability. Both bricks and simple cobblestones are suitable for these purposes. But don't get too carried away.
Each natural stone staircase is pure nature and thus unique and individual. With a wide selection of different natural stones in colors and textures, there are no restrictions on design possibilities, and combinations with other building materials are nothing to avoid. The dynamism of the material is the charm of every staircase.
You can also buy a piece of real nature and look around the world. Kitchen countertops made of natural stone are a natural and irreplaceable product. Natural stone kitchen countertops are the centerpiece of the kitchen and are now found in almost every kitchen, also due to the benefits of natural stone. Millions of years ago, natural stone has long been used in the kitchens of modern households and offers every kitchen a unique and luxurious charm.
A small section of the wall near the bar counter can also be trimmed with stone to highlight the bar space and add zest to it.
An accent made of decorative stone in the area of the hood or around the perimeter of a window or door to the kitchen looks good. Small stones, decorative bricks, and sandstone are suitable for this.
Artificial stones are also perfect for creating coziness in the kitchen; they can be used to highlight a window area, a doorway or a corner in the kitchen. Just don’t try to build stone bastions in the form of arches and partitions - this will overload the kitchen and reduce its size. Lay the stone in the form of small islands.
Both the hardness of the material and the unique aesthetics make natural stone countertops a harmonious look in every kitchen. Natural stone surfaces are resistant to heat and glow, odorless and insensitive to water and water vapor. Thus, every day accidents are in the zeal of the fight - placing pots on the countertop, cutting knives or scratching the work surface - for natural stone tiles is usually not a problem.
Thus, the advantages of natural stone countertops can be summarized as follows. – Easy to care for – Impact, scratch and scratch resistant – Hygiene – Heat resistant – Natural, timeless appearance – Moisture resistant. At best there is no alternative. Come and see for yourself.
Tips for laying decorative stone with your own hands
Before you start getting creative and placing decorative stone in the kitchen, work out a plan for its use and make a preliminary sketch. Calculate the dimensions and quantity of materials needed.
Different combinations of sand dyes and pigments can produce different concrete paints. Already in the 1970s, concrete in the garden and especially in garden design was predominantly used in the form of a practical, but not very aesthetic, concrete slab. For several years, very high quality and design-attractive slabs, stones and design features have been made from concrete, so landscape gardeners and architects are now using concrete as a distinct style element for attractive gardens. In place of the well-known concrete tiles, colored concrete products such as pavers and large format slabs with specially treated surfaces are now primarily used for paths and boundaries.
When laying stone yourself, you should be guided by simple principles that are universal both for choosing decorative stone and for its installation.
- Start by thinking through options for using stone in your kitchen. For a small kitchen, it is better to adhere to minimalism and limit yourself to a narrow strip of stone or placing it in the area of the apron.
- Decorative stone is a durable material, so it is wise to use it in the most vulnerable areas of walls to strengthen and protect them. This is the area of the doorway, the area above the work area.
- When choosing a stone, take into account the size and fullness of the room with details. Perhaps the decorative stone will be superfluous against the background of other interior details. You should not take large stones for a small kitchen and small ones for a spacious room. The first ones will take up free space, the second ones will be invisible.
- Combining details and maintaining a certain style is not an easy task even for experienced designers, especially in modern small kitchens. Try to use a variety of materials to add coziness. Bricks will soften the accent of visible aluminum pipes, and uneven stones will highlight wicker decorative elements.
How to properly place decorative stone in the kitchen?
Painting concrete with pigments
This includes decorative elements and load-bearing elements of seats or benches, which can also be made of colored concrete. Metal oxides are preferably used for coloring, which are distributed evenly during mixing and are permanently incorporated into the concrete as it hardens. These pigments exist in the colors red, yellow, black and many mixed colors such as brown, orange and beige. For blue coloring, cobalt spinel is used, green concrete can be obtained using green chromium oxide pigment.
Taking into account all the wishes and ideas for placing decorative stone on the walls, having selected the necessary material, you can begin laying it.
If you decide to do it yourself, then you will need:
When using white cement and additional coloring with titanium dioxide pigment, even white concrete can be used. The pigments used to color concrete are natural in nature and also add many colorful facets to the natural stone. So the question of the durability of these pigments is answered quickly. Under normal natural conditions, pigments embedded in solid structures are stable for thousands of years because they are not subject to wear and tear and are also extremely resistant to light, ultraviolet radiation or weathering.
- decorative stone and special glue for it;
- mallet, spatula and roller;
- primer (also known as an antiseptic coating) and putty for joints (it should be chosen in the same tone as the stone used).
The process of laying stone begins with careful preparation of the walls - removing old finishing materials and debris. Leveling and major repairs of walls in the kitchen are not required.
Selection of cement and sand
Washing out pigments from concrete with standing, running or dripping water is also impossible, because the pigments are firmly glued together in the cement stone. In the production of colored concrete products, it is usually important that the later color of the cured concrete is not determined solely by the color of the pigment. Other raw materials used to produce concrete also contribute to the coloration of the concrete surface and can significantly reduce, but also enhance, the color effect of the pigment. In addition to the typically light gray to dark gray color of cement, sand also greatly influences the color of the final product.
A layer of primer is applied to the cleared walls using a roller. It needs to be given a little time to dry. This time can be spent preparing the adhesive mixture for the stone. Instructions for preparing it are indicated on the package if you did not buy it ready-made.
Applying glue to the wall should also be carried out exactly according to the instructions on the package. Usually it comes down to spreading the glue in two or three thin strokes over the surface of the wall using a wide spatula. A pebble is placed on the applied glue, which must be pressed tightly against the wall and lightly tapped with a mallet.
The particularly bright cement color is the basis for the development of brilliant colors. The most beautiful colors are produced when using white cement, while regular gray cement tends to make the color of the concrete somewhat dark and dull. The same applies to the color of the sand used. Using a certain combination of pigment color and sand color, it is possible, for example, to produce green concrete with blue pigment and yellow sand.
Concrete products for gardening
Concrete pavers, concrete slabs or other garden and landscape objects such as palisades, planting rings, stone blocks have been produced in a variety of colors for many decades. The coloring of the final product occurs during the production process, that is, during the mixing of the concrete, as the color pigments are mixed homogeneously. However, the color of fresh concrete does not yet correspond to the color of the final product, which should only be assessed in the hardened state. Accordingly, the mixed color pigments are passed through the entire production process from molding, compression and hardening and are firmly embedded in the resulting concrete block.
The process of laying stones must begin from the bottom edge so that the stones subsequently form blocks and do not move anywhere. For convenience, use plastic stands from hardware stores; they will make the gaps between the stones equal and make the grouting process easier.
Do not try to lay all the stone at one time; it is better to spread the installation over two or three days so that you have the opportunity to eliminate errors if they arise.
Grouting seams between decorative stones is very simple. The grout is mixed with water until it becomes thick sour cream, after which it is evenly distributed in a small layer on the seams. Its remains and traces are removed with a damp sponge, which should not be delayed. Because once it dries, its removal will be almost impossible or will damage the surface of the stone if you use available mechanical means.
Look at the possible kitchen design options using decorative stone, pay attention to the video tutorials on how to install it and, guided by these principles, create your own unique atmosphere of comfort in the kitchen.
Expert advice
Prev
Track
To prevent oil paint from drying out during storage and to prevent a film from forming on it, place a circle of thick paper on the surface of the paint and fill it with a thin layer of drying oil.
“The polyethylene film covering the balcony or greenhouse is protected from being torn off by the wind by a string stretched on both sides at intervals of 10-15 cm.”
“To make it easier to work with a concrete mixture, clay is usually added to it, but clay reduces the strength of the mixture. Add a spoonful of washing powder to it per bucket of water. “
“To prevent the screw, the head of which is hidden behind the obstacle, from rotating together with the tightened nut, you need to throw several turns of thread or thin wire over it and lightly tighten the ends. Due to friction, the screw is held well in place. The ends of the thread can be trimmed after tightening. “
“You can cut out a birdhouse entrance without a brace. It is enough to split the front side of the board in the center and cut out half-holes of the required size with a chisel or hatchet, and then connect the halves again. “
Wooden screw plugs crumble and fall out of the wall. Take your time to cut out the new plug. Fill the hole in the wall tightly with nylon from an old stocking. Using a nail of a suitable diameter heated red hot, melt a hole for the screw. The fused nylon will turn into a strong cork.
“It’s easy to turn a carpenter’s level into a theodolite by equipping it with an aiming device made from a slot and a front sight. “
“In order for two strips of linoleum to lie end to end, it is convenient to use a self-adhesive decorative film, placing it under the base of the linoleum. “
“To ensure that the nail goes in the right direction and does not bend when driven into a deep hole or groove, it should be placed inside the tube, secured with crumpled paper or plasticine. “
Before drilling a hole in a concrete wall, secure a piece of paper just below it. Dust and concrete fragments will not fly around the room.
“To cut the pipe exactly at a right angle, we recommend doing this. Take a straight strip of paper and roll it onto the pipe along the sawing line. The plane passing through the edge of the paper will be strictly perpendicular to the axis of the pipe. “
“A simple device will help you move logs or wooden beams - a piece of motorcycle or bicycle chain, equipped with a hook on one side and attached to a crowbar on the other side. “
“In order for one person to work with a two-handed saw, we recommend using a simple technique: move the saw handle from the top to the bottom position. “
You can cut a piece of slate of the required size with a saw, but it is better and easier to punch holes along the line of the intended cut with a nail at a frequency of 2-3 cm, and then break off the slate on the support.
” The best way to stick tiles to the wall: take bitumen, melt it and place just four drops on the corners of the tile. Stuck on dead. “
When making shaped window casings, it is most convenient to cut shaped holes with a hacksaw with a sharpened blade.
“Making stained glass is a long and difficult task. You can make a quick imitation of stained glass. To do this, they take thin slats or twigs of vines, glue them to a sheet of glass, and then paint the glass and cover it with varnish. “
“If you don’t have a dowel at hand, you can make one from a piece of plastic tube. The body of a ballpoint pen may also be suitable for this purpose. Having sawed off a piece of the required length, make a longitudinal cut, about halfway, and the dowel is ready. “
” It is notoriously difficult to hang a door when working alone. But it’s enough to shorten the bottom pin by 2-3 mm and the work will become much easier. “
“A very durable, non-shrinking and fairly waterproof putty is made from bustylate mixed with any powder - chalk, gypsum, cement!, sawdust, etc. “
“If you need to screw a screw into the end of a particle board, drill a hole slightly smaller than the diameter of the screw, fill the hole with Moment glue (not epoxy!), and screw the screw in a day later. The plate does not delaminate. However, the resulting connection can be placed under load only after a day. “
“It is more convenient to secure portraits, photographs, paintings in wooden frames with glass not with nails, but with the help of push pins bent at right angles. The buttons are gently pressed with a screwdriver. Compared to nails, the risk of splitting thin frames is reduced to a minimum. “
” Driving a screw into hard wood is not easy. If you poke a hole for the screw with an awl, and rub the screw itself generously with soap, then after such an operation the work will go like clockwork. “
To save time, the edge of the wallpaper can be trimmed with a sharp knife without unrolling the roll. To do this, you must first align the end of the roll and draw the edge border on the outside with a simple pencil. Working with a knife, the roll must be gradually turned in the direction of rolling.
To carry large sheets of plywood, glass or thin iron at home, it is convenient to use a wire holder with three hooks at the bottom and a handle at the top.
IF you need to saw a round stick into the distance, this work is most conveniently done using a template. It is made of a metal tube with a groove in the middle. The diameter is chosen so that the template slides freely along the stick.
Thanks to the variety of colors, sizes and textures, decorative stone can beautifully decorate any interior. The stone looks especially organic on a loggia or balcony, in a large cozy hall, around a fireplace or in a winter garden. Stone is not only placed indoors. On the street, they can cover the base of a house, decorate window openings or corners of a building. The same stone is used to decorate outdoor gazebos, patios, and high flower beds. In order for a decorative stone to please the eye for a long time, it must be laid correctly.
The principle of laying stone is absolutely the same as the principle of laying ceramic tiles. It is simply glued to the selected surface. But if in tiles you have to strictly control the vertical plane, then in the case of stone you don’t need to do this. Its rough, heterogeneous surface allows you to visually not see some flaws in verticality. The main thing in laying the stone is that it adheres securely to the surface. To lay the stone you will need:
- stone;
- adhesive composition for gluing stone;
- primer;
- primer brush;
- small hacksaw for cutting stone;
- notched spatula for applying glue;
- rubber hammer;
- pencil;
- ruler.
Clean the surface of old paint, putty or any other building material. If the plaster on the wall is good, then it is enough to treat it with a construction primer. If there are defects, they will have to be eliminated. You can completely renew the plaster layer or make a partial repair. When the plaster is dry, do not forget to prime it.
Draw a sketch of the future stone installation on the wall. Be sure to mark off several horizontal and lines so that in the future the laid out pattern does not visually “slide” down or “climb” up.
Start laying the stone from the very bottom of the future stone panel. Using a spatula, apply a little adhesive to the back of the stone and spread it over the entire surface. Place the stone against the wall as tightly as possible and gently tap it with a rubber construction hammer. Place the second and all subsequent stones on the wall in the same way. Make sure that the seams between the stones are the same. Put enough glue on the stone so that it does not come out - it will be very difficult to remove it from the rough surface of the stone. If this happens, remove the glue immediately with a wet sponge.
Glue special corner stones, which are found in every collection of decorative stones, to the outer corners around the fireplace or rectangular column.
Seal wide seams between decorative stones with a special grout or grout for stone. Do this using a large construction syringe or a thick plastic bag with a corner cut off. The grout should only get into the seams, without smearing the outer surface of the stone.
Decorative stone is much easier to lay than tiles. It does not need to be calibrated, it can be easily cut using a thin hacksaw and can be attached either to cement mortar, to special glue, or even to “liquid nails” or transparent silicone.