Artificial stone in the interior is very similar to natural stone, the only thing is that the stone for the hallway, kitchen, bedroom, loggia is made manually or industrially. Finishing with artificial stone looks organic in any room.
Children's interior
A particularly bold and unusual option is finishing the ceiling with decorative stone.
Ceiling decoration with decorative stone
Thanks to the huge variety of textures and shades, these finishing materials can be used to create interiors in various styles: from brutal loft to delicate shabby chic.
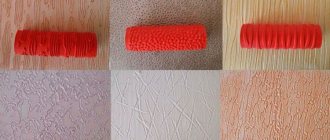
Decorative stones of different textures and shades
Artificial stone as a finishing material
It may seem that artificial stone is an unnatural material and therefore harmful to health. However, no caustic chemical additives are used to make decorative elements. The main component of the mixture is usually gypsum or colored concrete. Products made from these mixtures have a number of obvious advantages.
- Decorative stones are much thinner and lighter than their natural counterparts, do not create excessive loads on the walls, and the finishing does not “eat up” the free space in the room.
- Artificial stones are resistant to temperature changes and do not crack.
- The finishing process does not take much time. The reverse side of each element is flat, and the elements themselves usually have almost identical dimensions, this simplifies the calculation of the amount of finishing material and installation.
- The finish is durable and repairable.
- Finishing materials are not flammable.
- Artificial stone is much cheaper than imitation, and the choice of textures and shades is almost limitless.
Artificial stone in the interior
On a note! If decorative elements are treated with a water repellent, mold and mildew will not appear on the wall, and dirt will be washed off from the surface with a slight movement of a damp cloth.
TOP 6 types of natural stone and their features
Natural stone is quite capricious to work with, but at the same time this material has a unique texture and color, is durable and stable, environmentally friendly and especially luxurious. It is difficult to imagine many interiors without such a stylistic solution.
Sometimes it’s simply impossible to imagine a future interior without stone
There are several types of natural stone that are popular for interior decoration:
1 marble - distinguished by a variety of colors, durability and high price;
2granite - easy to care for and resistant to mechanical damage;
3travertine - resistant to moisture, popular for decorating bathrooms;
4 limestone - available in a wide variety of colors, easy to work with, quite inexpensive, but also very fragile;
5 shell rock - characterized by the presence of a porous structure, fragile, require additional coating with special materials;
6tufa - has high thermal insulation properties, is easy to saw, and is not resistant to moisture.
Granite is often used as the main material for countertops
To make the interior of a room with stone harmonious, it must be diluted with softer materials. This could be decorative plaster, wallpaper, painted walls, etc. A large number of rough surfaces in a room can create an undesirable effect and make the atmosphere cold and uncomfortable.
We dilute it with plaster so that the interior does not look very rough
Recommendations for the use of decorative stone
It is not at all necessary to completely cover all four walls of one room with masonry or style it as brick, although such options are far from uncommon. Decorative stone goes well with photo and ordinary wallpaper, decorative plaster, painted surfaces, wood, and concrete.
Unusual wall decoration in retro style Decorative stone in the interior of the corridor
The best options for using “stone decor” are:
- design of corners, columns;
Decorative stone trim in the hallway - framing doorways, arches and niches;
Design of doorways and corners - finishing with stone only one wall of the room; Wall cladding with fireplace and woodshed
- laying stone around a large mirror or photo wallpaper; Combination of photo wallpaper and decorative stone
- decoration of the fireplace portal; Portal cladding
- stonework on the wall behind the head of the bed;
Brick behind the headboard - kitchen apron;
Kitchen apron - door transformation. You can make it completely invisible against the background of the wall or simply add decorativeness; Hidden hatch door
- a stone panel, small in size, but an independent decoration, a “highlight” of the interior.
Stone panel
Artificial stone panel in the hallway
If you lay out several narrow vertical stripes of dark-colored stone, the walls will visually appear higher.
Vertical dark stripes “brick-like”
Don’t get carried away with using dark shades when decorating small rooms. In small hallways and rooms, it is better to use decorative stone in light pastel colors, not forgetting about space-expanding techniques: using lighting, large mirrors, paintings and photo wallpapers depicting a beautiful view from the window.
Hallway in classic style
Large mirrors expand the space
Bright shades, especially contrasting ones, visually make the room smaller. Therefore, in small rooms it is worth using a monochromatic light finish.
Combinations of orange and blue, yellow and purple, etc. can enliven the interior of a spacious room with high ceilings. Bright monochromatic walls will not be boring if you place accents correctly, that is, add elements of decorative stone.
Bright wall stylized as brick
Light, cold shades visually expand the space more than warm ones.
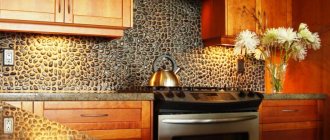
Kitchen decoration with decorative stone
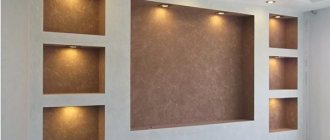
With the help of decorative finishing, you can easily zone a room and focus attention on the necessary surfaces.
Stone-like finishing in the studio interior
Finishing with artificial stone in the hallway
Artificial stone in kitchen interiors
*Click on image to enlarge.
Artificial stone in hallway interiors
*Click on image to enlarge.
Artificial stone in bedroom interiors
*Click on image to enlarge.
Photo
Stonington ResidenceRead: Arranging a yard in a private house - photos of the best ideas
Let's discuss this article together:
Click to cancel reply.
Decorative stone in interiors
Most often, stone finishing can be found in “country” or “chalet” interiors. Practicality and restraint reign here. Furniture and finishing materials are preferably natural: wood, leather, fur. Artificial materials are not welcome. The tones are selected in natural, warm shades: brown and beige, grass green and moss color, gray and white, sunny yellow. Furniture made of leather and wood, as well as metal with forged elements. “Hunting trophies” were used as decorations: busts of animals on the walls, skins on the floor as carpets. The ceilings have massive wooden beams or their imitation.
Stone in “chalet” interiors can be seen on the walls and fireplaces. Usually these are rectangular elements with a rough texture, calm gray and terracotta tones.
Imitation of natural stone and ceiling beams in the interior of a “chalet” bedroom “Chalet” style in the interior
“Loft” is a brutal style, which is also called attic and factory. The main shades of the style are gray, black, dark brown, and white as a background. The interiors are dominated by finishing made of concrete, plain tiles, and bricks. The factory style is emphasized by decorative elements made of steel and cast iron, lamps made of pipes and wire, graffiti, posters, road signs and other non-standard accessories.
Imitation of natural stone is not used in loft interiors. Brutalism and democracy are emphasized by the brick finish. This can be brickwork, painted or varnished, or imitation brick, as well as a combination of brickwork and decorative plaster, including bas-reliefs.
Interior in loft style
Artificial brick and stone are an ideal finishing material for loft-style interiors
Advice! If a lot of dark shades are used in the decoration of the room, there should be a minimum of stonework. Otherwise, the room will seem small and uncomfortable.
The next style, which cannot do without stone decoration, is castle style. The name speaks for itself - the interiors of the “modern Middle Ages” are atmospheric, spectacular, and not always homely. Coolness emanates from the stone walls, and authentic carpets or animal skins lie on the wooden floors. Wooden furniture is massive and rough; the use of lamps with filament bulbs is encouraged.
The stone in castle interiors should be as natural as possible, roughly hewn, of different sizes and shapes. Pebbles and antique block masonry look organic. To prevent the room from becoming too uncomfortable, it is advisable to combine stone finishing with plain wallpaper or plaster in light natural shades.
Castle style
Castle style interior
High-tech is a style whose main elements are metal and glass. And these materials go well with stone walls. Most often, in high-tech interiors, polished stone is found, less often - relief stone. Decorating one or two walls with stone can be done; you can complement the interior with porcelain stoneware flooring or a massive marble-like cast acrylic countertop. The main rule is that the room should be spacious and light, without pretentiousness, clutter, or tackiness.
White brick wall in a high-tech interior
High-tech bedroom
The brightest and boldest, denying the presence of any rules, is the “kitsch” style. The main rule is to combine incongruous things, use as many bright colors and colorful decorations as possible. Any materials and finishing methods are appropriate here, preferably budget and cheap. And brick acts as a decorative stone. Brick walls can be plain or painted with graffiti. You can safely give free rein to your imagination and create whatever your heart desires.
Kitsch style Brickwork with graffiti in a kitsch interior
The grunge style is somewhat reminiscent of loft. Brick walls are often combined with wood flooring and beamed ceilings. It is advisable to recreate the spirit of the past by using an imitation of chipped brick. The interior will be complemented by decorative peeling plaster, textured unpainted boards, panels or frescoes in the pop art style. Artificially aged furniture, soft plain carpets on the floor, heavy faded curtains, and forged elements fit well into the interior.
“Grunge” style in the interior “Grunge” is a wise philosophy of life that captivates with its peaceful charm and aesthetic comfort
On a note! “Grunge” can only be recreated in a spacious room; for small rooms it is better to choose a different style.
The color palette of the grunge style is restrained and soft; all natural shades of brown and gray are welcome, as well as a white background and a small amount of black elements.
There is a lot of air in the interior, so there is no room for unnecessary details; the room contains only the necessary furniture and decorative items
However, it is not at all necessary to try to recreate any style, because you can design your own interior, guided by your own concepts of beauty and comfort.
Artificial stone in the interior of the loggia
In order to decorate the walls “like brick” in any room, not only on the loggia, you do not need to bring pallets of building materials into the apartment. Imitation of masonry is easily created using tile adhesive and cement plaster.
Initial data: unheated loggia 6x1.5 m with panoramic glazing, painted walls, laminate flooring.
The railings on the loggia were dismantled
In winter, it will be cold on the loggia; accordingly, materials for cladding are selected marked “for the facade,” that is, intended for use at low air temperatures.
To finish the loggia you will need:
- tile adhesive and cement plaster. The dry ingredients will be mixed one to one and diluted with water. For 1 square meter of “bricks” approximately 5 mm thick, up to 9 kg of mixture is required. To determine how much mixture is needed, you need to calculate the area of the walls of the loggia, and then multiply by 9. Round the resulting number up, this will be the required amount of plaster + glue;
- masking tape 19 mm wide (6-7 rolls);
Narrow paper masking tape - plastic container for mixing the solution;
- gloves and respirator;
- construction mixer. You can do without it, but mixing the solution by hand is an easy task; Drill mixer
- plastic film to cover the floor. Wide tape for fixing the film;
- deep penetration primer. Two liters will be enough for a loggia with dimensions of 6x1.5 m;
- facade paint 5 liters;
- color. Consumption: no more than 130 ml per 1 liter of paint.
Color
Advice! Laying the finishing floor covering should be done last, when all other finishing work has already been completed.
If the flooring has already been laid, it is necessary to protect it from dirt. For example, cement mortar that accidentally gets on the laminate will be problematic to clean. The floor can be covered with plastic film, taping all the joints well and attaching the sheet to the baseboards or floor with adhesive tape.
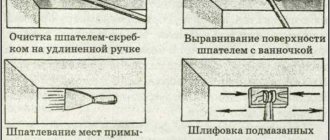
Step 1. If the wall surface is not too clean and smooth, we correct these shortcomings. We arm ourselves with a sanding block or a grinder. We remove all stains of grease and dirt without leaving any residue.
To improve surface adhesion, apply a deep penetration primer to the wall. We wait until the primer dries and apply the second layer.
If necessary, dilute the primer with water (the proportions are indicated on the packaging), pour it into the tray, dip the roller into it and squeeze it well, rolling it along the ribbed surface of the tray.
There is no need to pour too much. The tray allows you to perfectly distribute the primer over the entire circumference of the roller.
From a poorly wrung out roller, soil will flow and splash in all directions, which will lead to overspending and wasteful expenses. We carry out the work wearing a respirator and gloves (the solution may have a pungent odor).
Primer roller
Advice! Drops of primer will be very difficult to wash off glass and plastic surfaces, including switches. If you are not confident in your own accuracy, cover everything as best you can with film and seal it with masking tape.
Expert opinion: Masalsky A.V.
Editor of the “construction” category on the Stroyday.ru portal. Specialist in engineering systems and drainage.
The main task of the primer is to improve adhesion for reliable adhesion of the base and the applied layer of plaster, putty and other similar materials. Most solutions contain an antiseptic, which is an additional advantage of using primer.
Table. Solutions suitable for external use.
| Name | The basis | Drying time at air temperature 20°C, minutes | Consumption | Solution application temperature, °C |
| Water-dispersed | 180 | 0.3-0.4 kg/m2 | +5 — +30 |
| Polymer | 360 | 0.2 kg/m2 | +5 — +30 |
| Litokol Primer C-m | Water-dispersed | 240 | 0.1-0.3 kg/m2 | +5 — +35 |
| “Osnovit Dipkont LP53” | Water-dispersible, quick-drying | 30-40 | 0.05-0.1 l/m2 | +5 — +30 |
Step 2. Cover potholes, cracks and irregularities with putty.
Putty walls, niches
Level the slopes with putty, if necessary.
Putty on window slopes
We treat all putty surfaces with a primer.
Step 3. Let's move on to lining the walls. First, draw horizontal lines with a pencil. The distance between the lines is equal to the height of the brick plus the “masonry seam” of 2 cm. We also draw the “seam” with a pencil, so that we can then stick masking tape there.
For convenience, we use a meter bubble level.
Now we draw vertical lines offset in adjacent rows by half a “brick”. The distance between the vertical lines is equal to the length of the “brick” plus 2 cm.
You can make a template for marking, the options are shown in the image below.
Stencils
Let's move on to gluing the tape. First we glue all the horizontal rows, then the vertical ones. Not vice versa, otherwise it will be difficult to tear off the tape later without spoiling the “masonry” pattern.
Scotch tape applied
Step 4. Prepare the solution. Mix the dry ingredients (tile adhesive for exterior use and cement plaster) in equal proportions. Add the dry mixture to lukewarm water in a thin stream. Stir with a construction mixer or by hand (this option is very labor-intensive) until smooth. The consistency of the solution should be thick enough, but plastic, so that the solution does not spread over the wall.
We carry out the work wearing rubber gloves and a respirator!
Apply the prepared solution to the wall by hand. Distribute the mixture in a layer of approximately equal thickness (no more than 10 mm). The “bricks” will have an interesting texture, not too smooth.
Application of the solution
We begin to tear off the tape without waiting for the solution to dry. We carry out the work slowly and carefully, trying not to disturb the geometry of the “bricks”.
Work process
Niche design
Continuation of wall decoration
We leave the walls to dry and take a break from work for three days.
Step 5. Carefully prime the walls in two layers and wait until the primer dries. This may take several hours.
Let's move on to the creative part of the finishing process. Pour 1 liter of paint into a small container (if you purchased a large container in advance). Gradually add color, mixing the paint.
When the desired shade is obtained, we note how much color was used per liter of paint, so that a similar amount can be added to the next portions.
We paint the walls with a roller or a high-quality brush that does not produce lint. We carefully paint all surfaces, especially in the inner corners and seams.
Color application process
To emphasize the texture of the surface, apply a layer of color diluted with water to the wet paint. You can apply it with a wide brush or sponge without covering the entire surface of the bricks.
Painting walls
When the paint has dried, use a thin brush to paint the “brickwork” seams. In our case, we use white exterior paint.
Drawing "seams"
Table. Exterior paints.
| Name | Paint type | Complete drying time, hours |
| Facade paint “LATEK” | Water-based acrylic paint, odorless. | 1 |
| Water-based acrylic paint, odorless. | 4 |
| Water-based, odorless. | 2-4 |
Calculator for calculating the amount of paint for wall decoration
Go to calculations
Step 6. We create a niche on the balcony partition. The excavation was made in order to save building materials. And if you don’t plan to install shelves or a wall cabinet there, you can decorate the wall with a beautiful pattern.
Niche plain white
Select an image and print it on a plotter.
Stencil
We attach the stencil with masking tape to a pre-painted and dry surface. Carefully draw the elements of the drawing with a pencil along the contour, and then paint the pattern with a thin brush. The result is a stylish contrasting composition.
Niche design
We complete the finishing work with cleaning. We throw away the film and wash the tools, glass and floors used in the work. We put a sofa on the loggia to admire the “brick” wall, made with our own hands.
Sofa in the updated interior of the loggia
Video - Types of brick wall decoration
Video - Brickwork made of gypsum plaster
If you don’t like this finishing method and want to start making artificial stone, take a look at the detailed instructions on our website. Here you will find step-by-step master classes on making silicone molds, matrices from the compound, as well as methods for casting decorative stone for interiors and garden paths.