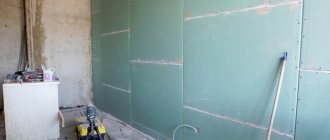
The practicality of drywall is due to its structure, which consists of two paper layers and a gypsum base. Thanks to this, the gypsum board sheet can be cut at different angles and given a variety of shapes.
The only drawback is considered to be increased fragility, which interferes with the creation of relief objects. As a rule, frame structures are used to form textured surfaces. However, their construction is not always justified and requires not only the availability of free space, but is also associated with material costs. Milling plasterboard, which is a cheaper and more practical alternative to lathing, will help save space and money.
Milling plasterboard sheet
The practicality of drywall is due to its structure, which consists of two paper layers and a gypsum base. Thanks to this, the gypsum board sheet can be cut at different angles and given a variety of shapes.
The only drawback is considered to be increased fragility, which interferes with the creation of relief objects. As a rule, frame structures are used to form textured surfaces. However, their construction is not always justified and requires not only the availability of free space, but is also associated with material costs. Milling plasterboard, which is a cheaper and more practical alternative to lathing, will help save space and money.
Full contents of the material
How to bend drywall at right angles?
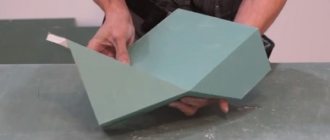
To carry out this operation, for example, when making a box to house the backlight, a V-shaped groove is made in the gypsum board. In this case, the layer of cardboard on the back side remains untouched. Therefore, for example, with sheets 12 mm thick, the maximum depth of the groove (where the vertex of the right angle passes) is 10 mm.
After this treatment, the gypsum board can be easily bent at an angle of 90° and glued with polyurethane foam. You will get a smooth and reliable connection.
Milling reduces drywall consumption and improves the quality of the external or internal rib. Processing such an element will require significantly less effort than with an overlap connection.
Disc router
A disk router is used to create straight grooves or to cut plasterboard sheets. The advantages of a disk router are the speed of work and the cleanliness of the cut. The plaster is cut very smoothly and without jagged edges. However, a disk router is not suitable for creating grooves of complex shapes.
The disc router is designed for cutting drywall, its advantage is speed and cleanliness.
Advantages
Among the main advantages of this technology are the following:
- simplicity of implementation of the method: ease of processing, high speed of work, does not require the use of complex tools;
- saving time on installation work: the ability to complete wall cladding, create suspended ceilings, interior partitions or boxes in the shortest possible time, compared to frame technologies;
- almost unlimited possibilities for designers: high precision processing, surface quality, the formation of complex textures is possible;
- minimum number of defective structures: when milling, the sheet is not subject to significant mechanical loads, as, for example, when manually cutting with a hacksaw or grinder;
Note! To reduce the number of defective sheets, it is necessary to perform work as carefully as possible.
- saving on materials: cutters remove only a given layer of gypsum, do it smoothly and accurately, without disturbing the reinforcement or reducing the safety factor;
- reduction in the amount of work: milled ends or a plane can be considered a finishing touch, that is, it is not always necessary to apply putty to them or install additional elements;
- creation of frameless structures, provided there are no external mechanical influences.
Possibility of using a V-shaped cutter
Creating partitions or boxes from plasterboard using the classical method assumes that the internal and external corners will be made up of two sheets. Accordingly, if, for example, you need to make a U-shaped box, then at least three separate pieces of gypsum board will be used, which will be attached to the metal profile at right angles to each other.
When making the same U-shaped box using a V-shaped cutter, only one piece of gypsum board will be required. By making only two cuts with a cutter, bending the sheet and gluing the sections, we get the same box, but without external joints.
The advantages of this method are obvious:
- Time costs. Milling drywall speeds up the cutting and assembly of structures significantly.
- The number of open cuts, fastening points and the number of required parts are reduced. This speeds up puttying and priming work. Reinforcement at external corners made in this way is not required at all.
- Boxes and structures bearing minor loads can be installed without a metal frame. After the adhesive layer has dried, the corners formed by milling themselves become quite strong.
- Using a V-shaped cutter, you can make structures of different profiles. To do this, you just need to correctly estimate the number of corners, evaluate which side each of the cuts is located on, make markings and cut the sheet. For large-scale work, you can prepare the required number of corner blanks in advance.
Installation of socket boxes in plasterboard for mounting sockets and switches
Workflow Features
Let's figure out what advantages milling drywall has over the classic version of the work, and also consider all the features of working with cutters.
Pros and cons of this option
Drywall milling has the following advantages:
- Saving time . The use of the technology we are considering reduces the time spent on the construction of boxes and corners by 2-3 times. Everything is done much faster and easier, in addition, the likelihood of damage to the material if all recommendations are followed is practically absent;
Making corner joints with a router is very easy
- Possibility of constructing boxes of any size and configuration . There are no restrictions on the complexity of the design, the main thing is to correctly understand the markings and make grooves in the required places;
It is better to train on designs of simple forms, and when you already have experience, you can move on to more complex options.
An experienced craftsman can make structures of very complex configurations without cutting the sheet into pieces
- The number of open ends is reduced . This makes the structure neater and greatly simplifies the work of puttying and finishing. In addition, you do not need to reinforce all bends with corners, which reduces the cost of the project and reduces the time spent on putty with metal elements;
- Possibility of creating structures without a frame . If there is no load on the box or corner protrusion, then you don’t have to reinforce such elements with a profile. They themselves will have good rigidity and will last for many years without deformation.
You can make blanks in advance if you need a lot of identical elements, this is very convenient
The only downside is that you will have to spend money on a cutter and router. But if you are doing renovations in your home, then it is easier to rent a power tool. The price of the service is low, so you will save significant money.
The working process
Let's figure out what you need for work:
- A 90 degree drywall cutter is a special device that is used to make perfectly straight corner joints. The cost of equipment varies from 1000 to 4000 rubles. For household needs, the cheapest option is also suitable - even it will be enough for ten years of occasional use;
Drywall is a soft material, so the cutters practically do not wear out during use.
- Manual frezer . As I wrote above, if you are not involved in professional installation, then it is easier to rent a power tool. The work usually only takes a few days, so rental costs will be minimal. The main thing is to make sure that the shank of your cutter fits the equipment.
A manual milling cutter is a simple and convenient device for making grooves in plasterboard and gypsum boards
Instructions for doing the work yourself look like this:
The cutter rotates clockwise, so during operation the router always pulls to the left. It is on the left side that the rule needs to be made.
What is drywall milling?
Working with a router
Milling drywall is, in simple words, cutting triangular grooves into it in order to give the sheet a certain shape. An example of such processing is shown in the photo above - a special triangular cutter cuts a groove in the body of the drywall at an angle of exactly 90 degrees.
- If you bring this line to the end, you can take the workpiece and fold it. The result is a perfectly right angle with a sharp outer edge.
- This fact greatly simplifies both the installation of the part and its subsequent puttying.
- This bending method is far from the only one, and you can personally verify this by reading the article to the end.
Complex ceiling box made of milled plasterboard
- In addition, milling helps to obtain complex relief patterns on the surface.
Complex patterned surface made using a milling cutter
Here is this little miracle cutter for drywall, which radically changed the idea of installing this material.
Triangular drywall cutter
What does the use of this device actually give us?
- Firstly , this is a significant time saving when assembling boxes and other rectilinear figures. You also save money, since many elements can be assembled without using a frame at all, or due to its significant simplification.
- Secondly , the assembly process itself becomes more technologically advanced and simpler. If you master everything well, then you won’t end up with any scraps or waste.
- Thirdly , the processing method is very flexible and allows you to give drywall very complex shapes, which you will also see in the course of our article.
Note! It is impossible not to note this point: it will not be difficult to coat smooth and right corners with a thin layer of putty. Whereas the same boxes mounted on a frame have seams in this place that need to be reinforced with a corner, after which more than one layer of the mixture must be applied to it. This takes a lot of time, and the geometry of the structure’s contour suffers greatly from multi-layering.
A small box with ideal proportions
Features of milling equipment
Festool drywall cutter
The quality of milling work largely depends on the equipment you use. One of the leaders in the production of high-quality cutters is the German company Festool.
Its tools have a fairly high price, but once you purchase such equipment once, you will no longer need to exchange it for another.
- As an option, you can purchase inexpensive Chinese analogues, but their quality will be significantly inferior, so see for yourself - perhaps you just want to try the method before investing in expensive equipment. Then this approach will be justified.
- The cutters themselves come in several types: triangular or fillet-groove V-shaped (this is the one shown in the photo above; they make right angles); straight slot cutter for cutting holes at an angle of 90 degrees; T-shaped cutter, the same as the previous one, but for larger diameter holes; U-shaped cutters - to create recesses of the appropriate shape; edge or chamfer cutter - for chamfering the edges of sheets.
90 degree slot cutter
When choosing cutters, in addition to the country of manufacture, you need to pay attention to the following points:
- Be sure to match the shank diameter to the router you have, otherwise you might just throw away the router.
- Learn to work on inexpensive equipment, so there will be no risk of ruining a tool for which you need to pay decent money.
- You should not buy all types of cutters at once - do it as you develop your skills, focusing on the tasks assigned to you.
Advice! Be sure to follow safety precautions by reading the instructions included with the equipment.
Next comes the choice of the router itself. It's no secret that equipment from renowned European and Japanese manufacturers, even assembled in China, will always serve for a long time and in good condition.
Fraser
- Separately, I would like to highlight the products. These instruments are very common in the world and are so popular for good reason. Despite their high quality, they have a very affordable price.
- Although it is worth noting that recently complaints about reliability have become more frequent - nevertheless, the modern business model is taking its toll.
- If you intend to immediately invest in good equipment, consider options from: Metabo, Festool, Hilti, DeWalt, Bosch, AEG.
A vacuum cleaner must be connected to the router
- There are two types of milling cutters themselves - shaped and disk.
- The first applies to all the main types of work that we listed above.
- With its help, you can: select holes and grooves of various shapes and depths, create shapes of complex configurations, and display unusual patterns on the surface of sheets.
Disc router bit
- The disk router is used much less frequently. Its main purpose is to cut drywall sheets to length. It allows you to do this at high speed and with good cutting quality, but only in straight lines.
- When choosing a router, pay attention to models with a power of 1 to 1.5 kW. You should not take more powerful ones, as they can ruin the sheets.
Milling drywall requires high precision in positioning the tool, but this is problematic due to the fact that the center of the cutter will be some distance from the edge of the tool, and, accordingly, to the stop strip. As an auxiliary device, it is worth acquiring such a flat wooden plank, the width of which will exactly correspond to the above-mentioned indentation.
The rack is used only when setting the guide; it is not needed when milling
Tools at hand: how to cut drywall at home
To evenly cut the material, you can even use scissors or a simple blade, a stationery or kitchen knife, using them according to the principle of a drywall knife. Shaped cutting can be done with a regular hacksaw for metal. The principle of its use is similar to using a jigsaw, but there are differences. You can start sawing the sheet with a whole hacksaw, but the handle will not go deep into the sheet, so you will have to remove it and continue cutting only with the blade.
Round holes can also be cut with a regular knife, for this you need:
- Mark the location of the slot on the front and back sides of the slab;
- Outline the shape of the hole by tracing an outline on both sides of the sheet;
- Use a knife to cut through the cardboard layer on both sides;
- Lightly tap the plaster with a mallet.
In order to cut a hole in an installed sheet of drywall, a location is selected and the outline of the figure is outlined and a drywall hacksaw is used.
Purpose of milling gypsum boards
The process of milling gypsum boards consists of cutting grooves at a certain angle to the surface being processed in order to ensure tight contact between the connected structures or relief patterns. Due to this processing, finished parts can be quickly and easily joined together, without resulting in loose contacts or unacceptable gaps.
Important! When milling drywall, you need to securely fasten the sheet on the table and the cutter in the chuck, and also monitor the positioning of the tool. The cutting speed is determined by the power of the power tool, the type of cutter, the thickness and composition of the material.
- Form for ordering milling services. Drywall milling
- How to mill drywall and why is drywall milled?
- Drywall milling
How to mill drywall and why is drywall milled?
Various multi-level structures, arches and niches are created from plasterboard, intended for decorative purposes or necessary to hide communications.
Types of machines, cutters and areas of their application
There are two main types of routers: disc and shaped.
Disc router
A disk router is used to create straight grooves or to cut plasterboard sheets. The advantages of a disk router are the speed of work and the cleanliness of the cut. The plaster is cut very smoothly and without jagged edges. However, a disk router is not suitable for creating grooves of complex shapes.
Shaping router
The main milling of gypsum boards is carried out with a shaped router. It is used for cutting grooves of complex geometry, as well as round or oval holes. In principle, when using a router, the shape of the hole can be any. You can also make chamfers on plasterboard sheets using a router.
Drywall cutters come in different shapes and sizes, depending on what exactly needs to be done:
- The slot cutter is straight. Used for drilling grooves and holes located at right angles to the plane of the sheet. Can be used to create both pinholes and drill holes of complex shapes.
- T-shaped slot cutter. Used for drilling grooves and holes located at right angles to the plane of the sheet. Can be used to create both large-diameter pinholes and drill holes of complex shapes.
- Edge cutter. Allows you to make chamfers on the edge of a plasterboard sheet. May have a different profile.
- U-shaped fillet groove cutter. It is used for drilling grooves with a rounded bottom profile, as well as for drilling straight point holes and holes of complex geometry.
- V-shaped fillet groove cutter. Used for drilling triangular slots with an angle between cuts of 90°. This type of cutter is the main one in the manufacture of plasterboard structures.
Read also: Diameter of holes for screws in wood
How to properly work with a V-shaped cutter
The best way to work with a V-shaped cutter is to use special milling equipment, but such a milling machine costs a lot of money, and not every home craftsman can afford such a processing unit.
Drywall milling, the technology of which allows you to do without expensive equipment, is performed with a special hand tool. A manual router is relatively inexpensive, and the mobility of such a device allows you to carry out all the work on cutting plasterboard sheets directly in the room where the repairs are being carried out. The angle of the cutter can also be changed much more quickly using hand tools.
The manual milling method of working with drywall includes two stages: preparatory work and the actual milling of drywall.
At the preparatory stage, you should make a measure, which is a wide strip of plywood. The measure is used for ease of cutting; the width of this product should be equal to the distance from the center to the outer part of the cutter.
Before starting work, the rule is secured with clamps to the edge of the table on which work with the plasterboard sheet will be carried out. Then the router must be adjusted to the thickness of the sheet so that during operation the nozzle does not cut the bottom layer of cardboard. After completing the preparatory part, you can begin to directly work with the milling tool.
This milling technology works great only if the cut locations are accurately marked. If a mistake is made at this stage, you will need to replace the plasterboard blank and start the work again.
Work on milling plasterboard begins with the fact that the plasterboard sheet is placed firmly on the sheet, a measurement is applied for the cut, and the router is drawn along the marked line. To get a perfect cut and to ensure that the product is installed without gaps, you should also run the cutter in the opposite direction.
If necessary, milling on the back side of the sheet must be carefully turned over and the tool drawn along the marked line.
The above-described technology for milling plasterboard allows you to produce a structure of any shape. At the preparatory stage, you should very accurately make markings along which milling will be carried out; only in this case will it be possible to obtain a high-quality cut of the material.
Working with an edge plane allows you to obtain the optimal joint angle of gypsum board sheets.
When processing edges, beginners make many mistakes; as a result, cracks may appear at the joints. Common mistakes include forming edges after securing the sheets to the frame and using a utility knife instead of an edge plane. Read more about mistakes when working with drywall in the article “10 mistakes when installing drywall.”
The edges of the sheets should be chamfered at an angle of 22.5 degrees, so at the junction between the two sheets there will be an angle of 45 degrees. A precise angle can be achieved using an edge plane.
After installing the sheets on the frame, the joints are sealed with putty. For information on how to correctly perform this operation, read the article “Sealing seams between sheets of drywall: step-by-step instructions.”
Milling process
Now, having received information about the tool, let's see how the process itself occurs, what else you need to have, be able to and know to implement it.
Preparing for work
A comfortable table on site is already half the success
So, before you start milling, you need to prepare your workplace, which should be equipped with:
- A smooth and level surface on which sheets of drywall can be laid flat. It is best to have a wide wooden table, as shown in the photo above.
- The table is equipped with some kind of stop so that the sheet cannot be moved during the milling procedure.
- Buy a long and level guide - an aluminum strip or rule, as well as a pair of clamps for it, so that you can easily handle long sheets of drywall.
- Naturally, marking devices are required. It is best to use a metal carpenter's corner and a well-sharpened pencil. A tape measure is also used, but it is worth remembering that with it you can get an error of a couple of millimeters, so when taking measurements, strictly control the position of the tip of the tape measure.
The tip of the tape measure has a backlash for accurate measurement of internal and external angles
- In addition, be sure to equip the router with a vacuum cleaner. A cyclone filter with a container for collecting gypsum must be placed between them, otherwise the vacuum cleaner will not last long. The resulting gypsum dust is very fine and will be poorly retained by the original filters of the vacuum cleaner, which will lead to rapid clogging of the electric motor.
Cyclone filter on a vacuum cleaner
- No matter how you collect dust, it still ends up in the air we breathe. For this reason, all work must be carried out wearing a respirator and safety glasses. Among the additional protective equipment, we note gloves, which are always in place.
Minimum personal protective equipment
Let's start milling
On particularly large objects, a lot of milling has to be done, which requires preliminary cutting of a large number of workpieces. Moreover, this must be done with high precision, otherwise the result of assembling the plasterboard structure will be disastrous.
Simultaneous cutting of 3 sheets of drywall with a circular saw
- To minimize the time and effort spent on this stage, it is recommended to cut several sheets at a time.
- In the case of wall sheets (12.5 mm), they can be cut in the amount of 3, and ceiling sheets (9.5 mm) - in the amount of 4.
- For this we use an ordinary circular saw, which, due to its high speed, gives a high-quality and even cut.
- The procedure is performed as follows: we place the required number of sheets on our table; align their position with the stop; we make markings along the edges, taking into account the distance from the edge of the tool to the cutting disc; we install a level guide according to the marks and fix it with clamps; We set the required cutting depth on the saw and cut the sheets along the entire length.
Advice! Please note that the saw is also connected to the vacuum cleaner through a cyclone filter.
Having received the required number of blanks, we can begin the milling itself.
Before you take on the router, let’s simplify our task
- So, the amount of work we have is significant, so let’s put the process on stream so that we spend the minimum amount of time on the production of each element.
- First, place one of the sheets that needs to be processed on the edge of the table. We will need to chamfer its edge, so make sure that the sheet protrudes beyond the edge of the table by a couple of centimeters.
- Focusing on the other edge, build a stop for the router, as shown in the photo above. Please note that the strip of drywall protrudes beyond the metal lath; it can also be behind it so that the sheets can be slipped from below - this way we accurately set the gap for the place where the cutter will pass. All we have to do is move the workpiece close and cut through it.
Chamfering a free edge
- So, we lay the sheet, take a corner plane and use it to chamfer it. The sheet is turned face up.
Now the sheet needs to be turned over
- We turn the sheet over so that the chamfer is near the stop. We will mill from the reverse side.
Milling process
- We take a router and run it along the entire length of the sheet, after which we run it in the opposite direction. This is done in order to trim the edges of the cardboard and clean up other possible defects.
Priming drywall
- Next, the milled area must be cleaned of dust and primed. For this we use any brush, acrylic primer or ordinary water. Why water? Yes, because to glue this seam we will use polyurethane foam, which hardens effectively upon contact with water.
- Let's make a small digression. In general, for gluing milled parts, manufacturers recommend using, in addition to PVA polyurethane foam, hot melt adhesive, and Uniflot. However, it is the foam that allows you to complete all the work as quickly as possible and provides excellent coupling quality.
Application of polyurethane foam
- We take the mounting foam and apply it along the entire length of the groove in a thin layer. Use only professional compounds that provide low secondary expansion.
Temporarily fixing the workpiece with masking tape
- Next, the workpiece is bent into a corner, after which it is fixed in this position in several places with masking tape. Now it can be put aside to harden, and we can continue milling.
Drying workpieces
This is how our blanks gain their strength. Pay attention to how clear the corners were obtained by the master. Now installing these elements will not be difficult.
How good is polyurethane foam for gluing milled drywall?
If it seems to you that the strength of the mounting foam may not be enough to hold the corner in this position, then read this chapter and dispel all your doubts.
Corner glued to polyurethane foam
- In front of you is a double corner, which is held in place only by frozen foam. Let's try to break it.
Supports the weight of an adult
- The weight of the naturalist is 60 kilograms, but the corner can withstand more, since the master also jumped on it.
Ready console
- That is why such structures are so good as wall and ceiling consoles. They are very quick to install, you can easily put an LED strip there, and the person who comes after you to putty will remember you and your entire family with gratitude, thanking him for giving the world such a good person! This is, of course, a joke, but in every joke, as they say, there is a grain of joke!
- It is simply impossible to break such a console, glued with foam under normal operating conditions; good efforts must be made.
- In this case, the assembly is made from one sheet, you completely get rid of waste, and all angles will be exactly 90 degrees, which will satisfy even the most demanding customer.
What can we install using milled sheets?
What can such a rectangular box be useful for?
We have already written that there are a lot of options for using milled drywall. We understand that our site is about ceilings, but not showing the following would be simply a crime.
Covering the installation with plasterboard
- Have you ever seen an installation completed in 10 seconds? No!? But this happens, of course, after preliminary milling and gluing of the box. Look at this design, the craftsman only needed to screw three pieces of the PPN profile to the walls in order to screw the frame onto the screws.
Rectangular box with stiffeners
- The next figure made from milled plasterboard is universal. It can act as a decorative ceiling beam or wall semi-column, but the artist in the photo has a slightly different idea. He uses it as a removable formwork for niches in a cement screed for heating beds - simple and functional.
A flat niche for heating beds will then be covered with a decorative grille
