What is sculpture painting
A special technique of painting with decorative plaster consists of sculpting relief images from a painted plaster mass that holds well the shape given with a palette knife (some also do this with their fingers). That is, this is not painting, when paints are applied to the base with a brush or palette knife, resulting in multi-colored paintings.
On the other hand, this is not a sculpture made from clay. This art was called relief painting, since the result is something in between, combining both types of creativity. As in any art, painting with plaster is performed using special techniques.
The working material is a decorative plaster mixture containing a fibrous filler with a reinforcing agent. Thanks to the fibers, thin petals of flower arrangements are easily formed, even the wet mass holds its shape without cracking when drying. The plaster solution is painted before use. Therefore, sculpture painting is not painted after formation.
Creating three-dimensional ornaments/patterns using putty
Using the decoupage technique you can create many beautiful works. But very often, one technique is not enough to create a work, so craftsmen combine decoupage with other decorating techniques. In this master class we will talk about creating three-dimensional ornaments using putty. There will be a lot of text and few pictures!))
Perhaps I won’t tell you anything new for those who have been doing decoupage for a long time, but for beginning craftsmen, I hope this information will be useful!
Putty is an amazing material; you can use structural paste instead, but we will talk specifically about the putty that is sold in regular hardware stores.
Let's look at two ways to create a three-dimensional pattern.
1.The easiest way is to apply putty through a stencil. There are different stencils: self-adhesive and regular reusable stencils.
We simply glue the self-adhesive stencil onto the surface and apply putty, filling the “voids” in the stencil. I remove such a stencil by picking it up by one edge, gradually peeling it off from the entire surface.
We apply a regular reusable stencil to the surface and apply putty. But this must be done very carefully so that the stencil does not “ride” across the surface. If the surface to be decorated is flat, the stencil itself will press down under the weight of the putty; in other cases, it is better to secure its edges with masking tape.
Such a stencil must be removed “straight up” so that the design does not become smudged.
If the putty gets slightly under the stencil, leave it there until it dries. Everything can be fixed! When everything is dry, carefully remove the excess with a toothpick, slightly moistening this area (just a little, just a drop of water).
After the three-dimensional ornament has dried, we go over it a little with sandpaper, removing all the irregularities. Then we repeat everything from the beginning. Trying to place the stencil in the same place as accurately as possible, we again apply putty through it according to the existing pattern. Thus, the volume will be “higher” and smoother. After drying, we lightly sand again.
This is what we got!
2.The second method requires more time and accuracy. We print the pattern on the printer, transfer the chosen pattern using carbon paper to the surface. You can draw a picture with a pencil “by hand”.
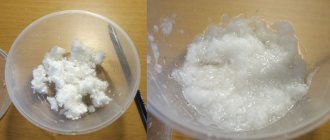
We put the putty in a bottle with a narrow spout (I used a bottle of PVA glue), add a few drops of water and a little PVA (for strength), the result should be the consistency of “liquid sour cream.” In my opinion, with PVA, the resulting mixture becomes more elastic and “obedient” to work with. And another little tip: when you put the putty into a bottle, tap the bottom of the bottle on the table, then the putty will “fall” on its own, otherwise it will be difficult to place it there (maybe this is obvious, but for some reason I didn’t come to this right away))) ).
We squeeze out patterns from the nose according to the pencil drawing. Each side is dried strictly horizontally overnight. After the first layer has dried, you can go over the necessary places with more putty.
If in some area it turns out very sloppy, then simply erase this area with a damp cloth and apply the pattern again. You can also correct it with a toothpick.
After drying our ornaments, we can move on to painting/tinting. But we will talk about this in the second part of the master class.
You can see examples of my work in my store!))
Thank you for attention!
Which plaster is suitable for sculptural painting
Techniques for forming high reliefs can be easily understood by watching videos of master classes. However, the material itself, on which more than half the master’s capabilities and the success of the process depend, most often those working in this technique prepare the materials themselves. The mixtures offered by manufacturers cannot be called cheap. In addition, sometimes homemade mixtures allow you to achieve special results.
Some of the masters (contrary to the “tradition” of keeping their own know-how secret) share the recipe for mixtures that you can make yourself. High-quality modeling dough makes it easier to master the technique of creating relief images.
On the other hand, overcoming difficulties gives birth to a true master who becomes capable of opening up new possibilities for creativity in everything.
However, more often than not, beginners do not intend to devote their entire lives to sculpting. Therefore, if the plans are amateurish and you need a quick result, or for the process of learning techniques, below are recipes for “homemade” plaster.
The basis of the mass is polymer binders and fibrous filler.
The mass should:
- have a long life span;
- do not be too sticky (do not reach for the tool);
- be plastic;
- maintain spatial shape;
- not be prone to shrinkage.
Compositions manufactured in factory workshops do not always fully satisfy these requirements. You can even start by working with universal acrylic putty VGT. The material holds relief up to 2 cm high. Plaster is capable of holding relief forms that rise above the base up to 3 cm.
Popular ready-made products:
- Marmur Stucco;
- VGT Bas-relief;
- Clavel Riviera;
- author's mixture of master Evgenia Ermilova.
Necessary materials
Perhaps half of the success in volumetric painting depends on the properties of the sculptural solution used. He must:
- holds its shape well, does not break or crack after drying;
- do not have rough roughness;
- spread in a thin layer;
- do not stick to the palette knife;
- have a white color for ease of coloring;
- and cheap =)
Factory materials that have the required qualities are expensive, mostly all imported. Moreover, they are only available in large cities. Therefore, to reduce the cost of work, craftsmen independently make sculptural plaster from more affordable materials.
Let's consider several mixtures for textured paintings.
Clavel Riviera . This plaster contains natural fibers that prevent cracking even with a thick layer of up to 20 mm. The material from Clavel has excellent ductility and adhesion to any surface. But this has a drawback - the paste stretches behind the tool, as if reluctantly sliding off it, so the flower petals are not very voluminous.
VGT Bas-relief . Decorative plaster with cellulose filler is designed to create textured surfaces with relief up to 10 mm. The marble powder in the composition gives snow-whiteness and strength, and does not shrink.
Marmur Stucco . This is essentially the German analogue of VGT plaster. The composition and properties are similar, but the price is much higher. In its pure form it is a little thin for sculptural painting; it needs to be mixed with other materials to increase density.
Evgenia Ermilova ™. An original mixture from Evgenia Ermilova, a master of relief painting. Completely ready-to-use plaster is sold already painted in the most popular colors. You can buy the material in the online store with delivery throughout Russia and neighboring countries.
NEOMID . Polymer putty for filling polyurethane foam. Contains microfiber that protects the coating from cracking. The material has an excellent consistency for our sculptural works; it is convenient to apply and form decorative elements. The downside is the light gray color, which reduces the brightness of the created pattern.
Expert opinion
Marina Zanina
Interior designer
I would advise novice craftsmen to purchase ready-made materials for decoration, so that it is immediately clear what the consistency and adhesion of the plaster should be. This will help you quickly master the technique of three-dimensional drawing.
Clavel
VGT
Ermilova
Neomid
Tools
Delicate work requires “fine” tools.
List of standard “working hands”:
- The palette knife is a tool used not only by painters. Externally, the working blade resembles a miniature trowel. The working part is made of a thin stainless steel plate. It springs, bending. The softer the palette knife, the more convenient it is to work. Palette knives vary in blade sizes and shapes.
Palette knives
The thin “blade” of the edge allows you to scrape off excess dried material from the base and gain weight. The narrow end allows for sculpting in difficult to reach areas. The size of the palette knife determines the size of the petals obtained by applying the paste to the spatula. The larger the blade, the larger the petal. The tip of the blade should be rounded.
For beginners, 2-3 palette knives of different sizes will be enough to start, with the most popular petal shape
- A paint brush with soft bristles is used when you need to smooth out sharp edges. A wet brush is used to soften the layer that has begun to dry out, if you need to make changes or correct the shape of the relief. The tool is also used to coat sculptural work with an “invisible” varnish.
- A spatula (medium or small width) is used to form the base layer.
- Knives and scrapers will be needed if you need to smooth or scratch the pattern. Chisels or sharpened screwdrivers will come in handy. You can make a similar tool from available materials.
- Confectionery syringe with the desired nozzle shape. There are ready-made pastes packaged in tubes with tips.
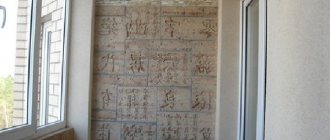
- It is rare to use stencils in this type of technique. After all, they are used to make low-relief patterns, and these are other techniques.
- A sanding net may be needed.
- You also need a palette for a set of multi-colored petals or tinting the white plaster mass. It can be plastic, glass, board or other rigid sheet material.
Other ways to decorate your walls
You can decorate the walls of your home with putty paintings in other ways. For example, draw a picture with a syringe. This method is good because you can exactly repeat the contours of the selected pattern.
First, the syringe is prepared: the needle is removed, the piston is pulled out. The putty for this method should have a thinner consistency than when working with a spatula. The cavity of the syringe is filled with solution, and the piston is inserted into place.
The mixture is gently squeezed out with a piston, and the syringe moves along the sketch line. First, the main lines of the drawing are drawn, and then the details are drawn. The finished painting must be completely dry. Then the background is applied. To do this, water-based paint is diluted and applied to the painting with a soft sponge. The background color can be any. After it has completely dried, you can begin drawing small details. It is better to do this with small brushes.
You can make a three-dimensional drawing on the wall using a stencil. You can purchase it ready-made or make it yourself. To do this, transfer the selected design onto a sheet of thick cardboard and cut out a stencil. Use masking tape to attach it to the wall. Using a spatula, the slots are carefully filled with putty. To work with stencils, it is better to choose a gypsum mixture.
When the putty begins to dry, but is not yet hard, you can carefully remove the stencil. Use a small spatula or other suitable tool to fill the voids in the pattern. Then sprinkle the relief with water and use a small brush to model it, straightening the lines. When the pattern is completely dry, its surface is treated with sandpaper and a scraper to remove all irregularities and sagging.
We recommend: How to make a decorative panel with your own hands
To give strength to the surface of the design, it should be treated with a varnish primer. After this, the entire wall and drawing are covered with two layers of acrylic paint. Then the pattern is drawn with a special oil felt-tip pen or a thin brush (3).
The wall can be decorated with a very special relief. Its essence comes down to creating three-dimensional contours of a design on a flat surface. To implement this idea, you need to make a recess on the wall. Then its surface is plastered flush with the rest of the plane. The pattern is made immediately. Recesses are cut along its contour.
A three-dimensional painting will make any wall a decoration for the whole house. An excellent result and the delight of others will be compensation for the time spent.
moyagostinaya.ru
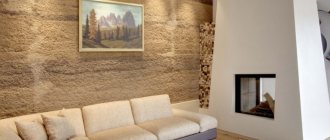
Sculptural painting with decorative plaster
Those who have mastered or just tried sculptural painting speak differently about the process of mastering the technique. Some say that mastering the techniques is simple, others say the opposite. Therefore, everyone learns the degree of complexity from their own experience.
The order of execution is as follows:
- preparation of the base;
- kneading and tinting paste;
- selection of a sketch, transferring a picture to the wall;
- creation of a relief panel.
- drying, varnishing.
The traces of solution remaining on the spatula dry out faster than the mass in the bucket.
Dried solution prevents proper formation. Therefore, the spatula of the palette knife is regularly cleaned with a damp cloth or napkin.
Base for sculpture painting
Masters create some compositions directly on the walls, that is, on plastered or concrete surfaces. In general, any base that has rigidity is suitable for creating a unique sculpture. It can be: cardboard, drywall, plywood, ceramics, even glass (the mass has high adhesion). The strength of dried “stucco” is close to that of stone, so you can create souvenirs or jewelry from the decorative mass.
The creation of the picture is carried out on horizontally located sheet material.
The base is being prepared. The preparation procedure is simple, somewhat similar to preparation for applying decorative plaster. It is necessary to clean (to increase adhesion) and level the base.
The fiberboard surface will hold the sculpture more firmly if it is treated with sandpaper. For the same purpose, the base is primed. Often an even layer (2-3 mm) of the solution used for “sculpting” is applied, which becomes the basis for “attaching” parts of the image. But still, plasterboard sheets are most often used as a base.
As a base layer, you can apply a mixture (1:1) of gypsum with acrylic-based finishing putty.
Tinting the base with acrylic paints
If the plaster or putty mixture used for the base layer is already painted, then the background color of the bas-relief will be even. It can be made with iridescence or color transitions by making several piles of paste on the palette, tinted in different shades or tones. Then, creating a background, use a spatula (and additionally a brush), mixing the tones when applying the mass to the base, shading. It is allowed to use acrylic paints when tinting.
Prepare and transfer the sketch
You can draw a sketch yourself if you have the skill, or print it from the Internet. To transfer to a wall or canvas, draw a grid and transfer the drawing along the dots, like across the cells of a notebook sheet in childhood.
You can transfer a sketch printed to the required scale from paper to the base using carbon paper.
Tinting the plaster
The color solutions of the future “art” are selected according to the interior scheme. You can get by with only two colors, one of which is white. By mixing them on the palette, transitional tones are obtained. And, having plaster of three colors (red, yellow, blue) it is easy to get any color of the rainbow. Relief surfaces, in addition to color, have a light and shadow expression. This also needs to be taken into account in advance.
It is customary to tint plaster in the same way as artists do in the traditional “craft” of painting. Pastes of different colors are placed on the palette in a heap, picking up portions from them with a palette knife, transferring the mass to a free “patch”, where the two materials are mixed.
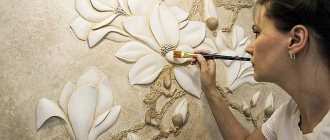
Forming a sculpture
Sculptural painting with decorative plaster is created according to the principle: each stroke should create one element. For example, one stroke is one leaf of a “sculpted” flower. One stroke - one finished petal. This technique is close to the method of working with an impasto palette knife.
A three-dimensional picture is created by sequentially superimposing detail by detail until a finished object is assembled from a colorful “constructor set”. There are two methods of applying the plaster mixture onto a palette knife blade and several methods of attaching the smear to the base.
The smaller the angle between the spatula and the palette when applying mass to the palette knife, the thinner the resulting petal will be. On the other hand, the thinner the petal, the more difficult it is for it to hold the shape given when casting and attaching.
To get a smooth, neat edge of the petal, a palette knife with a small part of the collected solution is “wiped” from this edge on the palette. After this, they continue to gain weight by pinching off portions from the mound with the other edge of the spatula. In this case, the paste being collected shifts the plaster mass (already collected) towards the edge of the future petal. The petal on the palette knife plate “grows”, turning into an influx over the edge of the blade.
The “assembled” image is dried and then coated with colorless varnish. The varnish coating prolongs the life of the painting by protecting its material from water.
How to choose the right material
If you take the issue of choosing high-quality plaster seriously, you can achieve a beautiful appearance and durability of the coating . When starting a renovation, each owner decides which design concept to use:
- Wall decoration.
- Ceiling.
- Floor covering.
- Furniture style.
- Choice of accessories.
- Installation of household appliances.
Everything together should correspond to one idea. The texture of the walls, color scheme and other factors must match. When renovation starts from scratch, choosing the right relief plaster is not difficult. According to the design, the appropriate material is selected.
What should the coating look like?
To make a room look beautiful, it is very important to choose the right wall texture. The use of all kinds of ornaments, beautiful designs and patterns allows you to hide the shortcomings of the room and emphasize the existing advantages.
If you put a small drawing on the wall, the space visually increases . A large drawing will significantly reduce it. The room will look larger if stripes are painted on the walls in different directions.
When choosing a texture, you must follow several important rules. The classic interior will be decorated with a coating that imitates natural stone or leather. Metal-look material is suitable for creating a modern interior. In a children's room, the surface of the walls can be decorated with a pattern of fruits.
The most popular shades
The appearance of the room depends on the color scheme. Basically, everyone decides for themselves which color of plaster suits them most. However, there are several rules that will help you make the right choice . It is necessary to remember that dark colors make the space narrower. Light shades, on the contrary, expand it significantly.
According to designers, a room looks very beautiful when all the walls are the same color. Those who like to experiment can be advised to make two walls red and the others beige.
For the bedroom, it is better to cover the walls with calm tones. A colorful pattern will look beautiful in a children's room. The work office can be decorated with a “natural wood” texture.
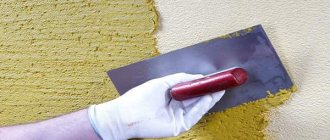
Technological process of applying plaster
To achieve a beautiful appearance of the plastered surface, it is necessary to comply with certain requirements of the technological process.
First, the desired drawing is selected. Then the wall surface is prepared. Old wallpaper is removed, a layer of old plaster is removed.
To prevent fungus from appearing in the future, the surface is treated with an antiseptic. It is an excellent replacement for a regular primer.
To work, mix relief plaster. All work is carried out strictly according to the instructions on the packaging.
The first (starting) layer is applied to the wall, which will become the basis for applying the relief pattern.
When the starting plaster has dried well, it is advisable to apply a second primer layer. It will improve its adhesive ability.
After complete drying, the relief of the future finishing plaster is formed.
Each drawing requires an individual approach . Sometimes it is done immediately after the mixture begins to set, the relief surface is leveled. In other cases, the drawing simply dries without any manipulation.
When the drawing is applied to the surface of the wall, it is covered with a colored tint. When the paint begins to set, remove excess with a damp sponge.
Homemade mixture recipe
You can make plaster for sculptural painting with your own hands. In the process of mastering the technique, understanding the mechanics, and also understanding what working qualities the paste needs, you can always experiment. As many masters doing master classes did (video below).
Decorative composition 1.
The paste base is Knauf Fugen universal gypsum plaster. This material is inexpensive and has low shrinkage. You can work with the diluted mixture for half an hour.
You can prepare a portion of plaster in half a rubber ball. Such a container is easily cleaned of the “crackers” of the set solution.
The addition of silk plaster mixture from Paritet (base coat No. 1) will help provide Fugen with fibers. You will need water, to which the base coat is first added and the fibers are allowed to distribute evenly. Then, bit by bit, mix and add Fugen. After “infusing” the gypsum plaster (~ 5-10 minutes) and mixing, the mass can be put into use.
Decorative composition 2.
Components:
- Silk plaster (as indicated above) is taken as a component - supplier of fibers. You can take fiber fiber instead - 10 ml (1 cap).
- The basis is 200 gr. decorative acrylic composition with marble filler.
Preparation:
- measure out the required amount of acrylic decorative composition, place it in a glass jar (which can be sealed airtight and stored for up to 2 months);
- wet the fiberglass and add it to the first solution;
- The mixture is mixed using a palette knife (until the fiber fibers are evenly placed).
LiveInternetLiveInternet
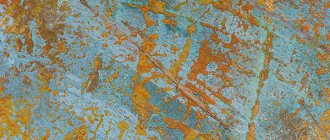
Today I want to tell you about putties and plasters that I tested with my own hands in the so-called decorative volumetric (relief) painting. You've probably seen examples of work using this technique on the Internet in the decor of clocks, frames, and wall panels (paintings):
But judging by the reviews, masters working in this genre do not like to share, especially when it comes to materials. And this question, I think, is the main one in this painting. Working with a palette knife will come with daily training and practice, and good and correct materials decide how quickly this skill will be revealed to you.
I don’t work in this technique, but I was wondering how difficult it is to choose the perfect material to create these works. And maybe I will find the use of this technique in my works.
Therefore, to make your search easier and systematize my own, I will tell you and, if possible, show you what I have tried myself. I can say right away that I haven’t found the perfect formula yet, but there is something to work with.
This technique uses plaster reinforced with synthetic and cellulose fibers, which make it possible to create a fairly high volume even for thin elements.
There are very few ready-made plasters with microfibers on our market; these are mainly expensive imported decorative materials.
Recently, decorative plaster with cellulose fibers “Barelief” from VGT appeared on the Russian market. Unfortunately, I haven’t been able to try it yet; it’s not represented in any distribution store in St. Petersburg, but I’ll definitely get it and try it. COMPOSITION: Aqueous dispersion of styrene-acrylic copolymer with the addition of hardwood cellulose, micromarble, modifying additives. PRICE: for a 6 kg jar (minimum packaging) 1020 rubles from a distributor in Moscow.
The first thing I tried was German decorative plaster Marmur Stucco, which could be purchased in our city by weight.
COMPOSITION: Material based on fine marble filler, reinforced with synthetic and cellulose fibers.
PRICE: about 550 rubles per kilogram.
The first thought when purchasing is EXPENSIVE!
Second, it would be great if it worked, and I calmed down even despite the high price of the material. But, alas, not everything is so simple. It is ideal for some decorative techniques, but for creating voluminous flowers in combination with palette knife painting it did not work:
- very sticky polymer base, sticks strongly to the palette knife and drags on it.
- The consistency is runny, the elements spread like “buns”. It is impossible to make enough volume in height, maximum 5-6 mm.
On the positive side, it is ideally white in color, tinted well, and adheres firmly even to a painted surface.
Similar to the German Marmur, the French Torchis Saman plaster is on sale, similar in price and quality.
The next step was to try NEOMID polyurethane foam putty, produced in St. Petersburg.
PRICE: 200 rubles per 1.4 kg.
COMPOSITION: acrylic based with reinforcing microfibers, which allow filling cavities up to 10 cm deep without cracking. Cool!
Moreover, whatever the property is, it’s fantastic:
- Resistant to cracking;
- Non-shrink;
- Contains reinforcing fibers;
- Contains biocidal additives to prevent the formation of fungus and mold
- Plastic and easy to use;
- Moisture resistant;
- Environmentally safe, does not contain toxic components;
- High adhesion to any type of building substrate.
When working with a palette knife, it turned out to be ideal, BUT! The color is gray, when it dries it becomes much lighter, but when tinted it is not predictable. I would love to work with it, but for beginners this composition will be difficult in terms of color solutions.
Color aside, this is a great material for training!
I took this putty as a standard and continued my search.
The next step, I decided to mix the materials.
To reduce the spreadability and stickiness of the German Marmur plaster, I added to it:
Experiment No. 1 - Tex wood putty, and my putty turned out to be no longer fresh, slightly dense. It helped, but not much. It still stuck to the palette knife and did not allow me to lay out high elements.
Experiment No. 2 – added dry plaster, or rather alabaster... Absolutely not! Everything I tried to get rid of got worse. There's nothing to show 
I decided not to bother with the expensive Marmur plaster anymore, but to move on to a completely different material. I will talk about it and the results of my experiments in the next article.
In the first part of the large article “Decorative plaster for relief painting” I told you about ready-made compositions sold on the Russian market and tested by me in my work. In the second part, I will share with you a recipe for the material that I mixed myself, again, experimentally.
Of course, it would be possible to continue experiments with ready-made German Marmur plaster, but the cost of the issue forced us to look for other solutions: move to a completely different material - to gypsum plaster, which is widely used by artists to create real bas-reliefs. And a live master class on bas-reliefs by the amazing artist Georgy Tandashvili helped me a lot with this.
I used the universal gypsum plaster FUGEN from KNAUF as the basis for the composition. It does not shrink much, the batch life is 30 minutes, which allows you to work with it for quite a long time. The price of 10 kg of dry mixture is about 200 rubles.
Gypsum plaster does not contain fiber. And to fill this gap, I purchased decorative silk plaster (base coat No. 1) from Paritet at the Leroy Merlin building supplies store. The bag costs about 580 rubles, enough for... a very long time.
Let's make a batch:
1. Dilute silk plaster with water.
There should be a little water, add gradually until you get a paste.
2. Add gypsum plaster to a thick consistency so that the composition holds its shape well and is elastic at the same time. Everything is based on personal feelings and work trials. Let it sit for 5-10 minutes and apply the plaster.
Note! For better adhesion to a smooth painted surface, you can add PVA glue to the composition (a little, otherwise it will stick strongly to the palette knife).
Unfortunately, the color This doesn’t interfere with my work, the composition is painted with acrylic paints excellently, holds its shape and volume perfectly, and the “penny” price makes me so happy.
My search is not over here, because this composition also has its drawbacks, which come out in the process of work. But the main thing is to find a simple recipe, understand what is missing in it, refine it through trial and error, and ultimately get the ideal mass for yourself.
You will read about how to artistically (not uniformly) paint plaster in the next third part.
Thank you for your attention and your feedback! I hope this information is useful to someone 
https://www.livemaster.ru/topic/2331103-dekorativnaya-shtukaturka-dlya-relefnoj-zhivopisi-chast-2?vr=1&inside=1