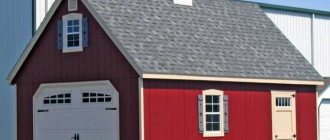
Painting wood is considered a rather complex undertaking that requires adherence to certain rules. Various paint and varnish compositions can be used for work, but before applying a decorative protective layer, the base must be properly prepared using special mixtures. Only the comprehensive implementation of all stages guarantees a beautiful and durable coating.
Compositions for painting wood
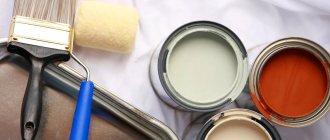
Painting wooden surfaces can be done with several types of finishing materials. Each option differs in the composition and appearance of the resulting coating.
Paints
Wood paints are consistently popular. They allow you to renew the surface, but hide the natural texture. If the technology is followed, the result is a coating that is distinguished by individuality and a magnificent decorative effect.
The following compositions can be used in the work:
- Oily. This variety is currently used quite rarely. This is due to the many negative qualities that the mixture has. Among them, the sharp and toxic odor, as well as the long drying time, stand out. The composition is used for painting wooden bases and household products.
The advantages of oil paint include good adhesion and high covering power.
- Alkyd enamels. This option, like the previous one, has become less popular, but demand remains at a good level. This is because the mixture is excellent for outdoor woodwork. After application, a thin film is formed on the surface, thanks to which it is possible to emphasize the texture of the base. In addition, enamel has low vapor permeability, which reduces the risk of wood deformation when exposed to moisture. They are not durable.
Alkyd compounds are best used for outdoor use as they have a toxic odor
- Water-based (water-dispersed):
- Acrylic. The basis of such solutions is water and acrylic resins; they also contain additional modifiers. Due to this, the mixture turns out to be completely environmentally friendly. The scope of application is wide: it can be internal and external surfaces and even furniture. Possessing elasticity, the material prevents the appearance of cracks and damage to the wood.
Acrylic water-based coating is an environmentally friendly, fireproof type of coating with good adhesion
Latex. Hides surface cracks up to 1 mm wide, a good option for protecting the coating from the harmful effects of moisture.
Compared to acrylic paints, latex paints are more moisture resistant
On a note! Acrylic solutions may additionally contain a latex-based additive, which increases the water-repellent properties of the material. In addition, PVA water-based emulsion is available, but it is better not to use it for working with wood.
Epoxy coatings are characterized by high strength and resistance to abrasion, as well as the effects of various chemicals and solvents.
Thus, to the question: is it possible to paint wood with water-based paint, the answer will be in the affirmative. These products are considered the most preferable. It not only has excellent characteristics, but is also well tinted, which allows you to realize your design imagination.
Lucky
When deciding what to paint a tree with, be sure to take into account that paint is not the only option; varnish is an excellent alternative. It is a composition based on natural or synthetic resins. Various substances that determine the properties of the material can be used as a solvent. The resulting film can be transparent or change (emphasize) the texture of the wood.
Colored varnishes allow you to imitate various types of wood
Several composition options are suitable for work:
- Polyurethane. It is most in demand because it dries quickly and has excellent durability. But due to the presence of a solvent in the composition, it has a specific odor.
- Water. Suitable for work outdoors and inside the house. It is environmentally friendly, but requires impregnation of the base with a primer. It may take up to 24 hours to dry.
- Acrylic. A modern composition with good decorative qualities. The disadvantage is the high price.
- Nitrolac. It has low light fastness and is suitable for working with inexpensive furniture.
Varnish can be an independent coating or an auxiliary protective coating when applying paint to wooden surfaces. In this case, you need to choose the right foundation to achieve the best effect.
Other dye options
These may be the following substances:
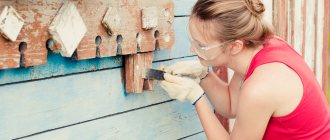
- Stain. Allows you to give the wood a richer texture. For example, after treating cheap pine with a properly selected stain, the appearance of noble oak is created. Can act as a protective impregnation.
Today, most manufacturers produce stain in several shades that are as close as possible to the natural color of natural wood. - Potassium permanganate. The solution is prepared in the proportion of 50 g of manganese per 1 liter of warm water. The mixture is well treated with the base, if necessary in several layers. If you paint the floors with this composition, they will look like dark walnut.
Regardless of the material chosen, the surface is coated with colorless varnish.
Why wood needs protection
Wood is natural, “living” and “breathing”; in its original form, the bark protects it from all external influences. When turning a log into a building material, even if it is a wild or chopped log, it is debarked. And when producing timber and boards, they are dissolved into several parts. Left without a natural shell, wood is unable to withstand external influences. There are not so many varieties characterized by increased density, hardness and resistance to moisture and, as a rule, they are not used for construction. While the most popular wood species are distinguished by good permeability, due to which they absorb moisture, are affected by pathogenic microflora, and lose their original properties under the influence of ultraviolet radiation.
Not to mention the fact that the gradual deterioration of a tree is laid down by nature itself so that the result of its “life activity” is dust that is safe and even beneficial for the environment. From the first day of use as a construction or finishing facade material, wood is exposed to various negative influences.
Climatic:
- Atmospheric moisture and precipitation;
- Solar radiation;
- Wind loads.
Biological:
- Pathogenic microflora (bacteria, fungi, mosses);
- Insect pests.
All of the above are equally dangerous for a tree, and even the location of the facade affects the degree of danger.
House_headFORUMHOUSE Member
I have a log house made of rounded logs (260 mm), assembled in November 2021 (i.e., summer forest), with a roof. I didn’t treat it with anything in the winter of 2021. In the spring of 2021, I covered the ends with a specialized protective impregnation and treated them with a temporary water-based antiseptic for the period of shrinkage. I haven't done anything else until today. From time to time, bluing and blackening appeared locally, both inside and outside, so I treated them with wood bleach.
Recently, significant fungal damage was noticed on the external log beams and walls of the log house. I would like to clarify - is the appearance of fungus caused by the fact that the log house has not yet dried out? Or the fact that it is not processed/painted? Or is it external influences (rain, sleet, above-zero temperatures in winter)?
DAW Technician
All of these factors together can cause the appearance of fungus or mold. The cause of damage to wood may also be the northern location of the facade, since it is this side that is more susceptible to the appearance of fungus or mold.
If we talk about decking, interior decoration and floor coverings, then instead of precipitation there are fluctuations in temperature and humidity conditions and mechanical influences, as well as ultraviolet radiation. And mold and woodworms will reach both outside and inside, under conditions favorable to them. Therefore, not only on the facade, but also in the house, wall or ceiling cladding and floorboards or parquet need protection.
Selecting a pre-treatment agent
A separate category consists of impregnations, which are necessary to improve the structure and durability of wooden elements.
Such mixtures include:
- Drying oil. It is applied to protect the base from any harmful influences. It is better to lay several layers to achieve deep penetration. Can be used before oil paints to reduce their consumption.
Drying oil Oxol consists of 55% natural oil component, 40% white spirit, 5% drying agent, therefore, compared to natural drying oil, its cost is lower and it dries faster
- Oil. Parts that are close to the ground or immersed in it are processed.
The oil is ideal for processing wood indoors with temperature changes and high humidity.
- Special antiseptics. Protect from microorganisms and insects, prevent rotting.
Universal deep-penetrating colorless antiseptic for wood Neomid
- Fire retardants. Do not allow the fire to spread quickly.
Fire-retardant composition for wood Phenilax
Important! Impregnation is carried out carefully and in advance so that the wood has time to absorb the required amount of the composition.
The procedure for performing painting work
The technology for painting wooden products assumes that the work will be carried out in several stages:
- Selection and preparation of tools.
- Preparation and processing of the base.
- Painting.
- Additional processing (if necessary).
All processes are carried out carefully. It should be remembered that wood is a capricious material and is easily deformed.
Stages of preparing and painting a wooden product: sanding, dust removal, degreasing, priming and painting
Tool
For painting you may need:
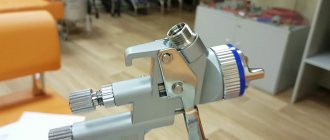
- Spray gun and compressor. This system allows you to process large areas in a short period of time. At home, an alternative can be a mechanical sprayer.
- Brush. Necessary for painting hard-to-reach places, as well as for interior painting.
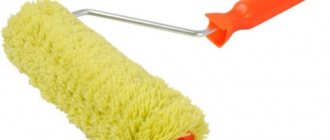
- Roller. It is better to choose a fur coat with medium-length pile.
- Convenient container. If you plan to paint with hand tools.
- Rags. To quickly correct errors.
Necessary tools for painting
Everything necessary is prepared in advance.
Preparing wooden surfaces for painting
Preparation has a special role to play. If you follow all the procedures correctly, then no problems will arise in the future.
Process diagram:
- If surfaces have previously been treated, they are thoroughly cleaned of the existing coating. For this purpose, a mechanical, chemical or thermal method is used. The main thing is that the base must be completely clean.
- To properly prepare a work site, you need to assess its condition. If the previous coating quickly deteriorated, the reasons for this are first identified and eliminated. Thus, the wooden facade is influenced by water that flows from the roof. In the absence of a drainage system, the impact will be destructive.
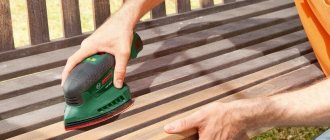
- Grinding in progress. This procedure is necessary for both new and old grounds. The resulting dust is removed.
- Traces of resin are cleaned off, areas are washed with white spirit.
- The surface is treated with protective agents. Fire retardants and antiseptics are applied first. Then, if necessary, the areas most susceptible to destruction are coated with oils. The impregnation is applied in several layers with a roller and brush.
- Further work is carried out after complete drying. Existing cracks and defects are covered with special putty. After it has set, the areas are sanded.
- Primer is applied. If required, it is necessary to treat the surface with drying oil or stain.
The coating is left to dry thoroughly; it is unacceptable to act on a wet base.
Applying paint
Attention! It is necessary to carry out work outside or inside at optimal temperature and humidity levels, which depend on the selected composition.
Painting wooden surfaces is carried out as follows:
- The process starts from the corner when working with walls, facades, floors and ceilings and from one of the ends when designing objects, furniture, and individual wooden elements.
- Oil and alkyd paints are applied using vertical strokes. Next, the composition is rubbed well, after which the movements become horizontal. Acrylic paints can be immediately laid horizontally (along the grain of the wood).
- The first layer is considered the base layer. To do this, the solution can be diluted slightly to ensure better styling. The second layer (if painting is done in three layers) creates a reliable base. After this, in places of defects, the surface is ground with fine abrasive. The last coating is applied most carefully.
- Spraying tools make it much easier to work over large areas. But when using them, the movements should be uniform and at the same distance from the base.
Rules for applying paint with a spray gun
If required, after drying, a layer of varnish is placed on top. It not only protects the paint, but also adds shine.
Technology of painting wood with varnish
Varnishing is carried out after preparing the surface. If a colorless composition is used, then the base can be treated with stain to give the desired shade.
The varnishing process itself looks like this:
- The first layer is applied evenly. Drips should be avoided.
- To achieve a better effect, grinding is carried out. It allows you to remove invisible imperfections.
On a note! Many craftsmen advise sanding after laying the second layer. But this depends on the viscosity of the varnish: with a thinner consistency, the first coating cannot be sanded.
- The second layer is laid. The main thing is to distribute the mixture evenly to avoid its accumulation in some places.
- The third layer completes the work.
When applying all coatings, wait until the previous one has completely dried. If necessary, the product is polished after a few days.
How to protect wood
The main problem of wooden surfaces is the ability to absorb moisture - and wet wood is not only an excellent environment for pathogens, but also a deterioration in technical and decorative parameters. The sun also does not add positive properties to the tree, since under the influence of ultraviolet light lignin is destroyed and the surface not only turns gray, but also becomes loose and begins to absorb not only more strongly, but also more deeply. Therefore, the main task is to reduce the permeability of wood and increase its resistance to UV radiation.
For this purpose, a number of specialized products are used that cover wooden surfaces after certain preparatory measures.
There are several types of protective materials.
- Sealants – for sealing inter-crown seams, cracks, crevices and ends.
- Antiseptics - to prevent biological damage and increase the moisture resistance of the surface (have hydrophobic properties). Antiseptics can be both highly specialized and universal, combining several properties, for example, protection against biological damage, fire and ultraviolet radiation and surface coloring.
- Primers – reduce the consumption of finishing agents and increase adhesion.
- Protective and decorative products – varnishes, paints, oils, waxes, emulsions, glazes.
Sealants, antiseptics and primers are intermediate, preparatory materials used both during the period of standing of log houses and in preparation for the application of finishing coatings. Protective and decorative products are used in the interior and on facades as finishing coatings that not only protect the surface, but also increase its attractiveness.
Decorative painting
There are tips to help you achieve the best visual effect with your own hands:
- Painting like bleached oak. The easiest way is to cover the surface with a stain of a suitable color. It is much more difficult to produce such paint; complex tinting is required for this.
- To obtain a bleached wood color, a pigment (acrylic or polyurethane) primer is used. It is diluted and applied to the surface. A similar effect can be achieved by using oil with a similar color. After installation, the base is treated with wax and rubbed.
- Patination is used for an antique effect. It is recommended to use special compositions: paste, liquid patina or beveled varnish.
If desired, you can get any decorative result.
Priming before painting
We choose a primer depending on the type of surface to be painted. For the kitchen cabinet we used a pigmented shellac-based primer, which reliably seals resinous pine knots. Using a synthetic or natural bristle brush, first apply one coat of primer to all surfaces and edges of the product, and then a couple more coats at 5-10 minute intervals to areas with exposed end grain.
A board with nails supports a primed kitchen cabinet door, allowing you to finish both sides and all four edges in one go. Sharp nail tips provide firm, even support while leaving almost invisible marks.
To save time when painting the door, we placed a board with sharp tips of nails protruding from it, on which the door rests with the already treated side while priming the second side and edges. After 24 hours, when the primer is completely dry, sand large flat surfaces with 220-grit abrasive using an orbital sander or sanding block. Sand small areas by hand using an abrasive pad or profile sanding pads.
To reveal all the imperfections of the primed surface, use backlighting. Unlike surfaces primed for clear coat, nothing untoward will happen if you remove the primer layer to bare wood. Simply apply the primer again, let it dry and sand smooth. Then thoroughly clean the surface from dust.
By directing the light from the lamp parallel to the primed surface, you can see shadows that indicate coating defects. Sand these areas and reapply primer.
Fill all the recesses that need to be hidden with acrylic putty and smooth the surface by sanding. Apply another coat of primer and sand with 220 grit abrasive. Sanding a putty surface creates a lot of dust, so vacuum the piece before wiping it with a damp cloth (for latex paint) or a tack pad (for oil-based paint).
| Rough areas and knots show through the primer, so they can be easily identified and smoothed out using latex putty | In profile areas, we use the simplest and most accessible tool for applying putty - our own finger. | You can restore the clarity of profile parts using a small block with sandpaper on two edges |