Home/Children's room/How to decorate a children's room with your own hands: choosing a design and all the nuances of painting
The interior of children's rooms is significantly different from that of adults. Children are more interested in bright colors, fairy tales, and a sense of miracle. To diversify the design of a nursery, it is not at all necessary to resort to the services of designers or spend fabulous sums on exclusive decor. No one except you and your children can know better how to decorate a children's room; you can easily do it yourself. Joint creativity is a great way to instill in a child a sense of beauty and captivate him with a new hobby.
Decorating the walls in a children's room is an important stage in the development of a child as an individual.
Preparation
Wall painting is one of the easiest ways to decorate a nursery with your own hands; anyone can do the simplest drawings, even if the last time you held a brush was at school. The theme of the paintings depends on the age of the child:
- In a baby's nursery, you can use large images, but it is better not to choose too bright colors;
- Children 4-5 years old will love images of characters from their favorite cartoons and fairy tales;
- In a primary school child’s nursery, you can paint the walls with drawings symbolizing his hobby;
- A teenager’s room may be austere, but the child may want a brighter room design, decorating the walls with images of their favorite bands, actors, etc.
You can make a simple drawing on the wall yourself
As for the color scheme, the chosen shades for the drawings on the walls should be combined with the rest of the design of the children's room. When choosing colors, you should take into account the area where the painting is located. Calm blue and green tones are suitable for a bedroom or work space, but for the play area you can choose the brightest shades.
In the sleeping area it is better to use pastel shades with calm scenes
Choosing the color scheme of the picture
When creating a project for a new nursery, you need to decide on the color palette of the walls. The selected shades will serve as an excellent background for decorative elements. You can choose a variety of tones. The main requirement is that the colors should not be flashy or overly bright. It is better to avoid red altogether. It has an exciting effect on the child’s psyche and makes him irritable. This color can only be used in minor elements. It is not necessary to adhere to the classics of the genre and choose shades based on gender – pink for girls, blue for boys. Today, colors such as white, yellow, gray, orange, and turquoise are more relevant. In order for them to become a worthy decoration of any interior, they just need to be correctly combined. One of the walls can be made brighter by filling it with images, while the rest can be neutral.
What you need to paint the walls
To decorate the walls of a room with handmade drawings, you need the following:
- Paints (ideally water-based acrylic);
- Wide brushes;
- Thin brushes for drawing small details;
- Matt lacquer.
For wall stencils it is better to use a paint roller
Acrylic paints are good because they are easily diluted with water to the desired consistency and applied to the surface. The finished drawing cannot be accidentally erased by touching it with wet hands or touching it with your shoulder. In order for the painting to be durable, it is necessary to cover it with additional layers of matte varnish.
Important! By adding white acrylic paint, you can choose suitable shades, and the ideal consistency should resemble rich sour cream.
Even a simple plot with bright colors will become the highlight of the interior
Paints for painting a room need to be diluted carefully - if they are too liquid, then after drying, unsightly stains will appear and you will have to repaint everything again. To paint a nursery wall with your own hands, in addition to ordinary brushes, you can use rollers and sponges; they are convenient for painting flowers or painting large areas.
Important! Before starting work, do not forget to prepare containers with water for washing brushes and a palette where you will mix shades.
The main attributes of a young artist are a palette and brushes for painting.
There are also faster ways to decorate the walls with paintings in a nursery with your own hands. These are regular vinyl based stickers. You can choose any design and stick it on the wall in a few minutes. You can entrust the choice of a picture to the child, let him decide how to decorate his room.
Even kids can handle vinyl stickers
In addition to stickers, there is a simpler option for decorating a nursery - an accent wall with matte paint. On it, the child will be able to draw with crayons whatever he wants and change the drawing at any time. This will protect the upholstery and wallpaper from children's scribbles, and will also develop the child's artistic skills.
An accent wall in a nursery perfectly zones a child’s sleeping area
Accent wall
If the interior allows, you can give the entire wall to the child for sketching. This option is suitable for older children, when they are already able to draw drawings that everyone can understand. Pencils, markers or paints will do.
Note! You can make a brighter picture with children's finger paints. The baby will explore his capabilities and apply layer by layer. This activity will help keep the child occupied, while parents will do some housework at this time.
If you want to decorate the entire wall, all family members can participate. This will bring household members closer together and give an unforgettable experience that will linger in the memory for a long time.
Related article: How to fit a crib canopy into the interior of a room
In this case, you need to try to explain to the child that you can draw in a designated area, otherwise the child will turn the house into an exhibition space for the young artist.
How to paint walls by hand
To decorate a child’s room with real painting with your own hands, you will need a clear procedure. It is important to decide on the placement of the picture, its size and color, as well as the method of applying paint, etc.
Select a pattern
First, find suitable pictures on the Internet, from which you will later transfer the sketch to the wall. If you don’t know how to draw, you shouldn’t immediately take on complex landscapes, knightly tournaments, space battles, etc. The drawing should be quite simple, this will simplify the task of drawing on the wall with your own hands.
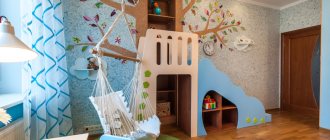
Drawing can become an integral part of children's furniture
Surface preparation
The wall under the drawing must be perfectly smooth; if there are cracks and unevenness on the base, they need to be leveled. Next, you will need a white primer, against this background the paints look brighter and the shades are not distorted. When the base is leveled and primed, it is necessary to paint the wall in the background color.
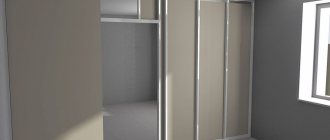
Before painting, the walls should be well leveled and primed.
Preparing the drawing
Before transferring the drawing to the wall, practice on several printouts of the selected picture. At this stage, you can select shades of paint, check how they are combined in the drawing - when applying the image to the nursery’s wall, there will be no chance of error.
Important! If there are many identical parts, it is easier to make a stencil than to draw the same thing over and over again.
Using stencils, you can accurately transfer the design to the walls of the nursery.
Sketching
No artist begins to paint a picture by immediately applying strokes. The basis of any painting is a rough sketch - the outlines of the future color image. To draw a picture on the wall, use colored pencils; it is better to avoid black or plain ones. The lead of simple pencils can leave unsightly marks. If you have drawn any line incorrectly, use an eraser to correct it.
A projector will help you draw a sketch on the wall.
First of all, you should symbolically outline the boundaries of the painting, and then begin to draw first large and then small details. While working on a painting for a long time, your eyes get tired and you may miss mistakes; to avoid this, periodically look at the sketch from a distance. In order not to be mistaken with the scale, the drawing can be transferred to the wall using a grid.
To draw a sketch, you can use chalk or a simple pencil
Painting in color
When the surface and sketch in the nursery are ready, you can finally begin the painting itself. Do not thin or mix acrylics in advance; they dry out too quickly. To make the image three-dimensional, apply paint in several strokes.
Important! Make sure the previous one is dry before applying a new coat.
You can even use felt-tip pens to draw on the walls.
Brushes should be held at right angles to the wall. If you make minor mistakes, correct them in the drawing using a thin brush. Decorating with children's paintings is a long process, so that the work is not monotonous, turn on music or involve household members in the process. Lastly, the smallest details are drawn, and the picture is given volume with the help of shadows and highlights.
You need to draw on the walls very carefully so as not to spoil the picture.
Mural on the wall in a nursery for a girl and a boy
Fresco in the interior of a children's bedroom
If you want the nursery to change beyond recognition, then try decorating it with a colorful fresco. But keep in mind that creating such a masterpiece requires certain skills. Therefore, if you don’t want to waste money on materials, then try to find a professional who will quickly bring all your ideas to life.
In this case, you only have to tell the master about the child’s preferences, and he will literally create for you an original and unique fresco in a child’s style in a matter of hours.
Mural ideas for boys:
- Space
- racing track
- Pirate Island
- Spy laboratory
- Bridges
- Safari
Mural ideas for girls:
- View from the window
- Picturesque waterfalls
- Fairytale castles and princesses
- Flowers
- Still lifes
Transferring a drawing with your own hands through a stencil
Anyone who is not good at drawing can handle transferring an image through a stencil. Ready-made stencils can be purchased at construction stores or ordered online. PVC layouts are more convenient to use; they can be washed and used several times. A cheaper option is regular cardboard, but this is a disposable item.
Thick paper or cardboard is suitable for stencils.
You can simply make a stencil yourself by printing out the desired design. It can be transferred and cut out on plastic film, cardboard, plywood, etc. Using the same method, you can draw your own original image.
Stencils can be printed on a regular printer and then transferred to a denser base
The finished stencil must be fixed to the wall using regular masking tape. The paint is applied with a brush or sponge. If you want a three-dimensional painting on the nursery wall, choose decorative plaster instead of paint.
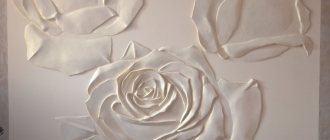
For more voluminous designs, you can use decorative plaster
Six ways to decorate children's drawings in the interior
- Framing pictures in a baguette. It comes in a variety of shades and comes in plastic and wood. You can choose a baguette that matches the furniture, or play with contrast. Children's drawings can be hung above the bed or chest of drawers, between the windows, or placed on a desk or shelf. Group the paintings together by style, color scheme and theme. Want to save money? Use photo frames instead of baguettes.
- “Drying” works is an analogue of the modern format of photo exhibitions held in the open air. Stretch twine or ribbon along the wall and attach children's drawings with decorative or regular clothespins. This method allows the child to independently update the exposure whenever he wants.
- A similar option is curtain string with clips.
- A collage of photographed paintings is an option for small rooms. This way you will save space and keep your child’s work as a keepsake.
- Cork board is an environmentally friendly and durable thing. Children's drawings can be attached using pushpins and nails. There are wall-mounted models and floor-mounted ones with legs.
- A fabric note board tied with ribbon or thread. Choose a fabric that matches the textiles in the room - this way, children's drawings will organically fit into the interior. Pictures are inserted under tape or thread, without the use of needles, nails or buttons.
Ideas for professionals
If stencils or a series of small images are not enough to decorate a children's room, you can aim for an entire wall or a significant part of it. This type of work is complex and will require artistic skills. If you are confident in your abilities and can do everything with your own hands, this option is for you.
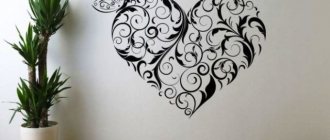
You can make this kind of abstraction in a nursery with your own hands.
Selecting a location
If you can find even a small corner for small paintings, then here you will have to choose a specific wall. It is necessary to take into account the location of sockets, sconces and furniture. Practice by drawing several sketches. Select the most suitable image, taking into account all of the above. Before you start work, be sure to get the approval of the little nursery owner.
It is better to coordinate the future drawing with the owner of the room
What you need
To paint a wall in a nursery, you will need the same as when applying a small picture:
- Acrylic paints;
- Primer;
- Varnish;
- Set of brushes.
But since you plan to paint an entire wall, you will need a stepladder to paint at the top.
Transferring a sketch
To apply markings to the surface, you can use different methods - all of them can be easily done with your own hands. The easiest option is to draw a sketch by hand; you can also use homemade or purchased stencils if there is a need to transfer a number of identical elements to the wall.
Here is another option on how to transfer an image. Draw the entire drawing on a separate sheet of whatman paper or even on an old roll of wallpaper. Then place something soft under the canvas - thick fabric or carpet. Carefully go over all the contours with a regular pin or use a special copy wheel. Now you can fix the paper on the wall and easily transfer the design to the surface. The result will be a clear dotted outline.
Painting tips
When the wall is prepared, the contours are drawn, it’s time to start the most important thing - decorating the surface with painting. Here are some useful tips:
- If you have not painted with acrylic before, make test strokes on a blank sheet of paper. Do not strain your hand; movements should be free and relaxed.
- If you need to apply a long line, do it in one confident motion. Short strokes will not look neat on the drawing, and there is also a high risk of drawing the line too crookedly.
- If you need thick lines, there is no need to draw them several times, just press harder on the brush while drawing.
- By pressing the brush with a gentle twist, you will get circles or rounded lines.
- Always draw the main details first and only then draw the smaller ones.
Try to draw casually, don’t be afraid to make mistakes - in most cases they are easily corrected. In addition, remember that you are not painting a masterpiece for an exhibition; small errors in painting a children's room are unlikely to be noticeable to an uncritical eye.
Applying varnish
The final stage of painting a wall in a children's room with your own hands. The varnish layer will extend the life of the drawing. Wait until the paint is completely dry and apply regular matte varnish. This will allow you to wash the walls without fear that the paint will smear. In addition, the varnish layer will protect the painting in the children's room from fading.
Decorating a child's room with your own hands using paintings or ready-made adhesive-based drawings is easy if you approach the matter wisely. Even if you have never picked up a paintbrush, you can decorate your walls with ready-made stickers or use beautiful stencils. When choosing an image, you should listen to the wishes of the child, and also take into account the general style of the children's room.
Drawing posters for a children's room: a variety of options and taking into account the baby's wishes
Today, the quality of printing is high, which allows you to create the perfect poster - bright, rich, accurate and not losing its properties for a long time. Therefore, looking at a catalog or a window display, not only children, but also their parents’ eyes widen.
When choosing a poster with inscriptions, make sure that you correctly understand the meaning of what is written, especially when it comes to phrases in foreign languages
How to choose the poster that will really decorate the room and appeal to your child? Only subject to a few rules:
- Taking into account the child's age. Preschoolers will be interested in pictures with cartoon characters. This could be the beloved Hare from “Well, wait a minute!” or SpongeBob, Winx fairies or Robocops, for example.
- A primary school student will be interested in posters with characters from books or comics, but older children will choose a cool poster or picture with an original inscription. You need to be different from the rest in some way. And the children's poster project will be turned into reality.
- Gender of the child. Girls are more drawn to pictures of nature, animals and princesses of their own kind, but boys are interested in Space or Sky, as well as heroes they want to be like.
- Interior style and color scheme. A cute picture will only complement it, so you shouldn’t choose something inappropriate in style.
It is worth noting that most often children choose their favorite animals or those they would like to have or who they would like to be like as poster designs. Therefore, cats, lions, tigers, wolves, dogs and other “living creatures” are found quite often among producers.
Poster with watercolor drawing of giraffe
Also a giraffe, but as imagined by an abstract artist
You can’t go past the Space or Starry Sky posters. They are equally fascinating and enchanting; you want to look at the picture again and again. You can buy a small poster and study the stars and constellations, or you can use it to decorate part of the ceiling, add lighting and admire the picture sky as if it were real.
“Cartoon” space for the youngest children
Space “adult-style” for teenage children
Celebrities are another common design on posters. And all because at one age children want to be like this hero - an actor, a singer, and at another - already like this one. It’s worth deciding which one you like best at the moment – and hanging the poster on the wall.
A teenager who is passionate about rock will love a poster with an image of an idol
So-called pedagogical posters appeared on the market. Tired of constantly reminding your child of the same things? Several posters will do their job, reminding you of the rules and regulations in an unobtrusive and humorous way. Your son or daughter will be grateful!
An educational poster can help a small child learn the alphabet
By following simple rules and using the child’s hint (if age allows), it’s easy to decorate a room with paintings on the wall and even a closet. It’s worth taking enough time to consider the options and settle on a specific one. And the poster will become a kind of favorite that all your friends will come to look at.