Main advantages
In order to make joints between sewer pipes, sealant must be used between the wall and the bathtub or sink. The range of building materials offers several options for sealants based on different polymers. Suitable for use in bathrooms:
- Silicone.
- Acrylic.
- Silicone-acrylic.
- Polyurethane.
Silicone-based sealant is the most suitable option, which will help firmly bond the surfaces. It is different:
- Resistant to temperature changes. Manufacturers indicate the limits within which the substance fully retains its properties, this is from -50 to 200 degrees Celsius.
- Excellent adhesion. It adheres well to all materials used to furnish a bathroom (tile, metal, acrylic, wood, glass).
- Duration of operation.
Silicone-based sealant has excellent adhesion and resistance to temperature differences
But you need to remember that such sealant is more expensive than others. Although you shouldn’t skimp on creating a safe bathroom.
What types of sealant guns are there?
Sealant guns come in closed and open types. They all have a piston for extrusion and are made to fit different tube diameters.
All kinds of sealants are very common in modern construction. They are used almost everywhere and are made from various substances.
The scope of application of sealants is not limited only to hydro-, noise-, and thermal insulation.
Sealants, depending on the composition, are used to seal seams between logs, in bathrooms, kitchens, etc.
Sealants are also used to seal the seams between panels used to construct residential and non-residential buildings.
The sealant is usually packaged in a special metal or plastic tube (cartridge). In tubes, the sealing compound may be under pressure.
When there is no excess pressure in the housing, the sealant is squeezed out of the tube by the piston.
Possible mistakes
Masking tape will prevent contamination of the surface near the seam with particles of sealant
If you know how to work with the composition correctly, you can quickly and accurately finish any seam or joint. But there are a few more nuances, without which the desired result will not be achieved.
The following errors may occur when working with the composition:
- the area where the mass is applied is not properly cleaned of dirt and dust;
- the product is applied to a dry surface;
- before filling the seam, masking tape was not glued on both sides, limiting the line for applying the sealant;
- the spatula or finger is not lubricated with soapy water to prevent the mass from sticking.
If the amount of sealant is too large, then the frozen excess will have to be cut off with a blade, and the stained areas will have to be washed with a solvent.
Working with silicone sealant is not difficult, the main thing is to get used to it and squeeze it out exactly as much as needed, using a gun or doing without this tool. It is important to avoid common mistakes, then the process of sealing seams and joints will go quickly, without complications.
septik.guru
How to operate a pistol - simple steps
How to work with a pistol - this question is relevant not only for novice craftsmen, but also for any person who first encountered this tool. In fact, there are no difficulties - just a few nuances, after studying which all questions will disappear.
So, the principle of operation of sealant guns is quite simple - due to mechanical pressure on a container with sealant (or other material, for example, liquid nails), the material is extruded in the form of a strip, by directing which we achieve the desired effect. The pressure is provided by the rod, which is set in motion by pressing the trigger - apparently, this is why the tool got such a militant name. In pneumatic tools, instead of a rod, the pressure is exerted by air. Basically, difficulties arise when you need to equip the tool with the material itself, the same sealant. Fortunately, manufacturers try to adhere to the same standards, which makes our task much easier.
What does it consist of?
For the production of sealants the following are used:
- synthetic rubber (silicone);
- a filler that gives the composition the required volume;
- plasticizer;
- vulcanizer, which imparts viscosity to the sealant;
- strengthening additive and adhesion modifier;
- pigment that gives color to a material;
- antiseptics that destroy harmful microorganisms.
There are two types of vulcanizers added to the sealant. Based on this, there are two types of silicone sealant:
- Acidic compounds. They are easily identified by the specific smell of vinegar. These sealants are very durable. However, they cannot be used on marble, aluminum and cement mortar substrates due to their instability to acetic acid.
- Neutral analogues. They are used to work with any type of base.
How to choose the right option
When going to the store for sealant, you need to familiarize yourself with the assortment at home through online stores. There you can also read reviews about long-known manufacturers and completely new ones. Popular brands include:
- Moment.
- Penosil.
- Tytan.
- Ceresit.
We suggest you familiarize yourself with How to remove sealant from a bathtub.
These manufacturers offer packages of different volumes. In addition, a coloring agent is added to the main composition, which allows you to select a sealing material that is invisible on any surface.
Advice! For home work, it is better to buy 2-3 small tubes of sealant than 1 large one. In a large open container, the substance quickly becomes unusable.
Some options have additional components that help resist silicone sealant to various microorganisms and fungi. Such compositions are called sanitary sealants. They are best used in rooms with high humidity.
When choosing, you must also remember that the composition can be:
- Acidic - acetic acid is added to the composition, because the substance has a pungent and unpleasant odor. This sealant cannot be used on metal surfaces as they are exposed to acid and will quickly rust. The putty is suitable for working with wooden and ceramic surfaces.
- Neutral. This option is universal and does not harm any known substances.
Attention! Additional components in the composition should be less than 10%. A higher value worsens the properties of the sealant.
There is currently a wide range of different sealants on the market.
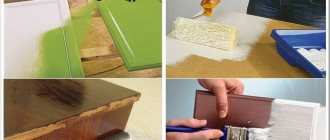
How to apply silicone sealant
The rules for applying silicone-based sealant are not significantly different. However, you should know some features. The silicone composition dries up to two days, while its surface becomes dry after half an hour, which does not indicate the possibility of further work. Throughout the drying period, care must be taken to ensure that no liquid or moisture gets into the seam.
Before sealing seams with silicone compound, it is important to remove remnants of old material:
- Mechanically - with a knife, sandpaper, spatula.
- Special removers and solvents.
A small amount of the product can be removed with gasoline or alcohol. But you can also buy products specially designed for this. Some will only help soften the silicone mass, but then removing it will be much easier.
A problem may arise such as uneven filling of the seam, the appearance of protrusions and depressions. In this case, you should not be upset, but you need to remove the excess material that has not yet dried with a knife dipped in a soap solution. Many people use their finger to smooth out the seam, which is practical and convenient. But it is important to wet your hand in water.
When performing individual work, additional components in the product are taken into account. A quarter of the quality composition consists of silicone polymer, rubber mastic 5%, acrylic putty and thiokol 3%, epoxy resin 2% and cement additive 0.5%.
If the product contains antiseptic components to prevent mold and mildew, it should not be used for joints that come into contact with food and drinking water . Such mixtures are not suitable for filling aquariums and terrariums.
Professional craftsmen recommend using silicone compounds for external work, in order to seal small cracks in window frames on the room side. This will ensure a long period of operation, as they can withstand sunlight and UV rays.
To seal glass, mirrors, and mosaics, you can choose good colorless sealants. It is better to treat floor cracks with a dark-colored sealant.
Silicone sealants are available in different types, so they are universal, and you can choose a product for almost any joints, seams and cracks. They are easy to work with, in addition, all the necessary information is indicated on the packaging.
On video: How to work with silicone correctly? We make a neat seam!
How to use without a gun
To work with sealant, you can purchase a set of spatulas at once or take only a couple of pieces of the desired shape
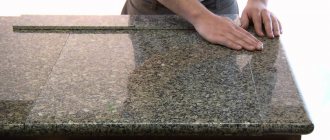
If the length of the joint or seam that needs to be sealed is short, and the work itself is one-time, then there is no point in buying a gun. There are special spatulas to distribute the composition.
A strip of sealant is squeezed straight out of the tube along the entire length of the joint or crack. Using a spatula, the mass is leveled, the seam is filled and the excess is immediately removed. The tool makes the surface smooth and uniform.
If the sealant is packaged in a suitable container
A number of manufacturers complete the container with a disposable “syringe”. There is only one drawback - sealant that has not been used for its intended purpose cannot be used subsequently. Therefore, it is worth taking a closer look at the shape of the container - if it has protrusions into which you can insert your fingers, then such a sealant is not easy, but it is possible to squeeze out without any devices.
Other methods involve disassembling the container. To do this you need:
- Carefully remove the spout from the bottle. Direct the container itself in the opposite direction (there should be no people there).
- Cut off the end of the tube using a sharp knife.
- Place the spout in its original place, having first removed the cap from it.
- Insert the handle of a regular plumbing hammer into the bottom of the tube. The T-shaped profile of such an “extruder” will create a fairly uniform pressure.
To ensure uniformity of the extruded layer of sealant, it is advisable to keep the pressing force constant. The width of the hammer should be 5...10 mm less than the inner diameter of the tube. If you don’t have such a hammer at hand, you need to use a similar object with a suitable cross-section. The heavier it is, the easier it is to squeeze out the sealant.
How to use sealant
The first thing you need to do correctly is to select a sealing compound in accordance with the work being performed.
In this case, you need to take into account where the sealing is carried out, inside or outside the room, how susceptible the composition will be to different precipitation and temperatures, whether it will need to be painted, and what the desired service life is.
To work with wooden structures, it is correct to use polymer compounds on an acrylic base. They can be painted after application.
They are also suitable for sealing seams of windows, walls and ceilings, but in this case it is better to give preference to acrylic siliconized compounds.
They are more flexible and less susceptible to moisture.
For work in a humid environment, where the seams are constantly in contact with water, a silicone-based composition with antifungal properties is best suited. This type is most popular when performing various types of work.
How to insert sealant into a gun
Before work, the tube is inserted into the instrument. Knowing the design will help you figure out how to do it correctly.
Hard Pack Material
Can be used for case, skeleton and semi-case mechanisms. In any case, the cartridge must be prepared before installation.
Preparing the cartridge
- Cut off the tip of the tube with a sharp knife.
- We take the nozzle, it comes complete with the drug. We screw it to the cylinder.
- We cut the tip of the nozzle at an angle of 45°. An important point: the thickness of the nozzle varies along the entire length. The thinner the seam should be, the closer to the end of the tip the cut is made. And vice versa.
The container can now be inserted into the fixture. We offer instructions on how to open a closed-type sealant gun and install a tube into it.
We insert the sealant into the closed type tool
- Open the tool. To do this, unscrew the housing-tube. Find a plastic nut at the end of the rod and remove it.
- Remove the metal washer from the rod and screw the support nut onto it.
- We put a washer over it and secure it with a nut. Take the wrench and carefully tighten the support nut. Important: the end of the rod should not extend beyond the washer.
- We assemble and tighten the body.
- We insert the container with the mixture into the pipe and secure it in place with a plastic nut.
How to use sealant: instructions
Sealing compounds are usually produced in 310 ml tubes. The cylinder is prepared for operation:
- The tube is opened, the end of the plastic distributor is cut at a certain angle (depending on the size of the space to be filled).
- Mounting is done in a mounting gun. The back of the tool contains a long rod bent in one direction. It needs to be pulled back. This action opens the stem part into which the tube is inserted. Initially, the base is placed, then the spout is tilted towards the front of the trunk. The hook rotates, points up, the serrated side points down. This tool will allow for uniform distribution of mass on the surface.
- The end of the distributor is guided and inserted end-to-end. When you press the trigger of the gun, the mass begins to come out and be distributed over the surface.
We suggest you familiarize yourself with How to remove silicone sealant from clothes
The force of pressure on the trigger depends on the speed of movement of the cylinder along the surface. Comparison of these actions will give an even distribution of the product.
Joints and gaps should be completely filled. Otherwise, during polymerization of the sealant, there is a possibility of cracks appearing.
In case of uneven distribution, it is necessary to act before the initial setting. All defects are corrected with a moistened rubber spatula or simply a finger, which is first dipped in a soap solution.
Operating a pistol - tips for beginners
As we have already found out, if the tool is properly equipped, then there should be no difficulties with its operation. And if you installed the cartridge as described in the instructions above, then you have already done half the work. Therefore, all that remains is to slowly press the trigger and apply the mixture to the desired seam. If you have a semi-body or skeletal type tool, it may take a couple of initial clicks for the required amount of material to fill the void in the tip. After this, make only smooth movements.
And if the model is battery-powered or electric, then by pressing the trigger you will regulate the intensity of the material supply. Therefore, if you are picking up a tool for the first time, then first practice in inconspicuous places - for example, seal a seam in the far corner of the room. After a little practice, you can move on to more visible places.
If you need to trim something or insert material into a gap, wet your fingers a little and run them along the surface. Use soapy water for this so that the mixture does not stick to your fingers. By the way, it is with this water that it is most convenient to remove the formed drips.
Note! The sealant does not require additional drying - in the fresh air it will acquire the required strength in just two to three hours. And one more good tip: after you finish sealing, be sure to rinse the instrument with warm water
And one more good tip: after you finish sealing, be sure to rinse the instrument with warm water.
Go ahead. To make the seam beautiful, use masking tape - stick it on both sides of the gap and remove it immediately after applying the sealant
To make a beautiful and, more importantly, high-quality corner seam, do the following. First, gently wet the side surfaces with soapy water.
First prepare a small stick made of plastic or wood; Cut one side of the stick so that you can use it to set the shape for the seam. Accordingly, the final shape of the upper part of the seam will no longer be formed by the tip of the gun, but by the stick mentioned above.
Note! If you accidentally squeeze out too much sealant, don't worry - there's nothing wrong with it. Simply dry the seam with a hairdryer and remove the remaining material from the side surface using the same stick dipped in soapy water
How to apply correctly
In order for sealing to take place effortlessly and leave the desired result, you need to know how to apply the sealant correctly. Application process:
- The surface is thoroughly cleaned of dirt and dust deposits, wiped dry, and degreased.
- The dryness of the opening is checked (this is very important to ensure high-quality adhesion).
- To avoid contaminating the area around it, seal the gap on both sides with mounting tape.
- The sealant, ready for use, is distributed over the area.
- The mass is applied from the corner part, while the cylinder is tilted at all times; the distribution should occur evenly.
- A seam is formed using a moistened rubber spatula.
- The protective layer of masking tape is removed.
- The excess is removed with a spatula or a clean rag.
- Further work is carried out only after the seam has completely dried.
Can sealant be applied to sealant?
Craftsmen do not recommend reapplying sealant to an already applied layer. From the first time it is necessary to completely apply the sealant and replenish all openings. But when sealing pipes, such a case is possible.
If the surface contains a layer of acryplast that needs to be renewed, then it must be thoroughly cleaned, the surface dried, and then applied. Surface application without cleaning will not give a full result.
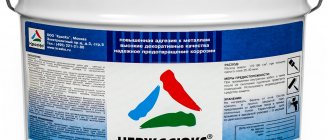
Applying crown sealant with a brush is also not the best option. To penetrate the mass more deeply, it is necessary to treat with a brush.
Interesting video on the topic:
Preparing surfaces for sealant
Preparing surfaces before applying sealant is an important step in the work. The level of adhesion and type of coating will depend on its quality. Preparation process:
- To remove dirt and dust residues with a brush or vacuum cleaner, you can use a damp sponge, but then you must wait until the surface being treated is completely dry.
- Degreasing the surface with alcohol and acetone, paying special attention to the internal areas.
- A paint strip is glued on both sides, allowing you to limit the area where the product is applied.
- Drying the work area: wiping with a dry cloth or a hair dryer.
We suggest you familiarize yourself with How quickly hydrangea grows
Rules for working with sealant
Buying a quality product is only half the battle. It is also important to use it correctly to get the desired result. Therefore, when working with silicone compounds, you need to consider the following subtleties:
- The composition is applied only to a dry and clean surface. This means that you need to carefully prepare the place where the substance will be applied. The base is washed, dried and degreased with alcohol or acetone.
- After drying, silicone sealant is difficult to remove from surfaces, so the borders must be covered with masking tape. The more carefully the stripes are glued, the more inconspicuously the putty will be applied.
- You need to squeeze the substance out of the tube evenly, without making any gaps.
- Before the composition hardens, you need to level the applied layer. To do this, use a soft spatula or cloth soaked in water and wrapped around your finger in one layer.
Attention! The tool should only be used in the direction in which the sealant was applied. Otherwise, unevenness will form.
- The masking tape is removed before the sealant hardens. Once the substance hardens, it will be difficult to tear it away from the total mass. Then you will have to trim, and this may lead to a violation of the tightness.
- Hardening time and complete drying time are completely different indicators. The hardening time is about 30 minutes, after which the substance dries and stops sticking to the fingers, complete hardening takes from 6 to 24 hours (depending on the thickness of the layer, temperature and humidity), the period of time after which the sealant acquires all its properties.
Using sealant is not particularly difficult even for a non-professional
Types of sealant guns
Sealing mechanisms can be classified depending on their design features.
In this situation, several types can be distinguished.
- Tubular. The presented models were made to seal joints using viscous silicone or acrylic mass. Such a device is equipped with a rod and a cylinder with a void inside. This is where the sealant is poured. As a certain advantage of this mechanism, it is worth highlighting the lack of need for frequent refills.
- Skeletal models, the designs of which are focused on working with sealant in a standard cartridge. This mechanism is equipped with a rod and stiffeners. The advantage of this product is the ability to use the sealant only partially. There is no need to use the entire cartridge at once, but only a small amount can be used.
- Semi-body, which involves installing cartridges with a volume of less than 310 milliliters. Their design is very similar to the previous version, but the difference is the absence of a solid frame. It is replaced by a stand for installing the cartridge. This mechanism is very convenient to use, since the composition does not leak out during operation.
Sealant guns can also be classified according to other criteria. If we consider these mechanisms according to the principle of supplying the substance, we can distinguish several types of pistols.
- Mechanical. These are devices that have a universal design. This mechanism can be used by both professionals and beginners for domestic use. To squeeze the compound out of the gun, you need to press the rod with a certain force.
- Pneumatic option. It is usually used when the job does not require a large volume of sealing agent. In this situation, the composition is supplied automatically after lowering the handle.
- Cordless, which are typically used by professional workers. Such models are used in cases where a large amount of work is expected. The pistol functions similarly to the previous version. The difference is the use of a battery in operation.
Applying silicone sealant with a gun
Depending on the purpose of use, the composition of sealants and the volume of containers differ slightly.
Silicone sealant is the general name for a whole group of products in the form of a synthetic adhesive mass, packaged in tubes or cans. They are used to fill joints, cracks, and places where parts meet.
If there is a large-scale job ahead, then it is difficult to do without a special gun. For home use, you usually purchase a hand-held mechanical tool consisting of the following elements:
- housings;
- nozzles;
- trigger;
- pens;
- stock
Operating procedure:
- Remove the cap from the tube and screw on a suitable nozzle, and then insert the structure into the body.
- Press the trigger to push out a portion of the sealing compound. Try to ensure that the emerging mass is laid in a continuous strip.
- As the tube is emptied, use the stem and handle to push the contents towards the nozzle.
It is important to ensure that there is not too much product: the excess will have to be removed, which is not very easy to do.
How to work with sealants and adhesives in tubes
It is enough to have a simple construction gun and the actual tube (tube) with the required material, and in addition a chisel and (or) a stationery knife, because in order to avoid premature drying of the material, the tubes are hermetically sealed and the tube must be opened before use. To do this, cut off the tip of the spout with a chisel or knife. Then the nozzle is screwed on. For ease of use, the tip of the nozzle is also cut with a knife or chisel at a certain angle (from 60 to 45°).After this, the tube is inserted into the gun. There are different types of construction pistols, but further we will talk about the simplest household pistols. There are at least 3 types of such pistols:
Figure 369.1 . The main types of household construction pistols.
a) skeletal, b) semi-corpus, c) hull
The design of hand pistols, regardless of type, is such that by pressing the trigger (2), we move the piston (4) of the pistol; when the tube is inserted into the body of the pistol (1), then the piston (4) with such movements creates pressure on the bottom of the tube and, accordingly, After several presses, the contents of the tube are squeezed out of the nozzle. In order to load the gun, you need to press the lever (5) and pull the rod back until it stops. As soon as we release the lever, the spring (6) returns the lever to its original position in which the rod remains fixed.
The video shows a nozzle with a screw-on cap. This cap is a very useful thing if the contents of the tube are not completely used. After using sealant or glue, just gently wipe the tip of the nozzle and screw the lid tightly. This will help preserve the adhesive or sealant for many months.
However, there are now many types of work where the contents of the tube have to be squeezed out a little every few minutes. At the same time, sealant or glue accumulates in the screw-on lid and gradually dries out; in order to screw the lid tightly, it must be removed. This can be done with the first nail or self-tapping screw that comes to hand.
The video shows charging a pistol with a tube with a plastic body and a screw-on nozzle. However, sometimes liquid nails, especially those made in America, may be in a cardboard tube with a non-removable nozzle. In such cases, the tip of the nozzle is first cut at the desired angle, and the diameter of the resulting hole in the nozzle must be large enough for a nail 80-100 mm long to fit into the nozzle. Use this nail to pierce the foil that seals the tube on top. After this, you can work with a cardboard tube in the same way as with a plastic one.
If the tube was sold with a nozzle without a twist, or it is a cardboard tube to which caps are never attached, then you have to make the cap or plug for the tube yourself. For a cardboard tube, it can still be the same nail. For plastic tubes, I used to use self-tapping screws as plugs if I used an uncut nozzle. But this still does not protect the sealant well from drying out. Then I began to additionally wrap the tip of the nozzle with a rag and then with electrical tape, thus obtaining a homemade cover. Now I'm doing it even simpler. If I have to use a lot of tubes, and not all of them have a nozzle with a screw-on cap, then I do not screw a new nozzle onto the new tube, but replace it with the one I just used. In this way, a whole set of nozzles with twist is assembled. In addition, this allows you to use the contents of the tube more economically, since you do not need to fill the nozzle with sealant or glue every time. Thus, according to my calculations, 2-3% of the content is saved. As they say, it’s a small thing, but it’s nice.
Well, then everything depends on the characteristics of the work being performed. If you need to squeeze out a lot of contents, then you need to press hard and often on the trigger of the gun, and in order for the contents to stop coming out of the nozzle, you need to not only stop pressing the trigger, but also release the pressure. To do this, there is a lever (5) near the pistol handle (1). While the lever is not pressed, it allows the rod and, accordingly, the piston to move in only one direction - forward. And if you press the lever, the fixation of the rod will be removed and it will stop pressing on the piston, and accordingly the pressure in the tube will decrease.
The video below shows how to quickly and easily seal the gap between the window sill and a wooden window with acrylic putty.
Sometimes, if the tube is inserted into the gun at an angle or the contents of the tube are airy, then pressing the valve does not help; the glue or sealant may come out of the tube for quite a long time.
And one last thing. If the contents of the tube have become very dry due to long-term storage or careless closing, then there is no need to press the trigger with all available force, trying to squeeze out the stiff contents. A pistol, especially a half-barrel or skeleton pistol, can break in this case. Pistols have many types of failures: the lever can bend, the protrusion that locks the lever can get licked off, the trigger can bend or crack, rivets in a skeleton pistol can fly out, etc. And cheap household pistols are practically impossible to repair; it’s easier and cheaper to buy a new one.
To prevent this from happening, you need to unscrew the nozzle and squeeze out, for example, a nail, the contents of the nozzle through the spout. Sometimes, if the contents of the tube have not yet thickened greatly, then it is enough to cut off the nozzle nose so that the diameter of the hole increases.
Properties
The basis of the seal is silicone polymer. It determines the characteristics of the sealant:
- Elasticity. Thanks to this, the compactor can be used on moving bases. The composition compensates for deformation movements at the joints.
- Strength, resistance to mechanical and tensile loads.
- Good adhesion to ceramics, glass, metal, wood, concrete, plastic.
- Weather and UV resistant. Thanks to this, silicone sealant can be used outdoors.
- The temperature range at which silicone can be used is from -50 to 200˚.