Anyone can decorate a wall in an apartment with an original pattern or relief. Making a bas-relief on the wall with your own hands is not difficult, you just need to choose the relief style, decide on its shape, and make a drawing. A three-dimensional image on the wall can be made anywhere, if the space for applying the chosen form has been carefully prepared.
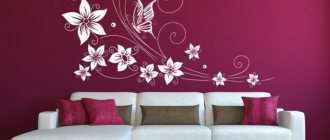
The bas-relief visually changes the room, hiding the imperfections of the wall surface. The variety of relief allows you to choose a pattern, shape and stucco molding taking into account the style and design of the room, kitchen, hallway. You can make a bas-relief in the form of a complex or separate ornament, place a panel in the center of the wall, or scatter the relief in separate elements along the wall. You can focus attention if you place lighting near the composition
Types of bas-reliefs
The bas-relief should protrude above the surface by no more than half the volume. This type of panel is called low bas-relief. If the figures protrude more than half, then it will be a high relief or a high bas-relief. You can make a three-dimensional image on the wall through the casting of a solid form, assembling a composition from individual elements. Other types of bas-relief include:
- Thematic and visual – the painting is in the center of the composition.
- Ornamental – patterns and ornaments are depicted.
- Flattened - a minimum distance is maintained between the volumetric parts and the plane.
- Picturesque - flat figures are created with barely noticeable elements of nature.
- Multifaceted - various components are used, contrasts are created between them, the effect of shadows is applied, including falling ones.
- Facing – used during facing works. Usually such images are created as ornamental.
Bas-reliefs are divided into other types and according to execution technique:
- Simple ones, which are made in the form of baguettes for paintings.
- Baguette or edging. They look luxurious on the wall, but not provocatively. Great for decorating plain walls on which photos or paintings are already hanging.
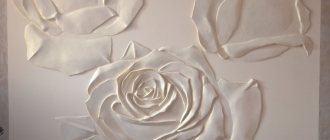
- Wall panels with floral patterns or paintings with plant themes. Such a bas-relief should be accompanied by lighting to enhance individual elements of the composition.
- Bas-reliefs that contain images of mountains, lakes, trees, nature, trees.
- Subject - occupy the entire wall or only a small part of it.
When choosing the type of bas-relief on the wall, which you can make yourself, you should take into account the features of the room where the composition will be placed. The following types of three-dimensional images are perfect for the kitchen:
- Still lifes.
- Pictures with pets.
- Drawings with kitchen utensils.
- Compositions with fruits and vegetables.
In a child's room, bright and light panels will look great, on which it is better to depict magical or fantastic animals, castles, butterflies, and cartoon characters. In the living room, bas-reliefs will look great in combination with stone and wrought iron.
Restoration and care of the bas-relief
If individual parts break off, they can be easily restored with the original composition. At the same time, in order to increase adhesion, the surface to be repaired is cleaned and primed. Next, diluted gypsum mass is applied to the damaged areas (if there are several of them).
During the formation of the bas-relief, it is necessary to try to ensure that the transition is invisible. If the relief image was painted with rich colors that have lost their brightness over time, then a new layer of acrylic is applied to the drawing. If a panel is treated with varnish, it can be cleaned with water or a wet cloth when dirty.
Creating a bas-relief with your own hands is quite a feasible task even for a beginner
Even any novice finisher can create a bas-relief on his own. The main thing in such work is patience, perseverance, as well as a willingness to work out the smallest details, which takes a lot of time. If you are in a creative mood, the work itself can arouse interest. If the result is successful, novice masters learn a useful and valuable lesson.
Was this information useful to you? Share in the comments!
Do-it-yourself bas-relief from plaster
Most often, plaster is used to decorate walls with three-dimensional images. Before creating a bas-relief from plaster, it is worth thinking through the drawing and making a sketch of it. It is recommended to take into account factors such as:
- Wall background.
- Interior items.
- Direction of natural light and lighting systems.
- Entrance to a room or apartment.
Gypsum bas-relief is used to decorate fireplaces, niches, and walls with additional lighting. Subjects for such three-dimensional images are:
- Nature themes.
- Antique stories.
- Themes of love.
- Fairy tale characters.
- Images of the sky and castles.
- Still lifes.
Bas-relief in the interior
To create a bas-relief image, materials such as:
- stone;
- gypsum;
- marble;
- clay;
- plaster;
- metal.
Bas-relief images in the bedroom interior
The walls are decorated with:
- landscapes;
- figures of people;
- plants;
- objects.
These can be full-fledged artistic compositions. Thus, they can decorate the building inside and outside.
Cast parts of the decor are made of polyurethane or gypsum, and manual, designer modeling is done using putty and polyurethane glue.
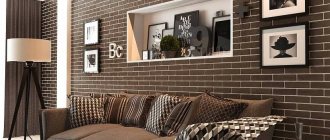
Complete compositions that can decorate any room
Bas-relief is often used in modern interiors. The technique of such compositions is different, this allows you to correctly place the bas-relief in a room of any style.
Bas-relief compositions will help develop and complement the main theme of the interior, and place the necessary accents in the house. Stucco molding in the living room helps to create a special solemn atmosphere. In the bedroom it creates an atmosphere of intimacy, in the corridor - the appearance of imaginary movement. All this helps change the impression and create the necessary mood.
On an empty wall you can create a panel in the form of a painting. If the bas-relief is illuminated, then all the convex details will look even more distinct. They are often used to decorate various openings.
You can create entire panels
Unlike decorative painting, bas-reliefs do not necessarily need to be highlighted with color. If desired, you can leave it white, and it will look just as good. You can combine these two options to get an original and unusual effect.
The bas-relief goes well with the following finishing materials:
- mirrors;
- leather;
- tree;
- marble;
- plaster.
Unusual but very beautiful
A simple stucco molding can add originality to a room in a minimalist style; it is suitable for a loft or classic style.
What tools and materials are needed for gypsum bas-reliefs
To make a bas-relief on the wall, you will need special tools, which can be purchased at construction and art retail outlets.
The main devices for working with bas-relief include:
- Abrasive sponges.
- Containers in which the mixture will be mixed.
- Trowel.
- Brushes.
- Dye.
- Palette knives are spatulas that help create three-dimensional images on the wall.
- Sandpaper.
- Knives.
- Polyethylene film.
- Simple pencil, pen, marker.
- Painting tape.
- Scrapers.
- Putty knife.
Additionally, you need to purchase a primer, gloves, stencils, and also make sketches of the design.
Bas-reliefs are created from the following materials:
- Plaster.
- Alabaster.
- Putties.
- Clays.
- Gypsum or decorative plaster.
- Polyurethane.
Gypsum is an environmentally friendly and easy-to-work material from which you can make both simple and complex images. Acrylic paints are easily applied to plaster, helping to protect the bas-reliefs from damage. The strength of the composition is enhanced by the application of varnish, primer or glue.
Plastic foamed using a special technology called polyurethane is also popular. Its advantages include:
- Practicality.
- Resistance to changes in temperature and moisture.
- Environmentally friendly material.
- Does not fade or fade in the sun.
- Does not absorb odors.
Bas-reliefs are made from polyurethane for kitchens, bathrooms and swimming pools.
Advantages and disadvantages of bas-relief on the wall
Bas-relief is considered a separate type of finishing work and has positive aspects. The main advantage is the ability to create an original interior in any room. Other benefits include:
- Effective play of shadows, allowing you to create a special feeling of space that can change when switching light sources.
- Masking significant differences in walls.
- A visual way of zoning rooms with smooth transitions.
- Creation of original compositions.
- The ability to independently create three-dimensional images, without the involvement of specialists.
- Effectively hides those elements that are best kept out of sight.
- Creating bas-reliefs creates a special charm and emphasizes the individuality of the owner of an apartment or country mansion.
These advantages are felt only if the technology is followed during the formation of convex ornaments. However, you should be aware of a number of disadvantages:
- For beginners, the process will seem difficult, especially when creating a complex composition with many small details. For this reason, such work is entrusted to professionals.
- High price.
- Have artistic skills at least at a basic level.
- It is extremely difficult to repair such a surface if damaged.
- Dust quickly accumulates on any bas-relief.
If you want to decorate your home with volumetric relief of different heights, you need to take into account both the existing advantages and disadvantages.
The bas-relief visually changes the room, hiding the imperfections of the wall surface
Preparatory work
They include preparing the wall surface for creating a bas-relief, and take place in several stages:
- Leveling the wall surface.
- Wall primer.
Leveling involves treating the wall with a mortar made of sand and cement. After this, putty is carried out using alabaster or solutions that perfectly level the surface.
A reinforcing mesh is attached to the wooden wall in front of the plaster.
During plastering, beacons are used to monitor the evenness of the wall surface.
When the plaster dries, then primer is applied. Compositions made on the basis of acrylic, alabaster or gypsum mixed with sand are suitable for this. The primer is applied using a brush called a paint brush. It has a large width and does not leave streaks during operation. If the latter have formed, then they are removed immediately without waiting for them to dry.
Making a mold for pouring plaster
If for all sorts of different shells, fruits and bugs you can find a form and there is no point in making it, then for some details, such as grapes, it is easier to make the basis yourself than to try to find it.
Of course, they can not be cast, but rolled out of putty, but it will look somewhat worse, since this material is more porous when dried.
In general, with a certain skill, you can make any shapes you want using ready-made figurines. We bought one, and then poured out at least ten! And if you want, give them as gifts, or make panels if you want...
Well, let's get started. If we are talking about casting a grape berry, then you need to first roll it out of a thick putty mixture mixed with PVA glue, in the following proportions:
- Finishing putty – 0.5 kg;
- PVA glue – 1 tablespoon;
- Water – 100 grams.
Knead the thick mass, pouring water gradually. Since we gave its quantity approximately, because it can differ significantly when used with different types of putty.
After mixing, form a grape and leave it to dry for about a day. It should not burst, since the mass with the addition of PVA becomes quite resistant to cracking.
By the way, in the same top picture with shells, you can see the wall below, decorated using the technique of decorative strokes. So they need to be made with just such a mixture, based on PVA.
Well, is the grape dry? Let's make the form. For this we need:
- 0.5 liters of silicone;
- Plywood box;
- Self-tapping screws;
- Brush.
Liquid silicone is sold in construction stores, and you can choose any box, you will put a grape in it and fill it with the silicone mixture.
The main thing is that it can be easily disassembled, and then reassembled with self-tapping screws, and the holes can be covered with a mixture of silicone. This is necessary so that you can then easily remove the finished form without damaging it. If you don’t find a suitable box, you can assemble it from sheets of plywood.
We will show you step-by-step photos using the example of filling a figurine, and you can already put whatever you want there. It’s important to understand the sequence, that’s all. And the amount of silicone may be different. A grape needs 100 grams, and an owl shown below already needs 1 liter.
So:
- 1 Place the base in the box;
- 2 Fill it with liquid silicone;
- 3 We wait a day until the silicone sets, then we disassemble the box;
- 4 We take out the base and get a ready-made form for pouring alabaster.
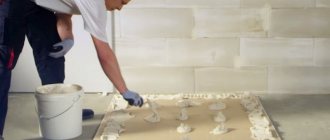
Now let's move on to the most interesting part, forming alabaster figures with your own hands.
Preparing to create a bas-relief: stages
- First you need to prepare tools and materials for work. In particular, you should have plaster of Paris, water, a bucket or bowl for preparing the solution, a spoon, and a bas-relief mold on hand.
- Then the form for filling is positioned horizontally.
- Prepare a gypsum solution: pour half a glass of water into a container, slowly pour one glass of gypsum, stirring constantly with a spoon. When the solution begins to resemble liquid sour cream, the solution is ready.
- Pour the solution into the bas-relief mold.
- After an hour, remove the casting from the mold, stretching its edges. This will make it easy to remove the casting.
- The next day, the parts are painted using gouache or acrylic paints.
- When the paint has dried, a thin layer of varnish is applied, which makes the bas-relief detail strong and durable, and the colors bright and saturated.
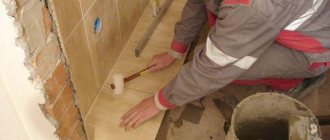
Creating a relief and attaching it to the wall: instructions
- Clean the base surface of the wall from local finishing.
- Level, prime, coat with base compound. Sometimes it is replaced with any type of decorative plaster.
- A background texture is created using a foam roller or pile.
- The so-called process of “slapping” with felt or foam rubber is carried out, after which the base is tinted. These steps are skipped if the wall is treated with decorative plaster or covered with gypsum board.
- A relief is being formed, which, after drying, is tinted on top. For plaster, coloring is done with special paints, shading with a damp sponge into thin halftones. Acrylic paints will help create sharp transitions from one color to another.
- When the paints are dry, then the relief can be treated with latex made from a butadiene-styrene mixture. The solution helps preserve the brightness of colors for a long time.
- After one or two weeks, it is recommended to treat the relief with acrylic varnish.
A bas-relief is attached separately to the wall, which requires fastenings to provide support for the figures and other details of the composition. Installation of the bas-relief on the wall is carried out step by step:
- Use corrugated nails, the length of which is 80-120 mm. They are driven into plastic dowels.
- Attachment points are made in the thickest places, marked in advance at an evenly spaced distance from each other.
- The nails are driven into the wall 50-60 mm.
- 15020 mm of nail should protrude above the wall; excess tools are bitten off.
- Attach a bas-relief on top, which should protrude 10-15 mm above the peg.
How to use a stencil for bas-relief step by step instructions
To create a bas-relief on the wall, in addition to desire, you will need a stencil for decorative plaster, finishing materials, as well as qualities such as accuracy, patience and imagination. The stencil template allows you to create pattern details with precise outlines and protects adjacent areas of the surface from contact with the solution.
The work is carried out in stages:
- Preparing the base.
- Fixing the stencil.
- Primer.
- Applying plaster.
- Formation of small parts.
- Removing the template.
- Creating surface texture.
Next, we will consider each of these points in detail.
To prevent the bas-relief from weighing down the room, the size and convexity of the created image is made according to the dimensions of the room. For a small room or a room filled with large furniture, a small bas-relief enclosed in a frame is suitable. Large forms are good for facades and halls with a large area.
Those who do not mix floral and geometric patterns do the right thing.
To “get the hang of it,” you can practice on a test sheet of hardboard plasterboard or in a utility room. At the same time, the obtained result will make it possible to evaluate the selected pattern in its natural form.
When creating a bas-relief, plaster compounds are used. Therefore, it is necessary to create conditions similar to those observed during plastering work. Temperature +5 - +30°C, moisture content in the air - up to 60%. Fans and heaters should not be used to dry the bas-relief.
Preparing the base
Since the bas-relief is applied to an already plastered wall, on which wallpaper will not be glued or paint will be applied, surface preparation consists of leveling (puttying) and priming.
First, start marking:
- mark lines of ornamental stripes along landmarks (corners, edges of openings);
- mark the centers of repeating elements or the boundaries of fastening stencil sheets;
- mark the lines of the frames if the future bas-relief is decorated with molded frames.
A level is not used for marking, since existing walls may have some curvature. This flaw will immediately appear with an ornament made strictly horizontally or vertically.
Preliminary marking is necessary, since it will no longer be possible to correct an obliquely applied relief.
Remove dust from the wall. If there are irregularities, they are eliminated before applying the bas-relief. The surface is primed in two passes and puttied.
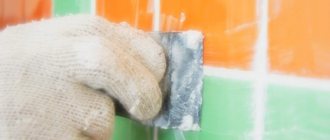
Fixing the stencil
The paper or plastic template must be securely fixed to the surface to prevent it from moving when applying the plaster mixture. To attach the decorative plaster stencil to the wall, you can use spray adhesive, double-sided tape, or strips of masking tape. Masking tape is better than all others because it leaves no marks.
The glue is applied to the back side of the template sheet, after which the device is pressed against the wall, waiting until the adhesive lubricant sets. If it was not possible to get the glue or a test with glue in an inconspicuous place revealed that it leaves stains, use tape.
The edge of the retainer is positioned at a distance of 4 mm from the edge of the slot.
Primer
Open areas that will be hidden by the bas-relief are primed with a brush. The primer is applied generously. After the priming operation, the wall is dried. The primer chosen is suitable for both the composition of the underlying putty and the decorative plaster.
Applying a stencil layer
For bas-relief techniques, plaster mixtures with fine-grained sand are used. The plaster dough turns out to be plastic and fits well even into narrow slots. Often, putty compounds or plasters with a gypsum base are used for this technique.
If you apply a liquid plaster mass, it can “float” after the template being removed. Therefore, the mass is prepared with a viscous consistency. You can use a ready-made composition or dilute the dry mixture. The volume of the mixed solution must be worked out before setting begins. Therefore, it is more rational to mix the composition in small portions.
The thicker the stencil sheet, the more viscous the plaster composition is made.
When applying a thick coating, the composition is applied in several layers. The lower layers are not particularly carefully smoothed in order to achieve maximum adhesion of the layers. When working, it is convenient to use a metal smoothing iron and a spatula. A portion of the plaster mass is applied to the trowel. While working, use a spatula to grab a little solution from the trowel and transfer the mass to the wall covered with a stencil.
The solution applied into the slots is pressed with a spatula for better adhesion and the formation of a denser layer. The direction of applying strokes in this technique is not important. The solution is spread in the direction that is convenient. It is important to fill the slots as best as possible.
Formation of small parts
When all the slots are covered with the mixture, if necessary, the surface of the layer is formed using improvised means, achieving the creation of the surface of the desired relief. In plant patterns at this stage, the veins are drawn and the stamens are applied using a confectionery or medical syringe. Using a palette knife, parts of complex shapes are formed, for example, plates of bird plumage.
Removing the template
The applied mass is allowed to set. At this time, it forms crystalline bonds with the wall material. After setting, you can carefully remove the stencil.
When removed, “stretches”—raised fringed formations—remain at the edges of the design. A particularly obvious “fringe” is formed when a thick layer of plaster is applied. You need to wait until the solution has completely hardened and sand along the edges.
Having removed the stencil, the pattern is corrected by applying the solution where there are gaps using a palette knife.
Create an invoice (if necessary)
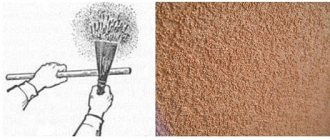
Sometimes, following the design idea, the pattern elements protruding above the wall are made with an original textured surface. Any available means are suitable for its application, for example, hard brushes, sponges, stamps for concrete and plaster. You can imitate fish scales by using a tablespoon. The texture is formed before the solution begins to set.
Cast molds
If you cast the molds for the composition in advance, this speeds up and simplifies the work of the master. You can cast leaves, flowers, trunks and branches of trees and bushes. The use of cast forms visually improves the effect of the bas-relief. Forms of various designs and types are sold in special stores, or are made independently. For this, alabaster or gypsum is used; reinforcing frames must be located inside the form. They are designed to maintain the integrity of the mold and cast parts for which a solution of plaster or other material is used. The mixture must be liquid to completely fill all the spaces in the mold. A metal frame is inserted before or after pouring the solution, which ensures the strength of the resulting part.
The wire frame is made of steel wire, which has a thickness of 0.7 to 2 mm. This mold blank can be used not only for casting molds, but also for making composition details directly on the wall. You can attach the frame to the surface using dowel nails, for which special holes are drilled. One turn of wire is wound onto the dowels, after which the nail is driven in all the way.
How to properly place a stencil on the wall
In order to get started, you need to determine the location for the drawing. The next step is to attach the stencil to decorate the walls.
Manufacturers, in accordance with the requirements and demand of the population, produce adhesive-based silicone templates. But if you decide to make a stencil for the walls with your own hands, then you will need improvised fasteners.
Creative ideas are implemented in accordance with the basic rules of work. We mark the extreme attachment points. Stencils on the walls are fixed:
- aerosol glue;
- masking tape.
You cannot attach or glue prepared models onto a recently painted surface; you need to thoroughly dry and prepare the place.
You cannot attach or glue prepared models onto a recently painted surface.
Techniques for making bas-reliefs
- Plastering of loose, unfixed and non-removable models on a supporting wall. Suitable for those who are just learning to create bas-reliefs.
- Reverse casting from plaster according to a model that is removed. The form is removed as soon as the composition is perfected. According to the mold, the master has the ability to cast up to 30 identical products.
- Artistic plaster molding, which is carried out in place on the wall. Requires craftsmen to have certain skills and abilities to work with plaster and alabaster.
Bas-reliefs of a particular technique are created on a table, on the floor or a plasterboard sheet, which is then attached to the wall. Prefabricated structures are assembled in parts, and if one of them is damaged, it is removed. The disadvantages of such bas-reliefs include heavy weight and the inability to attach to partitions and weak walls made of plasterboard.
Bas-relief based on poured molds
And here we will list everything that may be needed for this particular type of panel:
- Alabaster mixture
- Forms
- The base is made of plasterboard (if it is assumed according to your idea)
- Putty (or silicone glue)
- Water-based paint
We have already written above how to make an alabaster mixture, so we will not repeat ourselves, but rather give you some important recommendations regarding the process.
If you have come up with any composition, then do not rush to immediately glue the elements to the wall.
It's better to lay them out on the floor first and see if they look good. After all, it is not good to remove and re-glue the blanks several times, they will get dirty and more layers of paint will be needed later.
In addition to the elements poured into molds, you can add various materials to your composition. Let's say, if you are making a picture with shells, then you can glue regular crushed stone to the wall and paint it white. This will add volume and the picture will look much more interesting.
Free casting
The technique is suitable for creating high or low floral bas-reliefs and patterned compositions. It is not recommended to use tinting, which preserves the material. Finished parts of the composition must be painted. Free plastering is created using architectural plaster and water. The solution should be liquid and watery. The mixture is needed to dip all the details of the three-dimensional image into it. After dipping, each element is laid out on a board with plastic film. After a while, the procedure is repeated so that the models are plastered in a layer of 1 to 1.5 mm. Glue the parts using PVA glue, acrylic plaster or acrylic glue.
Features of creating a sketch and organizing lighting
Even if in practice the simplest method of creating bas-reliefs using stencils is used, you will first need to create a sketch of the image in real size, for which you can use various photos. This way you can check how suitable it is in size for a particular room, combines with other decorative elements, and also, if necessary, supplement the drawing with some details in order to eliminate voids on the wall.
USEFUL INFORMATION: Wall decoration ideas: decorating an apartment with your own hands
A special effect can be achieved if the volumetric composition is supplemented with artificial lighting.
Advice. It is better to install lamps for illumination on the wall in advance. Otherwise, the finished bas-relief can be covered with dust or damaged during the installation of lighting fixtures.
Reverse casting
This stucco technique can be mastered by any beginner who decides to independently make a bas-relief on the wall in the apartment. This method involves performing the following actions:
- Models made of plaster, plastic, plasticine and alabaster are created in the required quantities using casting molds.
- They are laid out on a flat surface, which is covered with plastic film.
- Coat each model with lanolin, which will allow the parts to stick to the surface. Lanolin is absorbed within 1-2 hours, a greasy sheen should appear on the models.
- Make an alabaster or gypsum solution that is used to coat the models. The layer thickness should be 1 cm. The solution is necessary to form anchors and stiffeners.
- Treat the coating with a frame made of soft wire, and its branches are fastened with copper wire.
- Coat the parts with a solution made from cement and sand. The thickness of the layers should be 5 cm or more.
- Form a supporting surface, which is called a mold.
- Separate the parts from the table or other material on which the models were laid out using a wedge.
- Protect the inside of the supporting surface with a copper brush, and correct defects with plaster or alabaster.
- Remove the bur from the mold and the chamfer from the internal edge, which is necessary for passing and fastening the parts.
- Lubricate the inside of the mold with lanolin.
- Fill the inside of the mold with layer-by-layer balls of casting mixture.
- Insert eye molds with handles that will make it easier to reach the casting.
- Pour the last layer of solution when the eyes are firmly stuck in the last layer.
Modeling technique
Conducted on site, i.e. directly on the wall. This allows you to achieve a high artistic effect. Before sculpting, it is recommended to practice on plasticine. It is worth considering that when working with plaster, the time to correct errors and drips is limited. Gypsum hardens quickly, so sculpting work in one area is completed before work begins on another part of the composition.
Plaster molding can be low flat, high or round. Flat molding is made from a thick mixture that is applied in layers. Each layer is smoothed, which allows you to form a relief and trim its contours. Layers are applied on top of the previous ones when they have not yet completely dried. With each layer, the master must switch to smaller tools.
How to make it yourself
You can purchase a stencil for decorative plaster, but it is much more tempting to make it yourself. In this case, you can choose an image to your liking or repeat patterns already available on furnishings - furniture, curtains.
This overlay can be made from any sheet material:
- plastic plates;
- thick paper;
- silicone;
- old x-rays;
- strips of masking tape (to imitate brickwork).
The main thing here is the density and strength of the stencil material, the ability to obtain a smooth edge. You can even use tulle for decoration using stencil technology (see video at the end of the article).
Ordinary thin stencils with narrow partitions are not suitable for decorative plaster, as they can easily collapse. The thicker the layer of solution applied, the wider the jumpers should be.
Made from silicone
To make a silicone stencil, you can go in two ways:
- use a silicone sheet on which to cut out a pattern along the contour;
- Apply silicone hot glue along the contour of the pattern.
Silicone is a reusable material that is easy to clean. When working with silicone glue, you must be careful, apply paths using a gun. To make a stencil template, you need a flat surface. It is sprinkled with talcum powder or starch to prevent the silicone from sticking to the surface.
To make it, you can apply a layer of thin paper to a drawing printed on paper and connect these sheets with paper clips. The top sheet is greased with vegetable oil, as a result of which the paper becomes transparent. The glue is applied along the developed lines so that the glue tracks do not go inside the contours. We hold the tip of the gun to the surface at a 45-degree angle. Cured silicone is easily separated from the paper.
Made of plastic
Transparent plastic with a thickness of 0.2 mm or more is suitable for making a stencil. File folder covers will do. Covers for A3 size paper are available for sale. To transfer a drawing printed on paper, just place it under transparent plastic and trace the contours on the plastic with a thin marker. For small stencils, the plastic walls of PET bottles are suitable.
When cutting out pattern details in plastic, make sure that the edges of the slots are free of burrs and slits. In the case of cardboard templates, this is not so important, since the paper edges are easily deformed when removing the template without disturbing the integrity of the plaster.
You need to cut plastic with a sharp utility knife.
Papers
Paper is the most common material from which a stencil template can be made. They even make decorative plaster from paper. Unfortunately, paper is not resistant to water, so for decorative plaster the template will be disposable. Whatman paper is best, but you can also use durable sheets of thick wallpaper.
To apply contours to whatman paper, a pre-printed drawing is placed on glass. A sheet of whatman paper is placed on top and secured to the glass to avoid displacement. A lamp is placed under the glass. The drawing that appears on whatman paper is outlined with a felt-tip pen. Sections of the pattern are cut out with a scalpel or a breadboard knife (just like on plastic).
Safety measures and recommendations for organizing the work process
Materials such as plaster and alabaster are harmful to human skin. They dry it out and irritate it, so creating bas-reliefs from plaster or alabaster requires the novice master to follow the following rules for organizing work:
- Use rubber gloves.
- Protect your eyes with glasses that prevent dust and small dust particles from getting into your eyes.
- Wear a respirator when working with the solution.
Such safety measures perfectly protect the lungs and bronchi from dust, plaster and putty. Protective equipment must be worn by the person during the entire period of work. It is not recommended to remove them until the final touch on the bas-relief is completed.
It is also important to organize the work process correctly, which guarantees the creation of a beautiful three-dimensional image on the wall. The following recommendations will allow you to create an original bas-relief on the wall of an apartment or house with your own hands:
- Install a powerful light source next to the wall to detect any imperfections and correct them before the material hardens.
- Correctly dose the components for the solution so that it is enough to create the entire bas-relief.
- The density of the solution should be optimal. If the mixture turns out to be very thick, then add a little water.
- Before working on a wall, a novice master should practice a little applying the mixture to a wooden surface.
- It is worth preparing all the tools and containers in advance so as not to look for them when mixing the mixture or preparing bas-relief parts.
Features of creating bas-relief from different materials
Materials suitable for creating three-dimensional relief have their own processing characteristics. For interior decoration, paper products are suitable, which are dipped in plaster and, when dry, hung on walls, frames, etc. But most often plaster or wood is chosen.
From cement
The bas-relief, located on the street side, is created from cement mortar, as it is exposed to atmospheric precipitation.
Sometimes, instead of gypsum, putty with cement is used, which is used to create panels. However, for practicality, it is better to choose a cement or cement-polymer plaster mixture. However, this composition is heavier, hardens more slowly than gypsum, is less plastic and shrinks. Therefore, difficulties may arise. For this reason, it is better to involve professionals to create a bas-relief from cement-based compositions.
The cement composition is heavy and has little plasticity.
Based on polyurethane foam
In some cases, this material allows not only to reduce the time needed to create a bas-relief, but also to remove restrictions on the dimensions of the “products”. It’s easy to create images that look “heavy” at first glance on the walls. Craftsmen create static models from polyurethane foam, which are then covered with plaster and painted.
You can make absolutely any bas-relief from polyurethane foam
Made of wood
To create wooden bas-reliefs, you need the appropriate tools. Namely, cutters of different types:
- conical – for clean surface treatment;
- end - with its help, rough work is performed.
Large-sized bas-reliefs require the use of high-precision equipment, as well as special software.
To create a bas-relief from wood, in addition to the source material, you will need cutters
From fabric
Fabric is suitable for creating an original three-dimensional relief. The technique will arouse interest not only among beginners, professionals will also find passion in it. The main advantage is complete freedom in improvisation using your own imagination. Work order:
- In a separate container, a mixture of yogurt consistency is prepared from gypsum, alabaster, plaster and PVA.
- Finished fabric products are dipped into the prepared solution several times.
- Before each subsequent dive, you must wait for each layer to dry. Dip until the coating disappears.
- Dried crafts are glued around the perimeter of the panel or frame.
Another option is to make separate compositions.
The technique of making bas-relief from fabric is perfect for beginners