Manufacturing procedure and classification
Manufacturers of wooden window sills offer products from several species. A variety of colors and shapes allows you to choose from a large assortment. Finished products are easy to install. You can even do this yourself.
Oak window sills are considered the most durable
Wooden window sills are made taking into account the required dimensions, the purpose of the room and the customer’s wishes regarding color and texture. The most popular and well-established wood species are oak and larch. Oak window sills are very durable. With proper care and use, they can last a very long time. Window sills made of larch are no less durable, and compared to pine they have higher moisture resistance.
It is recommended to varnish window sills for wet rooms. Wooden window sills can be classified according to various characteristics:
- in shape (classic straight and arched);
- by size (narrow - no more than 10 cm; wide, consisting of the width of the opening and an addition of 6 cm; large, serving as a working surface)
- by type of wood, and therefore by color and texture;
- by manufacturing method (from solid wood or from glued wooden planks);
- according to the method of surface treatment.
Products of any shape and size can be made from wood. The production of window sills itself is carried out only after taking all the necessary dimensions. They are made by private companies, presenting a wide selection of products.
Removing the window sill
Solving the problem of how to remove a window sill from a plastic window inside an apartment begins with determining the type of window sill: wooden, concrete or PVC - each of them has its own dismantling techniques and technologies.
Wood
The most surprises await repairmen (professionals too) when dismantling a wooden window sill. Only it can be attached in several ways that are not available to window sills made of other materials:
with pinching by a window frame;
Pinched by the window frame.
with partial pinching by the window frame and mechanical fastening through the frame profile from above or from the outside, from the street side;
With window frame clamping and mechanical fastening.
Self-tapping screw from the street side.
on glue;
Fastening with glue.
- on support dies and glue;
- on metal brackets.
Bracket mounting diagram.
In this regard, there are several methods for dismantling a wooden window sill.
The window sill is most easily removed from metal brackets. Use a screwdriver or a Phillips screwdriver to unscrew the screws that secure it to the brackets. After this, the tree is easily removed from the grooves in the wall and frame.
In all other cases, the window sill is torn off from the lower plane of the window opening with a crowbar or a hammer - tamping is done along the entire length. Here you need to be especially careful and attentive. A sudden movement can seriously damage the frame if screws are screwed in (it is impossible to know for sure).
Therefore, when pulled away from the glue or polyurethane foam, the window sill should rise only 1-3 cm. After this, shaking it from side to side, you must try to remove it. If there are no screws, the attempt will be successful.
Otherwise you will have to look for them. To do this, first remove the rubber seal from the inside of the window. If there is no hardware underneath, the ebb is dismantled (sometimes a self-tapping screw is screwed through the ebb, which does not require disassembling it) to get to the window sill mounting.
Concrete
How to remove a window sill from a plastic window if it is monolithic, made of cement-sand mortar? Experienced specialists advise in such cases to first protect the furniture from dust - take it to an adjacent room or cover it with plastic wrap. All lamps are also closed.
There are several ways to remove the solution:
- Hammer;
- Cut the strips with a grinder and then knock them out with a hammer and chisel;
- Work only with a hammer and chisel. The option is the least dusty, but energy-consuming. However, removing a cement window sill without using power tools will take a lot of time.
Plastic
There are two ways to remove a PVC window sill:
- Gentle, when the polyurethane foam is sawed through from the bottom of the plastic using a knife or a hacksaw blade, after which the window sill is removed completely intact. If necessary, it can be reinstalled;
- Destructive - using hands or a crowbar, the PVC is lifted up. This option does not involve preserving the window sill. It can break out in pieces until the window opening is completely freed from the old window sill.
Self-adhesive film
If the surface of the window sill is flat and smooth, cover it with self-adhesive film. It is inexpensive, easy to apply and holds tightly. It is easy to care for and can be washed with warm water. In stores there are many color options, with patterns and single colors, of different textures and densities. For a wooden prefabricated window sill, it is better to take a denser, laminated film. It will slightly smooth out height differences between parts, if any, and will not break due to small cracks and chips. For a flat plastic surface, you can choose a film of any thickness.
Before pasting, the window sill must be washed, degreased and dried. Cut a piece of film to the size of the window sill and stick the decorative material in place. This should be done slowly, gradually separating the film from the base and gluing it onto the window sill. Make sure there are no bubbles or distortions. The main thing is to eliminate them in time. The advantages of this method:
- fast, simple, cheap;
- large selection of films.
The downside is the fragility of the material.
Grinding and polishing a concrete window sill
As soon as concrete in a liquid state is poured into the mold, its surface must be leveled with a spatula. The drying time of the mass depends on the thickness of the window sill. After it has completely dried, the mold is removed and sanded. First, all irregularities and roughness are eliminated with a rough disc. Then grinding is carried out with a 50 grit disc, and finishing with a 100 grit disc.
Rice. 8. Sanded concrete window sill
The final stage is polishing. Polishing is carried out with discs of higher abrasiveness, approximately 400 units, to give the surface the appearance of natural stone. When the surface has become shiny and smooth to the touch, you can stop polishing and begin finishing with a protective coating.
Before applying a layer of protective agent, do not forget to remove any remaining dust from sanding the surface. To achieve a glossy effect, several layers of enamel will be required.
How to trim correctly
The new window sill is sold as a solid board, so before cutting it, it is important to correctly calculate the dimensions:
- To do this, measure the concrete base in length and width. A few millimeters are added to the resulting figures to create an overlap. The width of the window sill board should extend 10 cm beyond the seat. Otherwise, the warm air coming from the battery will not circulate, which will lead to moisture accumulation.
- If you can’t make the correct calculations, you can use a template that you make yourself from cardboard paper. The finished template is placed in place of the window sill and examined to see how accurate it is. If necessary, it can be altered to fit the required size. Then the product is transferred to a PVC panel and cut out.
- The factory film on the PVC panel is quite slippery and a line drawn on it with a pen or pencil will be almost invisible. It is better to mark with an alcohol marker. If the film comes off, it is removed. Instead, glue masking tape onto which markings are then applied.
- The cut out window sill is mounted under the window frame. Wooden blocks (wedges) are inserted between the window frame and the wall. This is done so that a gap does not form. Usually wedges are placed at the edges and one in the center.
- The product is installed at a slope of 2-4 mm into the room. The situation is regulated by the building level. To maintain the correct slope, you need to secure the bars on the side that is closer to the base. The thickness of the bars is selected in accordance with the slope.
- Then the product is secured with mounting foam, screwed from below with self-tapping screws, and also fixed to the wall with L-shaped brackets.
Cutting tools
You can cut a plastic window sill using different tools:
- Grinder (angle grinder). Working with this tool is easy. It is small, cuts smoothly and efficiently. Easily held with one hand. For cutting, thin discs from 1 to 1.6 mm are used. Sometimes when joining one window sill to another, extra millimeters appear that are cut off. You won’t be able to do this with a jigsaw, but an angle grinder will do an excellent job with this task. Disadvantages of the tool: a lot of dust, not used in hard-to-reach places.
- Jigsaw. The tool has several files with different tooth sizes. When working with it, you need to take into account that the tool does not cut cleanly. Jagged marks and chips remain on the surface of the plastic. This is especially true for a file that has large teeth set in different directions. It is not recommended to use it for cutting plastic unless you have experience with the tool. It takes a long time to cut with a fine-toothed file, but thanks to the slight setting, the cut has minor jagged edges and looks “shaggy.” This drawback is easy to eliminate, but the cleaning work will take a lot of time. The most suitable option is to use a blade without setting with medium teeth. The jigsaw jerks less and works smoothly, leaving virtually no nicks.
- Renovator. This is a multifunctional cutter that is capable of cutting off extra millimeters or making holes of varying complexity in an already installed window sill. This cannot be done with an angle grinder and a jigsaw. Most often, a small file with a size of 1 cm and a medium one of 2.5 cm are used for work. A blade with large teeth cuts quickly, the cut is of good quality.
Window sill installation technology - we do it all ourselves
Thus, having familiarized yourself with the general information, you can begin to study the most important thing - how to properly install a window sill yourself
Step 1: Product selection
It’s not enough just to read the description and decide on the type of window sill, you also need to take a responsible approach to its purchase, since plastic, wood and stone come in different qualities. At the same time, you should not underestimate the functions of this window element, because not only the appearance of the room, but also the thermal insulation will depend on its correct selection, since it does not allow cold air to penetrate inside, and warm air, accordingly, to escape
In addition, it is important to pay attention that there are no defects on it, for example, if we are talking about wood, then it must be free of knots, cracks, areas of rot, etc. In general, any little thing can subsequently negatively affect the functionality of the item
In general, any little thing can subsequently negatively affect the functionality of the item.
Step 2: Preparatory stage
If you prefer a natural material, namely wood, or a combined one (but with wood chips in the composition), then let the product stand in the room where this window sill will be installed for several days. In this way, its acclimatization will occur, because wood tends to expand, become saturated with moisture, etc.
Step 3: Measurements
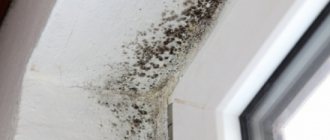
You should begin to understand the skill of how to install a window sill with the correct measurements. The slab can protrude from the wall no more than five centimeters. Otherwise, it will heavily cover the radiator. As a result, condensation will accumulate on the windowsill, and a fungus that is very harmful to health will appear. The slab must cut into the walls at least two centimeters on each side. Please note that the window sill must fit freely onto the landing pad before it can be fastened.
Step 4: Preparing the window opening
This stage of work is no less important, since it directly affects not only the ease of installation, but also the thermal insulation of the room. Therefore, remove all dust and dirt; it is better to use a vacuum cleaner for these purposes. Check how well the window frames are foamed, because if the foam is not blown in around the entire perimeter, then cold air will enter the cracks in winter, and warm air, on the contrary, will escape. Therefore, if there are any defects, be sure to fix them. After careful inspection and treatment of the surface, it should be primed and allowed to dry.
Step 5: Preparing the window sill
Based on the measurements made earlier, we draw out the window sill slab (you can first cut out a pattern from cardboard or other dense material). Plastic products are the easiest to cut, and this can be done with almost any tool, but an electric jigsaw is most often used. Wood will take a little work, but stone is generally better left to professionals.
Step 6: Installation
After all the preparatory work has been done, you can begin the installation itself. There is nothing difficult at this stage; first of all, it’s worth trying on a ready-made window sill slab. It should fit under the window frame. Make an inclination from the window of 3 mm, so that condensation, if it occurs, will drain. Then, using wooden wedges, we wedge it (along the edges and in the middle) so that it fits tightly to the window frame. And special linings are installed between its front edge and the window opening.
Throughout the entire process, you must use a building level. And finally, when the window sill is perfectly aligned, we blow foam into the space between it and the window opening. To prevent it from lifting the slab during its expansion, it should be covered with something and 5-6 bricks should be placed on top. Now the technology for installing a window sill is at your disposal, try your hand.
Ventilation Valve Installation
When upgrading windows, it is recommended to install fresh air ventilation valves. These compact devices allow you to ventilate rooms even in winter. Thanks to their use, a flow of fresh air is ensured when the doors are closed, so the rooms do not cool down. In addition, this method of ventilation is not accompanied by drafts.
This is especially important for children's rooms and other rooms where a child may be present.
Ventilation devices can be overhead or built-in. The intensity of ventilation is regulated by a movable damper, and a special grill protects against the entry of debris and insects from the street. When choosing a model you need to consider:
- device performance;
- compatibility with temperature and humidity sensors;
- sound absorption level;
- temperature range in which the device can be used.
Ventilation devices are integrated directly into the PVC profile.
Depending on the model, they can be embedded in the frame or sash. Since the installation of a supply valve on a plastic window can be done in a structure already installed in the opening, it is advisable to choose this option. After all, it is much more difficult to embed a ventilation device into a frame that is already partially covered by the upper slope. Independent actions without experience can lead to damage to your profile. In case of an error, replacing the supply valve will not be necessary - the device will remain intact, but a new valve will have to be ordered. This will cost significantly more than paying for the services of a specialist.
Use of plastic pads
Onlays – prompt assistance in restoration. This product allows you to quickly eliminate defects without leaving a trace. They come in white or imitate different types of wood. The most famous manufacturer of linings is Werzalit. Price from 50 rub./piece. The cover is attached with mounting adhesive (Acrifix, Weiss, Cosmofen). Before attaching it, you need to level the surface with putty, additionally clean and degrease.
Rice. 4. Overlays for plastic windows
The main materials from which window sills are made:
- plastic;
- tree;
- concrete;
- stone;
- Chipboard.
Each material has its own pros and cons. The most common type is plastic window sills. They are fairly easy to care for, easy to install, inexpensive, and come in a variety of colors to choose from. And paint for window sills is affordable.
Wooden ones are quite easy to install, they are harmless, environmentally friendly, but are susceptible to easy ignition and the appearance of fungus.
Concrete ones are practically the most stable, they are practical. One of the disadvantages is that they strongly absorb moisture. Installing a stone window sill is not a practical solution because they are easily damaged, are not resistant to moisture, get dirty and are difficult to clean.
But a chipboard window sill is a profitable investment. They are durable, resistant to damage, ultraviolet rays and temperature. They are easy to care for and you can choose the color and texture to suit your taste.
Updating a plastic window sill
When the question arises of how to restore a plastic window sill in case of major damage, but simply restoring the window sill is not possible, replacement is the solution. If repairing a plastic window sill is impossible, then it can be replaced.
Replacing a plastic window sill with your own hands is not a difficult job, but it is painstaking, and compared to other options, it is expensive.
The procedure consists of the following steps:
1. Removal. It's a simple matter, but it requires care. You must be extremely careful not to damage the window.
2. Take measurements. The length is measured by the width of the window, and 10 must be added to the resulting figure. The width is measured from the window to the corner of the wall, if necessary, add from 8 to 12 cm, depending on what will be on the window sill.
3. The workpiece must be inserted into the window profile and leveled using a building level, tilting the window sill by about 0.5 cm. This will help prevent water from accumulating and freezing in winter.
4. For a quality installation, it is necessary to drive in wooden pegs, and then foam the empty space with two-component foam to prevent the appearance of cracks.
Painting a PVC window sill
Is it possible to paint a plastic window sill? Yes, if there are no major defects on it. The restoration consists of several stages. Before starting work, wash off grease stains, dirt and dust, then dry. Now you can restore it.
To remove paint from PVC, you can use sanding paper. The first layer is removed with coarse sandpaper, the second with medium sandpaper, and for the last layer you will need fine sandpaper. This method of removing paint will help remove yellowness and further level the surface, remove small irregularities and cracks. It is necessary to ventilate the room while removing paint.
If there are large scratches and cracks, you must use putty. Use it to remove all unevenness from the PVC. After it dries, sand it again and you can move on to the next stage.
Before painting a plastic window sill, it is necessary to apply a primer. This is necessary to apply the paint in an even layer. Before applying the primer, all adjacent areas are protected with newspapers and masking tape. The surface is cleaned of dust and primed.
Now it's time for the little ones. How can you paint a plastic window sill? Today, a buyer at a hardware store can be presented with many options for paint that is suitable for restoration. Paint for plastic window sills is divided into two types: aerosol and polyurethane.
Most often, spray paint is used for PVC window sills. It is durable and strong. A large range of colors will help you choose the right shade, based on the interior design of the room. Polyurethane paints withstand all damage and sudden changes in temperature.
To paint a window sill with aerosol or polyurethane paint, apply a layer of paint to the primed surface, holding the can at a distance of 20 centimeters from the surface. After the first coat, any yellowish spot may appear. After the first layer has dried, you can apply another one until you are satisfied with the result.
Before applying a new layer, you must allow the previous one to dry.
Once the paint has been chosen, you need to start painting. We update and remove each yellowed section.
When is restoration necessary?
Plastic is a relatively practical material. Elements made from it are easy to maintain, easy to install, have a wide range of colors and are low in price. But at the same time, they are susceptible to mechanical damage and sensitive to elevated temperatures (they swell and can crack).
What to do if the following appears on the windowsill:
- Chips, cracks and scratches.
- Traces from flower pots and hot objects.
- Spots faded by sunlight.
- Damage caused by chemical surface cleaning agents.
The plastic surface of the window sill is subject to mechanical damage. In this case, repairs of plastic window sills are carried out depending on the degree of damage. There are special restorative agents for these purposes. If these are minor damages, the repair is done using putty; for multiple chips and cracks, a laminated film is used, and for serious problems, a special overlay is used.
A universal and durable solution for window sill repairs
Overlays can be installed on old window sills of various types and made from a variety of materials (concrete, wood, natural or artificial stone), the thickness of which does not exceed 5-6 centimeters.
The most common material for the lining is rigid PVC. Window sill covers have many advantages, in addition to being cheap, they are also durable, fire-resistant, resistant to variable temperatures, UV rays and moisture.
It can be easily adapted to the color of the window, allowing for a variety of veneer colors. A restored window sill is easy to keep clean.
When is restoration necessary?
Plastic is a relatively practical material. Elements made from it are easy to maintain, easy to install, have a wide range of colors and are low in price. But at the same time, they are susceptible to mechanical damage and sensitive to elevated temperatures (they swell and can crack).
What to do if the following appears on the windowsill:
- Chips, cracks and scratches.
- Traces from flower pots and hot objects.
- Spots faded by sunlight.
- Damage caused by chemical surface cleaning agents.
The plastic surface of the window sill is subject to mechanical damage. In this case, repairs of plastic window sills are carried out depending on the degree of damage. There are special restorative agents for these purposes. If these are minor damages, the repair is done using putty; for multiple chips and cracks, a laminated film is used, and for serious problems, a special overlay is used.
Ways to solve the problem
Let's break down the options for restoring PVC window sills into categories depending on the use of the material used.
Important! Before you repair a plastic window sill with your own hands, the surface must be cleaned of dirt, degreased with alcohol and dried.
Chemical cleaners
It is known that the plastic surfaces of windows and window sills are covered with an invisible or decorative film that performs a protective function. If handled carelessly, it will become scuffed and yellowed. To eliminate such minor defects, you can completely restore the part using laminate wax or a special solvent-based Cosmofen cleaner.
Small stains and abrasions can be removed with a special cleaner Cosmofen
If the window sill is completely yellowed, it is better to apply the composition to its entire surface. It will dissolve the top yellowed layer and the plastic will become as good as new. This will complete the restoration of the window sill.
Special putty
The use of a specialized mixture such as Fenoplast or Reparaturset to seal small defects is a very popular method today. In stores it is sold in powder form complete with a spatula and measuring cup. Preparing the putty according to the instructions is not difficult. After use, this mixture acquires properties close to PVC and easily covers gaps, be it a crack or a scratch. To dilute the two-component mixture, experienced specialists use not water, but a primer for deeper penetration, which helps to obtain a fairly durable coating.
Immediately after preparing the composition you should:
- Apply putty to the surface.
- Carefully repair the scratch and smooth it out.
- Wait 10-15 minutes. until completely dry.
- Sand with sandpaper.
- Polish with Fenosol S5 “UVA”.
To understand what it will look like to repair a plastic window sill with your own hands using putty, you need to start with more inconspicuous places.
Liquid plastic
If you don't know how to remove scratches from a plastic window sill, use liquid plastic. This material is absolutely indispensable for repairing deep scratches and large dents. It allows you to restore even the most advanced deformation.
To correct deep defects in the window sill, liquid plastic is used
With a ready-made composition such as Cosmofen Plus, all the recesses on the plastic window sill are sealed until a smooth surface is obtained. After this, you need to see how the cracks being repaired and the patch will differ from the overall texture of the plate. Therefore, it can additionally be covered with self-adhesive decorative film.
Laminated Film
This is a fairly simple and affordable option for restoring the surface of plastic windows with numerous defects. A wide variety of colors and a choice of assortments to imitate various textures (wood, stone, Russian pattern, etc.) make this product very popular even when restoration of the plastic window sill is not required.
Using laminated film you can update an old window sill
To use the film you should:
- Apply putty mixture.
- Use sandpaper to remove any bulges.
- Cut the film to the required size with a margin of 2-3 cm at the edges.
- Gently spread it over the surface with a towel.
- Remove any air bubbles that have formed by piercing them with a needle and level the surface.
- Glue the film in hard-to-reach places using a hairdryer, which will make it more elastic.
Using liquid acrylic
Liquid acrylic perfectly hides all defects of a plastic window sill. It is difficult to carry out restoration using this method on your own. Installation requires skill in working with the material, but the effect is excellent. The window sill looks like new. For restoration, you can use bulk acrylic (price is per liter):
- Art-eco – 2400 rub.;
- Art-Array - from 3900 rubles;
- Plastol – from 800 rub.
Rice. 5. Liquid acrylic on a plastic window sill
The material additionally strengthens the surface of the window sill. Acrylic can be used to change the color and texture of the window sill. Perfectly hides cracks, scratches and chips.
Window sill upgrade options
There are many ways to restore plastic window sills, and repairing these elements has a number of advantages over complete replacement. It's simple and doesn't cost much work. In any case, PVC remains the most affordable material. Laminated surfaces are especially loved by customers. They look aesthetically pleasing, last a long time, are wear-resistant and reliable.
Restoration using putty
You can restore a damaged surface using a special material - a mixture of Reparaturset or Fenoplast, popularly called putty. It can be used if the damage is minor. It is sold in construction stores, the instructions for use are simple.
The consistency of the material resembles liquid plastic, therefore it is actively used in restoration work. It fills gaps and cracks, due to the fact that the mixture penetrates deep into the damaged area. For the best effect, the dry mixture is diluted not with water, but with a primer.
It is easy to restore a plastic window sill with this material; you should work with it immediately after preparation. The putty is applied to the surface and leveled. The composition dries in 15-20 minutes. After drying, the treated area is sanded with fine sandpaper and polished.
Advice! Before repairing major damage, it is worth practicing working with the material in an inconspicuous place.
Liquid plastic or acrylic
You can repair a plastic window sill using liquid plastic. The flowing substance perfectly seals all scratches, including deep ones, cracks and dents. This is an excellent option to cope with even significant damage. To eliminate deformation, you should use a ready-made composition.
All recesses are sealed with liquid plastic until the surface becomes even and smooth. The only caveat is that when restoring an old window sill, such patches may differ in shade from the rest of the surface. In this case, you can cover the product with a completely decorative film.
Liquid acrylic has a similar effect. This material is expensive, but it not only improves the decorative properties of the product, hides all defects, but also strengthens the surface. Liquid acrylic allows you to change the color and texture of the surface. The question remains that it is difficult to work with this material without special training.
Restoration using onlays
What to do if the plastic window sill is cracked? PVC plates will come to the rescue. Overlays are created for sheets no more than 6 cm in thickness. This is the simplest and most economical method of restoration, since it does not require any special skills. The problem area is hidden under a cover made of pure polyvinyl chloride. It is resistant to negative factors.
The overlays are installed as follows:
- The damaged area is filled with glue.
- A part equal in size to the surface of the window sill is cut off.
- The plastic is degreased and coated with an adhesive.
- The pad is installed in place and pressed down with a heavy object.
- To dry completely, leave the structure for 6-8 hours.
- The joints and cracks are filled with colorless sealant.
Required tools and materials
To repair this element, you need to prepare everything you need in advance.
The tools you will need are a hatchet, a spatula, a chisel, and a construction gun. Depending on the nature of the work, you need to take chemical cleaners, special putty, laminated film, liquid plastic or PVC linings. Sandpaper or diamond mesh may be required to make the surface smooth. To remove remaining dust, you can use a vacuum cleaner or compressor. If this is not the case, then use a brush. Dilute the paint in a plastic tray and dilute it with solvent or acetone. Paint with a roller or brush.
The best ways to repair and restore PVC window sills
Korovin Sergey Dmitrievich
Master of Architecture, graduated from Samara State University of Architecture and Civil Engineering. 11 years of experience in design and construction.
The window sill is an integral part of the window opening. And since PVC windows are now a big priority, this part should also be made of plastic. Without this element, the interior of the room looks unfinished and uncomfortable.
But with prolonged and improper use of window sills on a variety of surfaces, this part of the window may require restoration. And we don’t always know how to update and how to repair a plastic window sill if cracks and chips appear, not to mention the change in color and deformation.
Choosing a wooden window sill
Comfortable and practical wooden window sills give a finished look to the interior of the room and the window. By installing a solid lamella wooden window sill, you can create a cozy atmosphere in a bedroom, living room or office.
In addition, skillful installation of a window sill according to all the rules will improve the functionality of the structure when glazing, for example, a loggia.
window sill view
As part of a window block, a window sill board can be:
Wide or narrow
With or without wall launch
Rectangular in shape or have rounded (radius) corners.
But the main selection criterion is still the quality of the wood.
wood
When choosing a wooden window sill, you need to pay attention to the type of wood, proper installation and daily care of the surface. The most preferred choice is oak window sills
Pine and beech wood is also suitable for window sill boards. It is preferable to choose glued pine window sills, which are least susceptible to warping due to temperature changes
The most preferred choice is oak window sills. Pine and beech wood is also suitable for window sill boards. It is preferable to choose glued pine window sills, which are least susceptible to warping due to temperature changes.
dimensions
According to the technology for installing window sills, only 1/3 of the board should protrude beyond the wall. Therefore, the conditionally recommended width can be 20-25 cm. No one can prohibit the installation of a wide window sill. However, this will require additional strengthening of the structure and, accordingly, fastening. The classic dimensions of a wooden window sill are: length 1.50 m, width 250 mm, thickness 40 mm.
Complete replacement
If it is not possible to restore a plastic window sill, then you can solve the problem radically - dismantling the old one and installing a new one.
Removing the window sill:
- you need to get rid of the mounting foam and smoothly pull out the plate;
- remove debris from the old window sill;
- the new plate is installed in place using support rails;
- the joint with the window is lubricated with sealant;
- the void is filled with polyurethane foam;
- After complete drying, it is necessary to remove the protective film.
This method is resource-intensive and financially uneconomical. But perhaps this is the only option to repair the window sill of a plastic window.
In order for a window sill to serve for many years, it is necessary to properly care for it and use it appropriately. And it is worth noting that you can repair the window sill of a plastic window yourself.
How to repair a window sill made of plastic, wood or concrete?
After installing a new window, the window sill pleases with its beauty and perfectly smooth surface, but over time it loses its original appearance. Therefore, many people have a question: how to restore a plastic window sill so that it looks like new? Let's try to figure out what to do and how to restore a window sill from different materials.
If you have a wooden window sill
It will not take much time to restore the proper appearance. The basic principle is the same as for PVC window sills. First, remove the old paint using any convenient method. The window sill is sanded, all irregularities are removed using putty. Then the window sill is primed.
A plastic window sill cannot be painted with oil paints, which cannot be said about a wooden one.
The choice of paint for wooden products is huge. All that remains is to paint the window sill, and its updated look will delight all household members.
How to refresh a page with cache clearing
In fact, more than 95% of cases where a page refresh is required are resolved using the above method. However, sometimes there is still a need to update the page cache, i.e. reload images, styles, etc., which are usually loaded by the browser for each site once, and the next time the pages are opened, they are loaded from the computer’s memory, which significantly increases the site loading speed by reducing the transferred data.
If this is your situation, then simply refresh the page to clear the cache. To do this, use the keyboard shortcut Ctrl+F5. Thus, the page and all its files will be forced to be downloaded from the remote server again. This is exactly the difference between F5 and Ctrl+F5.
If refreshing the page and clearing the cache does not help you for some reason, try completely clearing your browser cache. We recently talked about how to do this in one of the previous instructions on our website.
By the way, you may also be interested in learning how to automatically refresh a page in your browser, and we have also already talked about this using the example of all the popular Internet browsers today.
How to quit and take work correspondence and contacts with you to spite everyone
Users of the global network often ask how to properly update their browser to maximize PC protection from malware, speed up work, and get additional features. Let us immediately note that the update process is individual for each web explorer. Below we will look at how to do this work and why it needs to be done. We will also analyze situations when the software installation fails for some reason.
How to update a plastic window sill
In order to thoroughly update the window sill, it is necessary to install a new plastic top. There are special pads available for sale for this purpose. The installation of such a coating takes a little time. In addition, there is no need to repair the wall adjacent to the window sill and the slopes.
After carefully laying the overlay and pressing it a little, you should wait until the adhesive solution dries completely. After the glue has dried, the window sill with the trim installed will look like new and its strength will not be compromised. You can also update the window sill using laminated film.
On the modern market of finishing materials, adhesive film is presented in a wide variety of colors. A single-color or multi-color coating will give the window sill an elegant and clean look. Before applying the film, it is necessary to level the surface of the window sill, repairing all cracks and chips.
Restoration of concrete and stone window sill
A concrete window sill is repaired according to the same principle as a wooden one. It is first cleaned of old finishing material, then rubbed with sandpaper, primed and puttied. After the putty has dried, the window sill is again rubbed down and primed. The prepared surface is painted, tiled or otherwise decorated.
Finishing a concrete slab
Working with stone slabs is more difficult. They require special pastes, a grinding machine and good knowledge of the material. It is better to entrust the restoration of natural stone to specialists.
Repairing a window sill does not take much time, but requires careful preparation. The correct choice of tools and materials largely determines the result. If you don’t want to carefully select a PVC cleaner or wood varnish, you should also entrust the work to the experts.
How to put it in place
The concept of how to replace a window sill on a plastic window yourself includes not only its dismantling, but also its installation. The technological process consists of several operations:
- preparing the lower base of the window opening;
- fitting (cutting protrusions);
- installation work;
- sealing slopes.
Preparing the bottom base of the window opening
Before installing a new window sill, it is necessary to clean the grooves in the walls from residual foam and dirt, and the base of the opening from various gaskets, mortar, and polyurethane foam. As a result of the work done, only the material from which the wall is made should be on the surface of the opening.
If there is a distance of several centimeters between the wall and the frame, allowing the space between the base of the opening and the window sill to be foamed, the preparation work is completed. If not, then the wall under the window sill is grooved: the width of the groove is up to 7.0 cm, the depth is 2.0-3.0 cm, to form a foam seam.
At the same time, it is advisable to replace the foam inside the opening, under the frame. These works are carried out to insulate the window.
Trimming the canvas
The new window sill canvas is sold in a rectangular shape. It is necessary to install it in the form of the letter “T” with a wide leg - to go under slopes and behind part of the wall indoors. In addition, the material must be trimmed in the longitudinal direction so that the width of the window sill ensures the overlap of the heating radiators installed under the window.
Installation diagram.
When calculating the size of the window sill, you should adhere to the following rules:
- the window sill should fit into the groove of the wall by 20-30 mm;
- the protrusion beyond the slope can be of any length, but be sure to overlap the plastic panel with the corner;
- the cross cut should be at the same angle as the slope in relation to the frame.
Window sill installation
The instructions for installing the window sill provide for performing work in the following order:
- The window sill is pressed with its upper cut edge close to the window support profile (frame);
- The window sill canvas is adjusted with the help of pads (mounting wedges) so that the plane has a slope towards the room of 2-3 mm (the operation is necessary so that water does not collect on the window sill near the frame) and, at the same time, very tight contact is achieved with the end of the frame. The length of the spacers is selected so that 8.0-10.0 cm remains to the inner plane of the wall;
Scheme of installation on wedges when a slope towards the room is required.
- After installing the wedges, the window sill canvas is set aside in order to restore the insulation seam under the frame;
- A vapor barrier tape is installed;
- When the foam expands a little, professionals call this moment “dry to the touch,” the window sill is inserted;
- A small weight (a 3-liter can of water) is placed on its plane - this way they achieve a tight fit of the upper plane of the window sill to the stand profile;
Cargo.
- After 15-20 minutes, foam is applied under the window sill in the area of the frame along its entire length, which, when expanded, will tightly press the window sill to the frame;
- After 25-35 minutes, an additional 7-10 kg of oppression is placed on the windowsill;
- The entire space under the window sills is foamed. Considering that the foam expands too much, it is necessary to leave 3-4 cm clean from the edge of the wall;
- If the window sill is to be strengthened with perforated tape, it is installed after the foam has dried.
Installation of a plastic window sill.
Seal of slopes
Self-sealing of slopes is possible after the foam has completely cured. The work is carried out in the reverse order of removal:
- the panel is inserted at an angle past the end of the frame;
- A small amount of foam is added near the frame between the wall and the panel;
- the panel is pressed tightly against the rail attached to the wall and secured to it with a self-tapping screw;
- after 2-3 hours, the joints of the panel with the window elements (window sill, frame, upper slope) are sealed with “liquid plastic” sealant;
- the corner is glued.
Monolithic slopes are sealed with gypsum plaster. The nuances of plastering corners can be seen on our website in the work “How to align the corners of walls in an apartment?”.
Installation Rules
To perform such work, the help of professionals is not required. It is enough to follow simple and clear instructions and not miss important points. Installation will not take much time, because there is no need to dismantle the old window sill.
For work you will need the following tools and materials:
- the cover itself with plugs;
- special glue;
- silicone or sealant;
- a hacksaw (or a turbine with a special disk, or a jigsaw, or a regular jigsaw);
- roulette;
- level with a length of at least half the length of the product.
After preparing the necessary tools, you can begin the installation process, which consists of several steps. You need to complete them in order, without getting ahead of yourself, especially if you are not strong in construction.
- Preparatory stage. If there are defects on the window slab or board in the form of cracks and chips, it is necessary to remove the surface by sealing these places with gypsum materials (for example, putty or gypsum adhesive). This does not apply to window sills made of wood and plastic; they are simply cleaned of debris and other foreign objects. Some advise treating with septic tanks, but this only applies to wood, which they usually forget to mention. This is due to the uselessness of treating other materials with antiseptics, which is a waste of money.
- Accurate dimensions are the next step. It is necessary to measure everything that will be important when cutting and trimming the product. These actions are carried out with a painting knife, a jigsaw, or a turbine with a special nozzle. The nozzle is needed because the plastic can melt and become deformed.
- Installation of panels for window sills. Special mounting adhesive is applied to the back side of the panel. It is distributed in horizontal stripes over the entire area of the part, after which it is applied in zigzags or parabolas. After applying the glue, the trim is mounted on the window sill. You need to press it tightly. Then it is recommended to take small weights (0.5 kg is enough) to place on the corners of the panel for better “setting” of the glue.
Until the glue dries, further work is prohibited. This is due to the fact that the panel itself may become deformed, after which it will have to be thrown away. In this case, it will take quite a lot of time to prepare the window sill for applying a new layer of glue.
- Installation of plugs. According to the shape of the entire structure that you have mounted, plugs are cut out and installed at the ends.
- Applying sealant. A layer of sealant or silicone is applied along the junctions (slopes, window frame). This is done to close the joints and protect them from moisture. You should apply the sealant, after which you need to run your finger along the bevel and get a smooth and beautiful angled line. You can also use special rubberized profiles or corners, but for better safety of the structure it is better to coat everything with sealant.
- When sold, the panels are protected with a special film that prevents damage during transportation and installation. After completing all stages of work, the film must be carefully removed. Then the window sill should be rinsed with clean water.
Caring for a plastic window sill
It is easier to prevent stains than to make efforts to remove them later, using all sorts of methods. It is also recommended to immediately remove all dirt before it is absorbed into the material.
Basic rules for caring for PVC panels:
- After using chemicals, do not forget to wash the surface. This will remove stains and prevent yellowing from occurring. You can take protective compounds; thanks to their antistatic characteristics, they will repel dust and add shine to the polymer.
- For cleaning products, use only those recommended for plastic. Test the new chemical in an inconspicuous area.
- Wipe daily with a dry cloth. This action will remove small dust particles that penetrate into the coating. As a result, the white slab takes on a dirty gray color.
- Wash the stove once every 7 days using a soap solution. This eliminates grease, which leads to dirt over time.
- You should not use iron brushes, as they scratch the products and dirt gets clogged into the resulting microcracks. It is not recommended to leave active agents on the panel for a long time to avoid corroding it, and also to use aggressive compounds too often, since such cleaning will have a bad effect on the top layer.
- Do not place hot dishes on the panel; the material cannot withstand elevated temperatures and begins to deteriorate. It is almost impossible to clean such marks.
- It is better to install a special stand under the flower pot or put a decorative napkin. This will not only decorate the room, but also protect the window structure from smudges, which cause yellow stains.
- To prevent the material from losing its color under the influence of the sun, it is better to opt for double-glazed windows with a special coating that prevents the penetration of ultraviolet radiation.
Knowing how to clean the window sill of a plastic window, you won’t be afraid if you notice stubborn stains, yellowness, soot and any other contaminants. From the proposed solutions, it is possible to choose a suitable method that will cope with the task without harm to the surface. Then perfectly clean and white windows will fill the house with energy and create comfort in the house.
Paint selection
Using paint is a less expensive way to improve the appearance of a window sill. To successfully transform plastic, you need to choose a good paint. The product must have the following properties:
- dry quickly;
- maintain slight hardness;
- be resistant to defect formation. To paint, you will need a paint brush or work with a spray can.
Various means are used to update the window sill:
- This can be a coloring material that is used to apply to plastic parts of a car. The paint is characterized by strength and durability, easy to apply. The products have a wide range of colors, so you can choose the ideal option for your interior.
- Alkyd-urethane or polyurethane paint. The coating is characterized by resistance to loads. You can put pots of flowers on the windowsill. A silky shine forms on the surface, and you can forget about repairs for many years. Service life up to 7 years.
It is not worth painting the window sill with ordinary enamel, as the paint does not apply evenly and will quickly become unusable, cracking and peeling.