You have to look for methods on how to dye fur at home when your favorite clothes wear out and lose their attractiveness. Returning faded pile to its original appearance is quite simple. Available methods suitable for different types of fur do not require much effort or large investments. After processing, the item will find a second life without remaining on the last shelf of the closet.
Methods for cleaning material
Before dyeing fur at home, it needs to be cleaned. Manipulation is necessary, because dust and burning particles remain on the surface of the material, which will begin to form into clumps during painting. It is best to clean with hair shampoo or dishwashing detergent.
Fur can be cleaned with a mixture of detergent and soda (1 tsp each). To them you need to add one and a half tablespoons of salt and 3-4 drops of ammonia. Distribute this composition evenly on the surface of the product. After half an hour, rinse with water and then dry well. Drying near heaters or radiators is prohibited.
Methods for cleaning fur
Types of damage to fur coat
Before deciding how to dye fur at home, you need to clean it properly. After all, during daily wear, city dust and fumes settle on the wool, the pile sticks together or falls into unsightly lumps on some types of wool. All this needs to be properly cleaned.
You can clean the fur with chemicals - high-quality dishwashing detergent or shampoo. You can use more “serious” products, such as special purified gasoline or lighter fluid. But in any case, you need to remember that chemistry can act very aggressively and worsen the appearance of the fur.
For cleaning, you can prepare your own alkaline solution from the following components:
- dishwashing detergent - 1 tsp;
- ammonia - 5 g;
- salt - 15 g;
- soda - 10 g.
Fur Cleanser Ingredients:
Mix all ingredients thoroughly. Lay the fur coat on the table or hang it on a hanger. Apply the resulting mixture evenly over the entire surface of the fur, leave for a while, and then rinse with clean water, trying to prevent water from getting on the bottom layer.
Types of fur used for tailoring
Fur products can be different, with their own characteristic appearance. Dying rabbit, mink or chinchilla fur is easier than others - they are initially white, so the pile does not need to be lightened first.
Note!
These are extremely sensitive materials. Treatment with chemical compounds must be careful, otherwise the product will be damaged.
The density of the material is taken into account - the amount of paint used and the procedure time may vary. Arctic fox is easy to paint and retains color. Difficulties arise when you need to dye capricious mink fur at home. It is difficult to lighten a beaver product because the hairs turn yellow.
An unpredictable and difficult material to work with is muskrat. The color fades quickly and is difficult to give it a renewed look. It is not recommended to use hair dye on faux fur. It contains aggressive chemical compounds that can damage the material.
Types of fur used in clothing construction
Any type of fur pleases with its appearance, but each has its own characteristics that you need to know before you dye the fur at home with paint so that the result is good.
White fur (rabbit, chinchilla, mink) is the easiest to dye. You don't have to lighten it to get the desired shade. You can give them any color - just paint over the resulting yellowness or paint them a completely different color, including pink, blue, red, etc. But such materials, especially rabbit, are very sensitive to the effects of chemicals, so staining should be done with extreme caution.
White fur may turn yellow
On the contrary, some types of fur are more dense, which must be taken into account before you dye Arctic fox fur at home. Since the hairs are quite dense, it will take more paint and, most likely, time to paint them properly. But at the same time, arctic fox coats are more convenient to work with: the color applies well and lasts a long time.
It will be much more difficult to work with some other types of fur. Mink is not very easy to paint. It is practically useless to lighten a beaver fur coat, since as a result the hairs acquire a yellowish tint.
Rabbit fur lends itself well to dyeing
The muskrat behaves completely unpredictably. After painting, the product acquires a pinkish tint with white areas. Moreover, over time, the paint fades and the appearance of the product changes again.
In addition to natural fur, artificial fur is also widely used, which also loses its appearance over time. It can also be dyed, but you need to know one subtlety on how to dye faux fur at home: you cannot use hair dye. It is based on quite aggressive substances; after dyeing, the fur may be hopelessly damaged.
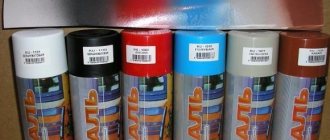
Painting methods: what to paint with
Fox fur can be treated with a solution of potassium permanganate to return the original color. With other materials it is unlikely to be possible to use improvised methods. For the procedure, hair and suede dyes and brighteners are used. Ammonia products are the most affordable and easy to use method. To achieve the desired effect, you only need one package of this product. It is better to take the color 1-2 shades darker than the material. For example, when a mink coat was black and it was dyed white, the result may be yellow.
Suede dye is only suitable for painting certain areas of the product, for example, the tips of the pile. High quality products are suitable for lightening - others will be less effective. Aerosol paints are suitable for large products - they are easier to apply.
Determining the optimal painting method
Having determined the variety, you should immediately decide what you can use to dye the fur at home. There aren't many options to offer here.
In this case, it is unlikely that it will be possible to get by with improvised means. The only exception can be fox fur - you can try to return it to its natural color with a solution of potassium permanganate. For others, you will have to look for other options. The most common at the moment are:
- hair dye;
- suede paint;
- clarifiers.
There is a special dye for suede.
Since the hairs are similar in structure to human hair, hair dye, oddly enough, is also quite suitable for dyeing fur products. It is better to choose ammonia-based paint. It is convenient and easy to use, it is not difficult to find - it is sold in supermarkets and cosmetics stores. For painting, one package of high-quality paint is enough (cheap ones don’t last as well).
Coloring stages
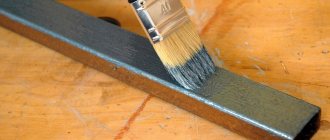
First you need to prepare for staining.
You need to put the fur coat on the table. If only the collar needs dyeing, it is better to protrude it. It is also important to test the paint tolerance on a small section of the product. To do this, the composition is applied to the sample. If after the procedure there is no damage to the villi or inner parts, and the color suits you, you can begin painting the product. For the procedure you need to use a special brush. Apply the paint evenly so that the shade is even on both the top and deep layers. After 40 minutes, remove the product with warm water. It is not necessary to paint a fur coat in one tone - highlighting will be an original solution. To do this, the painted ends are wrapped in foil. After some time, the foil is removed. Highlighting looks luxurious and rich. This staggered procedure also looks original. It is recommended to carry out the procedure with a suede treatment product.
Note!
Before the procedure, you need to study the characteristics of the material; some types, such as mink, are difficult to dye. Therefore, more helmets will be required.
Stages of fur dyeing
If the fur is already properly prepared for dyeing, then you can move on to the most important stage - dyeing. The essence of the process is to apply a dye to the fur. But to better imagine it, it is recommended to watch a video on how to dye fur at home.
The first step is to prepare the product for painting. But in this case, we mean something slightly different, namely the arrangement of the bellows in such a way as to simplify the work as much as possible. The fur coat can be laid out on the table. And if you plan to paint only the collar, then you can tear it off so as not to accidentally damage the product itself.
Then it’s worth checking whether the fur “tolerates” the chosen paint well. Ideally, there should be a fur sample that is provided with the purchase. You can use it to “test” a dye or brightener. The paint must be diluted according to the instructions, applied to the sample and held. The duration of staining is always indicated on the packaging or in the instructions. It is better not to exceed this time, otherwise you can damage the hair and mezra (the lower layer of fur). As a result, it will lose its appearance and become completely unusable.
You can dye fur by soaking it in a dye solution.
The resulting shade may differ from that stated on the packaging. But if you are satisfied with the result, and the hairs on the sample are not damaged, you can proceed directly to coloring the fur itself.
You can apply the paint with a special brush. You need to try to paint as evenly as possible, painting both the top layer and the deeper ones, in order to ultimately get an even shade.
Mink fur does not lend itself well to dyeing.
Before you dye mink fur at home, you need to remember the properties of this variety. Mink does not like painting, so it may take more than 1 package.
After application, the product must be left for the time necessary to obtain the desired shade, darker or lighter. Then you can rinse off with warm running water.
It is worth noting! Hair dyeing is best suited for skins or small fur products. For fur coats, this method of dyeing is inconvenient due to its large size. It is better to choose aerosol paints for them. When applying paint, you need to keep the can at a distance from the material and quickly comb the stuck together hairs so that the coloring is more uniform.
Coloring the flesh
The inner layer is the top layer of skin on which the fur is attached. Usually it is light, but it also has to be processed, especially old products with thinning pile. The finished silver fox product, where the flesh is too transparent, is easier to process with a black marker. So, the fur coat will look thick, and the inner layer will be less noticeable.
If it is a skin, the inside is painted with paint for leather and fabric. Then it needs to be treated with a rich cream (to soften it). Home dyeing is a risky undertaking, because there is a high probability of damage to the product. If the procedure is unavoidable, use shampoo with a coloring effect or tinting dye. You should purchase quality paints. Their application must be careful - you can harm your skin and the product.
Carrying out coloring of the flesh
Fur structure
Mezdra is the top layer of skin to which the fur hairs are attached. Usually it has a light shade, but sometimes it needs to be painted. For example, there is a great need to dye the fur of an old fur coat, in which the fur has thinned somewhat and the light “base” has become too noticeable.
Mezdra enlarged
It is most convenient to color the interior of the finished product using a marker of the desired color. In a thinning area, you just need to “cover” noticeable areas, and then the fur will appear thicker.
It is best to paint the flesh on skins using special paints for fabric or leather. After dyeing, it is better to treat the skin with a rich cream to soften it, since dyes often dry out the skin.
Painting at home is very risky, as there is still a possibility of damage. But if the product is already quite old, then you can try to correct its shortcomings with the help of tinting paints and shampoos with a coloring effect. You can choose paints of any shade to give the product originality.
Painting the core will also help update the look of the product, but from the inside
Ideally, it is better to choose reputable paints. But, as practice shows, domestic paints, which are also inexpensive, give good results.
Advice! In any case, you need to apply the paint carefully, as it may contain aggressive chemicals. You need to leave the paint until you get the desired shade.
Fur care after dyeing
Proper care begins with the drying process of the product. To do this, it is stretched to its full length, preventing it from losing its shape. The entire procedure should take place naturally without the use of a hair dryer or heating agents. Otherwise, the villi and core will dry out and the product will be damaged.
Over time, the villi become hard and lose their original color. Hair balm easily solves this problem. It is usually found in the package along with the paint. The product will make the villi soft, with a beautiful natural shine. In addition to the balm, a solution of vinegar and water (1:1) will be effective.
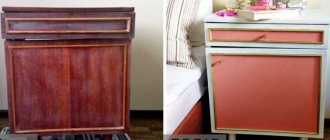
Dyeing a mink coat
Mink is an expensive and luxurious fur, and if the product has faded or tarnished, the problem can be easily solved. Regardless of the color, the item loses its original appearance when actively worn. This is especially true for white fur. It acquires a yellowish tint over time.
Dyed skins
Dyeing a mink coat at home will not take much time and money. We will need hair dye of the desired color, gloves, comb, and vinegar. To save money and distribute the dye evenly, it is better to use a spray bottle.
Step-by-step instruction:
- Lay out or hang the fur coat.
- Wet the fur with water.
- Dilute the paint according to the instructions and pour into a spray bottle.
- Spray the paint evenly from a distance of 30-50 cm.
- To be 100% sure of uniform coloring, comb the fur.
- Leave the paint for the specified time.
- Rinse the product well with warm water and vinegar.
Coloring at home
Painting of the mink coat is finished. You need to hang it on a hanger and leave it until it dries completely, then comb the fur. When rinsing, you can add a little shampoo or hair conditioner for shine. But vinegar copes with this just as well.
Features of dyeing arctic fox fur at home
Dying expensive arctic fox fur at home is not that difficult. To carry out the procedure you should prepare:
- hair dye;
- glycerol;
- hair balm;
- medical gloves;
- a special brush for painting;
- table vinegar.
It is recommended to carry out the procedure according to the following scheme:
- Treat the flesh with glycerin.
- Stretch the product as much as possible on a flat surface.
- Lightly moisten the cleaned surface with water.
- Apply paint to the product (with a brush), while smoothing the fibers with your hand (wearing gloves).
- Wait 40-60 minutes.
- Rinse the pile with warm water, then treat it with vinegar, then with balm and rinse it off.
- Reapply glycerin to the inside and remove the product to dry.
Fur dyeing: process, pros and cons
For dyeing fur, only natural dyes of organic origin are used. They can be:
- animals – such as sepia;
- plant - for example, logwood, mahogany or fernambuco, ink nuts, as well as betel, quebracho and many others.
Each type and grade of fur requires special preparation for dyeing. So, for example, it is more difficult to paint a long, hard pile than the undercoat. In addition, it is necessary to take into account the “age” of the product. After all, as mentioned above, a fur coat older than 5-10 years can survive painting with difficulty.
Theoretically, fur dyeing can be done by any dry cleaner that has the appropriate chemicals and an aqua-cleaning machine, but the result of their work may not live up to expectations, because soft and light fur coats (which are the majority now) have great difficulty surviving this procedure, which requires high temperatures. That is why it is much better to go not to a dry cleaner, but to a professional fur studio in Chelyabinsk, where I will not only help you with dyeing, but will also professionally assess the riskiness of the procedure specifically for your fur coat. This is where the work is done efficiently and quickly, and the result exceeds all customer expectations.
The fur from which this fur coat is made is dyed rich blue in our fur studio
What you need to know when dyeing fur:
- If the product, due to the age and quality of the fur, does not withstand the temperature, then it will be irretrievably lost (the chance of an unfavorable outcome can be estimated as 50/50, but much depends on the assessment of the specialist of the fur studio) - that is why the product is checked for rupture of the inner layer before dyeing (bursting the mezra excludes the possibility of coloring).
- After dyeing, a fur coat is guaranteed to shrink and change parameters, that is, the product will need to be recut (perhaps a reasonable option would be to shorten the fur coat), and it is also necessary that the product initially be quite loose (losses can amount to 10-20 cm in width and length).
- The core of the product will shrink and become stiffer, so even the lightest fur coat after dyeing becomes denser and less elastic.
- As a result, you will get a completely different thing - more stylish and modern.
- And most importantly, do not try to perform the dyeing procedure at home. First of all, you need to take into account that all chemicals and paints are very toxic and, if used incorrectly, can harm your health, and in addition, optimal, even coloring, which will not lead to loss of fur coat, may not be possible for everyone.
Our work on altering a fur coat
Another job of remaking a fur coat
Still have questions? Get a consultation from a specialist from Atelier Ural Request a call
Features of painting a mink coat
A mink coat has an excellent appearance. However, over time it also begins to fade, so painting the fur coat is inevitable. The procedure should not cause difficulties, adhere to the following scheme:
- First you need to clean the fur from dirt, then apply a rich cream to the inside.
- Moisten the villi with water by spraying them with a spray bottle.
- It is also better to apply paint using a spray bottle, after diluting it with water.
- Comb the fur with a comb and wait about half an hour.
- Remove the paint with warm water and shampoo, then rinse with conditioner and rinse the product again.
- Re-treat the inside with cream, comb the villi in the desired direction.
- Hang the fur coat to dry on a hanger.
Mink is different from mink
First of all, when choosing a fur coat, you should pay attention to the fur. If it doesn’t seem thick enough to you, it’s worth asking what time of year the skin was obtained. The fact is that the winter animal is much more pubescent and has more luxuriant fur, while the summer animal’s skin is more scanty and does not shine with luxury.
Everything in a fur coat should be perfect - the appearance of the fur, its color, and the “ins and outs.” Therefore, when choosing a mink fur coat, you should carefully examine not only the fur, but also the seams of the product. A high-quality fur coat will have all seams done neatly, will not “creep”, and there will be no creases on the product. Feel free to pluck and shake the fur coat - if the fur is of really high quality, it will not fall off too actively - a couple of hairs may remain in your hands, but no more.
Mink fur can also be plucked and shorn. Plucked fur is a skin that has been processed in such a way that, with the help of special devices, long and hard fibers are removed, leaving only the soft undercoat. After this treatment, the skin becomes especially soft and fluffy, but the wear period is significantly reduced, so often, in order to protect it from abrasion, a plucked fur coat is supplemented with unplucked mink on the collar and sleeves.
Sheared mink looks quite interesting, but it is important to remember about such processing that most often the fur is processed in such a way as to hide defects in the skin, and sheared fur does not retain body heat well.
How to dye mouton fur
Mouton fur is a popular material among fashionistas. A fur coat made from this material is very warm and comfortable. But even such high-quality fur loses its original appearance. It is easy to restore its attractiveness if the coloring is carried out taking into account the characteristics of the material. Painting this fur yourself is no different from manipulating other types.
Mouton has a thick, dense structure, so its processing will require more paint than usual. It is important to distribute the coloring pigments evenly. This will ensure that the villi are stained. Before the procedure, it is better to test the paint on a small piece of the product. If problems arise, it is better to trust the professionals and refuse to paint the house.
How to dye rabbit fur
After cleaning the material, you need to select the paint color. Dark colors will be the best, since light shades will require preliminary lightening of the pile. The quality of the paint affects the result.
The procedure is simple:
- moisten the fibers with water;
- distribute the paint evenly over them;
- remove the dye after the period of time specified in the instructions;
- It is better to wash it off with warm water, then treat the product with vinegar;
- Dry the fur naturally in a vertical position.
How to dye faux fur
There are no differences in the painting of artificial and natural materials. In the first case, it is possible to experiment by choosing any color. Cleaning such fur is carried out with ordinary soapy water, which is distributed over the entire surface of the product with a sponge. Then you need to treat the villi with paint of the shade you like. Drying is also carried out without the use of a hair dryer or battery.