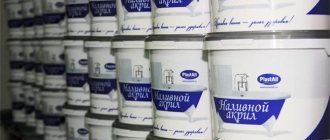
Features of surface and enamel for painting
To paint the surface of a slab, you do not need to have special knowledge; it is enough to have basic information and take into account some features when painting yourself. But it is worth considering the fact that ordinary enamel is not suitable for painting the surface of a gas stove, since when exposed to high temperatures, such paint very quickly deteriorates and peels off.
You can paint the stove at the place where it is installed, but it is still advisable to temporarily disconnect the device from the gas supply network.
First, let's look at the type of surface of gas stoves. So, most often, in the manufacture of gas appliances, alloyed stainless steel . The metal has a high degree of resistance to high temperatures.
This surface is painted with special enamel to protect the coating from corrosion and give the gas appliance a beautiful appearance.
Before you start painting the gas stove, you need to remove the old layer of paint. To do this, you can use a metal brush, sandpaper or a chemical agent. Only after this can you start painting the old surface.
Plain enamel or acrylic paint is not suitable for painting the surface of a gas stove. Because when exposed to high temperatures, it will melt and burn.
The paint for the surface of a gas stove must be resistant to high temperatures and other destructive factors.
As a rule, enamels with the following properties are used for painting:
- Internal stability . Such enamels withstand high temperatures well and do not deteriorate in conditions of high acidity.
- External stability . This protection is designed to protect the metal surface; the enamel protects both from thermal stress and chemical processes.
Such characteristics are necessary for long-term use of a gas appliance in aggressive conditions.
Heat-resistant paint is intended for painting surfaces exposed to high temperatures. This option is suitable for painting the slab yourself
To achieve the required level of stability, enamel for restoration of a gas stove must include the following elements:
- quartz sand;
- soda;
- feldspar;
- borax.
All these elements form a transparent mixture, to which you need to add some more components.
To obtain the most effective paint for devices exposed to high temperatures, the following elements are additionally added during production:
- alumina;
- zinc;
- alkaline elements;
- titanium;
- lead.
This entire composition forms a high-quality paint with high resistance to aggressive factors and imparts a beautiful shine to the painted surface.
It is worth noting that enamels with the addition of cobalt and nickel oxides have better adhesion to the element being painted. This paint can be applied even to a surface that has not been treated with a primer.
Positive and negative properties of enamel
Before you begin restoration work, you need to find out all the positive and negative aspects of the enamel coating.
Let's look at the pros and cons of the enameled surface of a gas stove:
- high degree of resistance to high temperatures;
- variety of colors;
- reasonable cost of paint;
- protection from various contaminants.
All these advantages allow you to confidently use this type of coating for a gas stove.
But, despite all the positive qualities of the material, it is worth paying attention to the disadvantages.
Among them, the most significant are the following:
- Problems often arise with cleaning the surface from carbon deposits.
- Weak resistance to mechanical stress - the material is very fragile, so there is a high probability of chips on the surface.
In general, this coating is very reliable and retains its color saturation and original shine for a long time.
Protective pads, mats, films for gas stoves: advantages
This idea appeared quite a long time ago. Many housewives, even without such covers, often laid foil on the hob.
Advantages of slab overlays:
- This helps keep the stove clean. Instead of spending several minutes scraping grease off the stove top, simply remove the foil and throw it away. However, this is not the most popular option. Metal foil covers for the stove are also popular for the simple reason that they significantly save gas.
- The fact is that, together with the burner, these linings get very hot and transfer heat to the pan and the food it contains. Thus, you will be able to save not only money, but also gas.
- Manufacturers saw the trend and really listened to the demand. Thus, many of the home improvement manufacturers have made metal plate covers from thick foil for the stove.
- This really allows you to significantly simplify the care of household appliances and prevents contamination. If you cook carefully, these pads can simply be wiped with a damp cloth. This way the stove always remains clean.
Device protection
Painting stages
It should be taken into account that even the highest quality and most expensive paint will not guarantee a successful result if the surface of the pipelines has not been properly prepared.
Preparing for painting
Painting of pipes should begin only when they are cleaned of dirt, old paint, sanded, degreased and primed. We offer you an indicative algorithm of actions for preparing the heating main for painting.
- remove all dirt and dust from pipes and radiators using a damp cloth or brush;
- clean the surface to a metallic shine with sandpaper or a special drill attachment;
- sanding and degreasing with white spirit or other solvent;
- treatment with anti-corrosion primer.
When preparing pipes for painting, you can use some tips. You can soften old paint and rust using a chemical remover, and then easily remove it with a spatula. It is better to use an alkyd-based primer, because it will improve the adhesive characteristics of the metal surface, and the paint will adhere better to the surface.
How is painting done?
Before painting pipes and radiators, cover the floor under the heating line with film or old newspapers. The wall behind the battery can be covered with masking tape or protected with a sheet of thick cardboard.
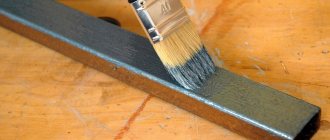
Use a small soft bristle brush, foam roller or spray gun. The choice of tool depends on your skills and the specific features of a given heating line.
The tops of the pipes and radiators should be painted first. The bottom of the pipe is painted last, so as not to spoil it with smudges and stains. If you need to apply multiple layers of paint, allow time for each coat to dry.
If you use a spray gun or spray paint, the painting process will go much faster. However, first study the sprayer’s operating instructions and find out from what distance the pigment can be transferred.
How to prepare mixtures for painting yourself?
In your opinion, does a home-made mixture for painting a brick oven have an advantage over a purchased option?
Not really
There are many options for how to paint a brick oven. You can make the coloring mixture yourself.
Based on chalk and lime
The heating structure can be covered with a solution of chalk or lime. To prepare it, it is enough to dilute the selected dry product with water, observing the proportions of 1:1.5. You can make the coating stronger by adding 0.15 kg of table salt for every 1 kg of solution. Another option is wood glue, add 10 ml per 1 kg. The adhesive additive gives a yellowish tint, which can be eliminated with blue (2 ml per 1 kg).
Homemade mixture has several advantages:
- minimum costs;
- resistance to humidity;
- bactericidal effect;
- resistance to temperature fluctuations;
- good adhesive properties;
- excellent hiding power.
Using a chalk or lime solution, you need to know how to paint a brick stove correctly. The composition should be applied in several layers. The next layer of chalk mortar must be applied only after the previous one has dried, but for a mixture based on lime this waiting is not required.
The disadvantage of whitewash is that it is easy to wash off. If you need to update the paint layer or want to replace it, this minus turns into an advantage.
Making natural varnish
You can make your own paint for a brick stove, which has a varnish-like effect.
You need to work according to the algorithm:
- Grind the brick to fine crumbs, sift it through a sieve to obtain a completely homogeneous mass.
- Add country milk, egg whites, mix. You should have the consistency of liquid sour cream.
- Apply the prepared solution to a preheated structure. It is convenient to use a wide brush for this.
- Apply drying oil for a matte effect. If you want a shiny surface, use varnish.
Homemade varnish has a natural brick color, which can be advantageously used in the interior. The resulting paint layer is resistant to abrasion and high temperatures.
The treated surface gets a little dirty, but this can be prevented by treating the structure with egg white (beat before application). First you need to heat it. This coating is not afraid of moisture and dirt.
Egg white can be used without brick chips, then the coating will be transparent. When heated, the treated walls will smell slightly of baked milk. Some people don't like this smell, others consider it a pleasant addition.
How to make plywood moisture resistant with your own hands
To impart the desired characteristics, various methods are used, involving the use of special impregnations.
Painting with nitro enamel
This is an effective method that ensures a surface that is resistant even to direct contact with water.
Process diagram:
- All sides of the sheet are sanded using abrasives with a coarse and medium structure.
- The surface is completely covered with drying oil; the ends need to be soaked especially well.
- The paint is diluted to a liquid state and laid evenly on the dry slab. The composition acts as a primer, creating a reliable basis for future work. It is recommended to paint in 2–3 layers. It is taken into account that the last coating should have the smallest thickness.
- As additional protection, fiberglass impregnated with nitro solvents is used. The canvas is glued to the entire area of the panel, but only after the first layer of paint.
Nitroenamel dries completely in a couple of hours, but this paint has a strong and pungent odor of solvent, and it also needs to be applied at least 2-3 times, since the composition is strongly absorbed. The technology allows the use of similar compositions that are marked as moisture resistant.
Impregnation with drying oil
This solution is one of the most common and most accessible. At home, the oil is used as an antiseptic and increases the durability of the product. Processing is carried out according to the following algorithm:
Prepare a suitable container, roller and brushes. The drying oil is mixed well and poured into the container
The composition heats up to a temperature of 60 degrees. Care must be taken, because the material is flammable
All plywood sheets must be treated with the prepared solution. It is important to thoroughly saturate each area, paying special attention to the edges. The surface is forced to dry. To do this, it is advisable to use a hair dryer with power adjustment.
The drying oil is heated, the entire processing cycle is repeated. The mixture must be applied until it stops being absorbed
To do this, it is advisable to use a hair dryer with power adjustment. The drying oil is heated, the entire processing cycle is repeated. The mixture must be applied until it stops being absorbed.
Natural types of drying oil have a high price, so most often plywood is treated with semi-natural compounds called oxols
The resulting coating not only is resistant to dampness, but also destroys mold and mildew.
Coating with PVA glue
This impregnation for plywood is recommended for use when additional protection against rotting is necessary, which is especially important for floor coverings.
The polyvinyl acetate composition is used to treat the slabs in a similar way: application is carried out sequentially on both sides until the surface stops absorbing the solution, special attention is paid to the ends. The main difference from the previous method is that forced drying cannot be performed. In addition, the entire complex of work will require at least 7 days, since the film takes quite a long time to form
In addition, the entire complex of work will require at least 7 days, since the film takes quite a long time to form
The main difference from the previous method is that forced drying cannot be performed. In addition, the entire complex of work will require at least 7 days, since the film takes quite a long time to form.
To treat plywood to protect it from rotting, it is not necessary to use glue; dispersed compositions based on PVA with the addition of an antiseptic work much better.
What kind of paint can be used for the stove?
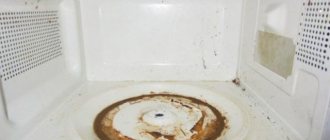
The kitchen stove is exposed to high temperatures every day, hot drops from various products fall on it, and after cooking, the stove must be thoroughly washed with various chemical and abrasive detergents. At the same time, the enamel covering the kitchen stove often deteriorates, chips and cracks appear on it. The equipment takes on an ugly appearance, as in the photo, but it’s a shame to throw it away; the stove works well. The only way out is to restore the enamel of the slab.
But how to paint a gas stove at home?
Enamel defects on a gas stove
The paint for a gas stove must be heat-resistant (see Heat-resistant paint and its features), for example, such as fire-retardant paints Polistil, used for application to metal.
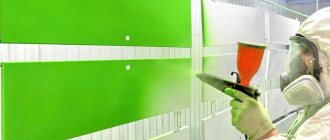
Tip: The most even coating layer is obtained when painting by spraying. In this case, you should use a spray bottle, or purchase aerosol cans.
Due to the small area of the gas stove, it is not necessary to charge the sprayer. In this case, more material will remain on the unit itself; preference should be given to cans. To paint a gas stove, you do not need to purchase compounds that can withstand extreme temperatures above 500⁰ C.
This is due to the fact that:
- The grate heats up the most, but it is usually not painted.
- When heating the pan - the areas around the burners, the temperature rises to a maximum of 70⁰ C.
How to paint the outside of a refrigerator: choosing paint composition and tools
The first thing that needs to be decided is how the coloring composition will be applied to the surface. There are two options here - brush and roller or spray. Both have their positive and negative sides. We will dwell on this issue in more detail.
Once the choice of application method has been made, you can proceed to the choice of paint. There can be three options here - enamel, epoxy or acrylic paint. It is on this issue that we will now dwell in more detail.
Refrigerator exterior paints applied by brush and roller
All three types of paints used can be applied with a brush and roller, but there is a certain difference between them:
- enamel paint. It is with these compositions that the surface is painted in production, which means this will be the best option. The enamel has good adhesion, and the surface after painting acquires an even gloss that is pleasing to the eye. The only drawback is the presence of highly toxic solvents in the composition. Therefore, it is worth taking care of good ventilation or (if possible) performing work in an open space;
- epoxy composition. After application it looks identical to enamel. It has the same characteristics, however, it is significantly inferior to the previous version both in price (such pigments are much more expensive) and in ease of application (epoxy compounds are very difficult to work with);
- acrylic. Despite the fact that this composition is inferior in characteristics to enamel, it is quite suitable for surfaces used indoors. In addition, the cost of painting will be significantly lower.
How can you paint a refrigerator without using a brush?
Today on store shelves you can find many aerosol paints that do not require the use of a roller or brush. Automotive pigments in cans are perfect for painting a refrigerator; their characteristics are not inferior to conventional enamels. Their use will significantly speed up and facilitate the process. However, the cost of such compositions is slightly higher.
HELPFUL INFORMATION!
Painting surfaces with a brush or roller is more difficult, but the work can be done more accurately without staining the floors or walls. It is better to use aerosol paints if you can take the refrigerator out into the open. The advantage of aerosol formulations is that the coating is thin and even.
Teflon and silicone gas stove linings: how to use?
Indeed, such overlays are often purchased by housewives who have a gas stove at home; this also helps save gas. If the house has an induction stove, which heats not the metal, but the food inside the container, then you should not purchase foil linings.
Features of plate overlays:
- However, not so long ago fiberglass linings coated with Teflon appeared. They resemble something similar to the coating of modern frying pans. Thus, they became an improved copy of metal foil pads.
- Their main advantage is that they have a non-stick coating. Almost nothing sticks to such a surface; they can be easily cleaned under running water. Now you can save time and money.
- After cooking food with fiberglass pads, simply remove them from the stove and rinse them under running water. Once dry, place them on the surface. Despite the huge number of advantages, they have a number of disadvantages.
- Many women note that sometimes a gap forms between the pads, into which moisture and particles of food that are being cooked can penetrate. Thus, streaks and stains still form on the slab.
- Some of the contaminants will still have to be removed from the stove. This is especially true for fiberglass linings, because they do not take the shape of a plate and are quite dense and rigid.
Teflon pads
Paint selection
The paint for painting gas pipes in the house or on the street is also selected in accordance with certain requirements.
Its main goal is to prevent corrosion of metal gas pipes, however, there are differences between compositions for indoor and outdoor use.
Of all the “utilities”, gas is the most “nasty”. Let’s ignore the cost of connecting to gas networks, which does not seem reasonable at all. The gas pipeline may run right along the border of your property, but for the “connection” of two meters of pipes they will charge you more than a thousand dollars. This is what the “service organization” will take from you, in my case “OdessaGaz”. In addition, at your own expense, you will design and build a gas pipeline that will run through your site and to the appliances inside the house. Needless to say, both the design and installation of this gas pipeline are carried out by “licensed” enterprises who also want to eat, and eat well. In general, a situation where the seller of a product requires the buyer to build an infrastructure for the delivery of goods seems absurd to me. It's like buying a milkman a car so he can sell you milk in the morning.
What follows is even more interesting. After you pay for all this infrastructure for delivering gas to your home, they also begin to dictate to you some requirements for its maintenance exactly in the form in which it is convenient for the gas service, even if this contradicts your desires and existing standards.
For example: such a cute painting of gas pipes in a poisonous yellow color, which our gas workers love so much and which they want to see on all facades, regardless of their color.
Not the most aesthetic option.
We take DBN V.2.5-20-2001, Gas supply. Let's read. We find that “gas distribution points” are painted yellow, not low-pressure gas pipelines for residential buildings. A gas distribution point looks something like this:
For low-pressure gas pipelines used in residential buildings, only the number of layers of primer and paint is established, plus the type of painting material (which is logical - the gas pipeline must be protected from corrosion), but not the color. So the demands to disfigure your façade can be safely ignored.
The next interesting point is the ban on “hidden installation” of gas pipelines indoors. According to gas service workers, this means that all the gas pipes inside your house must stick out in plain sight (and also be painted yellow, yeah) and you cannot sew them up with anything. When they told me this the first time, I simply shrugged it off, but during the installation process I was persistently taught the idea that these pipes on the walls are now part of my life and it’s better for me to make friends with them right now. I had to rummage through the same DBN again, after which it turned out that hidden installation of a gas pipeline is an absolutely permissible thing; you just need to provide access to it using some kind of removable panels and ventilation of the space in which it is located. Again, quite logical requirements - if you have a leak, it is in your best interests to smell it as quickly as possible so that the gas does not accumulate in a closed space.
So we are fighting the insanity of gas services with actions of civil disobedience - we paint the pipes in any color that suits us and hide them behind beautiful panels!
The question often arises about how to paint a gas system, and whether this is allowed at all. You need to understand what colors of paint to paint pipes, what types of dyes are allowed for painting and how to apply paint to the surfaces of pipes.
What paint can be used to paint the stove, grate, handles?
The panel and grille of the stove should only be painted with heat-resistant paints. They are made on the basis of a special resin. Heat-resistant dyes can withstand temperatures of several hundred degrees without cracking or flaking. You cannot restore the appliance using auto enamel - this paint begins to deteriorate at temperatures above 100°C, and even the side panels of a working oven heat up to 140°C or more.
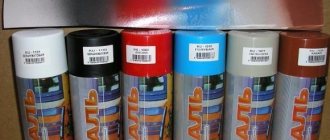
Examples of paints suitable for slabs and their gratings:
- Heat-resistant “Bosny Hi Temp spray”. Acrylic spray paint. Does not contain lead or mercury. Withstands heating up to 600°C, protects against corrosion. It fits well on steel surfaces and does not require priming before painting. It is recommended to work with it at room temperature from +20°C. Drying time for each layer is 2–3 minutes. The last spraying is completed by heating the painted part for better fixation of the paint. A 520 ml can costs about 470 rubles. Popular colors: black, gray, metallic.
- One-component heat-resistant enamel “Certa”. Extremely stable, depending on the color it can withstand heating from 350 to 900°C. Protects the surface from corrosion and aggressive chemicals. Available in 26 color options. This paint can be painted at sub-zero temperatures. The price of a can weighing 800 g is from 300 rubles.
- Aerosol "Kudo" based on organosilicon compounds. Heat-resistant compounds can withstand heating up to 600°C. Available in 20 colors. The price of one cylinder is from 150 rubles.
The stove handles can also be painted at home with any of the listed brands of thermal enamel. An alternative solution to the problem is to buy and install a new set of handles.
Making your own paint material
Homemade paint will leave marks when touched
If you can’t buy a professional coloring product, you can make it yourself. There are different recipes for creating paint for a brick oven.
- Chalk or lime solution. To create it you will need water and lime. You can buy them at a hardware store. The difference in these two types is only in the duration of complete drying. If chalk is used, the waiting time will be longer. The mixture consists of 1 kg of lime or chalk and 1.5 liters of water. For strength, add 300 g of salt per 2 kg of mixture to the solution. The resulting composition is white. The advantages include minimal financial costs, ease of application, covering up defects and resistance to fungal formation. Disadvantages - weak coating, gets dirty quickly and requires periodic updating.
- Natural varnish. It is made from brick dust, chicken egg whites and milk, which are taken in a 1:1 ratio. To process 1 sq.m. you will need ¼ liter of milk and 8 chicken proteins. To prepare the varnish, beaten egg whites and milk are added to the brick dust. They need to be mixed until a thick consistency is formed. The varnish is applied with a brush to the heated surface of the brick wall of the stove. The result is an even red coating with good resistance to sudden temperature changes. To make the surface matte, apply drying oil on top. Contact with a painted surface may leave marks. Also, during operation, the smell of baked milk is emitted.
How can I tint an electric stove?
The only drawback of this paint is its fairly high cost. Lime has been used for painting ceilings for decades, usually in rural areas. Its advantages include:. Lime is an already outdated method, plus it is not without its drawbacks.
In particular, after applying several layers of lime, such a ceiling turns out to be uneven, which can be seen with the naked eye. It can only be removed together with a layer of plaster.
What is the best way to paint a gas stove?
Considering the small amount of work, there are two optimal application options: an aerosol can and a spray bottle. Both methods will ensure uniformity and the necessary precision of application, but when choosing between them, preference should be given to the spray can. This option is more economical because, unlike a spray gun, the paint will not settle on the very surface of the tool.
Don't rush to throw away the remaining paint. Its excess can be stored in a can for a long time without losing its properties. Use it in the future to decorate other elements at home.
Painting the stove
It is convenient to use a roller for painting
You can start painting only after studying the instructions and carrying out the preparatory work. Otherwise, efficiency will deteriorate and service life will be shortened.
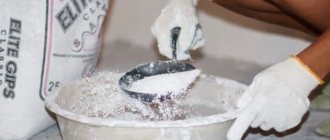
To work you will need:
- Capacity. It will contain the coloring solution.
- Dye.
- Brush and roller.
The solution must be prepared and poured into a container. Then it is applied to the surface in several layers (two-layer installation is recommended). The work is carried out with a brush and roller. The brush gives texture, and the roller gives uniformity.
Selection of paint and application methods
During the operation of the stove, minor damage, scratches, cracks form on the surface, where grease, dust, accidentally spilled soup or coffee become clogged. Thus, the metal surface is unprotected and can quickly deteriorate.
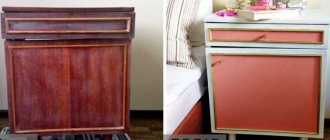
If the coating of your gas stove has become unusable, do not be upset and think about buying a new stove. If you paint it immediately, it will look like new.
First of all, you need to pay attention to the choice of paint, which must correspond to the operating conditions. So, the material must withstand high temperatures , so you need to use heat-resistant paint. Therefore, when choosing, pay attention to heat-resistant paint - it can withstand high temperatures, up to 1000 degrees. This will be quite enough for a gas stove.
Painting the surface of an old gas stove can be done by applying heat-resistant paint with a brush or spray. The second method of applying paint is the most effective. You can also use a can of heat-resistant material.
To effectively apply a layer of paint to the surface of a gas stove, it is best to use the spray method . To do this, you can use a spray bottle, but it is more rational to buy paint in cans, since the area to be painted is not so large.
Using the spraying method, you can significantly reduce paint consumption and apply a layer evenly - this will be more reliable and more beautiful.
Suitable paint
When choosing paint for a gas or electric stove, it is recommended to consider the following nuances:
- The material must be heat resistant. Dyes used in metal processing are recommended for gas equipment.
- It is not recommended to use spray guns for painting slabs due to the small area to be treated. In this case, aerosol formulations produced in cans should be used.
- For painting the hob, compositions that can withstand temperatures up to 70 degrees are suitable. It is not worth buying finishing materials with a higher fire resistance rating.
- Heat-resistant dyes should be used for parts that constantly experience temperature fluctuations. The remaining parts of the slab (side walls, etc.) can be treated with less durable compounds.
See also
How you can get green color and its top 8 shades when mixing paints
The general requirements for paints for such equipment include the following characteristics:
- absence of toxic components that are released when heated;
- resistance to moisture and detergents;
- increased wear resistance;
- not prone to fading.
The slab should be painted following the instructions for use of the specific composition. In particular, it is important to consider the drying time of the material.
Call a gas stove repair specialist
In order to quickly and efficiently restore the functionality of a gas stove, each client just needs to call us or leave an electronic request on the website. Our technicians will try to determine the possible causes of the malfunction based on the client’s data and come out for repairs with the necessary supply of spare parts.
We will arrive in any area of the city at exactly the specified time and repair the gas stove using original spare parts. Service always means high quality work, affordable prices and prompt response to any request. If the gas stove has failed or its performance has become worse than the original, the help of our engineers will be an excellent solution to the problem.
Procedure for painting
To repaint a slab efficiently, you need to have some knowledge and follow the instructions. Violation of the technological process can lead to poor results after completion of the work.
Stage #1 - preparation of materials
If you decide to paint a gas stove with your own hands, then you will need the following materials and tools: surface degreasing liquid, heat-resistant paint, a utility knife or scissors, masking tape.
Use masking tape to create clear outlines after the painting process. Cover areas that do not need paint with tape. You can also seal gas burners to prevent paint from clogging the nozzles and cutting off the gas supply.
Stage #2 - surface cleaning and preparation
Before you begin restoring the surface, you need to inspect it thoroughly. If there are deep chips and cracks on the gas stove, then it is recommended to remove the entire layer of old paint and thoroughly clean the entire surface. If the paint is not damaged, then it is enough to degrease the coating for further painting.
To remove old paint, you can use a metal brush or a metal-bristled drill attachment.
You can also use special chemicals to remove old paint, but this is ineffective and expensive. It is best to remove old paint outdoors, as small dust particles will fly around the room and settle on furniture and other surfaces.
Before you begin to clean the surface of old paint, the device must be disassembled and taken outside. This is necessary so that small particles of paint do not settle on the surface of the kitchen, and also for your own safety.
When the paint layer is cleaned, preparatory work should be carried out:
- Any surface must be degreased and all dirt and stains removed in order to achieve maximum adhesion of the paint to the surface of the slab. If this is not done, then a new layer may peel off in places of contamination and the process of destruction of the metal base of the equipment may begin.
- The gas burners must be closed before applying paint. This way the paint will not get into the nozzle holes, otherwise the jets will have to be changed or cleaned. You also need to cover furniture and other elements with paper or polyethylene so as not to stain them during work.
- You can use masking tape to create clear contours after painting the surface if you are going to do a two-color restoration.
When surface preparation is completed, you need to thoroughly shake the can of paint . This must be done before you begin painting the gas stove. This will allow you to achieve uniform application of paint and increase the efficiency of its distribution.
When painting, you should be extremely careful, be sure to protect your hands and eyes. It is also advisable to wear a mask or respirator to protect your respiratory system when performing work.
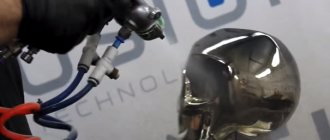
Stage #3 - spray paint application
Below are detailed instructions, following which you can paint the old gas appliance with the highest quality possible.
Work order:
- Ensure good ventilation of the room . It is worth understanding that the paint contains chemicals that can harm your body. Therefore, it is necessary to paint a gas stove in a well-ventilated area or in the open air. Otherwise, you may get poisoned or have more serious health problems.
- Apply the first coat of paint . When spraying paint, the can must be kept at a distance of about 20 centimeters from the coating, but when applying several colors, the distance must be reduced to 10 centimeters, near the color border. This is necessary to achieve the most even contour and increased color saturation.
- Apply a second coat of paint after 5 minutes . As soon as the first coat of paint has been applied, after 5 minutes you should begin applying a second coat. This will help prevent old stains from appearing and will also give the surface a richer color. In addition, additional application of paint increases all protective properties, including heat resistance.
By following these algorithms, you will be able to restore your gas stove yourself. This way, your appliance will retain its beautiful appearance, and you will not need to spend a lot of money on the purchase of expensive gas equipment.
By the way, after painting the stove, you can also update the gas pipe by painting it with fresh paint.
Stage #4 - painting the gas grill
In order for the restoration of the stove to be complete, we will figure out how to paint the grate of a household gas stove. After all, the equipment cannot do without updating this element.
As a rule, the grille does not need restoration. Often it is enough to simply clean the carbon deposits by heating or using special cleaning agents; you can also resort to mechanical cleaning
You can paint the grille using the same heat-resistant paint. But, as a rule, they are not painted. Typically, gratings are made of cast iron, and this metal has a high degree of resistance to aggressive factors. Therefore, it is enough to simply remove carbon deposits mechanically or using a gas burner.
In another article on our website, we looked at the best ways to deal with dirt on grates made from various materials at home.
Tools and materials for painting
Choosing paint is only part of the preparation for painting work. In addition to this, other materials will also be required. Putty is used to seal gaps and cracks. It can be oil-adhesive, acrylic or oil-based. The paste is selected based on the composition of the coating that will have to be worked with. For wooden floors, a homemade product made from wood glue mixed with sawdust is suitable.
You will also need a primer. This is a preparation intended to prepare the base for painting. It closes pores and improves adhesion. There are primers with special properties: antiseptics, fire retardants, etc. The choice of primer is determined by the flooring material. It is desirable that its color, which is usually white or gray, be close to the tone of the coloring mixture. Then it won't show through.
The most commonly used painting tool is a roller. You definitely need a tray into which the coloring paste is poured in portions. You need brushes of different sizes. They are used to paint complex areas, baseboards, and all small fragments. You will need masking tape to cover areas not to be painted, a spatula and a chisel for preparatory operations.
Preparing the Slab
Preparatory activities include the following steps:
- Clean the stove thoroughly. The product is washed, dried and wiped with acetone to degrease.
- Removing old coating. If there are chips or deep damage, the old paint in these areas is removed. This can be done with a brush, electric drill or grinder.
- Repairing minor damage. If there are small chips or scratches on the stove, they should be masked with special enamel.
Painting technology
Painting technology varies depending on the paint purchased, the method chosen and the original condition of the refrigerator.
Required materials and tools
For painting you will need:
- Painting tool: spray bottle or roller with brush.
- Solvent and sponge. No matter how much of a craftsman you are, there is always the danger of painting something the wrong way.
- Rubber gloves and a respirator to protect yourself from the toxic effects of paint.
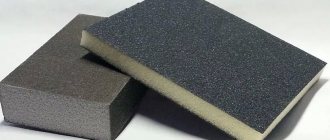
- Sandpaper for preparing surfaces for painting. It is better to use medium-grain and fine-grain sandpaper alternately.
- Another sponge to be used to get rid of streaks.
- Material for covering surfaces around the refrigerator. This may not require fabric, film, or several layers of old newspapers. If you plan to make any drawing on the refrigerator, then it is better to cover the areas not intended for painting with paper tape.
To paint the refrigerator you will need a respirator and rubber gloves.
Preparing the refrigerator
Preparing a refrigerator is not much different from preparing any other surface to be painted:
- You need to remove everything from the inside of the refrigerator. All products, shelves and drawers must be temporarily removed.
- Free up space around the refrigerator or take it outside. With this action we pursue two goals: to make painting easier and to protect as many surfaces as possible from paint splashes that will certainly appear.
- Wash and degrease the surface of the refrigerator. We have already talked about the pollution of kitchen air, so you should make sure that the paint layer is applied to the metal surface of the refrigerator, and not to the layer of grease on its surface.
- After this, the surface must be sanded. It is better to use medium-grain sandpaper first, and then fine-grain sandpaper. Keep in mind that chips and cracks need to be sanded and cleaned as thoroughly as possible. These are places where the refrigerator will be painted unevenly, so it’s worth making them as even as possible.
Roller painting steps
You can paint a refrigerator with a roller in three stages:
- Apply paint to the surface with a roller. It is worth applying the paint as evenly as possible, without paying special attention to any area. Layers that are too thick will stand out brightly on the uniform surface of the refrigerator.
- Use a brush to paint missed and hard-to-reach areas. The first layer is ready.
- After half an hour, apply the second, and then after the same break the third layer.
Spray painting instructions
Painting with a spray can is a little more difficult, since the hand with the spray can must move evenly along the painting surface of the refrigerator. One or two seconds of delay in one place is fraught with too thick a layer and an unsightly stain or smudges.
Paint stains that are too thick can be spread over the surface with gentle movements of the sponge, but the sponge itself must be hard enough not to leave fibers on the surface of the refrigerator.
You cannot work with a spray can without a respirator, because such paint is much more toxic. You need to apply paint from left to right and from top to bottom. Take breaks of 30 minutes between different layers.
For a refrigerator, 2-3 layers will be more than enough. The spray can should be kept at a distance of 30 cm from the surface, so the layers will be more uniform and the paint application process will be faster.
As you can see, painting a refrigerator is not that difficult. It is enough to choose the right paint and choose the most convenient painting method for you personally. The right approach, patience and care in the process will guarantee you a beautiful interior element with an extended service life. A bright or, on the contrary, anthracite-black refrigerator will become a good accent in the kitchen.
Painting gas and electric stoves at home
Any household appliances tend to wear out over time. The same applies to gas stoves. Over time, the surface becomes scratched due to frequent cleaning, which is simply done to keep the slab sterile. Of course, the stove remains in working condition, but it loses its aesthetic appearance. Painting the surface will help with this to return it to its original condition. The question immediately arises: how to paint a gas stove at home? This will be discussed in the article.
Question about the slab grate
Usually this component is not painted. But if such a need arises, the question arises: how to paint the grill of a gas stove? The most popular and easiest option is to purchase the right paint, for example - Hi-Temp. Choose a black or glossy black version.
As a rule, the grate of such a stove is made of cast iron. Variations made from other metals are less common. Although stainless steel is gaining more and more popularity. And yet, most stove owners are interested in how to paint the cast iron grate of a gas stove? The answer is the same specified types of paints. They will perfectly improve the appearance of a cast iron product and protect it from various influences. To prevent the created coating from burning, you can cover the product with another layer of such paint for reliability.
There is a folk remedy for restoring the enamel of a stove grate. This is linseed oil. A Chinese gas burner is used for the operation. With its help, the grate is partially heated. The smell is unimportant, but the color is restored.
Actions on defects
If the surface of the gas stove loses its elegant appearance, there are various defects on it, you need to take action. The following are solutions for some specific situations:
- How to whiten enamel on a gas stove? This is especially true when the enamel on the stove has yellowed. This category also includes cases where the enamel on the stove has darkened. Variations of actions:
A. Clean. You can use “Miracle Plate” or “Parma”.
B. Degrease. For example, “Antifat”.
B. Paint with suitable paint (their list was discussed earlier).
- How to fix a chip on a gas stove? Similar operations are used here as in the case of decoupage of the stove cover. That is, restoration activities are carried out:
A. Cleaning, Degreasing. Drying. Use sandpaper and acetone. The chipped area is dried.
B. A coating is made from a phosphate layer. Drying.
B. Priming. Drying.
D. Coating with suitable paint. Drying at +100 C.
D. Repeat point D. The number of layers depends on the level of chipping. For example, if the chip is 3 cm, you need 4-5 layers.
- How to remove scratches on a gas stove? Essentially the same operations are involved here as in point 2. You can use fewer layers of paint: 2-3.
Owners often ask whether it is possible to paint a gas stove with hammer paint? It is not advisable, since such paints, despite their many advantages, are not suitable for working with such a slab. They are not heat resistant.
Making your own paint material
If you can’t buy a professional coloring product, you can make it yourself. There are different recipes for creating paint for a brick oven.
- Chalk or lime solution. To create it you will need water and lime. You can buy them at a hardware store. The difference in these two types is only in the duration of complete drying. If chalk is used, the waiting time will be longer. The mixture consists of 1 kg of lime or chalk and 1.5 liters of water. For strength, add 300 g of salt per 2 kg of mixture to the solution. The resulting composition is white. The advantages include minimal financial costs, ease of application, covering up defects and resistance to fungal formation. Disadvantages - weak coating, gets dirty quickly and requires periodic updating.
- Natural varnish. It is made from brick dust, chicken egg whites and milk, which are taken in a 1:1 ratio. To process 1 sq.m. you will need ¼ liter of milk and 8 chicken proteins. To prepare the varnish, beaten egg whites and milk are added to the brick dust. They need to be mixed until a thick consistency is formed. The varnish is applied with a brush to the heated surface of the brick wall of the stove. The result is an even red coating with good resistance to sudden temperature changes. To make the surface matte, apply drying oil on top. Contact with a painted surface may leave marks. Also, during operation, the smell of baked milk is emitted.
How to paint a gas stove at home
The coating of a gas stove tends to lose its appearance over time. A common problem, the appearance of cracks in the paint layer, occurs due to constant exposure to high temperatures and mechanical damage. You can solve this problem yourself by repainting the slab in its original color, or you can be creative and choose a non-standard one.
Do-it-yourself gas grill restoration
The gas grill is heated to the highest possible temperatures. Heat-resistant paints are used to paint this part. Such compositions must withstand heating up to 1000 degrees.
Typically, the same paints are used to treat a gas grill as when finishing a gas stove. In this case, it is recommended to carry out the procedure outdoors or in a room with forced ventilation. The gas grill should be placed on newspaper or plastic wrap. Due to the fact that this part has a compact design with many hard-to-reach places, painting should be done with a brush, also applying at least two layers.
However, gas grates are not typically treated in this way. These plate components are made of cast iron, a durable material that can withstand sudden temperature fluctuations. To renew a gas grill, you basically remove carbon deposits using appropriate detergents.