Decorative plaster - advantages and disadvantages
Finishing with decorative putty is used as a self-sufficient coating for walls or a base for painting. Used alongside wallpaper, this material represents a modern finish. Combining different types of decorative putty produces original effects. One of the advantages is the ability to prepare mixtures yourself. The following series of “advantages” are noted.
- Used as decoration, looks aesthetically pleasing.
- The coatings are unpretentious and can be easily cleaned using the wet method. It is allowed to use detergents. Practicality.
- The finish “breathes”.
- There is no smell, as well as harmful emissions.
- It does not crack, but only strengthens over time.
- The wall does not need to be pre-prepared. Texture and thickness determine the smoothing of irregularities and defects.
- Long service life with proper work and careful operation.
- Masking of defects and irregularities in the presence of textures. In this case, mixtures with cellulose are good.
- Versatile, the coating is suitable for all or many surfaces.
- Resistance to the environment, compliance with environmental standards.
The coatings are free of toxins and many are breathable. Putty can isolate noise. Decorative putty used for walls involves many aesthetic solutions. The room is decorated to your liking. The disadvantages are the high price for some types, as well as the complexity of implementation.
Finishing with decorative putty is used as a self-sufficient coating for walls or a base for painting.
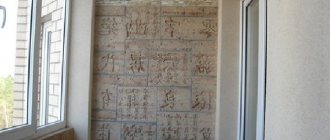
What is Versailles plaster
Versailles is a textured plaster with decorative properties, made in a golden color with or without mother-of-pearl. The material received this “name” due to the similarity of the decoration with the design of Versailles and other royal palaces. True, in the homes of the French rulers of that time, golden stucco molding prevailed against the background of white walls, so we are talking about the similarity only of the external appearance of the premises in terms of color.
Modern decorative Versailles plaster is a mineral or polymer material with high strength and aesthetic properties, which is widely used in the design of classic interiors and has many advantages.
Features of putty and plaster, the difference between them
Decorative putty, like plaster, serves the same purpose - to make the surface smooth. The second composition protects the wall from dampness and has thermal insulation properties. It has a coarse-grained structure. In addition, plaster can decorate and perform an auxiliary function. Putty does not have the same degree of viscosity. By smoothing the planes, puttying does not change the volume. The mixture comes in initial and finishing types for quick sealing and smoothing.
Plaster can decorate and perform an auxiliary function.
How to form a decorative relief?
It is necessary to prepare in advance a special roller or equipment for creating a pattern, a serrated spatula, a plaster float, as well as means for applying paint. During the work process, you will need a stencil, sponge, plastic film and other necessary equipment. Experienced specialists recommend that beginners use special rollers. It is much easier to work with them than with improvised materials.
Decorative plaster patterns obtained using various tools
You can even create an invoice using a package
Moroccan pattern can be created using a regular sponge
Wave effect or watercolor pattern can be done by hand
Note! The main thing is to quickly use the tools to create patterns. They should be applied at a stage when the decorative plaster is sufficiently wet. Otherwise, the design will not be able to print. If we compare purchased decorative plaster with homemade one, then in terms of ease of use, the former wins. But many craftsmen want to save money, so they prepare finishing mixtures themselves from simple gypsum compounds.
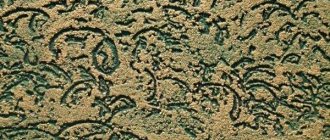
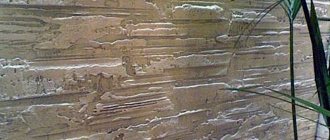
If you have little work experience, then you should not immediately try to use complex patterns. Even a beginner can do the standard “bark beetle” pattern or the effect of small pebbles.
Bark beetle patterns are very easy to make using a spatula, while choosing the directions of movement
Fantasy and floral patterns are considered complex. For them you need to purchase a special rubber roller.
Rubber textured rollers simplify the work of creating textured plaster
The rubber roller attachments can be changed. The fishing market offers a wide selection of textured attachments
You can also find stencils for creating prints in decorative plaster on sale. With their help, large and complex patterns are made. But such options have one drawback, which is the need to thoroughly clean the recesses from the plaster mixture. This procedure can take a lot of time, and the decorative plaster dries quickly, making it impossible to complete the pattern.
Using a stencil you can create an interesting decorative design
Almost everything from available materials is suitable for creating unique patterns. This could be crumpled foil, a regular sheet of paper, a broom, or a stiff brush. The main thing is that the product leaves a beautiful mark on the surface.
You can apply a simple scratching pattern using a massage comb.
A broom allows you to create a simple pattern over large areas
How to make decorative plaster from ordinary putty with your own hands
A homemade version can be easily obtained from existing ordinary putty. First you need to disassemble the composition. The base is cement, gypsum, clay, acrylic, silicone. Do-it-yourself decorative plaster using ordinary putty is done by adding components. If the base is mineral, add sand and stone chips. Synthetics work well in polymer putties, giving the effect of leather and silk. Viscosity and adhesion are achieved by plasticizers, which impart elasticity.
Homemade mixtures usually include PVA glue. The simplest option can be prepared for interior work. The result largely depends on the application method. For example, the relief is done with strokes. To make the wall expressive, coarse-grained additives are used. Such imitations can be done with your own hands.
To create strength and elasticity, use PVA glue or deeply penetrating primers. They contribute up to 2.5% of the total mass.
A homemade version can be easily obtained from existing ordinary putty.
Application technology
Decorating walls with Versailles plaster is quite simple. All work can be divided into two stages:
Preparation of the working surface includes:
You can prime the walls before plastering, for example, with acrylic composition Ceresit CT 17, Unis, etc. The consumption will be 0.16-0.2 l/m².
As a material for decorative plastering, we will use ordinary finishing putty made of gypsum. Dry mixes are inexpensive and are sold in many construction departments. Popular brands: Volma Finish, KNAUF Rotband Finish, KNAUF Uniflott, Prospectors, Osnovit, etc. There are no fundamental differences in them, so you can focus on price.
Material consumption: 1 kg/m² with a layer thickness of 1 mm.
Is it possible to use polymer putties in buckets?
Required tool:
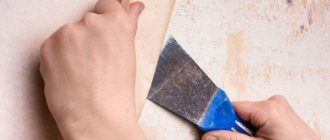
Decorative plaster is applied as follows. We hold a trowel in our left hand and a spatula in our right. Gypsum putty is applied to the trowel.
Holding the tool at a slight angle, apply the material to the wall. The direction of plastering can be any: from bottom to top, from left to right or in an arc.
At this stage, you need to cover the walls with putty in a more or less uniform layer. Perfect smoothness is not required, because next we will add texture to the surface. The layer thickness should be 2-3 mm.
It is more convenient to plaster in corners with a spatula.
Remember that the setting time for gypsum putty is no more than an hour from the moment of preparation. During this time, you need to have time to apply it to the wall, create a pattern, and join the next section with it “in the raw.” Therefore, you should not immediately plaster a large area.
Creating an invoice. After the putty is leveled, a pattern is made on it with a small trowel or plastic smoothing iron. Start from the corner, moving down. Short arc-shaped strokes overlap each other. The plaster seems to be “shaded”.
The drying time of the “Versailles” finish will be 24 - 48 hours, depending on the thickness of the layer.
After the walls are dry, they are sanded with fine sandpaper. Only the tops of the relief, large protrusions, are removed.
Crafting Recipes
In the simplest case, to transform plaster into a more stylish coating, you need to add a coloring agent. When making a composition such as decorative putty from ordinary putty, you may encounter a high cost of the result. But there are examples of simple mixtures, the production of which will result in a completely economical option.
In the simplest case, to transform plaster into a more stylish coating, you need to add a coloring agent.
With PVA glue
The polymer-adhesive mixture is prepared with the participation of the following components.
- 800 g PVA glue.
- CMC for wallpaper – 2 kg.
- Laundry soap in the form of a 10% solution.
- 6.5 kg of chalk.
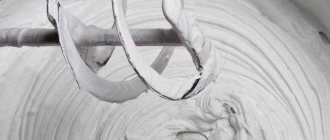
All components need to be combined and mixed. Bring to a paste structure.
All components need to be combined and mixed.
With primer
For example, using textured putty, drying is achieved and the relief is corrected. This composition can be made independently by adding wax or other means. The surface becomes matte or becomes shiny.
Using textured putty, dry it and correct the relief.
Gypsum based
An appropriate putty based on this material is taken. For example, the starting and finishing version is mixed 1:1. Gypsum plaster is also suitable. Everything is poured into a bucket of warm water. Add a little diluted wallpaper glue. The mixture hardens not so quickly, you can work calmly. The composition is mixed with a special mixer. The amount must be spent in 15 minutes. Then the surface is decorated with textures.
The mixture hardens not so quickly, you can work calmly.
With marble chips
A small or large fraction is added to one or another base. Thorough mixing is done with a special tool. Small particles will give an even effect, while large particles will create a noticeable structure.
Small particles will give an even effect, while large particles will create a noticeable structure.
Versailles plaster
The type of finish has a mother-of-pearl tint. A texture is created on the wall, which is then painted and varnished. You need to take finishing gypsum putty. Dry mixtures are available for sale. With a layer of 1 mm, 1 kg will be required for each square. meter. You will need a plastic or metal trowel, a bucket, and a spatula. A uniform layer without smoothness of 2 mm is achieved. Use arched strokes to create a texture until dry (1 hour). Then they paint (acrylic is suitable).
The type of finish has a mother-of-pearl tint.
Coloring
Before painting the walls, we treat them again with the same universal primer.
Painting “Versailles” plaster is not particularly difficult. The work consists of uniform coloring with the base color and highlighting the relief.
- For the base color, any white water-based (acrylic) paint for interior work is suitable. It must be mixed with the desired color, for example, beige. If desired, other shades can be added - yellow, orange. The paint color should be desaturated and calm. The surface is evenly painted in one layer with a brush or fur roller. It is necessary to ensure that all depressions in the relief are filled with paint.
- After the base layer has dried, the texture is highlighted with gold or silver. To do this, metal powder is mixed on a primer in a 1:1 ratio. The material is applied only to the tops of the relief. A foam roller is rolled over the plaster without strong pressure.
- At the end of the work, all decorative plaster is coated with acrylic varnish. It is better to dilute it by a third with water so that you do not get a thick, glossy crust. You can add glitter to the varnish - small sparkles that will create a slight shimmer on the finish.
Applying gold plating with a foam sponge
Read about other methods of painting decorative plaster in the following articles:
- Painting decorative plaster.
- Painting the facade.
- Painting plastered walls.
- Textured paint.
Patterns, embossing, roller textures
The sequence of actions is important. The wall is cleaned, primed and covered with putty. Textures and patterns can create relief. For this or that configuration, imagination is important, not just the tool. For example, using a roller they create a velvet effect. But you need to finish the surface quickly, no longer than 40 minutes. Interesting! Patterned embossing is even made from densely veined tree leaves.
Textures and patterns can create relief.
Homemade finishing tool
To carry out standard puttying work, you need the following set.
- Spatulas.
- Metal ironing board.
- A grater made of wood or plastic.
- Plaster rollers are used.
- Prepare containers for water and solution.
A home craftsman can make devices for creating relief and embossing. For example, these are coatings for rollers. Suitable leatherette, dressed with folds on the instrument. And it will give an interesting structure. The relief is also set with a piece of crumpled polyethylene.
A home craftsman can make devices for creating relief and embossing.
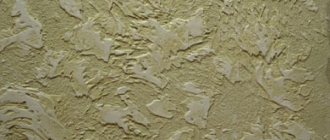
Base plaster layer
This is an important stage on which the final result largely depends. It is from this layer that the textured pattern will be formed in the future. To create a coating of the required thickness, you should take a portion of the mixture prepared in advance according to one of the recipes and apply it with a trowel. Decorative plaster should not be too thick, otherwise it will fall off. To create a beautiful textured pattern, a thickness of 4 mm is sufficient. It is easy to achieve if you use a special trowel for decorative plaster.
If a gypsum composition was used as the basis for the mixture, you need to work quickly, because such plaster will dry very quickly, so you should not immediately distribute it over the entire wall. It is advisable to carry out the treatment in stages in small areas.
Decorative plaster begins to be formed in small sections in a thick layer in order to create a pattern on it before drying
The prepared solution must be applied to the surface, quickly smoothed with a trowel and immediately form patterns. This work may seem very difficult, but a master with experience in using decorative plaster from ordinary putty will cope with this task with his own hands.