When making renovations, many owners of houses and apartments think about how to replace boring striped or floral wallpaper, how to turn a children's room into a whole fascinating world, and the living room into a romantic garden with a waterfall. To solve these problems, photo wallpapers were invented. Today we sell collections with paintings of different styles and photographs of the highest quality. They are quite affordable, easy to glue with your own hands, having studied the intricacies of the technology, choosing the appropriate image and base material.
Necessary tools for gluing photo wallpaper
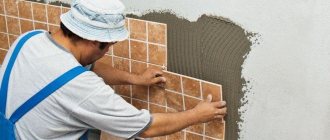
Before you figure out how to glue photo wallpaper on a wall, you should find out what tools and materials you need to prepare. To save effort and time, prepare in advance everything that may be useful to you in your work:
- Directly panels with a pattern. When purchasing, you must immediately decide on the future location of gluing and size.
- Adhesive. To choose it, it is better to consult with a sales consultant in the store.
- Wallpaper or stationery knife. With its help, you can easily trim the protruding parts of the canvases or adjust their ends.
- Brushes. The size of the brushes should be large, since with their help you will need to apply glue to the inside of the panel as quickly as possible. And for the joints, prepare a smaller brush.
- Tape measure, level, straight ruler. These tools are needed to maintain the correct proportions, check vertical and horizontal lines, and prevent the canvas from “collapsing” to the side.
- A block or other flat surface, with the help of which you can evenly draw the boundaries of the elements of the picture on the wall.
- Rubber roller. Using it, you can smoothly and correctly smooth the components to the surface.
- A simple pencil, a cloth.
- If you work at heights, prepare a stable chair or stepladder.
Where is it appropriate to use photo wallpaper?
Almost all designers recommend decorating rooms with a small amount of furniture with photo wallpaper. Otherwise, you can get the effect of an oversaturated space.
The most preferred places to choose such wallpaper are places for relaxation, although they often look good on doors.
Photo wallpaper looks most successful in the following rooms:
- living room;
- kitchen;
- bedroom;
- children's room
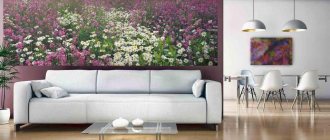
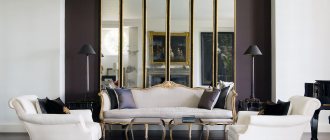
Living room
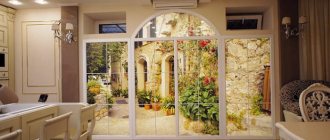
When decorating the walls in the living room, you should listen to the opinions of all family members, since this is the room where they spend most of their time. Also here, as a rule, they receive guests and celebrate all holidays. Accordingly, photo wallpapers should look original and elegant.
It is advisable to decorate this room with photo wallpaper in the form of a large-size model of a painting, especially if the room is quite spacious and has large open sections of the walls. Images that occupy the entire wall or a significant part of it look best. Do not forget that the drawing on the wall should not be cluttered with furniture or other objects.
How to hang photo wallpaper - on a wall with wallpaper or on a painted surface - everyone decides independently, based on their own preferences. The main thing is that the chosen image in the house looks harmonious and appropriate.
Bedroom
bedroom
The image on the wall should not be too flashy and annoying, so you should not choose wallpaper with bright colors.
To create an atmosphere of peace and relaxation, psychologists recommend decorating the bedroom with photo wallpapers of flowers, beautiful fields or gardens.
A decorated wall should not be cluttered with lamps, photographs or paintings. It is desirable that the tone of the wallpaper matches the main tone of the walls of the room.
Kitchen
It is generally accepted that tiles are the main decoration of the kitchen. However, by making a bright accent with photo wallpaper depicting, for example, juicy, delicious fruits, you can completely transform the room, making it brighter and more cheerful. In addition to fruit, splashes of champagne, coffee beans and other “edible” elements will look great in the kitchen.
Children's room
Choosing a picture for a child's room sometimes turns out to be the most difficult task. Since children grow quickly and change their preferences, parents should definitely take into account the age of their child. So, if he is under three years old, then it is advisable to choose a wallpaper pattern with large fragments, made in a calm tone. For a child over three years old, drawings with many small details are suitable. To decorate a room for a boy, choose wallpaper with the image of your favorite cartoon character, and for a girl, choose a fairy-tale plot with princesses.
When decorating a schoolchild’s children’s room, you can choose a huge world map or some kind of teaching aid as a drawing. However, before making such a choice, you need to consult with your child and find out his preferences.
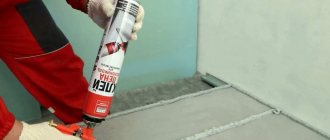
How to choose adhesive for photo wallpaper
The adhesive composition plays an important role in the durability of wall designs.
- As experts recommend, it is better that the adhesive for photo wallpaper matches its brand.
- Such brands as Contact Vinyl, Methylane and Quelyd have proven themselves well for these purposes. These models are affordable and do the job perfectly.
- Sometimes glue can be sold complete with photo wallpaper, but the amount offered is often not enough to cover the entire area of the canvas. Moreover, for reliability, the adhesive composition is applied not only to the inside of the photocells, but also to the surface of the wall. Each package of glue is equipped with information about the proportions in which the mixture should be diluted.
Important! For high-density materials, you need to use a thick adhesive mixture so that after installation, the wallpaper does not move off and adheres well to the wall.
To choose the appropriate adhesive option, pay attention to the following properties:
- the color should not appear in spots;
- moisture resistance will prevent the appearance of fungus;
- no unpleasant pungent odor;
- The faster the drying time, the better the glue.
Please note that quality products are provided to consumers not only by foreign manufacturers, but also by domestic ones. In the latter case, the price of the product will be much lower.
What wallpaper according to characteristics
Installing photo wallpapers begins with their selection. Divided according to various indicators:
- material used in manufacturing;
- texture;
- how many layers;
- subject;
- visual part.
In addition to the main characteristic, self-adhesive and standard wallpapers are distinguished. For the first type, glue is not needed, since it is already applied to the surface.
Material
The following types are distinguished:
- Paper. They are inferior in quality to other types due to their low moisture resistance. They fade quickly and are difficult to glue.
- Non-woven. Considered the best in most respects. Easy to apply thanks to the non-woven backing. They tolerate washing with warm water, but there is a risk of mechanical abrasion.
- Textile. Tapestries are used as the basis. Some of the most expensive on the market. Made from linen, cotton and silk. Can be glued using simple glue.
- Vinyl. They are made of plastic, which is why they are quite dense and highly durable. For maximum impregnation, you need to fold the area in 3 layers and let the glue dry for 5-10 minutes.
Texture
The image on the wallpaper directly depends on the texture of the material. Thanks to the manufacturing method, they do not lose their properties after wet cleaning. The following relief designs are distinguished:
- Plastering. Externally they resemble plaster. They are made on a vinyl or non-woven base. With a highly pronounced relief, it can push the imperfections of the walls into the background. They look like frescoes or oil paintings.
- Sandy. Using this textured look will make the wall look like a sand painting. They have a matte surface and are able to mask the roughness of the wall. To avoid the accumulation of dirt, you need to do wet cleaning once a week.
- Canvas. Outwardly they resemble a real painting. The surface is never smooth, as it cannot hide all imperfections, so before pasting you should pay attention to the unevenness of the wall.
- Painting. Up to 3 millimeters deep. The base is vinyl. Creates the effect of wall painting.
Preparing walls for wallpapering
Here are some recommendations for your attention on how to properly prepare the wall for installation.
- You should not glue photo wallpaper onto the remains of old wallpaper; there is a risk that both coatings will lift over time.
- If the wall is painted, then it should be removed if it is prone to peeling and crumbling. If not, simply coat the surface with acrylic primer.
- Paint that is too bright can bleed through, so it makes sense to give the wall another coat of white paint.
- It is better to straighten any bumps, this is especially true if you have chosen paper-based wallpaper.
- Under the non-woven vinyl covering, only smooth out obvious flaws.
- Ideally, scrub the surface with finishing putty, “scratch” it with sandpaper after drying, brush off the dust and coat with acrylic primer.
Selection of pattern and its dimensions
- Ideally, the area of the canvas should match the area of the wall.
- Custom photo wallpaper does not require customization.
- If the surface of the wall is larger than the area of the selected picture, then place the picture in the center, retreating an equal distance from the corners.
- If the canvas is larger, then it is better to trim it in the most inconspicuous place, or on the side that least spoils the overall composition.
- Photo wallpapers are available in 8 pieces and 12 pieces. The more elements there are, the more carefully you need to pay attention to the assembly. Lay out the pieces of the design on the floor so you can get an idea of the final result.
- Take care of the markings on the wall by measuring with a plumb line the lines beyond which the first row of elements will not protrude. Next, glue the next rows exactly along the line, adjusting the first one to the reference one.
How to stick photo wallpaper on the ceiling and doors
It is quite difficult to paste photo wallpaper onto the ceiling in one piece, so we will consider the option of gluing it in parts.
It is best if the design consists of longitudinal parts, rather than square ones, for example. They should be placed so that the joint runs perpendicular to the window, that is, in the direction of the sun's rays, so they will be less noticeable. The strips should be cut with a small margin so that they extend onto the walls by 2-3 mm, which will be cut off at the end of the work . You need to start from the wall, not from the middle of the ceiling, gradually moving towards the opposite wall.
Photo wallpaper on doors looks very advantageous, especially in small rooms.
To apply wallpaper to a door, you need to prepare it in the same way as the walls and ceiling: clean off the previous coating, level the surface and sand it. The gluing process is similar to gluing walls. Try on the canvas according to the size of the door; if you plan to cover not the entire door, then be sure to make markings, since without it it will be difficult to glue the wallpaper evenly on your own. If the canvas consists of several parts, then you need to start working from the top.
Working with non-woven base
Let's figure out how to glue non-woven photo wallpaper, since this coating option is the most practical and convenient for gluing it yourself.
In this case, there is no need to lubricate the blades with glue, so the speed of work increases.
The technology is like this:
- Place the items on the floor.
- Using a wide brush, generously coat an area of the wall slightly larger than the area of the piece.
- Press the dry canvas against the wall, leveling it along the pre-marked right angle. Using a rubber roller, stretch from top to bottom, and then fan-shaped from the middle to the edges.
- After the roller is applied, the element is glued, carefully blot the edges with a clean rag, pressing them against the wall. Do not rub so as not to spoil the drawing.
- Non-woven fabric is quite plastic, so if necessary, you can pull the fabric if any unevenness or wrinkles suddenly appear on the surface.
- Glue the next sector in the same way, paying special attention to the joints. The edges should not overlap one another, but there cannot be gaps between them.
- Remove excess glue as you go. At the end, all joints are rolled with a roller.
- When finished, avoid sudden changes in humidity and temperature to prevent the segments from peeling off.
Interesting! Recently, Komar photo wallpapers have become especially popular. If you look at the photo of the result of their installation, you will understand the reason for the popularity of “Komar”. These photo wallpapers look amazing in the interior: 3D effects, a variety of coating themes and bright colors, add to this the dimensions written on the tubes, instructions for pasting and glue included and you will get a decent material ready for pasting. See the video below for detailed technology.
Features of care
If all stages of the work were done strictly according to the rules, then the result will be a single picture without visible seams or displacements of parts of the picture. Photo wallpapers have varying degrees of moisture resistance; depending on this, different methods of care and cleaning are used. You can determine the level of water resistance by special markings on the wallpaper packaging. One wave icon means moisture resistance, two waves mean washable wallpaper, three waves mean super washable. The wave above the brush means high stability and can be washed with a brush and detergents.
Features of care depending on the type of photo wallpaper:
- paper wallpapers without a laminating coating are afraid of moisture, so they need dry cleaning and careful handling. Dust is removed with a vacuum cleaner with a soft brush or a dry soft cloth;
- moisture-resistant wallpaper can be vacuumed and wiped with a damp, well-wrung-out cloth, or brush off dry dirt;
- textile wallpapers do not have a protective film, they are vacuumed, and stains are carefully cleaned or removed with a special stain remover;
- Waterproof and laminated materials are washed using non-abrasive mild detergents. Hard brushes and chemically aggressive substances cannot be used to clean wallpaper. Wash without pressure, immediately removing moisture from the surface with a dry cloth;
- in areas of the wall that are regularly exposed to direct sunlight, the wallpaper may fade and the paint may fade. To solve this problem, it is necessary to shade the wall picture or cover it on top with a protective composition against damage by ultraviolet radiation;
- textured surfaces, especially sand and canvas, can quickly accumulate dust; they need to be cleaned more often than smooth and glossy canvases.
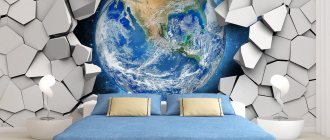
By choosing the design you like in the store and pasting the photo wallpaper with your own hands, as well as carefully caring for the canvas, you can enjoy beautiful landscapes for many years, wake up in your bedroom as if on a tropical island, and in the children’s room play with children and cartoon characters from fairy tales, fly to space and admire the underwater world of the ocean. Any painting will become the center of the interior, decorate and transform it.
Working with paper bases
Many people are interested in how to properly glue paper photo wallpaper to the wall so as not to spoil the material. Note that paper wallpaper is a rather capricious material, especially if thin single-layer options are chosen.
They literally crawl apart upon contact with the glue. The gluing technology is as follows:
- Lay out the segments on the floor, cutting off the edges on the left side of the segments and leaving the edges on the right so that you can overlap them later.
- The wall should be smooth and white, and the glue should be as thin as possible.
- Use a wide brush to coat the wall, and then the first canvas in turn. Wait 2 minutes and apply to the surface.
Important! If the paper density is very low and they are visible, then it is better not to smear the segment, but to glue it dry.
- Align the first segment with the vertical markings, roll the middle with a roller, removing air bubbles. Be careful not to damage the drawing. The direction of movement is from the center - to the sides and to the bottom.
- Glue the next segment overlapping the edge of the previous one. Make sure that no remaining edges show through.
Important! Don't be alarmed if the surface wrinkles, this is normal. If the pasting was correct, then after drying the canvases will level out again.
Be on the lookout: what rules for processing paper photo wallpapers are used by experienced finishers
Despite the very large assortment of colorful paper wallpapers and their low cost, craftsmen try to avoid working with them. And there is a serious reason for this: this technology is too troublesome, requiring increased attention and high practical skills.
At the same time, this is the most budget option, which means low payment for the work performed.
Experts joke about this issue: it’s easy to test the strength of a young family’s relationships. It is enough to instruct them to jointly hang paper wallpaper in a relatively short time. If the result is excellent, and the newlyweds do not quarrel, then they are an ideal couple.
Unfortunately, in practice this is often not the case... people lack patience and accuracy, which leads to nervous breakdowns.
The owner of the video, Alexander Fadeev, clearly shows how to properly handle “Symphony” paper photo wallpaper. Look at his work.
A few words about self-adhesive
Many people see this as a panacea, but in reality it is more difficult to decorate a room with self-adhesive. If pieces of ordinary material can be glued even alone, then even two people can ruin a watering can without reaching the wall. Such wallpaper has a paper layer of protection; after removing it, you need to accurately and quickly smooth the segment on the wall, since the glue quickly breaks down and dries. And the main problem is that the canvas tends to stick to itself. Wrinkles form on the surface that are almost impossible to smooth out.
Correctly installed segments will delight the owners for a long time, and will become a source of pride and demonstration of the result of repair and finishing efforts.