Engineered board is a relatively new type of flooring material, but has already become quite in demand. This is explained not only by its excellent characteristics, but also by the possibility of do-it-yourself installation without the involvement of specialists. Naturally, the work will require significant effort, depending on the degree of readiness of the base and the chosen flooring technology.
Features and options for laying engineered boards
The main feature of this material is that it can be mounted directly on a concrete or cement-sand screed. An alternative method - laying plywood - allows you to quickly correct all surface flaws.
Engineered board is considered a new word in the flooring industry
There are several installation methods depending on the specific situation. You can choose the best one based on the type of locking connection:
- Groove-groove. Grooves are cut out at the ends of the parts; they are held together by a special strip - a key. For additional fixation, glue is used.
- Groove-tenon. Traditional option. The ends of the elements are equipped with a groove and a tenon; to connect the parts, they are laid out sequentially. For better fixation, they are beaten with a mallet. The final fastening is made using glue or self-tapping screws (staples).
- Click locking system. Widely used for laminate flooring, engineered boards are supplied with such a lock only upon individual order. This option is suitable for working with warm water floors.
Types of engineering board connections
Before purchasing, you need to familiarize yourself with the existing connection.
The cost of laying engineered boards
If you decide to entrust the work of laying engineered boards to specialists, then you should add the price of the services of craftsmen to the cost of the product. At the same time, during the installation process, workers will need to perform various operations. Their cost is as follows:
- Installation of untreated engineered boards on a plywood base with gluing – 7.5 $/m².
- Laying boards with a varnish or oil protective layer on a plywood base using the gluing method – $8.5/m².
- Turnkey installation of raw boards - $16/m².
- Turnkey laying of treated boards - $18/m².
- Work on laying a floating coating on a substrate is paid in the amount of $2.9/m².
- For dismantling the old floor you will have to pay 0.7-0.9 $/m².
- Work to prepare the base will cost 0.15-0.45 $/m².
- Making a plywood base for installation using the adhesive method will cost $1.8/m².
- Artistic installation of engineered boards will cost $14/m².
Since the engineered board has a rather thick layer of valuable wood, during the operation of the floor, it can be sanded to eliminate defects and re-opened with varnish. As a result, you will extend the life of the coating and maintain its beautiful, original appearance. Such work is paid in the following amount:
- The price of floor sanding is from 17 to 29 $/m².
- For each varnish coating you will have to pay from 0.3 to 0.5 $/m².
Types of bases for laying finishing material
It is recommended to lay the material on a well-prepared rigid base. The following types of surfaces are suitable for use:
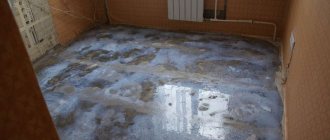
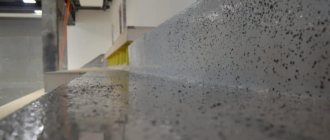
- Screed. Concrete and cement. Installation is carried out taking into account the parameters of residual humidity: the optimal indicator is less than 6%, which allows you to lay parts without waterproofing. For larger values, additional protection is required.
Under the engineered board you need a perfectly flat and dry concrete screed - Plywood. This is a traditional option for preparing foundations, which are ordinary wooden boards or poorly leveled screed. Plywood is also used for flooring on joists if more complex leveling is required.
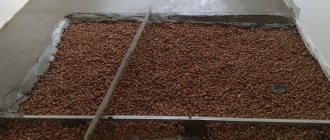
A plywood platform is considered a good option for leveling the base - Substrate. For this, special foam material is used. The underlay is required only when installing the floor using the “floating” method for a water heating system.
Soft substrate as a base option for laying boards
It is not recommended to carry out work on gypsum screed bases or in the presence of an electrical underfloor heating system.
What is the difference between an engineered board and a parquet board?
Let us say right away that it will not be possible to distinguish one material from another from a photo. But in terms of its technical characteristics, engineered flooring differs significantly from parquet flooring. Thanks to many advantages, the engineered product is becoming more popular and has won many positive reviews.
The similarities between engineered and parquet flooring are as follows:
- both varieties are multilayer structures;
- in both options, the top layer is valuable wood, which is subjected to protective treatment in the factory;
- There is a lock at the ends of both products to speed up and facilitate installation.
The differences between the two materials are as follows:
- engineered floors are more durable;
- the top layer of valuable wood for an engineered product reaches a thickness of 8 mm, while for parquet it reaches only 4 mm (as a result, an engineered board will withstand a greater number of sandings in order to renew the surface);
- engineered dies are not afraid of changes in humidity and temperature in the apartment, which cannot be said about parquet flooring;
- parquet boards come in one-, two- and three-strip, and engineered boards are only single-strip;
- Engineering products, unlike parquet ones, are allowed to be used when installing heated floors.
Methods for attaching the board
When deciding how best to lay an engineered board, they take into account not only the features of the base, but also the existing skills. This will allow the process to complete without further problems.
Adhesive
The most reliable option, giving the utmost durability of the floor covering. The adhesive for engineered boards on the screed should only be two-component polyurethane-based; it is this that will provide the required level of fixation to the concrete. For work on wood flooring, a one-component silane-modified compound is suitable. Water-based mixtures should not be used.
The adhesive is applied to the base using a notched trowel.
Combined
Installation technology using this method involves the use of glue and self-tapping screws (staples). This allows you to reliably press the fragments, ensuring quick adhesion, and significantly increase the durability of the resulting coating.
On a note! Screws or staples are placed at the locking joints at an angle of 45 degrees. Care must be taken not to damage the plywood base, therefore, when choosing self-tapping screws, it is recommended to do preliminary drilling.
The self-tapping screw is driven into the bar at an angle of 45 degrees
Floating
This method is suitable for products with a “Click” connection. It is necessary to lay only on an ideally prepared surface; minimal error is allowed. Due to the lack of a bond with the base, the durability of the coating is noticeably lower than in previous versions.
In floating installation, the “Click” type connection is mainly used.
Glue "in the dowel"
This installation is performed in rooms with unstable humidity. The presence of a key connecting adjacent parts makes it possible to compensate for expansion and slight shrinkage. Glue is used as additional fixation.
Dowel jointing is good only for wet rooms
Glue method
In this case, to secure the material to plywood or any other base, a one-component or two-component composition with good adhesion is used. To securely fasten the board to any base surface, it is recommended to use polyurethane solutions. After hardening, such compositions form strong compounds that are not afraid of contact with moisture.
The adhesive composition is used to securely fasten engineered boards to a concrete screed or to a substrate made of sheets of plinth, chipboard or plywood. Another option for the base coating is the use of a special multimol material with a reinforcing layer. Such roll products are attached with glue to a weak or collapsing base. The substrate reduces stresses and evens out minor differences in height.
It is not recommended to lay engineered boards on the following types of base surfaces:
- on a self-leveling floor made with gypsum binders;
- cork oak bark backing;
- on a warm floor with a cable heating system.
Important! When installing flooring using the adhesive method, you can lay standard or curved boards, but before carrying out the main work, you must first lay out the material.
Combined installation method using glue and additional fasteners
In addition to a special adhesive composition, additional studs or screws can be used to secure the floor covering elements to the base surface. These clamps are driven into the grooves of the joints of the products at an angle of 30-40 degrees. The method under consideration makes it possible to obtain a high-quality and durable coating, but it differs from other methods in the labor intensity of the work and additional financial investments.
Floating method
This method involves connecting engineered boards using locking connections, click technology. In this case, the coating material is completely unrelated to the base. The connection of elements using the floating method is quite dense and durable and does not require surface finishing. Before carrying out the main work, it is necessary to carefully prepare the base; installation of the flooring should be carried out by a qualified specialist.
Important! The installation option under consideration is not suitable for tongue-and-groove materials.
To the key
This method is used to collect domestically produced engineered boards. The elements are fastened according to the groove-to-end principle. This technology was used in the construction of residential buildings with insufficiently dried wood. This made it possible to obtain a house that was resistant to shrinkage, which ultimately ensured the ideal geometry of the building.
Interesting article on the topic: Marmoleum - what is it? Characteristics and installation
Installation of coating elements into a key with additional fixation on an adhesive mixture is used in regions with sudden changes in temperature and humidity. Such climatic zones include Primorye or the Caucasus.
Advice! When laying boards of different lengths, offset them by a third of their size. This will allow you to get a reliable and tight strapping along the ends of the building. The pattern of each panel of natural wood will differ from each other, so to obtain a beautiful coating you need to first combine the planks and choose the most successful combination.
Installation using adhesive or combined method
The first step is to prepare the necessary tools, devices and materials:
- glue and spatula or toothed roller for application;
- a special tool for driving staples or a drill (screwdriver) with suitable bits and a set of thin drills;
- screws, dowels;
- floor leveling products (plywood or finishing screed);
- mallet.
You can use nails instead of screws, but this is not recommended.
The full cycle of laying engineered boards requires professional tools
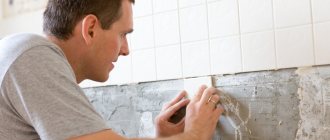
Preparing the base
If you need to lay the material on a screed, work begins only after the finishing fill has completely dried. This will require at least one month. Further actions depend on the result obtained: thorough sanding is performed, the surface is cleaned of dirt and dust, after which a deeply penetrating primer is applied in two layers.
Deep penetration soil is used for concrete
Preparation of the plywood base proceeds as follows:
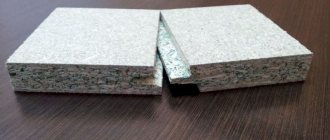
- Sheets with a thickness of at least 15 mm are cut into equal squares. If work is carried out on an old wooden floor, then it must first be cleaned of decorative coating.
- The plywood is placed in rows; adjacent joints should not coincide. A small compensation gap is left between the cut fragments. Self-tapping screws are used for fastening; the cap must be recessed.
In case of large curvatures or the need for insulation, plywood is mounted on joists - If installed joists are laid, they are carefully checked for level. If the room is on the ground floor, a waterproofing film is laid down first. In this case, plywood is laid in solid sheets.
- Sanding is carried out to eliminate any remaining defects.
- Dust and dirt are removed from the surface using a vacuum cleaner.
- A layer of primer is applied.
Regardless of the type of base, the maximum height difference can be no more than 2 mm per 2 m. The priming procedure cannot be ignored, since it is necessary to improve adhesion.
Algorithm for arranging plywood flooring along logs
Attention! When working with a wooden floor, the direction of the joists is marked in order to position the engineered slats perpendicularly.
Laying engineered boards
Installation instructions:
- The laying method (herringbone or deck) is determined and a diagram is drawn up.
- If the textures of the pattern of the parts are different, they are first laid out and each element is marked. Although this will take a lot of time, it will ultimately allow you to get a single canvas. In addition, this procedure makes it possible to determine the trim length in advance, and, if necessary, prepare a template.
Direct laying of deck planks is the simplest and most accessible option for a beginner. - An offset of each row relative to the adjacent one is provided. Work starts from the corner. Before this, markings are made connecting the corners diagonally. Crosshair lines that have a right angle are also drawn through the center. A line is cut from the wall, taking into account a compensation gap of 10–15 mm, and wedges are installed. Its size should be smaller than the selected baseboard.
- To glue the board, the composition is applied only to the base. The element must be placed on the mixture, tapped with a mallet and immediately aligned along the existing line. Excess glue is removed.
- The remaining parts are inserted into the grooves and seated on the composition. In order not to wait for the first row to set, it can be fixed along the edge with self-tapping screws, taking into account the plinth allowance.
- For reliability, upon completion of work, the load is distributed along the entire perimeter of the coating.
When laying, glue is applied to the base in small portions as needed.
The combined technology almost completely replicates the adhesive method, only each part is punched through with a bracket and screwed with a self-tapping screw. The fasteners are located in the places of the locking joints in compliance with the required slope. The main thing is to prevent the screw from sticking out, which will prevent a tight fit.
Laying methods - features of each
To ensure that the future use of engineered wood flooring is durable and reliable, it is important to choose the method of laying the coating in accordance with the conditions of the room. The material has a multi-layer plywood structure - this allows you to do without purchasing it additionally, but such floors are good in living rooms.
It is better to equip bedrooms and children's rooms with an additional layer of wood - then the optimal floor temperature will be maintained, especially since it is not recommended to install heating systems under an engineered board.
So, the installation method - on plywood or a concrete base - is chosen according to the purpose of the room.
Required tools and materials
For each method of laying engineered wood, you will need the following:
• Hammer. • Electric jigsaw. The thin blade will separate the wood without splinters or other cutting defects. The edges are neatly joined. • Mallet. Required for padding lamellas. • Leveling mixture for screed and corresponding tools - construction mixer, spatulas, beacons, reinforcing mesh. • Moisture-resistant plywood 12 mm thick - if you plan to lay an engineered board on it. • Wedges to maintain gaps between the covering and the wall, damper tape. • Primer for adhesion of all layers of the future floor.
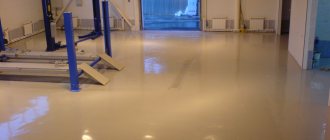
Features of the concrete base
Before laying the engineered board, an analysis of the base is carried out. The subfloor slab must meet the following conditions: be level and have a moisture content of less than 2%.
OLYMPUS DIGITAL CAMERA
The first condition is important for the size of the board - long lamellas should only be laid on a perfectly level surface. Secondly, the lower wood layer should not come into contact with moisture in principle. If the initial rough foundation does not meet these conditions, then it is reconstructed - leveled with a new layer of screed, waterproofing is applied, or bulk compounds are used.
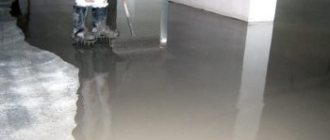
Leveling the base
So, if the concrete slab is defective, the following set of measures is carried out:
1. Dismantle the old screed with a hammer drill if the percentage of defects exceeds 15% of the total floor area. 2. Clean the surface from dust and small concrete granules. To do this, use a vacuum cleaner, first moistening the surface of the concrete slab. 3. Mark the zero level of the floor with a level and set the desired height.
In addition to the beacons, a reinforcing mesh is laid on the floor for strength. It is important to install it on separate supports so that the mixture grabs it from below and from above. 4. A damper tape, reinforced along the perimeter of the wall, compensates for the vibration of the floor towards the walls.
It is glued in such a way that, after pouring, a 2 cm edge protrudes. 5. The cement mixture is diluted with water to the required consistency and left until matured - about half an hour. Then the floor area is filled.
If the concrete base is suitable for laying, then one leveling mixture is used. The poured base must be cured for at least three weeks. Each time it is checked for moisture by covering it with polyethylene. If condensation appears on the surface of the film, it is not ready for installation of the engineered board. The dried concrete slab is primed in several layers.
Preparation of material and glue
Before laying the flooring, it is recommended to remove the boards from their packaging and allow them to adapt to the room climate for 24 hours. The adhesive is selected according to the installation method - moderate fixation is required for plywood, and strong fixation for concrete. There is no need to dilute a large amount at once, especially if you lack experience. The compositions, like the leveling mixture, require maturation in a plastic container.
Plywood flooring
It is laid on glue to the concrete base.
Square or rectangular sheets are laid in a checkerboard pattern, maintaining gaps between them (2–3 mm) and the wall (up to 1.5 cm) - linear expansions of wood can not only bend the subfloor, but also break it. If there is a difference in height between the sheets, then the problem is solved by lining the sheets or radically - by scraping.
Fixing the engineered board
Now about how the engineered board is laid. Stages:
• The process begins from the far corner of the room. Before this, you need to choose a laying method - deck or herringbone.
The principle is the same for all wooden coverings; the features of visual changes in rooms are here. • The adhesive mass is spread on the floor surface and smoothed with a notched trowel.
Do not put glue on the engineered board. The lamella is pressed against the composition and beaten with a mallet. Protruding “blots” are immediately removed, and if glue gets on the surface of the board, you should use acetone, otherwise stains are guaranteed. • Wooden wedges are installed between the wall and the boards. They are not removed until the floor can be walked on. The period from setting to use is 3 days.
The last step in laying engineered boards will be the installation of baseboards.
They are selected to match the floorboards or door frames.
Floating installation
If the lamellas are not supposed to be glued, then they are laid using the “floating” method. To do this, perform the following steps:
- The base is carefully prepared and cleaned. If required, a substrate is laid on the surface.
During installation, it is important to maintain a damper gap around the perimeter of the room (8 - 10 mm) - Place the parts starting from the longest wall from left to right.
- Markings are made (as for the adhesive method), the gap is removed from the wall and wedges are installed.
- The first row is laid out, the interfering interlocking joints, which are located on the outer parts towards the wall, are pre-cut. The size of the final offset of the rows is determined and a template is made.
- The second row is mounted sequentially, each element is connected to the previous one until it clicks and is slightly tamped down.
- To ensure that the boards lie level, they must be constantly checked for level and ensure that there are no gaps.
When laying, the transverse joints in the rows should not coincide; installation follows the principle of brickwork
On a note! Due to the greater thickness of the parts, this method is more difficult than working with laminate, so you should practice first. This will avoid problems.
Floating
The catalogs of some manufacturers present collections of two-layer engineered boards with interlocking joints. It is assumed that their installation can be carried out using the floating method, without fixation to the base. But in practice this is not recommended, since due to the two-layer construction (the bottom layer is multi-layer plywood), the board is more susceptible to deformation due to changes in humidity. And if the planks are not fixed to the base, this can lead to creaking, which is especially typical during the heating season. And in the worst case, the locking system may come apart.
The only advantages of this technology are the speed of assembly and the ability to disassemble the flooring for installation in a new location. But given that there are clearly more disadvantages, it is still recommended to glue the parquet, despite the presence of a locking connection. If the structure of the board is three-layer, then it can be mounted in a lock, but such material is already called “parquet board”.
Floor care
Engineered laminate flooring must be maintained correctly to ensure the longevity of the surface. Recommendations:
- cleaning is carried out without excess water;
- it is better to avoid using abrasive and chemical compounds;
- if there is heavy furniture, rubberized pads should be provided under the legs;
- To protect the floor, special parquet substances are used.
Parquet cleaners work equally well on engineered wood floors.
If the top covering is worn out, it can be removed by scraping or sanding.
Stages of preparation for installation
The technology for laying engineered boards involves proper preparation of the workpieces themselves.
After all, low-quality material, with the maximum professionalism of the craftsman, often becomes a reason for improvements in the future.
It is important to choose a high-quality material that is free from cracks and gaps. It is prohibited to store engineered wood in rooms with high humidity or near open sources of fire.
This product is in great demand among consumers for a number of reasons:
- versatility of use;
- large selection of sizes, colors and quality characteristics;
- reliability and durability in operation;
- long service life;
- ease of installation work.
Additionally, the advantages of the material include the fact that it is easy to select a unit of material from 7 to 14 mm in thickness. The multi-layer nature of the product allows it to be laid on an old floor, making it easier for a beginner in the construction business.
The good thing about the floating installation method is that, if necessary, the floors can be disassembled and repositioned in a new location
List of required equipment
Once the issue of installation method has been decided, it is important not to miss preparing all the necessary equipment.
It is important not to miss a number of rules, especially when laying engineered boards yourself:
- The preliminary stage also includes the installation of door and window frames.
- It is important to maintain a temperature regime of about 15–20 degrees and a humidity of no more than 60%.
- The purchased product must undergo acclimatization in the room for basic work for at least 24 hours.
- The humidity of the concrete screed should not exceed 5%.
- It is necessary to level the surface on which the material will be laid.
Before laying the engineered board, it is necessary to level the surface
The base for the material must be rigid with the absolute exclusion of the presence of various protrusions, roughness, nails and other defects. Otherwise, the floor may become deformed within the first weeks after installation.
Compliance with the basic requirements for installation work will allow everything to be done quickly and efficiently. After all, the high technical qualities of the material make it possible to obtain a fairly wear-resistant and aesthetically acceptable floor covering. In design areas, which is in no way inferior to other, more expensive materials.
Three categories of engineering board
The best way to lay an engineered board depends, among other things, on the model you choose. In total, this flooring material is presented in three varieties:
- rustic – veneer of different shades and textures is used as an external decorative layer;
- select - veneer for the outer layer of flooring material is obtained by sawing it in the direction of the grain, which guarantees the preservation of the original texture and the almost complete absence of flaws;
- natural - the veneer for the outer layer is made using a special cutting technology, which is why the lamellas may differ slightly from each other in shade or texture.
The category you choose depends on how to correctly lay the engineered board so that it fits organically into the interior and becomes its successful functional addition.
Laying material with construction adhesive
One of the popular types of such work is laying multi-layer boards using glue. The method is recognized as classic in all respects, because it is suitable for absolutely all types of similar products.
The subfloor is made of any material; it is important that it is thoroughly leveled. It is best to glue the board onto plywood, previously placed in a checkerboard pattern and secured with self-tapping screws.
It is better to additionally treat any type of plywood covering with an adhesive composition, which will prevent the formation of swelling of the board during operation.
Small technological gaps should be left between the sheets of plywood.
Along the perimeter of the room where the board will subsequently be laid, the gaps should be at least 10–15 millimeters.
It takes about 2–3 days for a plywood subfloor to dry. The next step is to clean the surface of the plywood covering from dirt, dust and glue residues.
Only after thoroughly sanding the plywood floor should you begin laying the base with glue. The optimal adhesive option is a two-component polyurethane adhesive composition.
Experts recommend using a small notched trowel to apply it. It is important to remove excess glue on the board planks using acetone.
If the product was purchased with a locking system, then additional fastening with self-tapping screws is not required; glue is sufficient.
The absence of a connecting system must be reinforced with self-tapping dowels.
This type of board is placed in rooms with low traffic. All installation work must be completed at least 3 days before operation. During this period, according to professionals, the floor will level, dry out and acclimatize to new conditions.
Floating installation
The floating method of laying building materials with your own hands is the installation of lamellas by connecting only to each other. The products are not attached to another base, but are supported using fastening locks.
It is recommended to use a concrete base, plywood, and mount it on a substrate. It is advisable, according to experts, to use such a floor in small rooms with minimal loads.
There are no special instructions for this method of laying engineered wood. It is important to be guided by general recommendations and follow the basic rules of preparatory and installation work.
An important technical nuance is that a floating floor can become deformed due to sudden temperature changes. Often this consists of the formation of cracks or cracks in the still relatively new lamellas.