In the process of building your home, it is important not only to do everything efficiently and reliably, but also beautifully. You will spend a lot of time in your home and you want a comfortable and cozy atmosphere to promote relaxation and good mood.
Therefore, almost all homeowners pay maximum attention to the interior decoration of the premises. Those who prefer a soft and natural interior and have used wooden material for decoration, for example, imitation timber, should know that such a product requires proper care and processing, for example, painting or varnishing.
Why paint imitation timber inside the house?
Imitation timber needs painting, since this material is very vulnerable to external factors . If you cover a facade with imitation timber, then it needs to provide increased operational and protective properties. As for the interior decoration of rooms, there are no such requirements for products.
Painting is often used if it is necessary to give the surface of the imitation timber a specific color. But despite the fact that the conditions in which the material is used are not as aggressive as in the case of external finishing, it is still recommended to process the product.
If you do not want to purchase a composition with a colored pigment, then you can use transparent paints and varnishes . With their help, the wood material will acquire sufficient protective properties that will prevent it from drying out, cracking and loss of appearance.
It is also important that many compositions intended for treating wood provide good vapor permeability of the entire surface.
IMPORTANT!
Imitation timber is a breathable material, which means that moisture will not accumulate inside the room.
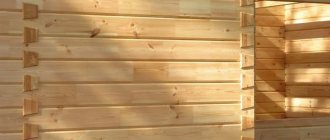
Concept of simulating decks
The most common “imitation lumber” is lining that has been pre-treated and creates the illusion of a wooden lumber structure.
This finishing method is equally applicable to wooden, brick and concrete buildings.
In order to form a substructure, linings of the same size range are fixed to a pre-installed sheathing in a clearly established manner, after which the structure is covered with specific mixtures.
In the production of lining, coniferous wood is often used: pine, spruce, larch. Variations of the species used allow consumers to choose cladding in accordance with quality and aesthetic requirements, financial capabilities, defining priorities before painting the interior decoration.
Types of paints - how to paint boards in the interior
Basically, to paint imitation timber inside a house, paints intended for facade work are used. If we consider such compositions from the point of view of painting the surface inside, we can say the following:
- The oil type of paint is used indoors and has sufficient protective properties . It should be remembered that the drying of a surface covered with an oil-based type of paint coating takes quite a long time. The paint also emits a sharp, unpleasant odor that takes a long time to dissipate. It is better not to use this composition for children's rooms;
- alkyd paint will give the surface not only the desired color, but also provide additional protection for the material;
- The acrylic variety of compositions is more suitable for covering imitation timber on the facade of a house. This is explained by the fact that it is characterized by high protection properties, reliability and practicality. With its help, you can carry out treatment indoors, however, such high requirements for paint and its performance characteristics for interior decoration are not imposed.
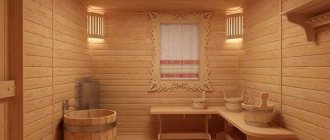
As for transparent coatings, there is a wide range of compositions designed for painting imitation timber indoors . The use of varnishes or impregnations intended for facades is recommended for rooms with more aggressive and non-standard conditions, for example, for a bathhouse, sauna, swimming pool.
For interior painting of imitation timber, it is best to pay attention to water-based paints, since such materials have a high level of environmental friendliness, which is ideal for residential premises.
NOTE!
In the process of choosing the most suitable composition for internal painting of timber, you must first of all pay attention to the environmental friendliness of the materials.
Textured painting
Textured painting can be applied to plain walls.
Several options are possible:
- The surface relief is created by processing with a wooden brush. It is carried out several times along the direction of the wood fibers. Soft fibers are destroyed, hard fibers remain, this makes the surface more textured after the destroyed particles are removed from it with a soft brush. After this, apply a layer of paint and varnish (if desired).
- Bleached wood effect. The relief surface is created in a similar way, but one more component is added - white glaze. It is applied to a surface treated with colorless varnish, and the excess is removed with a soft sponge. Thin gaps between the fibers become white, and the relief elements retain their natural color.
- Artificial aging of the surface. This work is carried out mechanically: a lot of intentional damage to the surface is done, for example, using a chisel to create chips in different places. To make the damage look natural, skills are required to perform this work, so this method is rarely used.
Please note: Technology for painting concrete ceilings
Colored or clear coating
When approaching the question of choosing a colored or transparent composition for painting imitation timber inside a house, it is better to start from your own desires or the general design of the room.
Regarding the protective and practical properties, the compositions do not differ much from each other. To impart a specific color without preserving the natural texture and pattern of wood, pigmented wood paints are used.
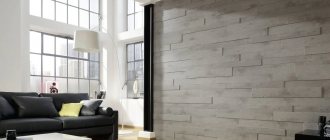
If there is a desire to preserve or show the naturalness of imitation timber, then use transparent compounds.
In addition to a suitable transparent paint coating, a special technology for coloring the wooden material is used to reveal its natural beauty.
If there is a need not to repaint the wooden surface, but only change its tone towards dark or light, then use glazes. This transparent composition is also used to create an antique look of wood.
Considering that you have to choose a material for painting the interior surface of a house, finished with imitation timber, from transparent and opaque compounds, it is worth remembering that the painted surface of the wood does not need subsequent varnish treatment.
Paint is an independent composition that provides all the necessary practical properties and gives the appropriate color to the surface. Varnish acts similarly to pigmented paint, but without imparting color to the surface. Therefore, it is not advisable to use both types of compositions.
Technology of work execution
The work of painting wooden imitation timber is not difficult, so it is not necessary to invite specialists to complete it; everything can be done with your own hands.
This process consists of several stages:
- applying an antiseptic;
- application of a protective composition (pinatex);
- applying the finishing coating (varnish, paint).
Although this sequence of work requires additional costs, the coating is reliably protected from the negative effects of external factors, has a beautiful appearance and its service life will be at least 5-8 years.
Most craftsmen indicate that it is better to paint the panels before installation, so you can paint them better. If you paint an already finished wall, then over time the seams will come apart a little and the unpainted areas will be very visible.
For additional protection of the wood, it is recommended to treat it with a primer before painting it. The material is often processed using an iron brush, that is, the surfaces are “brushed”, thus removing the soft layer and exposing the structure of the wood.
After such treatment, the composition penetrates deeper into the wood and therefore protects it more reliably.
You can carry out visual aging of wood, but for this you need to have certain skills, so a beginner will not be able to cope with this work on their own.
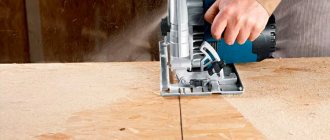
To apply impregnations and paints and varnishes, use a brush, roller and spray gun. The next layer is applied only after the previous one has dried well.
To perform the above work, you will need the following tools and materials:
- tools for applying paint: brush, roller, spray gun;
- personal protective equipment: work clothes, glasses, gloves;
- container for the compositions used;
- consumables: primer, impregnation, paint, varnish;
- ladder;
- masking tape.
If you plan to use a spray bottle, make sure you have an electrical connection.
If we talk about the technology of painting the outside and inside of the building, it is almost the same. The main difference will be in the materials used for this.
If when treating walls outside, it is convenient to do this with a spray gun, then indoors, it is better to work with a brush and roller. Using a roller, smooth surfaces are treated, and with a brush, they paint in hard-to-reach places and the joints between elements of imitation timber.
Surface preparation
Before proceeding directly to painting work, it is necessary to prepare an imitation of timber for this process. The following recommendations will help you prepare the tree:
- Initially, it is necessary to remove a small layer of material from the surface of the beam . To do this, the surface is sanded and polished;
- Afterwards, it is necessary to ensure maximum cleanliness of the surface . Remove all dust from it using a slightly damp cloth or vacuum cleaner;
- if further treatment of the surface with an opaque composition is planned, then you can walk over the imitation timber with a stiff brush and make small indentations in the wood. They will emphasize its naturalness, in combination, for example, with varnish;
- after such measures, they begin to apply antiseptic preparations and impregnations that protect the wood from rotting processes . This is especially important to do in rooms that are characterized by high levels of humidity, for example, in the kitchen or bathroom;
- in some cases, they resort to priming the surface. Such an event will improve the adhesion properties of the base material with the paint and varnish composition;
- After impregnation with such compositions, wait some time, allowing the surface to dry, and begin the painting work itself.
Treatment of unpainted wooden surfaces
Often wooden surfaces are not painted, because the natural structure of the wood, veins, knots, is already a decoration that gives the house a unique flavor. The following materials are used for processing:
Antiseptics. Used to protect wood from fungus and mold. Timber structures are also treated with such compounds so that they are not damaged and last longer. PAF-LST and “Ultra” have proven themselves to be excellent. Experts talk about the possibility of preparing an antiseptic with your own hands, using machine oil and copper sulfate.
Wood is a moisture-loving material, so it is necessary to protect it with antiseptics Source tr.decoratex.biz
Bleaches. They restore the beautiful appearance of wood, which it loses during storage, and in the same way as antiseptics protect wood from rot and fungus. There are two types of bleaches: chlorine-based and hydrogen peroxide-based bleaches.
Watch how the materials from which your house is built are stored. Stacks of wood should be well ventilated.
Waxes for timber. They have gained high popularity recently as an environmentally friendly way to protect wood. They are distinguished by their natural composition. It is based on beeswax, which forms a protective film on the surface of the wood.
Varnishes for wood. Varnish is an opportunity to preserve the beauty of wood for many years. Varnish for interior decoration of a wooden house, usually used water-based.
Yacht varnish has excellent protective qualities.
Any of the varnishes is applied to a clean, dry surface. First, the corners and joints are varnished, and then the entire remaining surface. All work with varnish must be done wearing protective gloves and a respirator.
Indoor paint application technology
The number of layers required for interior painting of wood inside a house is two or three. If staining is carried out in only one layer, then after a year you will have to repeat the entire staining procedure again.
The dyeing process is as follows (photo below):
- the first thing to do after preparing the surface is to dilute the coloring composition in a clean and sufficiently large container;
- this must be done in compliance with all specified proportions in order to obtain the desired color (using tinting) and consistency;
- after that, having chosen a tool for painting (it can be a brush, roller or spray gun), they begin to apply paint to the surface of the imitation timber (you should start from the ceiling);
- It is best if you choose a brush for work, do not dip it entirely into the composition and do not pick up a large amount of the composition at one time . This will lead to unevenness of the layer and drips, which are quite difficult to eliminate afterwards;
- The paint is applied to the surface in as thin a layer as possible . During the process, you should control the uniformity of the surface coverage, carefully paint over everything, even hard-to-reach areas;
- after the first layer has completely dried (the drying time for each composition is individual, indicated on the packaging), you can begin the second stage of painting;
- The second layer is applied in the same way.
Secrets of decorative wood staining: techniques and tricks
The embodiment of different ideas when decorating lining can be done using all sorts of methods. The most popular coloring techniques are:
- Bleaching. In this case, acrylic paint or a special stain is used for application. It is necessary to paint in a thin layer. After the substance dries, oil is applied on top of it. Any excess should be removed immediately. If the surface is additionally rubbed, you can get a beautiful and pronounced wood grain.
- Brushing. This technique is suitable for decorating soft woods that are easy to work with. It involves removing the top layer of the lining using a brush. After this, the surface should be sanded and painted with stain.
- Application of paraffin. In this way you can get the aging effect, popular in styles such as country and Provence. The surface of the lining is slightly worn. For this treatment, paraffin should be applied in a thin layer to the base, and this is done unevenly. After the substance has dried, the lining is patinated. When the paint dries, the paraffin will have to be removed and the surface covered with stain.
- Patination. This technique involves the use of two colors that are similar in tone. One of them is applied to the base in a thick layer. After it dries, a second, thinner layer of a different color is applied to the surface. Lastly, the lining is processed with sandpaper.
If you take the advice of experienced craftsmen, you can significantly save money on repairs, for example: using complex paint and varnish compositions will allow you to achieve the effect faster, and the coating will adhere firmly. If possible, the material should be impregnated with a protective composition on all sides, and only then attached to the base.
Painting the lining will improve its appearance, change the interior, and highlight the natural beauty of the wood. But you should choose and apply the composition correctly. If wooden lining will be used in difficult conditions (temperature changes, lack of heating), then it is better to give preference to those materials that are resistant to external factors and do not require regular updating.
There is an opinion that oil paint should be used for lining. However, in most cases this is unjustified - such treatment will cause the surface to become unnaturally shiny, and the wood will finally lose its natural beauty. In addition, oil paint takes too long to dry and fades quickly.
The best option would be to use an acrylate paint coating. This product will renew the lining inside the house, preserving its decorative effect and protecting it from external influences. In addition, it allows the material to “breathe” and extends its service life by 8-10 years.
Applying varnish
In addition to the fact that you can apply varnish in the same way as paint, having previously treated the surface with an antiseptic, there is an option to make a more original decor for the timber.
It is especially good if a hard brush was used at the surface preparation stage:
- Initially, varnish is applied to the entire surface of the imitation timber in the usual way;
- in particular, pay attention and paint the recesses in the wood surface, which are made with a brush;
- after this layer has dried, it is necessary to remove a few millimeters of the surface using sandpaper or any other convenient tool;
- after this process, the varnish should remain only in the recesses of the wooden surface;
- after sanding, the surface is again cleaned of dust particles and the varnish is reapplied;
- when the surface dries, it will have a distinct and bright wood texture, additionally drawn with the first layer of varnish.
Recommendations from experts
If you decide to paint an imitation wooden beam yourself, then there is nothing complicated about it, you just need to follow the recommendations of experts and follow the developed technology:
- before making a purchase of all consumables, you need to calculate the required quantity so as not to buy too much and not to look for material if there is not enough of it;
- before carrying out work, first try on an inconspicuous area;
- while working, use personal protective equipment: mask, gloves;
- both surface preparation and painting must be carried out with equal care;
- Before using any material, be sure to read the instructions for its use;
- do not apply a thick layer of paint, as this will cause unevenness; it is better to apply several thin layers;
- It is better to carry out work in the warm season, when the air temperature is not lower than 10 degrees;
- Before changing the material and before applying each new layer, the tools used are thoroughly washed and dried.
Paint consumption of popular manufacturers, as well as drying time and thinner:
Types of coloring compositions for timber
Before starting painting work, it is recommended to select a color scheme and type of paint material. Paint for profiled or laminated timber should be selected taking into account the climatic situation in the region. In addition, in this matter it is necessary to consult a specialist. The main criteria that must be taken into account when choosing a paint and varnish material are its resistance to atmospheric or mechanical stress, service life and vapor permeability.
Transparent materials
This paint is also called the term. Its peculiarity is that such a solution does not hide the natural structure of the tree, but rather emphasizes its beauty. Such transparent paints are perfect for fresh rounded or log beams that do not have defects, cracks or dark spots on their surface. Of the transparent materials, the following compositions are most widespread:
Opaque paints and varnishes
These compositions are chosen if the design indoors or outdoors does not take into account the structure of the wood. Therefore, such paints have a specific color that can be selected in each specific situation. Opaque formulations are suitable for the following situations:
Today there are several types of opaque compositions:
Mistakes when painting a house yourself
Many people who decide to paint a wooden house themselves are perplexed as to why the coating turned out unsightly, and after a short time it peeled off and they have to repaint it again. Some blame it all on low-quality dye, but even the best paint cannot produce high-quality and beautiful paint when non-professionals take on the job.
Home builders often make many mistakes:
Due attention is not paid to preparing the house, sanding is carried out incorrectly, the painting process is disrupted, the temperature regime is not maintained during work, wet lumber is painted, materials that are incompatible with each other are selected.
All these errors affect the final result, which causes confusion.
Do I need an antiseptic?
There is no doubt that wooden cladding with imitation timber used outdoors needs protection from biological damage. On the façade there is always an increased danger of the material becoming wet, and this is the first step to the appearance of mold, rot, fungi, algae, mosses... After all, water is a breeding ground for pests of all types. And wood-boring insects on the street have a greater chance of settling into our false wall.
It should be noted that similar protection will also be required in the case of wall cladding in rooms with high humidity.
The question remains: is it worth impregnating the walls with an antiseptic after installing the imitation timber, or is it better to treat the material before fixing it in place, when it is possible to protect:
- The front surface
- Castle elements,
- The back surface
- The ends (in fact, this is the most vulnerable part),
- Wooden frame made from edged timber.
Treating wooden cladding with an antiseptic
In the provisions of the currently valid GOST 8242-88, we are told that not all profiled parts made of solid wood are subject to mandatory antiseptic treatment. Bioprotection requires treating the back surface of only the window sill board and only the floor board. And where protective and decorative treatment is present, biosecurity is not required according to this standard.
In principle, you can limit yourself to following just such instructions, especially when it comes to cladding walls inside a building. However, it is still better to treat the façade material with some kind of non-washable compound. For example, you can use antiseptic "Nortex®"-Lux. And if suddenly wooden surfaces already have some traces of infection, then it makes sense to treat them with a “treating” agent, for example, “Nortex®”-Doctor.
The main stages of painting profiled lumber
The main stages of painting internal and external walls made of profiled timber:
- Wall preparation (sanding and cleaning).
- Antiseptic treatment.
- Coating with protective paint and varnish material (2 layers).
For the convenience of readers, we present video instructions for painting a house made of profiled timber:
Painting the walls will not cause any great difficulties, the only thing is that it is a labor-intensive sanding process. For profiled timber, sanding begins with a P80 nozzle and ends with P220 - 240. The latter nozzles are also used between layers of the main paint to remove excess hairiness.
Internal processing can be carried out at any time of the year. Outdoor - only in dry times at temperatures above +5 degrees. When working outside, you can use a spray gun; inside, it is better to use a brush or roller. The entire structure from the walls to the floor beams must be covered with protective agents.
The cost of painting with your own hands starts from 120 rubles/m2 outside the house and from 170 rubles/m2 inside. Work with the material costs from 450 rubles/m2; for example, painting an 8X9 box on both sides in one layer will cost from 60 thousand rubles.
It’s worth getting down to work with your own hands only if you have enough patience and free time. You can make the task easier and order the walls sanded from professionals and paint them yourself. But do not forget that the internal coating must be smooth and without smudges, since the appearance of the rooms depends on this. If you are not sure that you can do this carefully, it is better to hire specialists.
Painting an old wooden house
Over time, the painted facade begins to lose its attractive appearance - the paint peels off, mold appears, and the south side fades more rapidly. Sooner or later, the external walls of an old country house will require updating. Before repainting, the old coating is cleaned (for example, with a wire brush), and the surface is inspected to identify possible defects.
To ensure that the new layer goes on smoothly and lasts as long as it should, choose the same type of paint that was used originally. A study of the texture of the old coating will help determine what the façade was painted with:
- Acrylate paint. Thin, elastic structure reminiscent of leather; You can roll a piece of peeling paint into a roll.
- Oil paint. It has a matte color and may leave marks on your fingers after touching. You won’t be able to roll the roll—the fragment will crumble.
Old walls need careful preparationSource color-kostroma.ru
An old wooden house is painted in the same way as a new one. The difference is that it is not recommended to paint the old facade with a roller; it does not fill the unevenness that appears after periodic swelling and shrinkage of the fibers with paint. To give the old façade a neat look, painting the log house can be done in three or more layers.