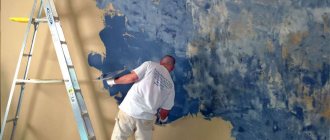
Many people are faced with a situation where after a while they get tired of the color of decorative plaster or a change in the interior of the room suggests that the wall should be a completely different shade. Sometimes the coating simply begins to age and stains and chips appear on it. Therefore, the question arises: “How to repaint decorative plaster? And is it even possible to do this?”
The answer to this question is simple: “You can!” There are several ways to do this. And to decide on the most suitable option, you need to study everything.
Methods for updating plaster
So, there are two main ways to update decorative plaster:
- Local repainting. This means that if there are unwanted spots on the wall that spoil the overall appearance, then only these areas can be repainted. This is not labor-intensive work and it does not require much time and effort. Also, with this method of restoration there will be no large amounts of dust and construction debris left. But this option is not suitable for everyone.
- Complete repainting of plaster. This method is suitable if the interior of the room has been radically changed and the old color of the walls does not fit into it at all. Or you just want something new. There won't be a lot of dust, but just in case, it's better to cover the floor and furniture in the room with protective film. As a result, the apartment owners will receive updated walls that will please the eye for a long time.
Paint selection
In order to choose paint for re-painting decorative plaster, you need to know two things:
- what paint was originally used;
- how much money has been allocated for restoration?
If the most common water-based paint was chosen for the initial painting of the plaster, and the budget for re-painting is small, then you can use exactly the same paint only in a different color.
If enough funds have been allocated for renovation work on decorative plaster, then better, more wear-resistant paint can be used. Acrylic-based façade paints are suitable. But, it is important to take into account the fact that when applying such paint, it is necessary to treat the walls with deep penetration primer.
KH-Rillenputz
Acrylic decorative plaster for facade and interior work. Forms a coating with a grooved structure, obtained by longitudinal, circular and transverse grouting with a plastic float. Weatherproof, water-repellent, resistant to harmful substances in the air, very durable, alkali-resistant, easy to apply. Diluted with water, does not pollute the environment, with little odor. It is tinted in volume on the Tex-Color MIX-Station computer station. Can be used as a topcoat in the Tex-Color B1 thermal insulation system.
| Density | ~ 1.8 g/cm3 |
| Consumption per m2 | |
| grain 1.5 mm | 2.3-2.6 kg/m2 |
| grain 2.0 mm | 2.8-3.2 kg/m2 |
| grain 3.0 mm | 3.8-4.2 kg/m2 |
| Color | White, matte |
| Drying time | Dry surface - 24 hours, complete drying - 3 days |
| Packing | Plastic bucket 25 kg |
Technology
In order for the paint to adhere well to existing painted plaster, the first step is to ensure the room temperature is +20°C. Temperatures that are too low or too high will have a negative effect on the work result.
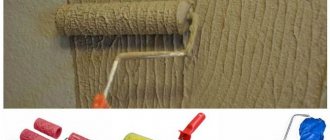
To apply paint, you can use a long-nap roller or a spray bottle with a compressor. Experts recommend a roller. Because it distributes the paint more evenly over the wall surface. But they must work very quickly so that the drips do not have time to dry. It will be quite difficult to fix them.
And the main thing to remember is that in any case it is necessary to take into account all the nuances and be careful. Then the result will delight the eyes of the household. In addition, you should not skimp on the material, because if the paint is too cheap, it will be visible to the naked eye.
Decorative plaster is gaining popularity among all other materials for painting walls. The main advantage of this material is durability and quality for many years, a wide selection of colors and textures. But, after some time, you will still need to update, refresh the plaster, and make the walls more attractive. Many people reuse paints, believing that this way they can economically retouch the surface. Experts do not advise doing this. Below is a list of consequences of such painting:
- Loss of paint density and the structure of the walls.
- Sloppy and untidy appearance.
- Peeling of the coating.
Tool
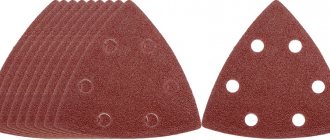
To work on decorative plaster, in addition to the usual plastering tools, you will also need a special one: textured rollers, stamps, a rubbing sponge, see fig. A set of notched spatulas wouldn't hurt either, especially if the design is going to be a modern clone.
Tools for decorative plaster
Rollers and stamps must, firstly, be soft-elastic, otherwise the result will not be a unique relief, but rolling with a roller. Secondly, they should not stick the mixture. For constant use, it is better to get rollers with Teflon or polyester coating - they are durable. For one-time amateur work, it is better to purchase cheap polyethylene ones.
Special mention needs to be made about rubbing sponges. The luxury finish is still rubbed with natural sea horn sponges; They go on sale as “coral”, although a sponge is not coral at all, and is expensive. Two types of horny sponges are obtained: toilet sponge and horse sponge. The first one is softer and is used for finishing grouting, and the second one, rougher, is used for rough grouting.
However, practice shows that horny sponges can be successfully replaced by an ordinary two-layer kitchen dish sponge. Its hard fibrous side is used for rough rubbing, and the soft foam side is used for finishing. A kitchen sponge on plaster wears out very quickly, but it also costs pennies.
Why you should not repaint decorative plaster
Let's look at the reasons why this happens. Here are the main ones:
- Incorrectly selected brush or roller for painting.
- Change the type of paint.
- Violation of texture and structure.
If the owner does the repairs himself, most likely he chose the wrong brush for painting. If the brush is too narrow, the paint will not apply evenly. Rollers with short bristles can make a pattern too thick and rough, ruin an existing one, or simply hide it. The grooves in the plaster remain the same color, and the design loses its beauty. When choosing a radically different paint, you need to pay attention to the combination of these two colors, since sudden changes in color will definitely play a cruel joke and the walls will turn out gray-brown-crimson, unpleasant and unkempt in appearance.
If the walls are painted with oil-based paints, then when repainting with water-based paints, it is better to completely get rid of the previous layer, otherwise the wall will peel off and the plaster will fall off in the near future. The disadvantages of this type of painting are that it cannot be used in rooms with high humidity. In addition, this coating takes a very long time to dry, approximately 2-3 days.
Water-based paints dry quickly enough and are easy to apply to walls. But here you can’t guess with the shade. After all, when drying, the paint becomes 3 tones lighter. Acrylic paints are considered the most suitable for decorative processing. They dry very quickly, making them more difficult to apply. Correcting mistakes is much more difficult if the paints dry quickly, decisions need to be made quickly. Therefore, it is worth removing the old plaster, making a new layer, and applying a primer.
Required tools and safety precautions
Painting plaster walls is not a difficult task. You can apply the raw material yourself without any skills. Almost all the tools are named above. The main requirement is serviceability.
They are usually the cause of injuries. For large volumes it is beneficial to use a spray gun.
But more often these are simpler tools: roller, brushes. The roller requires a tray. For operations at height, a stepladder is useful. After finishing work, the paint must not be allowed to dry on the working surface of our tools. How to beautifully paint the walls in a kindergarten group?
Avoid contact of material with eyes and skin. Painting decorative plaster will require the use of gloves, glasses, and special clothing.
Additional Information:
After drying, facade paints create a durable film on the surface of the plaster that is resistant to precipitation and temperature changes. They are often sold in white and are tinted in accordance with the manufacturer's shade chart. The consumption for textured plaster is slightly different.
For example, for acrylic paint it will be 0.17 - 0.2 kg/m2 when applied in one layer. For silicate - 0.15 - 0.3 l/m2
You are probably familiar with the “bark beetle” effect. To achieve this, you need to use a short nap roller. This will leave grooves where the paint did not get in, which will create the pattern.
You can experiment carefully and enhance or weaken this effect by adding a coloring pigment to the composition and repainting the walls. But this is just one of the common two-tone painting options.
You can use other combination options. For example, a second coat of paint can be used to give walls a shine.
But, this is just one of the common two-tone painting options. You can use other combination options. For example, a second coat of paint can be used to add shine to the walls.
In this case, you will need a bronze coating or, for example, silver.
This technique is a little more complicated and is suitable for relief plaster. In this example, we will tell you how to paint decorative plaster in two colors. To begin with, the entire surface is treated with one color, it is called the base color. Then you need to wait for it to dry, usually at least 2 hours.
After they have expired, a second layer of paint is applied to the protrusions with a brush, one tone or half a tone lighter. A minimum amount of it is collected on the brush, and the protrusions are processed. This way the wall can be given volume.
A more complex effect or so-called “relief coloring” can be obtained if, on top of a darker “base” layer that has dried for at least 2 hours, a material of a different shade is applied to the relief protrusions, usually lighter by half a tone or tone. To use this technique, you will need a brush or roller with short bristles, onto which a minimum amount of material is collected (the so-called “dry brush” technique). The technique of relief poering allows you to give the surface greater “volume”.
By the way, experts recommend immediately tinting the paint when purchasing it in a store using special machines and color inserts. The fact is that if the material turns out to be insufficient or in the future something needs to be corrected, repainted or repainted, then you can always buy paint of the required color by number.
Advantages of decorative compositions
Plastered and painted walls have a lot of advantages. All this is due to the quality characteristics of decorative compositions. This decorative finish is:
- Beautiful. Plaster takes on an attractive, aesthetic appearance. To paint walls, you can use absolutely any color, combine shades to get the desired effect.
- Reliable. The service life of decorative finishing is quite long. This cladding is suitable for both interior and exterior work, as it is resistant to different types of impact.
- Safely. The compositions are made from environmentally friendly raw materials and are therefore absolutely harmless to humans.
Decorative plaster can be easily painted, which allows you to change its appearance if necessary.
Choosing a dye
In some cases, it is more advisable not to paint the plastered surface, but to apply decorative plaster with an already selected shade. To do this, pigment dye is added directly to the plaster mixture.
Tinting must be done on the entire composition at once - otherwise it will be difficult to choose the same shade for re-preparing the composition. For example, for cement plaster you can use any concrete dye, but for a polymer mixture it is recommended to use an acrylic-based color.
A simple way is to add a universal dye to the plaster mixture.
When purchasing dyes for plaster, it is recommended to pay attention to the packaging labeling, which will indicate what kind of work the color is intended for (interior or exterior decoration), what type of plaster (for concrete, polymer, gypsum, cement).
Classification
There are two types of decorative plaster, depending on the effect achieved. There are structural and textured compositions. The former form a relief surface, the latter – smooth, imitating natural materials.
Structural compositions
Structural plaster contains granules or other particles, which make it possible to achieve the required texture. Depending on the filler used, in turn, its subspecies are distinguished, for example, bark beetle, fur coat plaster or rain. The size of the granules and their type affect the final result, but the method of applying the composition is also of great importance. For this, various devices are used: rollers, stencils, special stamps, etc.
In the modern market, structural compositions are usually sold in gray or white colors. Using coloring you can give the desired shade. You can paint the plaster yourself. Depending on the chosen technology, it is possible to achieve a deep, bright color or a discreet and calm one.
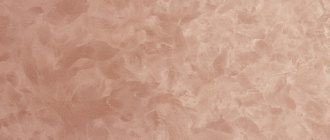
Venetian plaster
Textured compositions contain particles of natural origin. It is due to them that it is possible to obtain the effect of amber, malachite, jade, etc. The walls look as if they were decorated with slabs. A special application technique helps make the effect brighter.
Usually the plaster already has the required shade. You can also paint textured plaster yourself. This will allow you to achieve an unusual color or highlight individual details.
What is tinting?
Tinting is the process of adding color to the base composition, which can be either the plaster itself or white (light-colored) paint. The unpainted mixture can be tinted yourself or in a store, where the shade is selected based on color palettes. This option guarantees a uniform tone and a complete match to the color of the sample.
Tinting using an electric drill
Fast Forward TIP: if you need to tint a mixture for plaster, use color paste and pigments, not ready-made paint. This is cheaper and more reliable, because the composition of the paint can affect the physical properties of the plaster.
To give your own shade of paint you need:
- Prepare the base.
- Add a few drops of color. The labels of dyes already have a color scale with proportions, according to which the saturation of the shade is selected.
- Mix the composition until the pigment and base are completely combined.
- Make a few shadings on white paper to see how the color changes as it dries.
Exclamation Triangle IMPORTANT: it is worth remembering that adding a tint of one color will ultimately result in paint with a “poisonous”, chemical tint. For a more natural and stylish result, you need to take 2-3 colors and mix them in different proportions, adding additional colors for depth.
For example, ocher for a warm tone, or black for depth. When tinting, rely on ready-made pigment mixing tables and special color palettes.
One color
This is the easiest way to paint plaster - in one pass. The paint is applied evenly with a roller or brush. Suitable for smooth and shallow surfaces.
Interior in the hallway with decorative plaster
When working with a brush, the paint is applied first with horizontal strokes, and the next layer - with vertical strokes. Using a roller, begin painting from the bottom up. Each stroke should cover the previous one by 5 cm. The final layer should be well shaded. This way the surface will remain smooth, evenly colored and without smudges.
Two or more
This method is good for both smooth and textured plasters. As a rule, the lightest color is chosen as the first layer of paint. The top one is dark or with a metallic effect. Stages:
- Apply a base color to the wall.
- Pick up some paint on a sponge or roller. After rolling, remove excess.
- We go over the protruding parts so that only the first color remains in the recesses.
At the end of the work, you can use azure or decorative paints to give expressiveness to the surface.
Decorative plaster with metallic effect
Dry brush technique
The essence of the technique is to work with an almost dry brush, onto which a little paint is applied. Only the relief is painted, and the main area remains the original color. Sequencing:
- The initial painting is carried out in one color.
- Paint is applied to the brush. Remove excess from the sponge.
- We move along the surface, lightly touching it with bristles.
Dry brush technique
Depth is created by layering colors. This technique is universal and is used to imitate natural stone, aged surfaces and in combination with other techniques.
Chemical composition
Decorative plaster can be made based on minerals or polymers. Depending on the chemical composition, the following categories of polymer mixtures are distinguished:
- Silicone. Ideal for exterior decoration. They are distinguished by high water-repellent ability, resistance to atmospheric influences, and have a long service life. At the same time, their cost is also quite high.
- Acrylic mixtures. A universal option for interior and exterior decoration. They tolerate exposure to ultraviolet radiation and moisture well. At the same time, they belong to materials of the average price category.
- Vinyl. Provide maximum protection of plaster from the development of pathogenic microorganisms. Resistant to moisture and sunlight.
There are oil and alkyd compositions on the market. They have lost their popularity due to the fact that they provide poor vapor permeability and do not allow accumulated moisture to escape.
Mineral mixtures usually contain either cement or gypsum. Depending on the raw material, the color of the finishing material will differ. While cement mortars are often used for exterior finishing, gypsum mortars are only suitable for interior decoration, as they do not tolerate dampness well.
What paint and what kind of plaster can be painted
The quality of repair is determined by many factors. Chief among them is the type of finishing material. Therefore, we will list everything that can be used to paint plaster. Manufacturers offer paints and enamels for painting gypsum and cement plaster.
Paint is a composition with a consistency similar to sour cream, made from a binder, coloring pigments and solvents. Solvents can be aqueous or non-aqueous. Water-based paint is called water-dispersion or “water-based” - it’s simpler and clearer.
It has a durable, elastic film that allows vapor and air molecules to pass through. That is, the wall “breathes” under such paint. This is a big plus of the finish. The solvent for non-aqueous coloring materials is drying oil. The paint itself is called oil paint. After application it creates a durable, vapor-proof film. And this is a minus.
Enamel is a mixture of pigments, volatile resin fillers ground with various varnishes and special solvents (white spirit, acetone, etc.). The painted surface becomes glossy, almost mirror-like. Plaster coated with enamel is durable, perfectly resistant to ultraviolet radiation and moisture (you can paint the bathroom).
The paint binder can be several types of materials:
- cement (slaked lime) - mineral paint;
- acrylic - acrylic;
- liquid glass - silicate;
- silicone - silicone;
- latex - latex.
Mineral dye
Mineral paint is the cheapest type of dye. It fits perfectly not only on plaster, but also on brick, drywall, stone, and wood. Disadvantages: short service life - fades quickly, is afraid of moisture due to high hygroscopicity. Therefore, you cannot paint an open balcony with it - rain will quickly destroy the paint layer.
Acrylic
Acrylic-based dyes lead in sales volume. And this is not surprising. For finishing material:
- long service life;
- the ability to hide minor defects in the plaster layer, thanks to acrylic resins in the composition;
- high strength;
- ability to withstand any changes in temperature and humidity.
The downside is low vapor permeability.
Silicate
Liquid glass as a binder gives the paint unusual properties:
- retains original color under ultraviolet rays;
- operational life of more than a quarter of a century;
- resistant to temperature changes;
- not afraid of high temperatures - protects against the spread of fire in case of fire;
- does not provide a basis for the development of mold and mildew;
- easy to clean from any dirt.
Another plus is the affordable price.
However, significant shortcomings reduce sales growth. Among them:
- complex coloring;
- lack of plasticity - most of all dyes emphasize the slightest imperfections in plaster;
- poor adhesion to porous and loose materials;
- fear of moisture and frost - garage, basement, bathtub, balcony are not included in the list of objects for possible use.
Silicone
Silicone-based dye is the latest achievement in the paint and varnish industry. The paint has no drawbacks, except for the high price. But for good quality you need to pay accordingly. Advantages:
- excellent vapor permeability while being waterproof - steam molecules penetrate the paint layer, but water does not;
- good elasticity and plasticity, due to which microcracks are healed;
- high resistance to various types of mechanical stress;
- durability;
- high aesthetic characteristics, etc.
Latex
Latex-based dye is ideal for decorative plasters - it emphasizes the surface relief well. Dries quickly. Not afraid of moisture. Does not contain harmful components. Consumers are confused by the high price and difficult application due to the dense consistency - it is very thick and cannot be diluted.
In addition to the above criteria, the paint may differ from each other and in special effects. The following compositions can be found on sale:
- under the sand;
- velvet;
- silk;
- cotton fabric;
- stone;
- Venetian plaster;
- metal (metallic);
- chameleon paint, etc.
How to choose the right paint
The choice of coloring agent depends on where exactly it is used.
Interior and exterior work requires the use of various materials:
- Painting plaster on a facade is usually done using acrylic, silicate and silicone paints. With their help, it is possible to give an attractive appearance, while providing reliable protection of the walls from atmospheric influences. This paint is sold mainly in white; the desired shade is given by adding color. Facades are most often painted in one color, sometimes they resort to combinations.
- Painting decorative plaster indoors is often done using water-based compositions. They are applied in two layers to paint the walls in one color without differences or streaks. If you need to paint plaster in the bathroom or kitchen, where the humidity is quite high, then it is more rational to use acrylic or latex paint.
Types of paint for facades
Before starting work, you need to understand how to paint the walls of the building. The future coating must not only perform decorative functions, but also provide protection. Before starting work, all facade surfaces that will be affected by processing must be primed.
The primer will provide additional protection and improve the quality of paint adhesion to the surface.
The paint for decorative plaster must be impervious to water, the pigment must be resistant to ultraviolet radiation, as well as temperature changes.
An important point: if the composition contains fire retardants or antiseptics, this will also be a plus. Fire retardants prevent the coating from catching fire, and antiseptics prevent the growth of mold bacteria, which can cause rot.
Among the many varieties of paint, the following types are most suitable:
- Silicate. The basis of the composition is potassium glass in liquid form; this glass forms a coloring layer that does not absorb water from the outside and does not allow it to pass through from the inside.
- Alkyd compounds are also not afraid of water, but at the same time they take a long time to dry.
- Acrylic paints can have different compositions. Any type of decorative plaster can be used for exterior painting.
- Silicone compounds have all the advantages that are listed above and do not have any disadvantages.
- Oily. Now these compounds have begun to be abandoned due to the emergence of other, better compounds. But at the same time, oil paints are also an excellent option and combine all the advantages that they should provide. There is one downside: it takes a long time to dry.
Also, various pigmented compositions with antiseptics can be used. It makes sense to use such compositions when painting decorative plaster in two colors. First, an antiseptic composition is applied to the entire surface of the wall, and then the protruding part of the plaster, which creates the texture, is painted.
Some compositions can be pigmented independently, this, on the one hand, is a definite plus. This way you can create your own shade. But the downside is that one bucket of paint is unlikely to be enough for the entire facade of the house, which means getting a second identical bucket of the same shade will be very difficult, and sometimes even impossible.
Review of popular manufacturers
There are many manufacturers of paint and varnish products on the modern market. Typically, a company's product line includes several types of paints, including those for painting plaster. The most popular manufacturers today are:
Tikkurila . The products of this brand are distinguished by their performance characteristics. The paints have good vapor permeability, are not susceptible to ultraviolet radiation and dirt, and are absolutely safe.
The only drawback is the high cost of production.
Belinka . The Slovenian brand has an impeccable reputation and constantly introduces new technologies. Automation of the production process makes it possible to produce products of identical color in each batch.
A nuance of using manufacturer’s paints is considered to be strict requirements for the preparation of walls, since if they are violated, the compositions may peel off from the base.
Finncolor . Has a long service life without changing external qualities.
It resists adverse weather conditions and is not susceptible to the development of fungus and mold, therefore maintaining high technical and aesthetic performance.
Alpina . It is often used when painting decorative plaster because it is very easy to use.
It allows you to achieve the ideal surface color, repels moisture, does not prevent steam from escaping from the inside, and is not susceptible to the formation of pathogenic microorganisms.
Dulux . The brand is known all over the world. Offers the richest palette of shades, among which it is easy to find the right option.
It is distinguished by ideal quality of the European level, which is confirmed by relevant documentation and inspections.
There are many other domestic and foreign manufacturers offering their products. Before you decide, you should carefully study all the characteristics of the paints, as well as the reviews and reputation of the manufacturer.
How to calculate consumption correctly
Correct calculation of paint and varnish material is a guarantee of savings. This indicator depends on many factors. First of all, it is worth noting that each type of paint and varnish material has a specific consumption:
- 1 l. acrylic paint per 8 m²;
- 1 l. water-based composition for 8-18 m²
- 1 l. oil for 10-20 m².
This is a maximum that is rarely achieved. It is reduced mainly by the quality of the surface being painted. Consumption is indicated for perfectly smooth walls. Structural plaster will require more paint. Its consumption can be reduced by using a spray bottle rather than a roller and brushes for painting.
An important nuance when calculating consumption is also the thickness of the paint. If the composition is too thick, it is recommended to dilute it slightly with a special solution. Taking into account the above points and knowing the surface area, you can easily determine how much paint is needed to paint the plaster.
Plaster painting technology
When starting work, you need to make sure that the walls are completely dry - applying paint to wet plaster is not allowed. You can paint with a brush, roller, or spray gun. The technique of applying paint in each case is worked out to the smallest detail.
Brush
The most ancient way of painting surfaces is with a brush. Simple, but long, with not the best quality. And the 5% increase in paint consumption is also against the technology (paint losses occur due to splashes and drips flying in all directions, which after grouting turn into a thicker layer of paint).
The step-by-step algorithm looks like this:
- Before starting work, the flywheel (large) and small brushes are soaked. Wet wood of the handle holds the bristles more tightly - less of them remain on the wall along with the paint;
- The paint is poured into a small container - it’s more convenient to work this way. If factory containers are used, the water-based emulsion must be stirred every 30 minutes to maintain the color tone;
- the brush is lowered into the paint by about 1/3 of the bristles, after which, with light blows on the edge of the jar (bath), the excess paint taken up by the bristles is removed;
- a thin vertical stroke is applied from the upper left corner. The swing hand (maklovitsa) is held almost at a right angle to the wall. The pressure is weak;
- using zigzag movements, the vertical stroke is shaded - this technique allows you to reduce the number of drips to a minimum;
- the brush is dipped into the paint again;
- a second vertical stroke is carried out in such a way that when shading the paint slightly overlaps the painted surface of the wall with the first stroke.
There is a simpler technique: the first layer of paint is applied with horizontal movements, the second with vertical movements, without shading. Here, omissions are eliminated, but the number of drips, and with them the paint consumption, increases.
Roller
When working with a roller, professional painters use 2 paint application techniques:
- W-shaped, when the roller goes vertically from bottom to top and descends at an angle. And so on one by one. The movements resemble the Latin letter “W”. You can start from any angle. The painting strip is about 50 cm. The stripes are applied with an overlap of 50-100 mm;
- strictly vertical movements from top to bottom. You can also start from anywhere. Each subsequent strip overlaps the previous one by about 5-10 cm;
The process itself looks like this:
- the roller is pre-wetted and then pressed as hard as possible with your hands - this makes it easier to saturate the entire surface of the tool with paint;
- paint is poured into the tray;
- the roller is lowered into the ditch and then rolled along the edges of the bottom until the entire fur is covered with paint. If this operation is not performed, there will be unpainted areas on the surface to be painted, the so-called “unpainted areas”, which are almost invisible on a wet wall;
- the roller is again dipped in paint, after which it is wrung out on the ribbed tray of the bath so that a small amount of coloring material is around the entire circumference;
- drips are removed with a used roller.
Life hack: if you need to continue work the next day, you can not wash the roller, but wrap it several times in cling film.
Novice painters are unlikely to suspect that the quality of the paint depends on the type of roller. But on sale you can find them made of foam rubber, velor and fur. Therefore, we will briefly tell you which roller is better to choose and how.
The painting tool consists of a handle, a rotating cylinder and a replaceable coat (see photo below).
This structure of the painting tool allows you to buy only fur coats. The speed and quality of painting work depends on them.
Foam rubber is a budget option for a fur coat. High porosity allows paint to be absorbed into it in large quantities. This is both an advantage - you can paint faster, without being distracted by constantly dipping the tool into a ditch, and a disadvantage at the same time: tiny air bubbles remain on the wall, violating the integrity of the paint film. After drying it is clearly visible.
Velours. Professionals do not like velor - the speed of work is the slowest. The reason is the small amount of coloring material on the roller - you have to constantly dip it into the bath. And for home craftsmen - a godsend: the paint is applied evenly and without splashing. The only problem is that it is difficult to find on sale.
Fur. For coats of paint rollers, natural and artificial fur are used. They behave the same at work. Another indicator is important here: the length of the pile.
- Short fibers generate a lot of splashes, which also fly far.
- Long ones like to come out of the roller and remain in the paint layer. They splash too.
- Medium pile is the best option.
Life hack: it is better to paint a rough surface with a lint roller - better color.
Spray gun
Now let’s look at how to paint decorative plaster with a spray gun. Technically everything is simple:
- water or a solvent is added to the paint - it should be more liquid, after which it is stirred and filtered through three layers of gauze (otherwise the nozzle may clog);
- a test painting of a foreign object is carried out, during which the supply of dye is adjusted;
- after stabilizing the jet, the nozzle is brought to the surface to be painted: vertically, at a distance of 30-60 cm. Painting speed - 1 m in 5 seconds;
The painting process starts from the top - otherwise there will be drips on the finished paint. You will have to clean it up, violating the integrity of the coloring matter. Paint in sections of approximately 1 m2.
Painting was carried out with a spray gun from bottom to top.
The speed of movement of the nozzle should be smooth. Delay leads to drips, acceleration leads to poorly painted areas. Ultimately, it’s better to underpaint. The next layer of paint will hide the defects of the previous one. The optimal number of passes is three.
Painting walls: choosing tools
All necessary equipment should be prepared first. If everything is at hand, the painting process will be much faster. To paint plaster you may need:
- Roller. It has different widths, pile lengths and materials. The size of the handle can be adjusted.
- Brushes. An important element that allows you to paint both the entire surface and individual elements and hard-to-reach places.
- Spray gun. Allows you to save costs and paint the plaster in one color as quickly as possible.
Different painting methods require different tools. It is also important to consider the type of surface and its structure. In addition, be sure to have tools for grouting and leveling the surface on hand. If, while carrying out the work , defects are noticeable, they can be quickly eliminated.
Technologies for painting decorative plaster
Painting walls inside and outside after plastering has many nuances. The procedure algorithm will depend on the chosen staining method. By choosing the right method for painting walls over plaster, you will be able to achieve the desired effect.
Tinting
This technology is suitable if you need to paint the plaster surface in one color. Using the color scheme, the color mixture is given the required shade by thoroughly mixing the composition. Thanks to this method, it is possible to obtain the same color over the entire surface, without contrast differences.
You can apply the paint in several layers, which will help improve the result and get a deep shade. Most often, this method is used when painting the outside of a plastered house.
Blur method
For structural surfaces, the technology of highlighting by blurring is suitable. It is relevant for carrying out interior work. To do this, you will need to walk over the surface with a roller or brush with diluted water-based paint.
After it dries, the protruding places are rubbed with a sponge. As a result, the color in the recesses remains untouched, and the relief elements will become lighter, which will create an original, discreet contrast and help place accents.
Painting in one color
A universal option that is suitable for all types of plaster. Painting can be done with any equipment. If a roller is used, then you need to paint with vertical movements, and remove excess paint or any smudges that have formed with a brush. This painting can be done with a long or short pile roller. The spray gun will allow you to carry out the procedure in the shortest possible time.
If you use a brush, you will need to go over the surface twice: vertically and horizontally. This will allow you to completely paint over all the depressions and protruding parts.
Dry brush effect
Before proceeding with such painting , the entire surface should be treated by painting in one layer or tinting.
Then the relief parts should be painted with a dry brush. The tone must be lighter than the main one.
Restoration of the coating
Sealing cracks inside the wall must be done with the same solution that was used before. First you need to clean the cracks from the previous finishing material for finishing and rough finishing and place a new, prepared composition. Please note that modern construction experts recommend using reinforced tape. It allows you to create a high level of adhesion and affects the quality of the created coating. If you decide to restore the plaster and want to “revive” it, then you should check all the walls for the quality of the layers. To do this, you need to walk over the coating with a wooden stick, that is, tap it. If you hear a dull sound, then replacement is required. It is recommended to clean the old layer in different ways, it all depends on the basis of the composition. A very simple way is to use copper sulfate. But this option is not always suitable.
Additional compositions for processing decorative plaster
To give a more attractive appearance, as well as provide additional protection, which will help extend the life of the plaster and paint itself, additional coatings are applied. The most common are:
- Lucky. They are characterized by a high level of water repellency, which helps protect the surface. This is especially true for the exterior decoration of plastered houses. With this additional treatment, the façade paint will have an attractive appearance longer and will be protected from damage. For exterior finishing, it is recommended to use organic-based varnish, and for interior finishing, acrylic-based.
- Wax. Such compositions also have excellent water-repellent properties. They allow you to add shine and gloss to the surface. This is especially true for Venetian plaster. It is important to apply wax to walls that are thoroughly cleaned of dust. Drying time is about 4 hours, which is quite enough to correct minor inaccuracies.
- Glazing glazes. They make it possible to achieve a smooth transition of colors. It is important to carry out work at a temperature of at least +10°C. Suitable for indoor and outdoor use. Apply wax compounds with special gloves or a sponge.
Glazes and wax are usually presented as colorless mixtures, while varnishes can be tinted to achieve a more expressive result.
Preparing the surface for painting
A dried plastered wall must be properly prepared before painting.
This is done for several purposes:
- reduce material consumption by clogging the pores of the decorative coating,
- ensure the coordinated work of the paint and plaster coating,
- create conditions for the correct application of varnish or paint, which ensures high quality and long service life of the finishing layer.
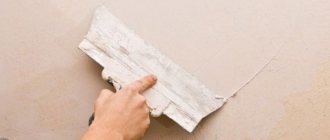
The surface of the walls to be painted must be cleaned of dust and small pellets left as a result of plastering. If the walls are smooth with a slight relief, they can be cleaned using a sponge or rag.
For more pronounced relief, these funds are not enough. It's better to use a vacuum cleaner.
The wall, cleared of dust, must be primed. Thereby:
- a primer composition that is cheaper than paint fills numerous pores of the plaster coating,
- roughness is formed, which is necessary for greater adhesion (adhesion) of the wall and the paint film,
- The adhesive substances of the primer additionally fasten the surface of the plaster and protect it from possible cracking.
Since the work involves dyes, you need to take measures to protect the floor and nearby areas of walls, trim, window sills and ceilings from drops and paint smears. The floor is covered with film, adjacent sections of the wall are sealed with masking tape.
How to paint decorative plaster with your own hands
Painting decorative plaster on walls with your own hands should be carried out strictly according to the algorithm. Only in this case is it possible to obtain an ideal result.
Surface preparation
Preparatory procedures are very important before painting, since paints and varnishes must be applied to plaster that is perfectly free of dust and debris. Since the plastered surface is most often embossed, it will be rational to clean it using a special vacuum cleaner. It will effectively remove dirt from the depressions. The second important preparatory procedure is priming.
Using a primer allows you to:
- reduce paint consumption;
- strengthen the surface of the plaster;
- provide improved adhesion of materials when painting.
When the primer layer has dried, you can begin the main process - painting.
Painting features
The application process itself will depend on the technology chosen. Regardless of the method of painting plaster, it is important that all parts are carefully painted, both raised and recessed.
For basic painting, it is better to use a roller; you may also need additional sponges and brushes. To paint a large surface area, it is better to purchase a paint sprayer.
When painting plaster, you need to make sure that the lint from the roller or brush does not remain on the surface. This may degrade the appearance. If the work is carried out outdoors, then you need to choose the right time and weather conditions so that particles of dust, debris, and pollen do not stick to the facade before the paint dries.
How to apply paint
To do everything right, the process is divided into three standard sequential stages: preparation, laying the primer and painting.
Preparation
Algorithm of actions:
- If the surface has previously been subjected to decorative finishing, then the old layer is completely removed.
- The general condition of the coating is assessed. Minor damage and cracks are covered with putty. You can paint a wall with textured paint even if there are minor defects and distortions, but they should not exceed 2 mm.
- If there are significant problems, the layer of plaster is removed and a new one is laid.
- Dirt and dust are removed and the work site is prepared. In order not to paint adjacent areas and other elements, they are sealed with masking tape.
The surface must be smooth and free of defects. If you want to enhance the visual effect, then the base is given the required geometry in advance. An example would be a small slope of a wall from top to bottom, which would be an excellent addition to horizontal straight or wavy stripes.
Applying primer
Priming is an important procedure that ensures reliable adhesion of the applied composition. The deep penetration solution is applied with a roller; all areas must be treated
The number of layers varies from 2 to 3; before applying the next coating, wait until the previous one has completely dried.
Applying primer is a mandatory procedure for any artistic decoration
It is better to choose a composition from a well-known and trusted manufacturer, this will guarantee a good result.
Coloring
To get beautiful textured walls exclusively with your own hands, you need to follow some rules, especially when using special texture compositions:
- The preparation of the solution is carried out exclusively according to the manufacturer's instructions. It is not recommended to dilute such mixtures, only if necessary, but the amount of thinner should not exceed 1-2% of the total paint volume.
- The surface is divided into conditional sections. Due to the rapid setting of the composition (15 minutes), the mixture should be applied to an area of no more than 2–3 m2. This will allow you to form the desired relief.
- The design is thought out in advance and the necessary texture is selected.
If any pattern is provided, then markings are carried out before applying the compositions
General painting technology:
- The base coat is applied first. A water-based acrylic composition is suitable for this. The need for such a layer is determined individually.
- Then the base is laid. Using a suitable tool, the desired relief is formed.
- After drying, the surface is covered with wax or varnish.
There are 4 basic ways to apply texture to a wall
You can simplify the work by inviting a partner who will be responsible for the texture or application of the composition.
To get an excellent result, coloring should be done in good lighting.
Expert advice
To achieve the highest quality results, professionals recommend:
- Do not paint plaster at temperatures below +5°C. The surface should be protected from moisture and sunlight until it sets, as this may cause staining.
- If the water-based or acrylic composition has become thicker during storage, it can be diluted with water to the required consistency.
- Usually, when adding color, the color in the container is brighter than on the surface, so it is better to immediately try the paint on a small area to assess whether the color you want is the one you want.
- It is better to start painting plaster from difficult places, for example corners.
- If the walls are painted in different shades, then the border areas should be taped with special masking tape to prevent surface contamination.
By following the rules for painting plaster, you can get an attractive look to the walls, which will not only look beautiful, but will also last a long time.
Tinting
The purchased plaster mixture, which has a white or slightly grayish color, is often tinted before use. This way, uniform painting of the entire surface of the wall is achieved, not only over the area, but also over the entire thickness of the layer. Therefore, even with scratches and small chips, the color of the plaster coating is preserved and minor defects are not so noticeable to the eye.
For tinting, one or more coloring pigments are added to the plaster mixture in the amount required to obtain the desired color. The mixture is mixed with a mixer.
As the plaster solution dries, it usually becomes lighter in color. Therefore, when adding color, it is advisable to check the color of the working composition with a test dye.
Tinting can be done in a store by selecting the color and pigment content using a computer program. It is advisable to prepare in advance as much plaster of the same color as is required for the entire surface to be treated.