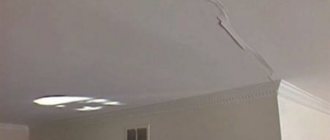
Cracks in the ceiling surface are the most common problem in older residential buildings. There are a large number of reasons why cracks form, ranging from mistakes made during the construction of a concrete frame and ending with the foundation. As a rule, in such situations there is no one to file a claim with, as a result of which you have to fix all the problems yourself. Repairing cracks in the ceiling is not as difficult as it might seem at first glance; it is enough to follow all the recommendations and carry out the work in stages.
What to do if there are cracks in the ceiling
If a gap is found, you must repair the crack in the ceiling yourself. First, you should close the doors to adjacent rooms to prevent dust from entering, and then begin cleaning out any cracks that may appear in the seams between the tiles. To make the work easier, it is recommended to pre-wet the surface.
After the surface has been cleaned and completely dried, you need to begin preparing the primer solution. The amount of solution applied depends entirely on the size of the crack formed.
As a rule, it is recommended to apply putty in at least 2 layers. A starting solution is suitable for the first layer; a finishing coat is excellent for small cracks. When working with the finished mixture, you need to understand that it must be applied immediately.
When all existing defects on the ceiling have been eliminated, it is necessary to remove all irregularities. If you subsequently plan to paint the surface, the work must be done as carefully as possible.
Causes of cracks in the ceiling
If we consider the reasons why cracks appear between the slabs, they can be divided into 2 groups:
- Features of a residential building. As a rule, the ceiling surface is not a monolithic structure; it includes several slabs made of concrete. It is impossible to make tight connections between the slabs due to the weight of the products and their far from ideal shape. As a result, small gaps remain between the slabs, which are sealed using rustication. As practice shows, over time the rust becomes unsatisfactory and has to be removed or repaired.
- Shrinkage of the building as a result of constant displacement of concrete slabs on the ceiling. Because of this, the existing gaps between the slabs widen, the finishing materials are damaged and cracks appear between the seams.
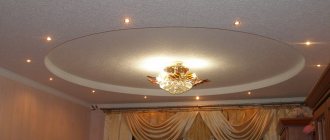
In such cases, it is not recommended to install suspended ceilings in the room, since there is a high probability that the frame or PVC sheet will be damaged.
What are the types of cracks in the ceiling?
Today, there are several types of cracks that appear on the ceiling between the slabs: structural and technological.
As a rule, structural cracks appear when a large load is applied to the ceiling surface, which exceeds the maximum permissible. The cause of deformation can be a strong impact, heavy equipment, explosion, or earthquake.
If we consider structural cracks according to their dynamic state, we can distinguish 2 types:
- developing - cracks between the seams of the tiles are constantly increasing, as a rule, they appear as a result of incorrect installation work or when the building is exposed to groundwater;
- stable - as practice shows, such cracks do not develop; such cracks can often be seen on ceilings in new buildings.
Technological cracks appear as a result of polymerization of liquid finishing materials, for example, glue, putty, waterproofing.
Attention! If the composition of liquid building materials was chosen incorrectly, this can lead to deformation of the ceiling surface and, as a result, the appearance of cracks.
Small cracks
Sealing small cracks is not a lot of work, but it requires thoroughness. Even if only spot puttying is required, it must be done competently, without neglecting the details and not limiting ourselves to masking imperfections.
The sequence of actions is as follows:
- Anything that crumbles, chips, or peels off must be carefully removed. In some cases, until the concrete layer is exposed. The edges of the crack must be perfectly clean. Here you will need to actively work with a spatula or even a wire brush. Remove dust with a dry brush.
- The prepared, cleaned surface is moistened with water. Spraying is preferable to brushing.
- Application of gypsum mixture. It will not stick to a dry surface due to low adhesion, which is why it is necessary to moisten the repaired area well. The putty is applied with a small spatula along the entire length. The movements are smooth, with pressure. The main thing is that the putty fills the entire crack. It is advisable to avoid it falling on the floor; it is difficult to remove dried material, so there is no need to take a lot of it on a spatula. The finished mixture contains PVA, which makes the composition quick-drying. Therefore, when working with him, you cannot hesitate.
- The putty layer must dry for at least 24 hours.
- Leveling the surface until smooth. For this purpose, a skin or a grater is used.
Useful information: “How to putty the ceiling yourself”
If the cause of cracks is falling off plaster or peeling of paint material, it is practiced to seal the defects using primers. Before applying the putty, the cleaned area is primed in 1-2 layers (the first layer must be completely dry). The best choice is a deep penetration primer. It is required for wet rooms and ensures the quality and reliability of the putty fastening.
What are rustics on the ceiling
The ceiling in a room is a structural element that is visually open. That is why special importance was attached to the finishing of the ceiling surface. Over time, technologies for carrying out construction work and facing materials have changed, as a result of which many types of finishing work have become outdated and the owners of residential premises have to get rid of the results of their use.
Rust is an element of decoration, which has faded into the background with the development of technology. Today, there are a large number of finishing materials, thanks to which it is possible to repair rustications on the ceiling or remove them.
Previously, natural stone or its imitation was used to decorate facades. The visible part had a smooth or faceted surface, which was processed rather roughly by chipping the surface. The joints of stone elements were separated using special strips of a certain width, and they were called rustics.
Why do you need rustics on the ceiling?
Previously, floors in multi-storey buildings were prefabricated, and hidden slabs were used during the work. Since the most important thing was the level of strength and tightness, the perfect pairing of elements was not given much importance. The slabs used for the ceiling were not in the same plane; in addition, they could be located at different heights.
Since the range of finishing materials was not rich, they used cement with the addition of sand and lime, and adhesive putty based on chalk. Since the elasticity of the materials is quite low, cracks appeared between the slabs after finishing the seams.
To eliminate cracks between the seams, a ceiling rust - a demarcation groove - was used. With the help of rustications it was possible to mask differences between the slabs and existing cracks.
Sealing rust on the ceiling
If necessary, you can repair the rust on the ceiling with your own hands. It is important to consider that all work must be carried out in stages and taking into account all recommendations:
- The first step is to prepare the base, since the durability of the result directly depends on this. To do this, you will need to remove all furniture and household appliances from the room.
- The old leveling compound must be completely removed from the ceiling. If there is damage to the plaster along the rustications, then it is necessary to clean the joints between the slabs. If the plaster is completely in poor condition, then the entire ceiling is cleaned. During work, you can use a hammer, chisel, spatula or metal brush.
- After the ceiling and the seams between the slabs have been cleaned, it is necessary to prime the surface. It is recommended to carry out the work with a narrow brush, having first removed dust from the ceiling. After 24 hours, when the primer is completely dry, you can begin filling the joints between the slabs.
- The next stage is filling the joints. For these purposes, polyurethane foam is used. Foam must be filled with all seams, cracks and crevices. Excess foam must be removed the next day using a sharp knife.
- If the ultimate goal is to seal rust, then putty is applied on top of the mounting foam. Once the mixture has hardened, you can remove the excess.
- If the purpose of the work being carried out was to restore the rustication, then you should not wait until the composition hardens, you should immediately begin cutting the rustication.
After all the work is completed, you can proceed to final sanding, priming and painting the ceiling surface.
Advice! To prevent cracks in the ceiling, it is recommended to apply putty over the reinforcing tape.
Inspection of damage
Even before heading to the store for building materials, it is necessary to carry out a thorough inspection of the damage. To assess the nature of the defect and its size, it is necessary to clear a small area around the damaged area from the existing coating. This must be done, since later, during repair work, you will still have to remove part of the coating around the fragment being repaired.
All peeling areas should be cleaned off and the depth of cracking should be visually assessed. Small flaws up to 1 centimeter deep can be repaired with ordinary gypsum putty. More serious cracks in the ceiling will have to be repaired using another, more complex technology, including the use of additional materials.
Having determined the nature of the cracking and its size, we can make an assumption about what materials will be needed and in what quantities. If the recesses are small, a simple gypsum putty will suffice, but for more serious and deep sinks you will need a sealant and a special reinforcing tape made of paper or a painting mesh.
Sealing seams between ceiling slabs
Even after the structure is completely settled, cracks may appear between the joints of adjacent slabs. You can seal the seams on the ceiling between the slabs yourself, just follow all the recommendations and do the work sequentially:
- First of all, the seams are unstitched using a hammer, puncher or chisel. All existing mortar must be removed from the joints.
- The resulting gaps are blown out with an air stream under strong pressure, and during work the seams are generously moistened with water.
- The seams are filled 2/3 with polyurethane foam.
- A day later, as soon as the polyurethane foam has completely hardened, the excess is removed using a sharp knife. The cut depth should be 3 cm.
- The recesses and edges of the primer are primed with a latex-based mixture.
- The remaining gaps are leveled with cement mortar, after gluing the reinforcing mesh.
If necessary, you can putty the entire surface of the ceiling.
How can I cover the seams on the ceiling between the slabs?
Experienced specialists have determined which compounds are best to use when removing seams between ceiling tiles. In order for the tile seams on the ceiling surface not to be noticeable and at the same time to remain quite firmly, not succumbing to the shrinkage process, it is necessary to purchase mixtures from specialized construction stores.
To seal tile joints on the ceiling, it is recommended to use:
- polyurethane foam;
- acrylic sealant;
- tow;
- building gypsum;
- special leveling mixtures;
- reinforcing mesh;
- latex putty;
- primer;
- special impregnation.
Using these materials, you can seal the seams and eliminate the possibility of further deformation.
How to seal a gap in a ceiling between slabs
To seal the cracks in the ceiling between the slabs, it is recommended to follow the following algorithm:
- First of all, remove the old coating.
- The seams are expanded using a puncher.
- Dry cement mortar is removed with a narrow spatula.
- Remove dust and small fragments.
- The surface is generously primed.
- Give the primer time to dry completely.
- The seams are filled with polyurethane foam.
- After the polyurethane foam has dried, cut off the excess. The sealed seam is puttied.
- Afterwards the surface is primed again.
- The final stage is to putty the surface and sand it with fine-grained sandpaper.
If necessary, you can further strengthen the joints using reinforcing mesh for these purposes.
Restoration of a plastered surface
If you notice that a crack has appeared in the plaster, you need to find out if it is spreading further. To do this, make a mark - glue a piece of paper to the problem area with putty, and wait a while.
You need to watch the crack
If the resulting gap does not diverge, i.e. The paper has not peeled off or torn, you can safely begin to repair it.
This operation includes several main actions:
- Preparation of materials;
- Preparing the surface for repair;
- Sealing.
Preparation of materials
Repairing cracks in the ceiling requires the following materials:
- Penetrating acrylic primer;
To repair the ceiling you will need a penetrating primer
- Reinforcing fiberglass mesh;
The mesh will create an elastic and durable base for finishing
- Putties;
- Plasters (required in some cases when the solution has to be applied in a thick layer);
- Water-dispersion paint.
Advice! When choosing how to repair cracks in the ceiling, you should focus on the old coating. If it is covered, for example, with gypsum putty, use the gypsum composition for restoration work.
Choose a putty similar to the one that covers the ceiling
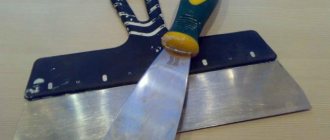
The set of tools you will need is quite simple:
- Chisel and hammer (you can use a chisel);
- Putty knife;
- Paint brush.
You will need a percussion tool to open the crack.
Preparation
Before repairing a crack in the ceiling, be sure to do the following:
| Illustrations | Actions |
| We begin work by filling out the gap so that it can be filled with putty. To do this, take a chisel and carefully use a hammer to widen and deepen the groove.
|
| Remove dust from the groove. To do this, treat it with a brush or soft sponge. |
| Next, we treat the groove with a penetrating primer. We dip a regular brush into the liquid and evenly distribute the soil over the surface of the groove in a thin layer. A few hours later, when the soil is absorbed, we perform this operation again. |
Note! Sometimes cracks appear in the paintwork. To determine this, just scrape off the paint. In such cases, the problem is eliminated by repainting the surface.
The area at the junction of the slabs must be cleared of old coating
If the finish is cracked at the junction of the slabs, it is necessary to remove the old coating so that the edge of each slab is exposed by 10 centimeters. In addition, it is necessary to remove the old putty from the seam between the slabs. Then we clean the seam from dust in the same way and prime it.
Sealing
We've sorted out the preparation, now let's look at how to repair cracks in the ceiling:
| Illustrations | Actions |
| We begin work by preparing the putty - dilute it in water according to the manufacturer's instructions and mix thoroughly. |
| We put putty on a spatula and run the tool along the groove. Thus, we fill it with putty and level it. |
| Now we reinforce the seam:
|
| After the putty has hardened, we sand it with a mesh or sandpaper stretched over a special grater. The abrasive size should be P100-P120. |
This completes the work. Now you need to coat the repaired area with primer and paint. To prevent the restored strip from being noticeable, it is advisable to paint the entire ceiling. If the old paint is not moisture resistant, it should be soaked and scraped off with a spatula.
It is advisable to remove old paint
Advice! If the paint is moisture-resistant and does not peel off, simply prime it and apply a new coat of paint on top.
Sealing cracks on the ceiling in reinforced concrete slabs
After the foundation has settled, there is a possibility that cracks will appear at the joints of the floors. Damage to the seam can occur due to temperature conditions, vibration or other factors. If necessary, you can repair the crack in the ceiling between the slabs yourself.
In order for the finishing in the seams to last for a long time, it is necessary to remove construction debris. After which the cracks are treated with an air stream and moistened with a small amount of water. After this, the seams are filled with polyurethane foam approximately halfway. For work it is necessary to use high quality foam.
After 24 hours have passed and the foam has completely hardened, you need to carefully cut off the excess. It is important to ensure that the end-to-end recess is about 4 cm. After this, begin priming the surface.
When the surface is primed, the seams are leveled using a cement mixture. After 48 hours, the seams are re-leveled using putty. After the work is completely completed, the ceiling is sanded and painted.
Attention! When filling seams, it is recommended to direct the balloon tube into the gap until it stops.
Types of ceiling cracks and locations
If you notice a crack in the ceiling, then you need to figure out its type. Defects can be technological or structural. The first appear when the technology for preparing or finishing the ceiling is violated. Structural cracks occur when the design loads on floor slabs or load-bearing beams are exceeded. The load-bearing capacity of building structures is exceeded during earthquakes, explosions, under heavy equipment or as a result of impact forces.
Depending on the dynamic state, cracks can be:
- stable;
- developing.
The first variety is characterized by stable geometric dimensions. Such defects appear in new buildings during the process of shrinkage of the house. The growth of cracks stops 4 years after the construction of the house.
Growing defects change their geometric parameters upward. They appear after floods, erosion of foundations by groundwater, shrinkage of the foundation, violations in installation technology, or due to vibration effects.
The slightest cracking of the ceiling is observed after the putty has dried, the glue or the waterproofing layer has polymerized. Repeated cycles of thawing and freezing, as well as the wrong choice of mixture, lead to cracking.
Depending on the location of the damage, they are as follows:
- the seam on the ceiling is cracking at the junction of the floor slabs;
- if the ceilings have bent, shifted or broken, then defects will appear in this place;
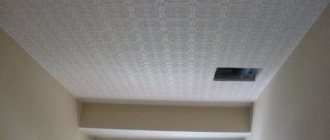
- the plasterboard ceiling is cracking at the seams between the gypsum sheets;
- often such a defect appears at the joints on the ceiling, that is, at the junction of the walls and the ceiling;
- After a flood, cracking may appear in places where it gets very wet.
How to cover shrinkage cracks in the ceiling
Shrinkage cracks on the ceiling surface are the most dangerous. This is due to the fact that due to such a defect the base of the foundation and the entire structure can be deformed, which has a significant impact on the strength level of the building. As a rule, such damage occurs as a result of uneven load on the foundation or a solution with incorrect proportions was used to fill the foundation.
The width of shrinkage cracks, as a rule, does not exceed 1 mm, as a result of which such small cracks are called hairline cracks. At first, a cobweb appears on the surface of the ceiling. If you ignore the protective layer, the steel reinforcement begins to oxidize under the influence of moisture, as a result of which the metal increases and the process of destruction of concrete begins. In such cases, preference is given to fiber-reinforced concrete, which is able to fully compensate for damage to the wire.
Deep and large defects
This problem is much more difficult to deal with. You will need to purchase not only putty, but also some additional compounds and materials. At a minimum, you need to have a special painting mesh on hand that can hold the repair solution in the crack, which can be replaced with gauze or special paper tape. In addition, when sealing very wide or deep cracks, sealant or foam may be required.
Repair begins in the same way as in the case of minor defects - with the removal of old coatings and priming of the entire existing cavity, but further operations will be different. You need to fill deep cracks with sealant or foam and wait for them to dry. If a shallow defect is being repaired, it is enough to fill it with putty. It is better to fill the crack not at once, but in several steps, depending on the depth of the cavity.
After this, putty is applied over the foam or sealant and immediately, without waiting for it to dry, the serpyanka is glued. This is done with an ordinary spatula, carefully leveling the composition that has appeared through the mesh. When the composition dries, a finishing layer of mortar is applied, which is leveled flush with the main plane of the ceiling. All that remains is to wait for the surface to dry and perform final sanding for paint, wallpaper or other coating.
How to seal the joint between the wall and the ceiling slabs
As a rule, the gaps between the ceiling tiles and the wall are almost invisible, but this does not mean that they do not need to be eliminated. It is necessary to seal the gap in the ceiling between the slabs, then when the ceiling leaks, water will not flow down the walls.
Repairing these types of cracks is not as difficult as it might initially seem. In the process of performing the work, it is necessary to unstitch the seam, clean the resulting gap from dust and construction mixture. After this, the gap is moistened and filled with foam. The principle of doing the work is similar to sealing cracks between ceiling tiles. The size of the joint expansion depends entirely on the width of the ceiling plinth.
To seal the seams, it is not necessary to use polyurethane foam; a silicone-based sealant is suitable for these purposes. In addition, a solution of cement and PVC glue, the consistency of which should resemble a paste, is ideal. Before starting work, it is recommended to prime the surface.
Advice! After the polyurethane foam has dried, the seams are covered with a latex solution in a 1:1 ratio with water.
Repairing cracks between walls and ceilings
Sealing cracks in the ceiling between two mating surfaces is carried out in several ways:
- the recess is filled with polyurethane foam or filled with mineral wool. The first option will work better, since the foam expands and fits tightly to adjacent surfaces. After the mounting foam has dried, the surface is plastered;
- You can eliminate cracks in the ceiling with plaster or synthetic putty. These are moisture-resistant, environmentally friendly and safe materials. For better adhesion of the composition to the surface, the cracks are first moistened generously with water. Upon completion of the repair, the composition is given time to dry, and the finishing begins;
- special putty is another type of material used to seal such cracks. It is sold ready for use. The composition is applied to the defective area with a spatula.
How to remove cracks in the plaster layer on the ceiling
As a rule, in such cases, the size of the crack is limited by the plaster layer, which is why eliminating such defects does not require much effort and time.
The first step is to seal the seam with a primer, after which they begin to prepare the putty. The existing recesses are filled with the mixture, and then leveled with a spatula.
Once the plaster has completely dried, the surface is rubbed with fine-grained sandpaper until the surface is perfectly smooth. If the cracks are large, it is necessary to additionally strengthen the surface with reinforcing mesh.
Attention! As practice shows, often one layer of putty is not enough, as a result of which an additional sealant or polyurethane foam is used to seal the seams.
How to fix cracks in a floor slab
If the cracks are not deep and do not pose a danger to the ceiling, ceiling repairs are carried out in the traditional way using a plaster mixture. The situation is worse when the reinforcement of the floor slab is damaged inside, and the slab is bent, and ordinary fiber-reinforced concrete is not enough. Then reinforcement is the only possible solution that will restore the integrity of the floor and extend the service life of the base ceiling. Such work will have to be entrusted to professional builders.
The repair includes sandwich reinforcement, in which a layer of reinforcement is applied on both sides of the floor slab. The reinforcement is selected with a cross-section of 8-15 mm, depending on the calculated load. The number of layers of reinforcement depends on the thickness of the ceiling: up to 150 mm one layer is sufficient, above this value two layers are laid.
A reinforcing mesh, mounted from reinforcement of the same cross-section, is attached to the ceiling. The size of the frame cells is 15x15 mm.
When the first layer of reinforced mesh is laid, the surface is filled with cement mortar. A second reinforcing layer is laid on the cement layer.
When performing ceiling repairs, it is necessary to pay attention to the presence and elimination of defects. Even a seemingly small crack will become a global problem and lead to unpredictable consequences if it begins to grow deep into the floor slab.