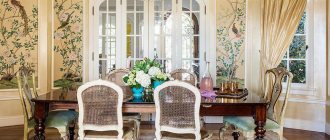
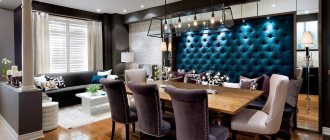
Tiles with a reflective surface are a relatively new type of finishing materials, but they are already in regular demand. Mirror coating is used when lining a kitchen apron, bathroom, instead of a standard mirror in hallways. The material looks harmonious and combines with other types of raw materials.
What does the material on the walls look like?
Mirror panel on the wall - features of use in the interior
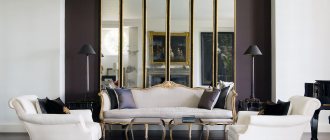
The panel is placed in the room instead of a traditional mirror. The image is not distorted and the light is reflected clearly. The panel serves as a mirror. ZP decorations are used with frames. The panel is placed in the center of the partition, images stand out, with shades of 16 primary colors.
ZPs are organically used to decorate bedroom walls. Suitable for Art Decor, “Classic”, “Neo Classic” styles in light colors. The Minimalist style uses practical tones of black, dark gray, and copper shades.
Gold and crystal chandeliers look good, chic and cozy. The strict geometry of the mirror pattern and floral patterns with smooth lines add to the interior. This composition creates up to 50 design styles: Japanese, Chinese, St. George, Gzhel, etc.
The panel serves as a mirror.
What materials can be used
When decorating the premises, interesting types of panels are used. Taking this into account, the following materials are used for installation:
- Glass - a variety of textures, colors, transparency, matte tiles, fragments of geometric shapes. The effect is improved by backlighting.
- Ceramics - practicality and inside the apartment, budget interior, suitable for the bathroom. The relief type, as opposed to tile, gives three-dimensional patterns.
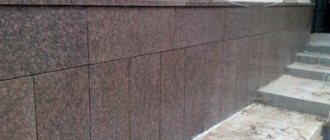
- Ceramic granite – it is highly reliable.
- Mosaic look - laying out drawings and patterns creates a colorful panel.
- Plastic – framing the space around the perimeter with a light, airy panel for the bathroom. Images are applied to the mirrors: landscape, still life, close-up photographs. ZP with facets age the interior and create a sophisticated style: “Art Decor”, “Minimalism”. The patterns give a spectacular, attractive look.
When decorating the premises, interesting types of panels are used.
Technical characteristics of mirror tiles for panels
Mirror tiles, in the form of panels of mirrors on the wall, are designed in various shapes, sizes, and oversized ceramic tiles. Mirror sheets are prepared in an automated way, preferably in a workshop, by cutting into individual segments of the desired size and type.
The mirror surface is prepared using the damping method. A mixture of crystals of any solid substance is added to the glass melt. They give the tile surface a characteristic shine. After cutting, the material is ground, polished, and edges processed.
Decorative elements are made of polystyrene. The material is easy to cut and painted to match the tone and color. Creates embossed designs. The material is not environmentally friendly. Drawings on the surface reflection are made by sandblasting. Moisture resistance and ecology are considered distinctive technical properties.
Mirror sheets are prepared using an automated method.
Types and features of panels
Images for wall decoration differ in different parameters.
- Material . For their manufacture the following are used:
- plastic;
- textile;
- wood;
- paper;
- cardboard;
- wire;
- fur;
- postcards;
- photo;
- buttons;
- yarn;
- mirror fragments;
- mosaic;
- tree branches;
- dry leaves.
- Performance technique. In this case the following can be used:
- knitting;
- minting;
- embroidery;
- wood carving;
- stickers;
- inlay.
A decorative element may consist of:
- interlacing lines;
- geometric shapes;
- abstract images;
- a certain plot.
- Shape, it can be of any size and geometry . Mirror wall stickers can be:
- oval;
- polygons;
- curvilinear figures;
- consisting of individual elements.
Types of mirror panels and methods of their use
The layout of the salary looks favorable: an elongated rhombus, an inverted square. Installing mirror panels is like assembling a puzzle, which is done exactly for each element so that they complement the picture. It is practical to produce mirrors with beveled edge processing.
A panel of the classic type: a square in the form of beveled tiles, a diamond-shaped mirror on the wall, will decorate the corridor, bedroom. The area is not limited; large equilateral squares are used. The configuration in the interior is adjusted to the dimensions in the workshop. Bevel width 5-40 mm. Choose a thicker mirror and a wider bevel.
Installation of mirror panels is like assembling a puzzle, which is made exactly for each element.
DIY installation
You can make jewelry from mirrors with your own hands. It is important to remember that cutting a mirror is difficult. It is better not to choose complex patterns if you have no experience in cutting glass elements. The edge of mirrors is difficult to process; it is not always even and smooth. The order of work is step by step:
It is necessary to determine the location of the decorative panel.- Choose a design.
- Before starting work, read the instructions, choose the right glue and purchase the necessary tools.
- It is important to carefully prepare the surface. It must be absolutely even, otherwise distortions will be noticeable and reflections will be distorted.
- Markings are applied to the wall.
- The panels are glued to the wall according to the manufacturer’s diagram.
- If required, mirrors are cut to the required size with a glass cutter. This must be done very carefully so that the parts do not crack.
- To glue mirrors you need to use high-quality glue.
There are workshops where you can order all the necessary elements.
Everyone chooses mirrors according to their taste so that they fit harmoniously into the interior of the room. But it is necessary to remember that the mirror must be carefully looked after; dust, dirt and stains are always visible on it. Especially if it is located in the kitchen.
Installing a mirror panel on the wall with your own hands, work in stages
Three installation rules:
- The installation of the ZP is carried out on a flat partition. The maximum difference in height of the wall covering is 2-3 mm for diagonal panels, up to 5 mm for horizontal and vertical panels. Otherwise there will be distortions.
- The ZP is not placed on a wooden partition. The exception is laminated coating. Wood is subject to deformation due to temperature changes. After 5 years, the seal crumbles, the glue loses its properties and adhesion to the wall.
- The installation site is treated with two layers of paint. Reliable protection of the tiles from moisture is provided. If processed poorly, mold and mildew will form. The second layer is applied after reaching 70% strength.
The progress of the installation of ZP compositions, where the assembly is carried out in separate tiles, a sticker is made. First, the surface of the partition is prepared. It must be leveled and primed, and also make sure that there are no peeling parts. If necessary, you will need to clean the wall down to concrete or brick, depending on what material the building is made of. After this, the wall is leveled and primed.
The mirror panel is installed on a flat partition.
Material
Beveled products are individual tiles of certain sizes with special processing of the edges. The side part is not cut straight, but is made with a slope that edges the element along the edge. Creating a slope is chamfering, which is why the product is called beveled.
Facets help make elegant panels, visually expand the wall, and increase the amount of light due to the refraction of rays.
Products with facets are resistant to moisture and temperature changes. The service life of the cladding is significantly increased.
Resistance to different types of detergents does not limit homeowners in their cleaning methods.
Separately, each block is fragile; care is required during delivery and installation. The lack of a well-organized ventilation system leads to the fact that the mirror surface darkens.
An overview of the unboxing material can be seen in the following video:
When the wall is prepared for work, begin gluing the mirror panel
- Marking the wall according to a pre-drawn diagram - a place for each panel tile is outlined.
- Apply special glue for mirrors to the tiles, after which the laying of the lowest row begins.
- When gluing individual panels, a small gap is created - this will save you from cracks and chips.
- After laying out the entire panel, the seams are sealed with silicone, after which the remains are carefully rubbed down.
It takes two days for the glue to harden and harden - it depends on the temperature and humidity in the rooms. Each tile is pressed against the wall and held for 5-10 seconds for the glue to set. When installing adhesive and sealant, each tile is secured with tape, which prevents the tiles from slipping.
It takes two days for the glue to harden and harden - it depends on the temperature and humidity in the rooms.
Tile layout ideas, patterns
Conventional mirror structures are being replaced. Designers use dimensional spaces: bedrooms at the end of the bed or on the side, in the hallway, in the bathroom. ZP replaces a regular mirror and does not distort the reflection. Images from photos, compositions of rhombuses and tiles improve the interior.
ZP replaces a regular mirror and does not distort the reflection.
The principle of installing mirror tiles
Tile, which is fragile in handling, requires full compliance with the work technology. You need to think in advance about how and where best to enter the material, how to arrange it. The method of laying is immediately specified: classic straight lines, offset or diagonal.
It’s easier to lay out standard rows, placing each block exactly above the previous one. It is a little more difficult to observe the principle of order: the tiles of each next row are shifted the same distance relative to the previous tier. Then the seams will be covered according to the principle of brickwork. The degree of displacement is determined individually.
It is more difficult to lay out the elements diagonally; you need to make each row even, provided that it is impossible to check horizontally or vertically. It is recommended to entrust such work to specialists.
Preparation
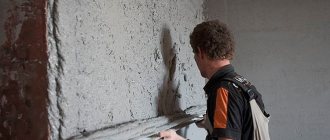
It is necessary to carefully prepare the main surface for cladding. You need to start by removing the old coating: dismantling wallpaper, paint, and other materials.
The base is cleaned of dust, defects are repaired, irregularities are removed, and degreased. The next step is to apply a primer in several layers for maximum adhesion.
When leveling and eliminating cracks, it is recommended to use an easy-to-make cement-sand mixture with the addition of asbestos or gypsum to speed up the hardening process.
If you are finishing a bathroom or kitchen, you need to take a primer with an antiseptic in it to protect the surface from the formation of fungus or mold.
Stirring the glue
For successful installation of tiles, specialized adhesive is required. While simple tiles can be laid even on concrete mortar, mirrored models cannot be installed this way.
Glue for mirrors is suitable, but liquid nails and neutral sealant can be used. When choosing the latter, you need to pay attention to the cement and vinegar in the composition - they destroy the reflective part of the products.
If you purchase ready-made liquid glue, it is enough to thoroughly mix the solution after opening. When working with dry mixtures, use a separate medium-sized container, add only clean water at room temperature, and for maximum homogeneous mixing, use an electric drill with a mixer attachment.
Effective techniques for decorating walls with mirror panels
The type of decoration is varied: sculpture, painting, landscape, sea and water. Popular RFPs with functions:
- Expansion of room space;
- Changes in room boundaries;
- Local lighting increases;
- Places unique accents in and around centers.
Modern technologies, decoration with mirrors, ZP are carried out by processing the front side. Used: photo printing, sandblasting retouching, glass painting. The design of the design gives a combination of two or three predominant surface reflections with an artistic style, types of unprecedented ZP effect.
The type of decor is varied.
How to decorate it artistically
Designers mirror painting on the wall fits into the style of the interior, emphasizes the advantages, and hides the shortcomings of the room. Classic styles: “Classicism”, “Modern”, “Renaissance”, “Rococo” will ideally decorate a living room or living room near the sofa with works of artists.
Good fit: “Indonesian” style, or “Bali”. The main task is to move a person’s gaze into the silence of the house on the shores of the oceans and seas. Thanks to the simplicity and proximity of nature, it is easy for the owner of the house to relax and unwind.
The monotony of the walls and the absence of distracting details on the partitions of the mirror panel make it possible to concentrate on intellectual work. The “Bali” style is used in the bedroom, living room, office, and decorates the interior.
Aged elements are used in modern interiors with interesting tile shapes. The distribution of mirrors is placed on the panel without overloading the room with mirror decors. Worse, a lot of glare and reflections will dominate and create discomfort.
The distribution of mirrors is placed on the panel without overloading the room with mirror decors.
Decoration of the panel
A mirror panel in the interior is interesting not only because of its frame and material, but also because of the variety of possible surfaces. This is also why it is so valuable for specialists.
- Relief. You can use both facets and rhinestones, which are attached to imitate jewelry.
- Sandblast. The surface becomes matte, and various patterns, usually geometric, can be applied to it.
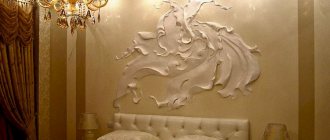
- Photo printing. Any image in high resolution is applied to the panel. For example, you can create a homemade, culinary painting for the kitchen.
- Painting. Usually it carries additional meaning, because you can paint it not only with petals and patterns, but also with a copy of works of art.
Mirror panel with bevel, non-standard techniques
Mirror panels on the wall with a bevel using glass processing technology look unique, inimitable:
- Polishing.
- Bevels around the edges.
- Drawing.
- Using and combining a variety of colors.
- Methods for “aging” a mirror.
- Matting the exterior of the mirror.
- Decorated with elegant frames and various materials.
Mirror panels on the wall with bevel look unique and inimitable.
Common options
Panels created from mirror parts can transform any room. This highlight is suitable for any interior style. Can be used in the classics or in another room design option. It is considered a kind of art object. This coating can be placed on partitions, shelves, columns. Most often they are used on walls, where they ideally perform an aesthetic and practical function.
The presence of a mirror panel becomes an example of the subtle taste of the owners. With its help it is easy to change the geometry of the room. The panel is easy to keep clean; it is not afraid of moisture, which is convenient. It is better to trust installation work to specialists who will competently select a sketch and carry out the installation.
What mistakes are made during installation and how to avoid them
There are five main mistakes:
- You cannot stick mirrors onto putty; any version of the material will come off from the wall. Mirrors are heavy and a layer of putty will not hold them in place for long.
- Mirrors are fragile. A light touch on a hard floor at the corner of the mirror will cause it to chip. During installation, the ZP is supported on an elastic surface, for example, corrugated cardboard, a substrate under the laminate.
- The mirror layers are delicate amalgam silver; it darkens in acidic and alkaline environments. For this purpose, mirrors are glued with sealant for mirrors. Silicone sealant contains acetic acid, tile adhesive has an alkali pH (above 7.0). The mirrors darken from the glue; after two months, the mirror will become 60% defective.
- Large-sized canvases of 3,210x2,250 m in the interior have a large length. During installation, the location where the seams will best be placed is selected. A clever solution to the seam in the middle part of the composition, it looks beautiful and is more practical than on the edge.
- Measuring and cutting are important components of the production of a wall, a 1 mm difference will lead to a failure of the design, distortions, and distortions in the overall picture of the wall decoration.
You cannot stick mirrors onto putty.
Installation
When choosing tiles, you need to carefully inspect each of them for chips, cracks, scratches, and darkening, so as not to buy defective material.
The main emphasis is on the preparatory stage of surface treatment; mirrors do not have a global impact on the base and are easy to handle. Leveled walls, a ceiling without cracks and significant differences in thickness and height are the key to high-quality finishing.
Marking the base
To lay out the cladding evenly, you must first correctly outline the working surface. To do this, use a construction or laser level, a simple pencil, a rule made of metal or wood, a plumb line, and a tape measure.
Marking for covering not from the edge of the wall
Before finishing, a diagram is drawn up, which outlines the position of each block, physical parameters, and seam width. It is necessary to correctly transfer the approved data to the base.
When difficulties arise as to how best to lay out the tiles, it is recommended to first lay the workpiece on the floor to see how it turns out.
Where to begin
The order of installation is from top to bottom, but if the size of the tiles fits without trimming, you can proceed in any direction.
If in the area of the first row there are protrusions, rosettes, pipes or other areas where laying solid tiles is impossible, precise measurements are immediately taken, transferred to the back side of the product, and drilling or trimming is performed.
When everything is ready for work, install the first test element. Double-sided tape is glued to the back side in small pieces, the block is lightly applied to the point. If everything is in order, the product is removed, additional glue and sealant are applied and it is glued forever.
The use of adhesive tape with two adhesive surfaces is due to the fact that the glue will dry for more than a day, during which the element may warp or slide. To prevent this, a secondary fixation agent is used.
Move to next row
Once the first row is completely laid out, it is recommended to let it dry completely before moving on if more than three rows are being laid.
A layer of glue is applied to the back of the mirror with a trowel and spread with a notched spatula. A cross or DLS system is placed above the tiles of the previous tier to form an even joint between the tiles, 1 mm thick.
The process of gluing beveled tiles
For even laying, each tile should be located exactly above the previous one. When installed offset, the distance from the edge of the other row is always the same. You cannot make one row of masonry with an order of 1/3, and in the next one put it at ½ or ¼.
With a diagonal arrangement, the top and bottom rows will act as corners. To make a single top line, triangles are cut from whole tiles.
Unpleasant pitfalls when using mirror panels in the interior
Mirrors, like an actor strategist, plays a wide range of roles. The main task is to create space in the interior.
- Move. Expanding the space with mirrors.
- Option. Adjusting the constructiveness of the PO.
- Idea. Adding perspective in the form of mirrors.
- Way. Multiplying artificial light with lamps and LEDs.
- Solution. Make it most effective indoors, for example, surrounded by sports equipment.
- Method. Decoration of the walls of the building with an individual plan and shape.
- Format. The real task is masked, for example: models of built-in TVs that look like a mirror. The remote control is pressed - TV program, news block, switch off - mirror again, brushing teeth, viewing mirror.
The original look is obtained by assembled mirror rhombuses.
The mirror panel comes in a variety of designs. Interior style and taste preferences are selected based on the design options for living rooms. The original look is obtained by assembled mirror rhombuses. The details of each canvas cover part of the room, which is given to the artists to increase the volume and length: hallway, living room, bedroom, ceiling. The sizes of polygons, squares, rhombuses, faces 470 mm, triangles with a base 670 mm are clearly collected by any ensemble of mirror panels. Facets form the design style and aesthetics of the overall composition.
Caring for mirror surfaces in the interior
In order for the tile to retain its attractive appearance longer, it is necessary to provide it with proper care. It is easy to wash and does not get very dirty. This is due to the advantages:
- Does not wear off due to friction.
- Maintains shine for a long time.
- Does not fade under sunlight.
- No fading.
Miniature mirrors do not require special care
There are products with a special coating that allows them not to fade for a long time.