Construction of mounting guns
Correct use of the gun makes it possible not only to save foam, but also to do the job efficiently, without the slightest flaw. The design of different models is almost the same. Their design is quite simple. The tool has:
- adapter (reducer): this is a threaded adapter, a cylinder is screwed into it;
- trigger - a trigger mechanism; when pressed, foam “shoots”;
- adjusting screw, used to dose the material output;
- nozzle - a tip that creates the necessary pressure of the sealant;
- handle designed for comfortable use;
- barrel - a cylinder with a channel for polyurethane foam;
- a needle-shaped rod located in the trunk.
The adapter, which is called a gearbox, contains a spring and a ball: these parts require cleaning almost constantly. The adjusting screw, which is responsible for the rate of supply of sealant and its quantity, is handled as follows: if it is tightened all the way, the supply is completely blocked; when it is screwed tightly, the foam comes out heavier. A screw with a gasket located next to the trigger prevents the compound from getting on it.
Rating of mounting guns
According to reviews from experienced craftsmen, the rating of construction pistols is as follows:
• Spit Pulsa 700E – French gas nailer, capable of working in hard-to-reach places due to its narrow spout.
Has dust protection.
The set includes a charger and 2 batteries, each of which is designed for 1.5 thousand shots.
The gas cylinder is enough for 500 – 850 shots.
With dimensions of 38x29x10 cm, it produces a shot energy of 82 J, while weighing 3.6 kg.
Designed to work with most materials, uses 15-40 mm nails.
• Makita AF505 is a lightweight (only 1.45 kg) Japanese pneumatic nailer with a straight handle on which the connection element for the compressor is located.
This tool can work with nails (15 - 55mm) and studs, and it also has the function of adjusting the driving depth.
With dimensions of 26x6x24cm, it is equipped with a magazine with a capacity of up to 100 units.
• Ottensten 4PRO CN55 – Chinese air gun for carpentry work with a drum capacity of up to 350 units.
The diameter of the fasteners is 2 – 2.5 mm, length – 25 – 57 mm. With a weight of 2.9 kg, it has dimensions of 33x29x13cm.
• Toua GSN50 is a gas gun made in China, supports work with fasteners with a length of 15 – 40mm.
Copes with concrete, metal, brick and other durable materials.
The narrow barrel and depth regulator allow for precise installation.
Operates in the temperature range -15 - +50 degrees.
With dimensions of 37x33x11 cm, it produces a shot energy of 100 J.
• Bosch GSK 18 V-LI – German electric nailer with a magazine for 110 elements and a driving depth regulator.
Works with fasteners 32 – 63mm long, and with dimensions 31x9x30cm it weighs 3.5kg.
Instructions for use
Before starting work, you need to open the package with liquid nails and the gun itself, and carefully read the instructions. You should definitely check the expiration date of the glue: if it has expired, then such a product is not suitable for installation. Water-based compounds should only be used at temperatures of +5 degrees and above. Solvent-based liquid nails can be used even at sub-zero temperatures.
Operating rules
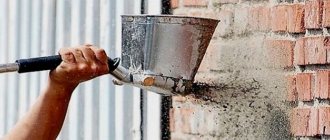
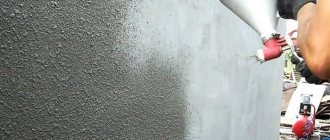
To ensure that the adhesion of the composition to the surface does not decrease, it is necessary to carry out a number of preparatory measures. All dirt, dust, debris are removed from the base, and the remnants of the old, peeling paint coating are removed. To degrease, wipe the base with alcohol, acetone or a special degreaser. Materials that are too porous are treated with 2 layers of primer. Smooth, shiny surfaces, on the contrary, are sanded to increase the adhesion strength of liquid nails.
Before inserting the glue cartridge into the gun, it is important to make sure that it fits exactly in size (it is better to take measurements before purchasing). If the gun is old, it is inspected for the presence of dried drops of glue or sealant; if necessary, they are wiped off with a solvent or scraped off.
Then load the tube into the gun in this way:
- remove part of the plug and screw the nose of the extension onto the thread;
- cover the tip of the extension with a cap;
- pull the rod towards you, making room for liquid nails;
- insert the tube into the body, move the rod to the bottom so that the disc rests tightly against the piston;
- if the gun begins to warp (this happens with low-quality models), wrap it with construction tape, electrical tape or wire.
Working with a pistol
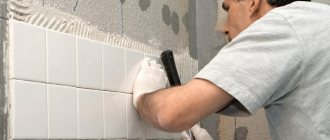
The supply of glue can be continuous or intermittent. In the first case, a solid line is formed, and for this purpose the pistol trigger is pressed constantly, with the same force. Also, the adhesive composition can be applied in the form of a snake or mesh, which is ideal for attaching ceramic tiles.
Applying liquid nails with a snake
For the second method, the product is applied spotwise or distributed in strips of the required length. This method is more popular because it allows you to use the product more economically. In addition, too much liquid nails will cause them to dry slowly.
After distributing the composition on the surface, proceed as follows:
- connect the parts to be glued together;
- squeeze them tightly, applying force;
- hold the elements for a minute manually or with clamps, or under pressure;
- remove excess spilled composition;
- Leave the surface without use until completely dry (about a day).
Fixing the parts to be glued with clamps
Applying liquid nails without a gun
It happens that you don’t have a gun at hand, so you have to apply the chosen product without his participation. It would be inappropriate to purchase a device for one-time gluing of small parts or applying a couple of small seams: all work can be done manually. Experts advise using one of the options below:
- Take a cap from a 5 liter plastic bottle and make sure it covers most of the bottom of the cartridge. Place it on a suitable sized wooden block or hammer handle. Using such a device, press on the bottom of the tube so that the composition begins to protrude from it. If you act carelessly, the packaging may become warped or its walls may be damaged. You should not use a block without a cork - the pressure on the bottom should be uniform.
- If the liquid nails package is made of soft material, it can be pierced for use. It is better to puncture in the bottom area or where it can then be sealed with electrical tape without any problems. After a hole appears, you need to squeeze out a little glue through it and spread it over the surface with a narrow spatula. This method is quite inconvenient, because the yield of the composition is difficult to control.
Liquid nails in packaging for manual extrusion
- The easiest way to apply the product without a gun is to immediately purchase liquid nails in a package for manual extrusion. It has a stopper and a comfortable thin spout, with which it is easy to make an even, continuous seam. If liquid nails will be applied to the seam, it is advisable to cover the edges of the two products with masking tape in advance. The tape should be removed immediately after completion of the work, without waiting for the composition to set.
How to use a gun
Regardless of the design and model, sealant guns consist of the following mandatory elements:
- a frame that serves to secure and hold a can or sausage with sealant;
- a rod designed to squeeze the composition out of the package through a narrow tip by pressing;
- trigger or handle to control the rod;
- a lever mechanism that pushes the rod to the required distance;
- a clamp to block the reverse movement of the rod and remove excess pressure on the tube, which prevents spontaneous extrusion of the product.
- work in protective gloves;
- prepare and degrease the surfaces to be treated;
- check the functionality of the mechanism;
- install sealant into the gun.
It is recommended that in order to obtain an even seam, the edges of the cavity to be treated are glued with tape. After applying the sealant, it is removed and the joint is smoothed with a spatula. You can remove excess paste mechanically, or by treating it with gasoline or white spirit.
Closed type
Simple and reliable mechanical manual units with a closed housing are made of high-quality metal and aluminum alloy. Used when working with silicone and acrylic sealants with a gun. They can be packaged in cylinders and foil bags.
To apply the seam evenly, it is recommended to use attachments that are usually sold complete with the gun:
- for corrosion protection of seam joints (0.5-1.3 cm wide) in cars, a butterfly-shaped nozzle or a flat tip is used;
- It is convenient to treat joints in the bathroom with sealant through a nozzle, which simultaneously applies and levels the compound;
- When sealing double-glazed windows, silicone is applied through a rounded nozzle, which helps smooth out the seam if you hold the gun at an angle with the nose forward.
To apply the sealing compound using a closed gun, the nozzle is placed into the seam and the trigger is pressed. Then they begin to advance the tip of the nozzle until the product evenly fills the entire cavity. If it is necessary to stop applying the composition, press down the lock and the rod moves back, the process stops. After completion of work, the tip is closed with a cap.
Open (skeletal) type
Skeleton and half-body guns are used only for sealants packaged in cartridges with a standard volume of 310 ml. The frame and handle of a high-quality device are made of steel, at least 2-3 mm thick. The cross-sectional diameter of the rod is about 8 mm. If thin steel (1 mm) was used for manufacturing, then there is a high probability that the device will fail after two or three charges.
To apply sealing paste with a skeleton gun, its nozzle is placed into the seam. Then the extrusion piston is moved out of place. To do this, lightly press on the metal plate located next to the hook-shaped end of the piston. It is steel-colored, not painted.
After work, all parts of the device (body, rod, nozzles) are freed from product residues. The instrument is washed and dried before storage.
The pistol is comfortable and fits well in the hand. Pressing the trigger or plate does not cause excessive muscle work. With its help, the sealant is applied quickly and evenly. The product has a sharp, pungent odor, so you need to work with it in a ventilated area or wearing a respirator.
Liquid nails Moment: how to use correctly
Today, a construction adhesive called “liquid nails” is used to connect various surfaces. The substance is used in construction, finishing and repair work.
The classic nail composition is based on synthetic rubber and a special type of clay mined in Texas. The addition of titanium dioxide gives the glue a white color. To reduce the cost, chalk is used (instead of expensive clay), which accordingly worsens the quality.
The toluene contained in the composition is responsible for adhesion, but slows down drying. To reduce this time, acetone is added to the material.
Sequence of gluing parts
To release the glue from the tube, you need to press the gun handle with frequent hand movements.
The threaded head of the tube is cut off with a sharp knife or the membrane is pierced with a sharp object. A conical tip is screwed onto the head and the cap is removed from it. The edge of the tip is cut at an angle of 45°, and the cap is put on again. The glue cartridge is ready for use.
Before inserting the cartridge into the gun, the operating rod must be relaxed. The tube is inserted into the device; by pressing the trigger, the rod is clamped until it stops. The cap is removed. By frequently pressing the handle, the glue is applied to the surface in an even strip or dotted fragments. To glue large surfaces, a mesh or snake is applied.
The surfaces to be glued are pressed and, if necessary, fixed with additional devices. Individual flat parts can be pressed down with a press. Some types of glue set within 1-2 minutes.
The total bonding time of the parts is usually 12-24 hours.
The area of surfaces prepared for gluing should be taken into account. Do not completely cover large surfaces to be glued with glue and do not apply excess glue. This will increase the setting time of the composition. To glue decorative parts, the cut is made with the smallest distance from the end of the cone.
Excess glue that appears is wiped off with a rag soaked in solvent. Glue stains remaining on wood parts can be washed off with a special cleaner. The glued structure can be used no earlier than after 24 hours.
In any large-scale repair, we resort to the help of assembly adhesive, however, not everyone knows how to use this composition correctly. It is likely that each of us will figure out how to open the mounting adhesive
, but not everyone knows how to insert it into a gun. Adhesive joints in repair work are simply irreplaceable when attaching laminate or parquet boards, wall and ceiling panels, baseboards, stucco moldings, and various decorations.
Modern adhesive compositions sold as “liquid nails” are cartridges with a volume of 400 to 310 g; there are also more economical options - 200 g, which are suitable for small jobs. Any product indicates how to use the composition correctly and what materials it is best suited for, but not all manufacturers indicate how to use a glue gun
.
Correctly opening the mounting adhesive:
- So, first you need to strictly follow the instructions on the cartridge label: the nozzle should be cut at an angle of 45° to the mark.
- The membrane is opened with a knitting needle or other sharp object.
- Then we install the nozzle on the opened cartridge and insert it into the mounting gun - loosen the working rod of the tool, insert the tube into the niche and clamp the rod all the way, the main thing is not to create strong tension in the tube.
In general, nothing complicated, now you know how to insert mounting adhesive into the gun
. The glue is applied in dotted drops, a process similar to driving in regular nails. For bonding strength, a continuous application of the adhesive composition to the surface is not required; to fasten heavy parts, the composition is applied in a thin strip.
To remove the liquid nail cartridge from the gun, you need to press the locking tab and, holding it, pull the rod towards you until it stops. Then we move the cylinder forward a little and pull it out of the gun.
Please note that after completing work with liquid nails, it is recommended to immediately clean your hands and tools of the adhesive, otherwise, after drying, this will be quite difficult to do. Organic-based construction adhesive is best washed off with acetone, white spirit and toluene; water-soluble compounds should be rinsed well with water.
If you are unable to figure out how to use a liquid nail gun
or you think that you can handle it on your own and are not planning to purchase this tool, we recommend that you study in detail the instructions for working with the composition. For a small amount of repair work this is quite possible.
How to use liquid nails without a gun?
If you open a new tube of mounting adhesive, you can easily squeeze out the contents by pressing your finger; otherwise, you will need a stick, for example, the handle of a hammer. The main thing is to be careful; you cannot turn over the cap that closes the container, otherwise all the adhesive will spread and the tube can be thrown away.
Some people don't quite understand how to use liquid nails.
This is not surprising, since this device is relatively new on the building materials market.
The article explains how to use liquid nails and which ones are best to choose.
How to refill
The sealant is produced in two types of packaging:
- Plastic hard cartridge. Its volume is about 300 ml. It is a dense cylindrical shell (balloon) with a specially shaped tip. Its bottom is movable. It moves as the substance leaves the container. You buy sealant in such a tube if you need to do a small amount of work.
- Aluminum foil tube (sausage). The volume of this package is from 280 to 600 ml. You can buy sealant in the required packaging, depending on the scale of the work being performed. In such packages, the substance retains the necessary properties during the shelf life. Sealant packaged in a tube is cheaper than in a cartridge.
The sequence of actions when refilling the gun differs depending on the type of packaging in which the sealant was purchased.
Plastic cartridge
The sealant, packaged in a plastic cartridge, is filled into skeletal (open) and tubular (closed) type guns. Before installation, the packaging is prepared as follows:
- cut off the tip of the cartridge with a sharp knife;
- screw the nozzle to the cylinder;
- cut the tip at an angle of 45 0. The distance to which it is cut depends on the thickness of the seam being processed. The thicker the seam, the greater the distance from the end.
You can insert glue into a closed (tubular) type construction gun in the following sequence:
- Prepare your gun. To do this, unscrew its body and unscrew the plastic nut attached to the end of the rod.
- Remove the metal washer and tighten the support nut to the end of the rod.
- Place the washer on the rod and secure it with a nut. Use a wrench to tighten the support nut. At the same time, make sure that the end of the rod does not extend beyond the washer.
- Screw the housing.
- Insert the prepared container with sealant into the pipe of the mounting gun and secure it by screwing on the plastic nut.
To insert a plastic balloon into a mounting skeleton gun, follow this action plan:
- Pull the gun piston back as far as it will go by pressing the spring petal.
- A can of sealant is placed into the housing frame and pushed forward a little.
- Pressing the spring petal, push the piston until it contacts the bottom of the cartridge.
When preparing the cartridge, it is important to trim the tip correctly. It is not recommended to pierce a hole in it.
This leads to an increase in the pressure of the sealant inside the cylinder and makes it more difficult to squeeze out.
Ingredients in soft packaging (sausages)
The sealant in the sausage is used only with closed-type guns. Its body is a container for placing soft foil packaging.
Step-by-step instructions on how to fill the composition in a foil tube into a gun:
- Unscrew the gun body.
- The top nut is screwed off the rod, which secures the metal washer.
- Remove the washer and scroll the support nut slightly down the thread of the rod.
- Return the metal washer to the rod, and fix the plastic washer on top of it.
- Use a wrench to tighten the support nut.
- Screw the gun body into place.
- Prepare a foil tube by cutting off the edge of the package with scissors.
- Insert the sausage into the gun body.
- Install the tip into the cover and fix it.
- Screw the lid to the body.
- Cut the tip at an angle of 45 0.
The gun with the sealant installed is ready for use.
How to remove the solution
Even when working with a gun, there is a possibility that glue will get on furniture, hands or other elements in the room. In this case, you will need to remove it immediately. To do this, it is advisable to use a solvent, but this option is only suitable for quickly removing fresh glue.
If the adhesive has already hardened, then only a special cleaner is used to remove it, and you can also use a scraper, but it can damage the coating.
A liquid nail gun, the instructions for use of which are indicated above, is considered an excellent choice if you need to use a high-quality adhesive to connect different specific surfaces. It greatly simplifies this procedure, and also ensures that the solution does not get on other objects in the room where the work is being carried out.
When carrying out repair and construction, finishing, installation work, as well as work on decorating a room, construction glue is used, better known in everyday life as liquid nails - Liquid Nails. This special construction adhesive is made on the basis of polymers and rubber and is supplied to the market in tubes of various capacities or in cylindrical cartridges (tubes). For the convenience of working with cartridges, it is customary to use a special construction (installation) gun for liquid nails, which is designed for dosed application of glue to the surfaces to be glued.
Liquid nails will help in tiling
This gun is used for working with various sealants, which are packaged in similar special tubes with a standard volume of 310 ml. This tool got its name because of the principle of operation - the adhesive composition is applied by pressing on the trigger, which is why it is compared to the weapon of the same name. Although the process of applying glue itself is more similar to the operation of a syringe.
When choosing liquid nails, study the instructions on the packaging to find out whether this construction adhesive is suitable for the types of surfaces that are to be glued.
Like similar construction tools, mounting guns are divided into two main types: household (mechanical) and professional (pneumatic and battery-powered).
Professional ones are usually used to apply all kinds of sealants, and three types of mechanical guns are used to work with liquid nails.
An inexpensive type of liquid nail gun is a semi-body gun. Such pistols are short-lived and not easy to use. The stand for the cartridge with construction adhesive seems to be cut in half and during operation the tube often warps, which interferes with the smooth movement of the rod.
For the home craftsman, there is a simple solution to this problem - the tube is tightly fixed in the gun body using wide tape. Wrap tape around the tube placed in the body, closer to the handle. At the same time, they protect the branded sticker, which is located on the case. There is a manufacturer’s warranty for such working tools, and in order for the gun, if necessary, to be returned under warranty, it is advisable not to damage this sticker.
The next type of mounting gun is the most popular among buyers and is called skeleton. It is a little more expensive than the half-body, but it holds the liquid nail cartridge more securely, allowing the glue to flow more smoothly. However, even here, tape is used to secure the tube tightly, since cases for inexpensive pistols are made of aluminum, which does not provide sufficient rigidity.
The most convenient for working with liquid nails is a tubular (syringe) gun. It tightly fixes the cartridge with glue or sealant, and is used not only for working with tubes, but also with foil packaging, which is used for packaging certain types of sealants.
How to use a burning gun correctly
Before starting to work with the mounting gun, open the glue cartridge. To do this, unscrew the conical tip, if it is screwed, and use a sharp knife to carefully cut off the head of the tube immediately above the thread. After this, screw the tip onto the head of the cylinder and remove the cap.
Next, the edge of the cone is cut so that the cut diameter is slightly less than the thickness of the required layer of liquid glue seam. Then put the cap back on. Some manufacturers place a protective bottom on the bottom of the tube, which must be removed.
The construction adhesive cartridge is ready for installation.
In order to install the cartridge into the gun body you must:
- Taking the gun by the handle, press the locking tab with your thumb until it stops;
- Pull the rod all the way towards you, freeing the platform for installing the cartridge;
- Place the cartridge into the tool body;
- By lightly pressing the trigger, push the disk attached to the rod to the base of the tube until it stops;
- Remove the cap from the tip and get to work.
If a “syringe” gun is used for work, then in order to insert the tube into the body, unscrew the upper fixing ring and remove the internal insert from it.
When fixing the cartridge on the rod, it is important not to use excessive force when bringing the pusher disk to the base, so that excess pressure does not build up in the tube before using the glue. Otherwise, when you remove the cap from the tip, some of the glue will leak out.
The following video shows the instructions described above, which clearly demonstrates the stages of preparing a gun for liquid nails and sealant for use:
Safety rules and completion of work with liquid nails
It should be remembered that the composition of liquid nails can be toxic and flammable. This applies to materials made from artificial polymers. Such components have a pronounced chemical odor. When working with such materials, you need to wear a special mask, gloves and a room with forced ventilation.
Water-soluble mixtures are more environmentally friendly. But they dissolve with constant exposure to moisture and are not recommended for adhesion of metal structures.
- Before starting work, make sure that the LG packaging is intact.
- Store installation materials away from heat sources, at room temperature and out of reach of children.
- If you use power tools to spread the adhesive, check that the voltage is correct and that the insulation is intact.
- If the product gets on exposed skin or eyes, rinse immediately with running water.
After the work is completed:
- Close the packaging with the material tightly, otherwise the solution will quickly harden and the packaging can be thrown away.
- If you use special tools, disassemble them and wipe them with liquid to remove the adhesive component.
- Store equipment unassembled.
- If excess glue has not yet dried, it can simply be removed with a clean napkin.
- Hardened residues can be removed using special liquids for dissolving repair mixtures.
- If there is no fear of damaging the surface, you can scrape off the dried glue using a mounting blade.
- After gluing the elements, you should wait at least a day for the final adhesion of the surfaces.
Some tips:
Types of liquid nails
Before using a liquid nail gun, you must first understand what types of quick-setting glue exist. Liquid nails are classified into two types:
- Consisting of water or water-soluble, which are considered completely harmless, as they are created from acrylic compounds. Moreover, they are not only considered, but also are such. They are intended for use in residential buildings and apartments. They are well suited for gluing porous surfaces, but they cannot be used at sub-zero temperatures, or when the bonded materials are exposed to water and moisture
- Consisting of organic solvents or organosoluble - when using them, you must use respirators, and after use, you must ventilate the room. It is also recommended to use protective gloves and goggles when working. Their advantage is adhesive resistance, as well as resistance to temperatures down to -40 degrees
Although organic solvents are harmful to humans, such compositions are reliable and effective compared to water-based compositions. Organic compounds make it possible to combine not just gypsum, foam and plastic products, but also materials such as glass, ceramic tiles, chipboard, fiberboard, tiles, bricks, etc. They are also great for crafts, but you only need to use water-based ones. These are really real nails that work without a hammer, but with the help of a special liquid nail gun.
This is interesting!
When buying liquid nails, you must also buy a gun for liquid nails, with which you can not only obtain the composition, but also conveniently apply it to the materials being glued.
Which liquid nails are best to use: advantages of Titebond
Glue has become an indispensable assistant in repair and construction work of varying complexity. It allows you to glue elements made of stone, concrete, metal, wood. Liquid nails are applied to various surfaces.
The greatest effectiveness of glue is achieved by using the appropriate brand for a particular situation. The instructions describe in detail the areas of application of the products. But among the large number of species, common characteristics are distinguished:
- Practicality and ease of use. People who do not have the skills to carry out repair and construction work will be able to use “Titebond”;
- Applying material to uneven surfaces. In this case, the load is distributed evenly along the entire perimeter. This reduces the pressure exerted on the bonding site;
- Construction adhesive remains flexible after drying;
- Titebond liquid nails withstand vibration and are resistant to deformation;
- Retain properties for many years. Construction adhesive is resistant to temperature changes and chemical influences - acids, alkalis, salts.
How to use?
Nails are very often used during installation. Despite the fact that working with them is relatively simple, you still need to follow a few rules.
For example, you should remember that glue is applied only to a clean, dry surface. In addition, after spreading the solution, you must press the parts tightly in the desired position for 2 minutes.
You should also remember that the glue is applied in strips or dots. In this case, there is no need to spread the composition over the entire surface; gluing will be good without it.
Drying usually takes about 12 hours, but it can last 18 hours or a day - it depends on the brand and manufacturer. It is better not to touch the structure while it is drying.
If the gluing elements are quite heavy, then it is advisable to wait a week, then the glue will dry completely and will be able to completely hold the structure.
We should not forget that nails based on organic compounds are quite dangerous - you should not allow the composition to come into contact with the skin. The glue must be applied with a special gun.
In stores, liquid nails can be found in the form of cartridges, which helps to use the adhesive solution in doses and save money. At the same time, the shelf life of the composition is quite long.
However, everyone has situations when they need to not only apply glue, but also remove it. High-strength adhesive mortar is especially difficult to remove.
To remove newly applied liquid nail, you should try washing it off with water and solvent. You can use a regular sponge for this.
However, this option is not yet the most difficult, since the composition has not yet had time to dry. If the glue has already dried, you will have to wash it off with special substances that are available in stores.
However, not everyone has strong solvents on hand. For such cases, the use of a conventional scraper is indicated. You just need to work with it very carefully so as not to spoil anything.
You can try to heat the frozen glue. In this case, the mass will become liquid and viscous, it can be easily washed off, you just have to heat it up to 60 degrees.
Many people still have the question of how to properly use a nail gun. This is also quite simple - you need to press the metal tongue of the gun, then pull the piston in your direction, which will make room for the adhesive solution.
After fixing the cylinder, you need to press the piston back, and then you can squeeze out the nails by pumping the trigger.
Some people don't know how to open a tube of solution. This question is often asked by beginners, but in fact there is nothing complicated here.
The tube is either sealed - then you need to open it with a knife, or you just need to pierce it from the top if the container is tin. It is best to pierce with a nail, because there is a protective film inside.
A gun is used to apply an adhesive such as liquid nails to the surfaces to be bonded.
Let's look at what types of this tool there are, what to look for when choosing
Types of mounting guns and their purpose
Each construction gun belongs to one of the types, depending on:
— Energy source:
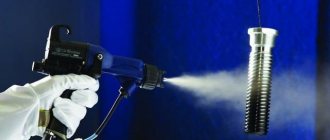
Gas
A powerful nailer that is suitable for working with thin metal and strong concrete.
To use it, you need a special disposable gas cylinder, which is quite expensive.
It is usually used by professional builders on large projects.
It is not advisable to buy a tool for household use, since it will pay for itself for several years.
The principle of operation is reminiscent of an internal combustion engine - gas from a can enters the combustion chamber, where, after pressing the gun button, it ignites.
The increased pressure pushes the piston mechanism, which in turn pushes out the fastener.
Among the disadvantages, it should be noted that gas often escapes through the seal, so once you have charged the cylinder, it is better to use it to the end.
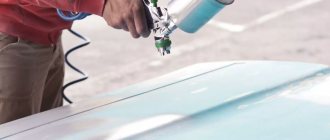
Pneumatic mounting gun
Among such tools, it is the most budget option, but its use requires a compressor with a receiver.
Due to its average power, it copes with a wide range of tasks, except for working with reinforced concrete, stone or thick metal.
Air from the compressor receiver is supplied to the gun through a hose, where, after pressing the release button, the piston is sharply pushed out under pressure, firing the fasteners.
It has a low cost per shot, and for operation it only requires a compressor and the dowels themselves.
Such a pneumatic gun has no recoil and works quite quietly on its own, but the disadvantages are a hose that interferes with operation, the need for electricity, and the periodic-constant noise of the compressor.
Powder Nailer
the most powerful option, capable of piercing surfaces of any hardness.
In addition, both the instrument itself and the consumables for it are expensive.
The operating principle is similar to that of a firearm.
A fastener is inserted into the nose of the gun, and a special blank cartridge is inserted into the back.
After the shot, the powder gases, expanding, push the piston, which acts on the dowel-nail.
Due to the risk of injury and lethality, like a small-caliber weapon, the use of the tool requires special permission.
There are single-shot and multi-shot options, and they can be combined with each other, for example, if the pistol is designed to use fasteners in a tape, but it must be loaded with a new cartridge after each shot.
Although this fact reduces the speed of work, it still remains higher than when using a hammer drill.
Requires strict adherence to safety regulations.
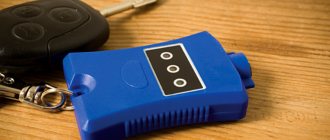
Electric gun
Electric models are produced in two types: mains and battery.
The cost of this tool is extremely high; not even every professional can purchase it.
It makes sense to buy this option only if you work with it daily.
They are suitable for working with different materials from wood to brick.
A cordless gun has a number of advantages, in particular, independence from the presence of an electrical network, ease of use, etc.
— Type of fastener:
Nailer
Better known as nailer.
Often used due to its high speed.
It is used in construction and in furniture assembly.
In addition, unlike the manual method of driving nails in with a hammer, a nailer is capable of breaking through hard materials, such as brick.
For these purposes, there is a reinforced fastener.
What is it used for?
Recommended uses include a variety of products including wood, silicate glass, ceramics, organic glass, aluminum alloys, natural cork, plasterboard, foam polymers, siding, wood fiber boards or shavings.
High-strength adhesives can be used to secure sinks and other plumbing fixtures, window and door frames, baseboards, countertops and mirrors. Sometimes craftsmen use liquid nails instead of sealants; they are used to insulate seams, fill microcavities, cracks in walls, ventilation ducts, and corner joints of design structures.
How to clean the surface
The procedure for removing excess or residues of liquid gas has several solutions and depends on the time of application and the material on the surface of which it is applied. Let's list the main ones:
- Fresh residues can be removed with a sponge and warm water (or mineral solvent);
- Dried adhesive can be removed with a special cleaner. It is sold in hardware stores;
- If cleaner is not available, a scraper or blade can be used, although this is not suitable for all surfaces;
- Another option for dried glue is increasing the temperature. Since liquid gas generators are operated at a temperature (as a rule) of no more than 50°C, then when heated to 55-65°C, the composition goes into a semi-liquid state and is removed with a scraper;
- An exotic option for old glue is exposure to direct sunlight. Again, we use the “weak points” indicated in the instructions. Staying under the rays softens the liquid gas, subsequently mechanical cleansing with washing is carried out (see the first option).
In general, liquid nails are an effective “lifesaver” for small household repairs. The photo above shows my personal choice. This glue from the company Macroflex has proven itself amazingly in many repair work, especially since it has a very affordable price. Don't take this as an advertisement, take my word for it, I know what I'm saying. I will end here. I hope it was informative... Subscribe to the blog, introduce friends and comment on articles. Hearing an outsider's opinion is always useful...
An anecdote on the topic: Few people know that in the Moment glue production workshop there is always a rosy and positive atmosphere.
Good luck to you in your family affairs and, of course, in construction! Bye!
Wisdom Quote: If all men thought alike, no one would gamble at the races (Mark Twain).
Description of the device operation process
First you need to figure out how to properly place the container with “liquid nails”. It is unacceptable that the seal of the package is broken if installed incorrectly, otherwise the glue will dry out and it will hardly be possible to use it.
Before using the gun, you need to prepare the following things:
- a bottle of “liquid nails”;
- sharpened knife;
- glasses and gloves for protection;
- a breathing mask if you plan to use an adhesive mixture prepared yourself;
- a dry rag to remove excess adhesive;
- a solvent, due to the fact that the glue may accidentally get on the skin or some surface.
The principle of operation of the tool is quite simple - after pressure is applied to the cylinder mechanically, the adhesive substance “comes out” of the cylinder. The pressure is provided by a rod, which is activated by acting on the trigger lever. In pneumatic mounting units, pressure is supplied by air. Difficulties arise when you need to choose the appropriate glue. As a rule, manufacturers use the same standards, that is, glue can be selected for any gun.
Next, pull the rod out of the device; to do this, mechanically act on the lever and remove the rod. Instead, install the tube and press the release lever 2-3 times with little force to strengthen the balloon.
Poke a hole in the container, glue will flow through it to the tip.
If you decide to use a tubular tool, it is charged differently. First you need to make a hole in a container with “liquid nails”. The container with the adhesive must be fixed so that the cut end of the container is directed towards the tip from where the glue will “come out”. Before installing the cartridge into the tool, you must remove the rod.
As a rule, the kit comes with several nozzles with tips; use one of them to tighten the cylinder. If there is no hole on the tip, then you need to cut off a very small part with a knife at an angle of 45 degrees. Then gently press the trigger lever and move the glue along the pre-applied markings. If you use a skeletal or semi-open instrument, then in order to fill the void in the cap, you must first press the trigger lever several times, and then perform the actions smoothly.
Before the gluing procedure, the surfaces must be cleaned and degreased. Then apply “liquid nails” in a thin layer or in dots. If the surfaces to be glued have a large area, for example, ceramic tiles, then it is necessary to apply the adhesive on them in the form of a snake or mesh. Afterwards, the surfaces to be glued need to be pressed against each other; if necessary, they should be fixed with special structures. Flat parts can be placed under the press. Some types of glue set within 1-2 minutes.
Preparation of bonded surfaces and tubes of liquid nails
Before applying glue, any surface should be cleaned of dirt and dust, degreased and dried. There should not be even the slightest trace of corrosion or rust on the metal. Wooden parts must be treated with a degreasing compound to remove grease. And concrete, brick and plasterboard surfaces are coated with a primer.
To squeeze the glue out of the tube, a special gun is used - mechanical or electric. Both of them operate on the principle of a syringe (when pressed, they squeeze out the required volume of material from the internal container).
The latter is worth purchasing only for large volumes of work. In everyday life, hand tools are sufficient.
Before using the liquid nail gun for its intended purpose, you must cut off the tip of the glue bottle. If you need to glue small parts, you should cut off the very top so that the adhesive mass is squeezed out in a thin stream. And for tiles or platbands, it is better to cut the cone closer to the base.
Recommendation! It is best to cut the tip of the tube through which the glue will be squeezed out at an angle of 45 degrees. This way, the adhesive composition will come out onto the surface to be glued in a neat, uniform layer.
The tube is inserted into the gun after the rod on it is loosened. The container with liquid nails should easily fit into the tool in its place. Then the working rod is pressed all the way to the bottom of the tube.
You shouldn’t be too zealous at this moment and press unnecessarily - the glue will still not be squeezed out from the tip. Before starting work, you will still need to pierce the control membrane inside the cone. This can be done using a long nail or an awl.
Important! There is a removable cap at the tip of the balloon. You should not throw it away when cutting it. It is designed to cover the top of the tube when not in use. Otherwise, the glue in the tip will harden under the influence of air and you will have to throw away the half-used container.
Liquid nail glue is applied in dots or in a thin stream to both surfaces to obtain a strong connection. If the area of parts to be glued to each other is large (for example, ceramic tiles and a concrete wall), then it is worth drawing a snake or mesh on them with an adhesive mixture.
After pressing, it will take about 12-24 hours to dry and bond securely, depending on the liquid nails you choose. You can find a more accurate time on the tube. You also need to take into account the temperature and humidity in the room. In order not to make a mistake, it is best to start using glued parts only after a day.
Device operation
An additional advantage of using guns is the simple operating principle of the tool. After placing the sealed cylinder on the platform and securely fixing it, you need to pull the trigger. It activates the rod-rod, which, in turn, moves the disk piston, which acts on the base of the cylinder. Under pressure, the glue flows out of the tip of the tube. How to use a liquid nail gun:
- You need to put a sealed package with glue on the tip.
- Before use, you must ensure that it is securely attached.
- To reduce the pressure in the tube, the trigger is pulled back slightly.
- If the bottle is not installed correctly, the liquid nails will dry out.
- Before installing the nozzle, you need to check that there is no restrictive bottom on the tube.
To open liquid nails for a skeleton or semi-open gun, you need to remove the lock from the base of the cylinder, remove the stem (retract it) and secure the tube. You need to press the lever with some force two or three times to finally fix the cylinder. You need to pierce a hole in the container through which liquid nails will flow to the tip. A tubular gun, which works on the principle of a syringe, is filled in the opposite way - with the cut end of the tube towards the tip. Before installation, the rod is removed.
The mounting adhesive is supplied with tips; after opening the container, the cylinder is screwed on with a suitable attachment for the job. If there is no hole on it for squeezing out liquid nails, you can do it yourself - with a small diameter at an angle of 45 degrees. By mechanically pressing the lever, the amount of glue is dosed and the gaps and seams are evenly filled.
The design of the pistol and the principle of its operation
The design is quite simple. Main nodes:
- Frame.
- A rod with a disk that distributes the load on the cylinder under the influence of the rod.
- Locking tab - secures the rod.
- The trigger that activates the structure.
- Pen.
Skeleton liquid nail gun
To understand how to use a liquid nail gun, you need to understand the basic functioning of this tool. When the tube is in the body, its base will be affected by a disk connected to the stem. The mechanism is driven by a lever (trigger). This element is also connected to the rod, so when you press the lever, the disc begins to apply pressure to the tube, and the glue comes out of the tip.
Advice: Preparatory work and installation of the tube into the glue gun for liquid nails is carried out before the seal of the tip is broken, otherwise the adhesive will begin to come out prematurely.
No. 1. Composition of liquid nails
Liquid nails were invented in the USA. There, in the 60s, Macco first decided to package regular glue in individual cartridges for ease of use. A couple of years later, a new development appeared - Liquid Nails
. In just a few years, liquid nails have conquered American users with a host of advantages, but they only entered the domestic market in the 90s.
The basis for the new type of glue was synthetic rubber
with polymer additives
.
A special type of clay
was used as a filler . In the USA, huge deposits of this clay are concentrated in the state of Texas, where the main industrial facilities of most local manufacturers are located. Today, instead of unique clay, ordinary chalk is often used. In this way, manufacturers kill two birds with one stone: on the one hand, chalk acts as a filler, but at the same time it gives the glue the necessary white color, which is achieved using classical technology by adding titanium oxide. Glue with the addition of chalk is significantly inferior in terms of quality.
Previously, toluene was added to liquid nails to improve adhesion and acetone to speed up drying. The increased toxicity of these substances forced them to abandon their use. However, some companies still use similar additives to reduce the cost of the composition. Their adhesives have an unpleasant odor and, as a rule, a suspiciously low price. Under no circumstances should such compositions be used indoors.