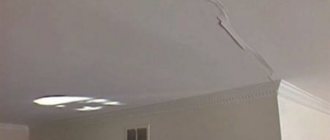
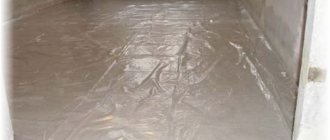
Yellow stains on the ceiling are the result of flooding; they not only spoil the interior of the room, but also become a breeding ground for fungus and mold if not treated in a timely manner.
It is necessary to begin eliminating yellow spots after a flood as quickly as possible. The main thing is to study in advance the subtleties and features of the process for different types of surfaces.
If you have a leaking ceiling and want to know how to remove yellow stains on it after a flood, read this article.
How to Get Rid of Bay Stains
There are several ways to do this:
- Mechanical.
- Using products containing chlorine.
- Fighting rust.
- Cleaning suspended ceilings and drywall.
For each type of ceiling, certain means are selected, so the same method will not work for everyone.
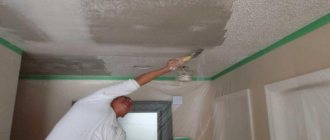
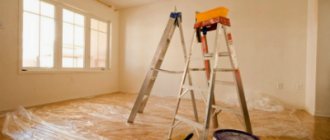
Mechanical method
The most common method that does not require the use of chemical compounds. Consists of several stages.
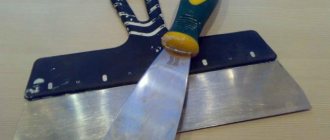
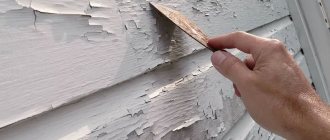
Cleaning with a spatula
This tool helps remove damaged layers of plaster, putty and paint. After these manipulations, wipe the treated area with a damp cloth. After the area has dried, a primer is applied.
The next step is applying putty to the ceiling. If the surface has become smooth, leave the ceiling until the putty sets. The irregularities are smoothed out with sandpaper, and the surface is re-coated with primer.
Painting
After the work has been done, the ceiling is covered with paint. To do this, use a roller or brush. To make the work more efficient, the ceiling is painted in two layers. If it was not possible to choose paint to match the ceiling, the entire surface is painted with a new color.
How to use whitewash
Application of the composition requires preliminary preparation. The ceiling is whitewashed in two layers. Whitening of the stain is possible if the affected area does not have a large area. After washing the area to be treated, it is primed and whitewash is applied in two layers.
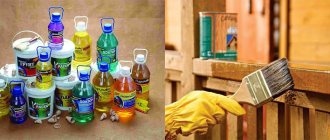
Chlorine-containing substances
The funds become in demand if the ceiling is damaged during a leak. Constant humidity is a good environment for the proliferation of harmful microorganisms. Therefore, to keep the ceiling clean, chlorine-based substances are used.
What you will need
For this type of work, a person must prepare certain tools. This will allow you to get the job done quickly and efficiently, without interrupting to get gloves or something else.
Bleach
Any product from this series is welcome.
"Ace"
The chemical not only gets rid of stains, but also has disinfectant properties. The liquid composition helps to whiten problem areas so that they do not stand out as a result of discoloration. Due to the components in the composition, the product is toxic, so it is only allowed to work with rubber gloves.
"Toilet duckling"
If you don’t have bleach or regular bleach in your home arsenal, use Toilet Duck. Helps quickly and efficiently whiten darkened areas. Has a toxic effect. During work, safety measures are observed.
See also
TOP 14 products that can be used to quickly clean tiles after repair
Travyanka
A good alternative to chlorine-based products. Herbal or vitriol primer is prepared with your own hands at home. The solution has no harmful effects on the human body.
Whitening paste
The acidic composition is capable of removing contaminants of any kind. It removes yellowness from the ceiling well.
Latex gloves
This type of work should be performed using rubber gloves. They protect the skin from the harmful effects of cleaning products.
Foam sponges
To work with the ceiling, you need to have at least 2-3 foam sponges in stock. They are convenient for applying compounds to the surface. With their help, the technique of blotting or rubbing the product is used.
Solution container
A sponge, brush or roller must be dipped into the substance. To avoid using the entire bottle, a little liquid is poured into a wide container. This also makes the job easier.
How to clean
The steps to complete the work are as follows:
- The ceiling is cleared of layers of finishing materials.
- The bleach is poured into a specially designated container.
- Gloves are put on the hands, the roller is wetted in the liquid, and the person begins processing.
- The sponge is applied to the surface and fixed in this position for 5-8 seconds. The steps are repeated until the entire surface of the ceiling has been completely processed.
- If the sponge turns reddish, throw it away and replace it with a new one.
The treatment continues until the spots become light. After the bleaching procedure, the ceiling must be completely dry. Only after this finishing work is carried out.
To fight rust
Leakage from neighbors above can be of a different nature. If the accident affected rusty pipes, a serious ceiling cleaning procedure is required. Along with the water, rusty particles leak onto the ceiling.
Necessary equipment
A person must have at hand all the materials and tools that will be useful for the job.
Vitriol
Not many people know the product as one of the rust converters. Used in a layer of putty, applied before painting.
Laundry soap
Before adding it to the cleaning solution, the soap is crushed. To do this, use a fine grater.
Bone glue
Bone or wood glue. It goes on sale in the form of yellow-brown tiles. Before adding to the product, heat until it turns into a liquid.
Drying oil
Protects surfaces from rust. After contact with the wall, it forms a protective film.
Latex gloves
Necessary for work so as not to stain the skin of your hands. The size must be matched to the person doing the repairs. Too large ones create inconvenience during work.
Roller, sponge or brush
Without this device it is impossible to apply the product to the wall. Depending on the area of the surface to be treated and preferences, choose a brush, roller or sponge.
Deep penetration acrylic primer
It has a lot of useful properties. Disinfects the surface from fungus and mold. Reduces the consumption of necessary materials. Protects the wall from rust and increases the strength of the treated areas.
Hydrophobic putty
Thanks to the presence of this product in the composition, the ceiling does not absorb moisture, especially if it is made of plasterboard. Hydrophobic putty creates a special layer on the surface. Thanks to it, the rust does not come out, and you will not have to make repairs again.
How to prepare the mixture
All prepared ingredients are mixed. For the solution, you need to measure out 40 g of drying oil, 250 g of vitriol and the same amount of soap shavings. Also 250 g of bone glue. After mixing, you should get a homogeneous liquid.
See also
23 best ways to clean silverware at home
Cleaning technology
To ensure that the work does not have to be repeated after some time, the quality of the stages is monitored. The first priority is to clean the surface of plaster and old paint. The better the cleaning is done, the better the job will be done. Old layers of finishing coated together with red spots are cleaned off to the maximum depth.
Contaminated areas are treated with the prepared product. The homemade primer should cover the area completely and extend slightly beyond it. To carry out further work, the treated area must dry out.
The next layer is applied with hydrophobic putty. Then comes an acrylic primer, which is also applied to the dried layer of putty. The final stage is painting the wall with paint and varnish material.
To save tension walls
The base allows you to wash stains with water with the addition of ammonia. Only a few people do this, while the rest repaint suspended ceilings. The surface can be repainted no more than 5 times.
With each new coating, the tone of the chosen paint should be darker than the previous one.
Paint selection
Regular paint is not suitable for such work. The composition must contain a mark indicating that the paint is suitable for suspended ceilings. To buy a high-quality composition, it is better to consult with specialists.
How to paint
The required amount of paint is poured into a container into which it is convenient to dip a roller or brush. A small amount is applied to the ceiling and rubbed. Actions must be performed in the same direction so that the paint adheres well and there are no streaks. If there is nothing left in the container, paint is added.
If you have drywall
Even owners of good-quality plasterboard ceilings face a similar problem. If moisture spreads inside, the problem becomes larger. After this, the ceiling not only turns yellow, but also becomes deformed. Bubbles appear on it, the surface swells.
After a particularly severe leak, water collects above the leaf. It is necessary to get rid of the liquid and only then begin repairs. Using a knife, a cut is made through which all the water is drained.
If, by tapping, it was possible to determine the area of the lesion, part of the sheet is replaced. In most of these cases, a new sheet is installed. The work takes a lot of time, but there’s no way around it.
Why do you need wall preparation?
Without preparing the walls, the result will not look very nice, the paint will not adhere well. This procedure also has a number of other advantages:
- Eliminates unevenness. There are few rooms where the walls are perfectly even and smooth, without the slightest defect. When applying a coat of paint, imperfections will be noticeable if the walls are not primed.
- Helps fight fungus. Mold often grows in corners. If you simply paint such walls, the fungus will not go away, it will appear again. Especially when using water-soluble compounds. Treatment with special means eliminates mold.
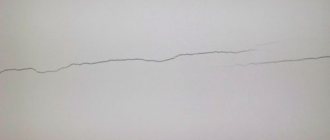
- Protects from destruction. If you do not repair minimal cracks on the surface, then over time they will only increase and the plaster will begin to crumble. In addition, this is a way to eliminate holes that were formed from old fasteners (screws, nails). Fungus happily settles in any holes.
- Removes traces of grease and rust. Any stains, especially from rust, easily show through the paint layer. To eliminate them, processing is required.
- Allows you to save paint. If you need to repaint from a dark color to light or paint over bright patterns, then applying paint in one layer is not enough; you will have to repaint it several times. After puttying, only one layer will be enough.
- Prevents peeling. Over time, the old coating begins to peel, crack, and peel off. If you do not clean the surface, the new layer of paint will begin to peel off along with the old one. Surfaces will quickly lose their attractive appearance.
All irregularities and cracks must be puttied. In addition, preparation ensures better adhesion of the composition to the surface.
The paint will lay down in an even layer, without drips. Pay attention to: Painting imitation timber inside a house: features and nuances, choice of composition and painting technology
Ways to deal with yellow spots
Sometimes the affected area is not that large and there is no need for large-scale repair work. To return the ceiling to its previous appearance, you need to get rid of small yellow spots. There are many ways to correct the situation.
If PVC panels
After a leak, a yellow coating remains on ceilings covered with plastic panels. In such cases, the problem is most easily solved. The areas are wiped with a damp cloth and nothing else is required.
Water based primer
The fight against yellow spots is possible with the help of a primer. The product is sold in construction stores. Helps quickly get rid of yellow stains on the ceiling.
Water-based latex paint
In some cases, it is enough to paint the area with a similar composition.
Paint material
Any product from this category will do. The main thing that is required from the material is the creation of a durable, dense film on the ceiling.
Adviсe
A few secrets of experienced craftsmen will help you carry out work to eliminate yellow stains on the ceiling quickly and efficiently:
- Before you begin any work to eliminate signs of flooding, you must make sure that the electricity supply to the meter is turned off.
- Before you begin to remove traces of the flood, you must carefully tap the entire surface of the ceiling with a rubber hammer. This will help diagnose hidden places where whitewash is peeling off from the rough surface.
- It is necessary to clean the ceiling after a flood as quickly as possible. While the paint and plaster are wet, they can be easily removed in single strips. Dried traces of a flood are much more difficult to clean efficiently.
- Instead of industrial chemicals, yellow stains can be whitened with a homemade product. To do this, mix one part of concentrated citric acid and two parts of crushed chalk. Glycerin is added to the resulting mixture (it should turn out to be a thick paste). The resulting composition is applied to the yellow stains and left for sixty minutes, after which the stains are washed off with clean water.
The most complete and useful information about methods and means of removing yellow spots and yellowness from various surfaces and products is presented in this section.
How to remove condensation
This problem is most often observed in rooms with poor ventilation. If after wiping the ceiling drops appear again, check the operation of the ventilation system. The procedure for insulating the walls will help eliminate condensation on the ceiling.
See also
How to remove dirt from floor tiles, the best products and equipment
Condensation appears on the ceiling in a room above which there is another room. For example, there may be an attic above the bedroom that is not heated. You can solve the appearance of drops by insulating the attic floor.
Causes of water and rust stains
- Leaking unsafe roof. Carry out a thorough inspection of it, and if there are leaks, repair the roof.
- Damp and damp room. Excessive dampness and moisture in the room is fertile ground for the appearance of rust spots and stains, as well as fungus and mold on the ceiling and walls. Get rid of damp moisture in the room.
- Presence of microcracks in the ceiling and walls. Promotes the spread of dampness and excess condensation in the room. Carry out a thorough inspection and repair microcracks.
- Leaking water supply and sewerage pipes. Carry out a thorough inspection and eliminate the causes of leaks.
- Water leakage from neighbors as a result of broken pipes, flooding, sewerage problems, and so on.
Special compositions for glossy stretch ceilings
They can be purchased from companies that install ceilings. The products contain distilled water, isopropyl alcohol, surfactants and dyes. Instead of isopropyl alcohol, ammonia is often added.
An additional component in the composition should be ammonia. The liquid restores gloss, since over time the shine is not as pronounced as before. In addition, it prevents the appearance of streaks during washing.
When working with special compounds, it is useful to have two rags in your arsenal. The wall is treated with a cloth soaked in liquid. Following this, the areas are wiped dry.
Rags must have moisture-absorbing properties. It is better to choose those that do not have long pile. The best option is microfiber cloths. There are no traces left after them.
Rules for removing yellow spots for different types of ceiling structures
When choosing a method for eliminating traces of a flood, a special approach is required:
- tension,
- glossy,
- fabric,
- plasterboard ceiling structures.
For each type of ceiling, there are certain repair rules that should be followed in order to restore the surface as quickly and efficiently as possible.
Tensioners
To eliminate traces of a flood on a suspended ceiling, proceed according to the following algorithm:
Remove the brackets that secure the tension fabric from the angle as close as possible to the leak site.- Folding back the canvas, drain the accumulated water.
- Clean the softened layers of plaster on the rough concrete base (work must be carried out as carefully as possible so as not to damage the tension fabric)
- The cleaned surface is dried with a construction hairdryer, after which the tension fabric is fixed with staples in its original place.
It is strictly forbidden to pierce suspended ceilings in order to drain accumulated water. Under pressure, a small puncture expands and turns into a huge hole that cannot be repaired.
Plasterboard
It’s easy to restore the original appearance of a plasterboard ceiling; the main thing is to follow a clear sequence of actions:
- using a sharp knife or screwdriver, pierce the drywall sheet and drain the accumulated water;
- by expanding the puncture site, determine the degree of damage;
- if the water leak did not have time to significantly deform the ceiling covering (the drywall did not swell, a loud knock is heard when tapped), then after drying the leak, the hole is covered with a layer of plaster, primed and whitewashed again.
Glossy
It is easiest to clean glossy surfaces from yellow stains after a flood . After the water has been drained from the interceiling space, the glossy film is mounted in its original place, and traces of the flood are wiped with a sponge soaked in an alcohol solution (2 tablespoons of alcohol per liter of water is enough).
When cleaning glossy tension sheets, do not use hard brushes or sponges that contain chlorine, alkali or acid. The result of such cleaning will be a completely damaged surface.
What to do with oil stains
Finishing the surface with oil compounds causes many difficulties in the future. Oil is a substance that saturates the slab, penetrating into the deepest layers. After complete removal of the painted layer, oil stains continue to appear. You can get rid of yellowness.
To do this, they start with the tools that will be useful during the work. This is a deep penetration primer, a wide spatula, a brush or roller and water-based paint. As soon as the tools are prepared, they begin to work.
Use a spatula to remove damaged plaster. The surface is treated with a primer in one layer. After the ceiling has completely dried, it is painted. The paint, applied in several layers, masks the stain, not allowing it to show through.
Kitchen and Bathroom Paints
Kitchens and bathrooms, rooms where there is high humidity, high temperature and various pollution. Therefore, to decorate the walls in the kitchen and bathroom, it is worth choosing a specialized biocidal paint designed specifically for these rooms. A good option are paints containing pure silver, which works as an antiseptic throughout the life of the paintwork. Other important features that kitchen and bathroom paint should have are increased moisture resistance and resistance to abrasion and washing.
Source