In order for the interior of the house to be cozy and beautiful, harmonious and comfortable, attention to all its components is important. The design of the ceiling plays a huge role in the perception of space. A successful solution will help to visually expand the space or create separate zones in one room, for example, a combined plasterboard and suspended ceiling. Individual style and effectiveness combined with practicality - that’s what a combined ceiling is. What are its features and advantages? And are there any downsides? Let's try to answer these questions.
Advantages of a combination of plasterboard and tension fabric when finishing the ceiling
Speaking about the advantages of a combined ceiling, we must first talk about the individual advantages of each type of finish.
A stretch ceiling made of PVC film or fabric has the following advantages:
- Lightweight design.
- When flooded from above, PVC film can withstand up to 200 liters of water per m2.
- Does not require careful leveling of the rough ceiling.
- Allows a significant difference in the height of the floor slab.
- May hide communications and wiring behind it.
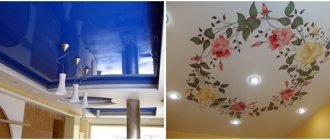
- Can be made in any color and with any pattern.
- Easier to replace and dismantle than a plasterboard ceiling.
The plasterboard ceiling in turn:
- Hides any communications.
- Can realize any design idea: shape, height difference, niche, and so on.
- The reliability of the supporting structures makes it possible to supplement such a ceiling with sound and heat insulation.
- Guarantees the reliability and durability of the structure.
- Convenient for arranging overhead lighting of any complexity.
Using a combination of plasterboard structures and tension film when decorating the ceiling provides a combination of their advantages:
- Making a ceiling of any configuration, stylistic solution and complexity.
- Hiding any communications, even complex ones.
- Convenient installation of overhead lighting (both open and hidden lamps).
- Convenience of zoning.
- Durability combined with the ability to quite easily modify some ceiling details.
Thus, today the combination of these two types of ceiling decoration provides the greatest scope for the implementation of interior solutions. But, as often happens when several materials are combined, some of the advantages of one of them are replaced by the disadvantages of the other.
Combined ceilings have many advantages; for example, in the event of flooding from above, the film will withstand up to 200 liters of water per m2.
About the advantages and disadvantages
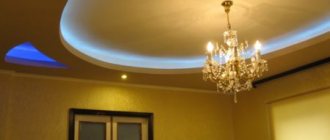
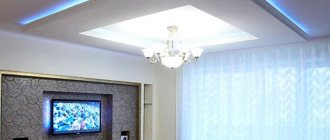
Design parameters are selected taking into account the needs of residents. It all depends on the number of communications that will need to be masked: the more there are, the more difficult it is to install the box. There are several ways to install drywall sheets. The most popular combination option: suspended ceiling and plasterboard with lighting, which gives the room a special charm. This is one of the advantages of such an organization.
It is worth noting another advantage of such a ceiling arrangement - it is the ability to obtain an absolutely flat and smooth surface, moreover, it can be given any shape, several levels can be mounted and the communications existing in the room can be masked. The main thing is that when carrying out repair work, stretch the electrical wiring and ventilation pipes to the ceiling and secure them there. Subsequently, the box and tension fabric will simply hide them.
As for the disadvantages, they also exist:
- significantly reduces the ceiling height;
- complex installation process.
Installing a plasterboard frame under a suspended ceiling is considered rational only in spacious rooms with fairly high ceilings. As for the installation work, it is unlikely that you will be able to carry it out on your own; in any case, you will need the help of one partner, and in some cases even two.
Combined ceiling options
You can combine a plasterboard ceiling with a suspended ceiling in any desired way. As a rule, the configuration of structures is selected based on two factors - the stylistic solution and the placement of lighting fixtures on the ceiling.
Basic combination options:
- Two parts of the room, separated in a straight line. This is done if you need to visually zone a space with different ceiling heights and textures, but a design with a complex configuration is inappropriate.
- A box in the center of the room with a suspended ceiling around the perimeter. The box can be round, square or any other shape. It dominates the interior and at the same time provides an opportunity to place lamps.
- Stretch ceiling with plasterboard around the perimeter. This design is used when you need to place built-in lamps, but not reduce the height of the room too much. If you use a glossy dark film in combination with a light box, then visually there will be more space.
- A sequence of structures made of plasterboard and suspended ceiling with a single center. This may look, for example, like the smooth surface of a canvas, broken by concentric circles of plasterboard.
Hallway made of plasterboard: ceiling finishing
Technology for installing a suspended ceiling with a plasterboard frame
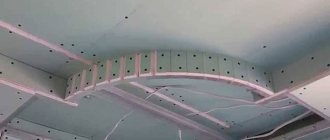
The combined ceiling finish, plasterboard and PVC film are supported on a frame assembled from a steel profile. The layout and structure of the load-bearing part is planned in advance and assembled, as for a regular plasterboard ceiling. Embedded elements are mounted inside the frame, which secure the stretch ceiling baguettes.
To obtain curved contours of multi-level structures, the load-bearing part for drywall must be formed from a cut steel profile.
In order to obtain a curved plasterboard surface, the profile is sewn up in small sections of the slab, or special arched plasterboard is used, which can be bent in an arc after moistening. The gaps between the edges of the drywall are filled with putty, sanded and painted in the required color.
All that remains is to stretch the tension fabric over the previously installed baguettes.
The sequence of actions when creating a combined ceiling: from design to installation
First of all, you need to decide what the finished ceiling should look like, what shape the structures will be and where the lamps will be located. It is best to entrust the creation of a ceiling design drawing to a professional designer. You should not save on this, because both materials and installation work are quite expensive. It will be unpleasant to discover in the end that the appearance of the ceilings does not meet expectations and is in dissonance with the rest of the interior.
When creating a complex ceiling design, we recommend using special visualization programs, or even better, contact a professional.
You also need to keep in mind that the installation of a composite ceiling is carried out only in a room completely free of furniture.
General sequence of actions:
- The ceiling is measured. It is necessary not only to measure the perimeter at the height of the structures, but also to take into account height differences, the angle between the walls, all protruding parts of the walls, ceilings and communications.
- A ceiling drawing is being developed taking into account all dimensions.
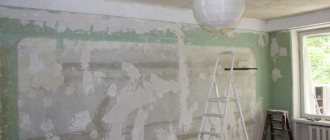
- Ceiling surfaces are cleaned. This item may have to be completed first, as old finishing elements may prevent you from measuring the ceiling correctly.
- The outline of the structures is applied to the ceiling.
- All planned ceiling levels are marked on the walls.
- Marking of lines for fastening load-bearing structures is done. Typically, a step of 0.6 m along the length and 0.4 m across the width of the room is used. For accuracy, it is recommended to use a laser level when working.
- Holes are drilled for lathing the combined ceiling.
- The sheathing is installed. When installing, it is important to maintain horizontality. To do this, you can tighten the marker thread or regularly check the horizontal level with a level.
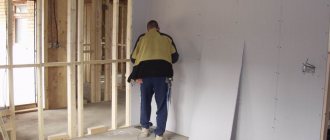
- The boxes are lined with plasterboard. All work with drywall cannot be carried out alone, since the material is quite heavy and unstable to bending.
- The joints of the plasterboard sheets with each other and with the walls are glued with reinforcing tape.
- All mounting holes are filled with the first layer of putty.
- Holes for lamps are drilled.
- Finishing putty is being carried out.
- The surface is sanded and dust-free.
- The plasterboard part of the combined ceiling is painted in the desired color.
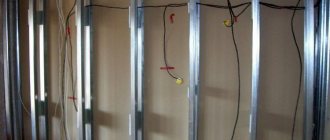
- After the paint has completely dried, the wiring and electrical equipment are installed, which must be hidden behind the boxes.
- The level of installation of the web of the tension part of the structure is applied to the plasterboard box and walls.
- In accordance with the level, a mounting baguette is attached with a fastening step of 6 - 8 cm.
- The suspended ceiling is installed to the plasterboard in accordance with the type of canvas.
Installation of film sheet
You can begin installing the canvas after the paint or glue has dried. Experts recommend using film ceilings with a harpoon type of fastening, which can be easily dismantled if the installation is unsuccessful. There are no textile fabrics with this type of fastening.
USEFUL INFORMATION: Kitchen renovation: where to start, main stages.
- The film sheet is installed in a room heated to +40°C, and during installation the temperature rises to +60°C. It will not be possible to properly stretch the film in an unheated room. When pulling, a heat gun is used, the operation of which requires certain skills.
- The film is attached to baguettes installed on the vertical sides of the gypsum board box using a harpoon, pulled in the opposite direction and fixed under the baguettes. Care must be taken to ensure that no wrinkles appear on the surface of the film. You can iron the canvas using a hair dryer, without bringing it closer to the ceiling than 20 cm.
Tip: When working with film with a glossy or mirror finish, you should wear gloves to avoid leaving hand and fingerprints.
[custom_ads_shortcode2]
Features and nuances when installing a combined ceiling
Combined plasterboard and suspended ceilings certainly look very impressive. But when deciding to install them, you need to remember some points that need to be taken into account:
- You won't be able to save money on installation. In addition to the fact that the materials themselves are not cheap, the work of installing such ceilings is quite difficult and requires professional experience.
- A carefully designed ceiling drawing and a well-thought-out color scheme are required.
- Combined ceilings cannot be installed in unheated rooms - they may deform unevenly.
- It is not recommended to install combined ceilings in rooms with a risk of flooding - even moisture-resistant plasterboard may not withstand the accumulation of large volumes of water.
If all the nuances and features of the combined flow - tension and plasterboard - can be taken into account, then such a ceiling will certainly become a worthy decoration of any home and will delight owners and guests with its individuality and beauty for many years.
Modern ceiling designs - interesting interior design
An amazing combination of materials, a rich palette of colors and shades, as well as the latest innovative technologies allow designers to successfully implement even the most daring and original solutions.
Ceiling structures amaze with the variety of original curves and lines, allowing you to create a unique and unique design in any room.
Attaching a stretch ceiling is a rather labor-intensive process and requires preliminary measurements and calculations. In order for the final result to bring only positive emotions, the installation of a combined ceiling should be carried out exclusively by professionals in their field.
Combined ceiling: suspended with suspended
Preparation of material and tools
Before proceeding directly to the installation work, it is necessary to prepare the material, namely drywall. It is also worth stocking up in advance with special fastening devices and tools that may be needed during installation.
Plasterboard sheets with a thickness of 9 mm are best suited for arranging a combined ceiling. Their technical characteristics meet all the specified parameters , and they are ideal for arranging the ceiling in an apartment.
They have a long service life, provided that massive and heavy elements are not attached to them.
It is very important to select the material, taking into account the purpose of the room in which it is planned to be installed. If you need to organize a ceiling in a bathroom or kitchen, where high humidity prevails, then you should give preference to moisture-resistant plasterboard. Usually surfaces are painted green.
For arranging the remaining rooms, the usual standard option is suitable, but it is advisable to purchase sheets with a small margin, so that later you do not have to run to the store for the missing material.
also prepare the following:
- supporting profile;
- building level;
- screwdriver;
- set of spatulas;
- a knife designed for cutting drywall;
- guides;
- corners, preferably made of galvanized metal;
- screws, brackets and dowels.
In addition, finishing work is carried out at the final stage. They will require a primer and putty, with which the seams will be sealed, as well as the surface of the mounted box.
The choice of base for the frame must be taken carefully and responsibly, and the plasterboard sheets must be carefully inspected for integrity. They should be free of any damage or cracks. The fact is that low-quality material becomes deformed during operation. This will ruin the appearance of the room.
Color solutions for combined designs.
You should approach both the choice of shape and the selection of colors for combined ceilings with all responsibility. The wrong choice of color combinations can easily ruin the look of the entire room, as can incorrectly selected shapes and illiterately installed lighting. But there are several standard recommendations that can be used for a harmonious combination of shades.
In the photo: Living room interior in an Art Deco style apartment
If the task is to create a calm environment in the room that would not distract or strain the household members living in it, you should choose monochrome pastel shades. These color schemes are very suitable for bedrooms, small rooms and places intended for relaxation. To implement a design solution, special attention must be paid to the installation of lighting.
In the photo: Interior of a children's room in a modern style apartment
Bright and contrasting colors can be used in living rooms or children's rooms, but in this case, the main thing is not to overdo it. Experts can suggest colors that can be combined with each other, as well as correctly combine them. A professional designer will be able to create the right mood for those who will be in the room, using the appropriate color scheme.
In the photo: Living room interior in a classic style apartment
To give the apartment design more space, that is, to visually expand it, you should use glossy ceiling surfaces. Gloss is often used in kitchen areas, since the kitchen is a room that should be calm, cozy and pleasant for communication.
Hallways should be made light so as not to spoil the impression of the owners from the threshold of the house. The ceilings in the hallways should be lighter than the furniture in them and the color of the walls.
In the photo: The interior of the corridor in the apartment after renovation in the Art Deco style
The specific selection of colors for decorating ceilings in a particular room depends on the style in which a particular space is decorated. If the room is supposed to have a high-tech style, then cool color shades are suitable for the ceiling. For rooms with a classic style, shades of white, beige or gray will be preferable.
In bathrooms, it is better to have ceilings in light shades of gray or beige, as they allow you to mute the contrasting combinations of ceramics and steel sanitaryware.
In the photo: Bathroom interior in a modern style apartment
When choosing color schemes for children's rooms, you should remember that children grow quickly; if you decorate the ceiling with your favorite cartoon characters, then after some time these characters will no longer please, but irritate the grown child. Therefore, it is best to simply use pure colors of beige, blue, yellow or green shades of the spectrum.