When renovating old premises, the owner has a question about whether it is possible to paint with water-based paint over whitewash, what is needed for this, how to do the work correctly so that the old plaster does not fall off the walls and ceiling.
Experts advise to first get rid of the whitewash and then start painting, but you must take into account that when washing the plaster a lot of dust will accumulate, so you will need polyethylene to pre-cover the surfaces to be treated before work.
Painting over whitewash.
Is it possible to paint a whitewashed ceiling?
Since whitewashing is the most common way to give a ceiling a fresh look, and is also the cheapest, in many homes the ceilings are simply whitewashed.
When the time comes for renovation, owners often decide to replace whitewashing with painting, but not everyone knows how to properly prepare the ceiling. It would, of course, be very convenient if the paint stuck to the whitewash, but, as experience shows, the whitewash must be removed. As a rule, the ceiling is whitewashed, if not annually, then at least once every three years, and the old whitewash is not removed, but simply a new layer is applied on top. Thus, the whitewash layer gradually becomes too thick, and if you paint it on top, the whitewash will begin to fall off in pieces along with the paint. Some advise painting over whitewash only if it is applied very thinly and the ceiling itself is free of problem areas - cracks, crumbling areas and other defects. But ideal ceilings are quite rare, so the question of whether it is possible to paint the ceiling whitewash has only one answer: you shouldn’t do it. The same applies to applying new paint to old paint: you should never paint a surface if there are traces of old paint there. After the fresh paint dries, the old one will begin to deform and lag behind the ceiling, and at the same time pull the new paint along with it. But if the paint does not fall off, the appearance of such a ceiling will be unsightly.
Is it possible to paint over whitewash
How to paint a ceiling without streaks and streaks
There is no prohibition on painting old plaster. Water-based emulsion is easily applied to whitewash using a roller or spray gun. But how long the paint will last on the plaster depends on the quality of the old coating.
Therefore, when renovating an apartment, many owners prefer not to undertake such work, but choose the following alternative options:
- installing suspended ceilings in an apartment over whitewash allows you not to modernize the old surface;
- Various plastic panels are introduced into the design of the kitchen and other auxiliary rooms, which are separated from the old lime at some distance.
But if a person does not have the opportunity to use modern repair methods, then all that remains is to use paints.
Then you must first make sure that there is a thin layer of whitewash on the ceiling and walls. Then the surfaces are examined for the presence of defects, cracks, and various stains. If all this is missing, then you can start painting without washing off the lime. The same actions must be performed if it is decided to use a water-based composition after whitewashing. You just need to wait for the applied lime to dry.
In what cases is it better not to paint the ceiling and walls over whitewash?
Do not paint with water-based paint over uneven whitewash.
The demand from specialists to dismantle the old coating in most cases is not caused by a desire to complicate life or add work, but by the need to protect people from future problems.
Pay attention to: Painting aluminum at home: compositions and processing methods
A whitewashed ceiling and walls, after treating them with water-based or acrylic paint, may simply lose their attractiveness, since under the lime coating the condition of the base, which has various defects, such as cracks and chips, depressions, is not visible.
When painting whitewashed surfaces, deformation of the new coating is possible due to unevenness of the old layer. The whitewash gets wet under the influence of the absorbed paint and then becomes sticky. In this case, lime sticks to the roller or brush and is then spread over the surface to be treated.
In addition, you will have to wash off the old whitewash in the following cases:
- There is a thick layer of plaster on the ceiling and walls. Due to its hygroscopicity, it will absorb paint, then swell, crack and collapse. In this case, the paint will bubble and become covered with cracks.
- If there are traces of leaked water on the surfaces being treated, then the paint, despite the selection of colors and textures, will stand out sharply in these places. Any attempts to correct the situation will not be successful.
- Old walls and ceilings have defects such as microscopic cracks and pits. Painting such a surface will sharply highlight these imperfections. Therefore, first you will have to work with a spatula and putty.
- Traces of mold and fungal infection appear. If you paint over them, these simple organisms quickly spread over all surfaces. Therefore, when this danger is identified, it is necessary not only to wash off the whitewash, but also to treat the room with antiseptics.
- The old coating begins to crumble spontaneously. Adding paint will speed up this process.
If at least one of these factors is identified before starting the repair, you will have to remove the old lime and then start painting.
Life hack: how to paint a ceiling over old whitewash with water-based paint with your own hands
How to paint a ceiling with water-based paint without spots or streaks
Traditionally, a self-respecting master prepares equipment for work. The list of equipment is not that long, but the presence of the presented tool is required.
Tools and equipment
- Roller - for acrylic emulsions it is better to take a plush or foam rubber one, and for synthetic-based materials - mohair. The same tool is useful for painting OSB or DSP.
- A set of paint brushes - for treating hard-to-reach areas. The coarser the bristles, the thicker the layer of water-based emulsion applied.
- Paint tray - before you paint the ceiling in your own apartment, you need to prepare this accessory, it will be more comfortable to work with.
- Painting tape - for fencing areas that do not need coating.
- A set of spatulas - needed for cleaning whitewash and filling uneven surfaces.
- Sandpaper – for finishing the surface.
- Step ladder - for working at height.
Don't forget about protective clothing. Goggles, gloves and a hat will also help.
The preparatory procedure can be much more labor-intensive than the coloring itself. However, if you want to eventually get a beautiful coating, you will have to work hard to remove the entire whitewash layer.
First of all, you need to assess the condition of the old coating and what it is. To do this, you should moisten the ceiling surface; if it does not stain your finger and has taken on a dark color, then the bleaching is lime. If it can be easily removed with a spatula, it is a chalk-based solution.
Now about how to prepare the ceiling for painting with water-based paint - the process includes:
- Place PET film on the floor and remaining furniture.
- Prepare a soap solution based on warm water and a sponge.
- There is no point in moistening the ceiling plane in squares or completely treating the entire area with the solution - it will dry out, after which the procedure will have to be repeated.
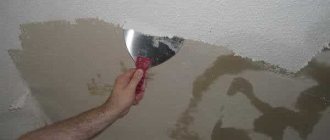
- Treat the wet area with a spatula, removing the layer of old whitewash.
- Wash off any remaining old coating with water.
- If necessary, putty uneven areas and cracks.
- Rub the dried putty with sandpaper and prime in 2-3 layers.
The most common are acrylic primers of a universal nature. They dry quickly and have no foreign odor. If the ceiling has a crumbling surface, then it is worth using deep penetration emulsions.
Coloring rules
Not everyone knows the nuances of implementing painting work. For example, neglecting the direction of the light flux results in visible marks from the passage of a roller or brush. To avoid such unpleasant moments, you should listen to the recommendations of the experts:
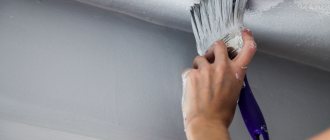
- Painting begins from the corners where the walls and ceiling meet. You need to start from the corner farthest from the front door, making a brush pass along the entire perimeter of the room 50-70 mm wide.
- The main painting is done with a roller in three passes, the first of which should be applied in a direction parallel to the direction of light from the window. The second layer is perpendicular to the first, and the third is directed towards the window.
- Each subsequent layer is applied after the previous one has dried.
Process technology
Before painting the ceiling with water-based paint in a whitewash room, you should prepare an emulsion. To do this, according to the instructions, the material is diluted and some is poured into a tray. Further work is performed through the following transitions:
- Wet the roller in the bath and run it along the rough surface, which will evenly distribute the emulsion over the roller.
- Make the first pass, starting from the corner of the left side opposite the window.
- The video should be played from left to right, and then change direction.
- Remove excess paint with a roller by rolling it over the painted area.
- After the first layer has dried, repeat the above operations to form subsequent layers.
During the process, you need to control the quality of the repair using a directed beam of light. Before complete drying, drafts should not be allowed to appear in the room. It is advisable to protect the painted surface from direct sunlight, which will avoid the appearance of stains.
Painting a whitewashed ceiling
How to paint a ceiling with water-based paint without streaks
If you don’t know what paint to paint a whitewashed ceiling, then we want to disappoint you - such paints simply do not exist. In other words, in order to paint a whitewashed ceiling, you first need to clear it of this building material.
This is explained by the fact that whitewash does not have sufficient strength, and also has the ability to roll off if, for example, PF-115 enamel is used when painting. Also, the number will not work with water-based paints, since whitewash cannot tolerate moisture, and especially water.
True, some on specialized forums advise thoroughly priming the whitewashed ceiling before painting and this, supposedly, will solve all the problems. Remember, and if you can’t, then write it down: whitewash cannot tolerate absolutely any contact with liquid products.
Even if you prime such a ceiling with the most expensive and high-quality primer, the integrity of the whitewash will be damaged under the influence of moisture. And, even if you manage to paint the primed whitewash on the ceiling without any problems in the future, then in a short time all this mass will simply fall on your head. This can even happen because the upstairs neighbors slammed the door hard! Not to mention private houses, which are subject to shrinkage every hour. For this reason, before painting, it is necessary to remove all whitewash from the ceiling.
Removing whitewash from the ceiling
Removing whitewash
Please note that there are many ways to remove old whitewash from a ceiling. Among all of them, the most popular is removing whitewash by gradually wetting the ceiling and cleaning it from the whitewash layer
When wetting the ceiling, you can use a spray gun. If you don’t have one on your farm, you can make a homemade version. So, you should take the nozzle from a regular sprayer for cleaning windows and put it on a simple plastic bottle.
It is not recommended to spray the entire ceiling at once, because while you clean a certain wetted area of the ceiling from the whitewash, another will have time to dry and you will have to do the wetting procedure again. This will significantly delay the preparatory process of cleaning the ceiling for painting.
Please note that before you start removing old whitewash from the ceiling, first cover the floor and kitchen furniture
As roofing material, you can use both old unnecessary sheets and ordinary newspaper. To minimize dirt, when cleaning the ceiling from whitewash, you can hold a piece of plywood or a plastic tray over the area being treated.
When cleaning whitewash from the ceiling, do not try to remove all of it. As soon as a minimum layer of whitewashing materials remains on the ceiling, you can proudly consider all the dirty work done. Now, the remaining layer of whitewash on the ceiling can be washed off with a sponge. Try to keep the size of the latter as large as possible. This will reduce the tedious task of rinsing the sponge in water.
With the above operation, you should also not scrub the ceiling to a perfect shine. Currently, there is a huge selection of deeply penetrating primers, which you will subsequently use to fix the remaining layer of whitewash, which will be quite enough for further painting of the ceiling.
So, in order to properly paint the ceiling, it is necessary to carry out high-quality preparatory work. This action is responsible for the final quality of the painted surface and its appearance. As mentioned above, a ceiling that has been painted with whitewash must be thoroughly cleaned and washed.
Removing the whitewash layer is quite simple. To do this, you need to take a lint roller and thoroughly moisten a certain area of the ceiling with warm water. After the whitewash has soaked, it will take about 5-10 minutes; it can be removed from the ceiling using a simple spatula.
Preparing the ceiling for painting
To achieve the best quality and long service life, it is strongly recommended that before painting with any type of paint, remove as much of the whitened layer as possible and carry out work to eliminate minor irregularities, depressions or scratches. This process is not as complicated as it might seem at first glance.
The ceiling, like any other surface, must be prepared before painting.
For high-quality surface cleaning, you can use two main methods:
- wet processing;
- dry processing.
Dry ceiling cleaning
When dry cleaning, the following tools are often used:
- grinder with grinding disc;
- electric drill with brush attachment;
- Grinder;
- sandpaper.
The dry cleaning process is carried out quite quickly, however, it has several significant drawbacks, due to which it is used extremely rarely.
Dry cleaning is fast, but problematic
- The main disadvantage is the large amount of dust. If work is carried out in only one room, then the room must be carefully insulated while ensuring good ventilation.
- This method is harmful to health; it is necessary to use personal protective equipment in the form of a respirator and goggles.
Video on how to remove whitewash from the ceiling:
Wet cleaning of the ceiling
With wet processing there is much less dust, and the method itself is much safer, however, it takes more time.
To work you will need:
- respirator;
- a small sharpened spatula;
- metal brush;
- roller with medium length pile;
- bucket with water;
- spray.
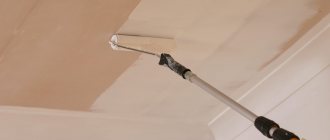
Before painting over whitewash, its base layer is removed as much as possible by wetting the surface of the ceiling using a conventional roller or spray nozzle. You need to wet a small area as large as you can handle before it dries completely. After applying the washing liquid, you need to wait a little more than half an hour and begin removing the previous layer with a spatula.
For maximum effectiveness, you can add a few tablespoons of liquid soap and 5-6 tablespoons of regular soda, which will significantly speed up the decomposition of the lime and make the removal process easier. Try to apply the solution in a generous layer, as lime absorbs it strongly, and the more it absorbs, the more effective the surface cleaning will be.
Not all areas of the surface can be treated immediately. In such cases, you do not need to dwell on them, but continue working further; you need to return to these areas after processing the entire surface and remove them using sandpaper or a metal brush. Before painting over whitewash, try not to use very sharp objects such as a chisel or chisel when removing its base layer, which can leave scratches on the surface. This is especially important if there is a leveling layer of finishing putty under the lime.
Selecting Tools
To apply the coloring composition you will need two rollers of different sizes, a soft brush, a tray with a grooved surface for squeezing, and a telescopic extension.
The brush should be soft so as not to leave marks from the bristles. You should never buy completely synthetic brushes, as they become unusable after only five to ten minutes of use. Natural bristles tend to “fall out” from the cage, remaining on the surface being painted. The best option is a brush with mixed bristles. It lasts a long time and does not lose lint.
The roller should not be made of foam rubber or thin synthetic thread. The first leaves bursting bubbles, which are then visible to the naked eye. The second loses lint-threads, which are extremely difficult to remove. To paint the ceiling, select a roller coat with piles of varying heights.
A wide roller is used to roll out the main surface; a small roller is used to roll out paint applied with a brush. This is due to the fact that the texture of surfaces painted with a brush and roller differs from each other. If you do not roll out the paint composition applied with a brush, then visually this place will look darker or lighter than the main surface. The pile height of the rollers should be the same.
The tray is necessary to squeeze out excess paint from the rollers to avoid uneven application. The telescopic extension allows you to paint the ceiling while standing on the floor, rather than crawling on a stepladder. You can also use a spray gun.
Technology of whitewashing the ceiling with water-based paint
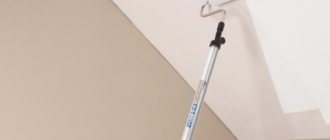
When the ceiling has already been prepared and the paint has been purchased, all that remains is to decide on the tool necessary to apply it. A simple and effective method of painting the ceiling involves using a roller with a handle more than a meter long. A roller with a pile size of at least 1 cm is placed on it.
In addition, we will need masking tape, a long brush, a spatula, and protective film for the walls and floor.
The first step is to cover the surfaces of the walls and floors with a protective layer of film or paper. This must be done as carefully as possible if the finishing of these surfaces has already been completed and it cannot be dirty. When painting the ceiling, splashes of paint will definitely fall on everything that is currently in the room.
Next, you should seal the seam between the ceiling plinth and the ceiling with latex sealant. If the plinth is made of wood, then in the places where it connects with the walls there will be holes from nails, which are also sealed, in this case with putty.
A mop removes from the ceiling all the dust that has settled on it when processing the wooden baseboard with sandpaper. The procedure for sanding the baseboard must be carried out after the putty has dried.
Water-based paint is poured into a special container.
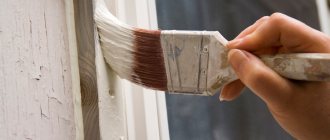
The first tool that will be used to apply the coloring composition is a brush. Using it, you need to paint a small area of the baseboard so as to cover as little of the ceiling surface as possible.
Next, use a large roller to begin applying the first layer of paint in a direction parallel to the light source (window).
The roller operation stops when the first area limited by the painted baseboard has been painted. After that, paint is applied with a brush to the next section of the plinth and the treatment of the ceiling with a roller continues. In this case, the surface of the plinth is approached so that the texture of its surface coincides with that which will be on the ceiling.
Next, you should wait until the paint of the first layer dries - this is about 3-4 hours, depending on the humidity and air temperature. The second layer must be done in the direction of the light falling from the window. That is, the roller movements are performed at right angles to the wall with the window and, accordingly, perpendicular to the first layer.
Removing the protective film and masking tape from the walls is carried out before the paint on the baseboard and ceiling dries.
If you have a crooked ceiling, then dilute the paint 30% with water for the second layer. This technique will allow you to remove darkening in the paint layer that occurs as a result of unevenness on its surface. When the distortions are very noticeable, the spots with spots on the first layer are treated with sandpaper with a grit of 4 or even finer. Then a second layer of paint is applied, diluted by a third with water, and no stains will be visible on the finished ceiling.
Drying gates
Drying under natural conditions will take a couple of days. To speed up the stage, you can use a hairdryer or heater to dry it. Then the process will be completed in 3-4 hours. When painting from the inside, you need to create ventilation, open the windows.
To speed up the stage, you can use a hairdryer or heater to dry it.
Painting gates is a simple process, but it requires the right selection of paint and varnish products. If you adhere to the work technology described in the article, you will be able to get a long-lasting result that will be pleasing to the eye.
Whitewashing the ceiling
For whitewashing I use water-based paint for many reasons:
- It is more stable than chalk or lime
- Does not require additional preparation.
- Does not have an unpleasant odor.
- More resistant to stains than other materials, which is why it is widely popular.
Painting works with water-based paint
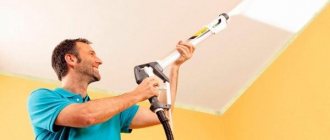
If we have a compressor with a spray gun in the garage, then this greatly simplifies the task; even in the absence of a spray gun, you can make various attachments with your own hands that work on the principle of a spray gun. I even came across a nozzle that included 2 hoses, similar to a gas welding cutter, one supplied air, the other a mixture, which is even superior to a spray gun and significantly lightens the load on the brush, unlike working with a spray gun.
As a last resort, you can use the same sprayer to whitewash with water-based paint. But I had to experiment for a long time with selecting a spray tip - the sprayer is designed for water, and the density of the whitewash is higher, so you need to pump up more pressure, and you need to make a wider tip with your own hands, like a spray gun, the diameter of which was selected experimentally.
When working with various sprayers for water-based paint, it is important to have a respirator, pre-glue all adjacent surfaces - baseboards, wallpaper, switch seats, I also glue small pieces of film along the entire length to the baseboard, so as not to accidentally catch the wallpaper, and settling microparticles of water-based whitewash will not settled on the walls. The work goes quickly with significant savings on water-based paint, which can be diluted with water; working with a roller and brushes takes much longer
But here there are many advantages - the layer of water-based paint is thicker, thanks to the fleecy coating of the roller, and therefore more durable, stable and durable than when working with sprayers
The work goes quickly with significant savings on water-based paint, which can be diluted with water; working with a roller and brushes takes much longer. But here there are many advantages - the layer of water-based paint is thicker, thanks to the fleecy coating of the roller, and therefore more durable, stable and durable than when working with sprayers.
In the absence of a roller, painting with water-based paint can be done with a wide brush; using the same principle, carefully moisten the tip of the brush in the liquid, after which you easily apply whitewash, making sure that the paint on the ceiling does not collect into bubbles, or that sagging and drops do not form when fresh layers intersect with each other.
When applying two layers of water-based whitewash in one direction, marks from the roller and brush will be visible. Especially when painting with a brush, be sure to paint 2 layers in different directions.
Ceiling painted with water-based paint
After work, water-based paint is easily washed off until it dries, so I never worried about the hoses from the sprayer, the spray gun, brushes and rollers, the main thing is to remember to rinse it with clean water in time.
After the water-based whitewash has completely dried, I carefully remove the entire film, the water-based paint usually does not lag behind the film, but sometimes it happens that where the film is attached there is not an even mark, or the ceiling is poorly painted in some places at the joints, I carefully correct such places with thin with a brush.
Understanding the types of paint
So, in order to understand what effect to expect from this or that coating, we need to understand what types of paints there are and what properties they have.
Lime mortar is exactly what we just looked at. Cheap, durable, with a lot of advantages and one drawback - the final surface after whitewashing is uneven and does not meet modern repair standards. Lime is sold in two types: slaked and quicklime. Quicklime is cheaper - but to pay it off, you need to suffer. And this is not so safe due to the release of a huge amount of heat upon contact with water - more than 100 C! It is easy to work with a ready-made, slaked one, and no preliminary preparations are required.
Silicate paint - used mainly for outdoor work on plaster or stone. The paint is extremely resistant to various atmospheric conditions, it does not fade, and can be washed if necessary. The basis for production is potassium glass, so it is not so cheap and widespread. There is no need to use this paint for interior decoration, unless you need exactly these properties.
Oil paints are made from drying oil using pigments and additives. Well suited for wood processing and very poor on hard surfaces. They are extremely rarely used, because they fade and peel off after just a few years.
Enamel paints form a durable surface through which water absolutely does not penetrate. Resistant to various atmospheric conditions and abrasion. Used for painting metal, wood and concrete surfaces. Widely used in Soviet times for painting walls in wet rooms, baths and kitchens. Nowadays it is used only for painting metal and wood.
Water-based paint is the queen of all modern paints. Occupies 90% of the market, used in many aspects of finishing work due to its low cost and versatility. It is made on a water or other basis and has the following properties:
- easy to apply;
- non-toxic;
- easy to wash off;
- allows water and steam to pass through;
- applied to any base;
- fades poorly;
- dries quickly;
- when applied it forms a smooth matte surface;
- happens to be waterproof.
There are the following types of water-based paints:
- polyvinyl acetate - fireproof, does not burn and does not support combustion, is used in rooms without moisture, mainly intended to create an even matte finish for the final finish;
- acrylic - resistant to water, made on the basis of polyacrylates, can be wet cleaned, is frost-resistant and withstands mechanical stress well, while it does not wear out and does not leave marks. Well suited for corridors, kitchens and toilets; there is no need to use such paints in bedrooms and other similar rooms;
- silicone - made on the basis of silicone resins, forming a water-repellent but vapor-permeable coating, used for painting walls and surfaces that require constant air exchange, helping the wall to “breathe”.
How to paint with water-based paint over whitewash
First, it is recommended to prepare all surfaces for further processing. Then a primer is applied. After its layer has dried, the main actions begin. The paint is used 3 times if a spray gun is used, since it produces relatively thin layers. When doing work at home with a roller or wide brush, painting is done in 2 layers. It is recommended to take breaks of 7-8 hours while working so that the layers have time to dry.
Surface preparation
Surface grinding.
In order for the ceiling and walls to be painted well, they must first be prepared. To do this, it is recommended to remove the top layer of whitewash. To make it come off faster, you need to moisten it with water, and then clean it off with a spatula after 15-20 minutes.
After this, the treated slabs are washed with clean water and then dried for several hours.
In this case, all defects appear, which are eliminated with a spatula and putty.
It is necessary to pay attention to the joints of the slabs, where the whitewash crumbles more and crumbles faster. Using fine sandpaper, sand all overlaps until smooth.
Then use a damp cloth or vacuum cleaner to remove the accumulated dust.
Painting - step by step instructions
A layer of primer is applied to the cleaned surfaces. To do this, choose mixtures that penetrate deeply into the whitewash. If there is a suspicion of the presence of fungi and mold, then use formulations that contain antiseptics.
The primer is applied with a roller or spray gun. It should cover all treated surfaces evenly, without streaks.
It is recommended to purchase masking tape before painting. It is used to cover vertical surfaces right up to the ceiling to protect them from paint penetration.
The paint is poured into a tray with a grooved bottom. A roller with short hairs is dipped into it, and after collecting the substance, the excess is removed by squeezing along the grooved surface.
Painting with a roller.
Before starting work, the composition is thoroughly mixed. To do this, use an attachment on an electric drill or a construction mixer. If you don’t have a spray gun, then use a brush to pre-treat the corners and joints in the places where the tape was glued.
Apply paint with quick movements. Drops and smudges must not be allowed to appear. Coloring is done in small squares, the sides of which slightly overlap each other.
After applying the first layer, wait for it to dry for 7-8 hours. The first time they paint parallel to the window opening, and the next strokes are made perpendicular to it. This allows you to get rid of defects in the form of stripes or spots.
If you use a spray gun, then to obtain the desired tone, it is advisable to first practice on a piece of cardboard. After completion of work, the device is disassembled and thoroughly washed.
According to experienced builders, it is better not to paint the old whitewash, but to completely remove it. But if this is not possible, then it is necessary to strictly comply with all the requirements of the technology for carrying out such work.
Surface painting
After the ceiling is ready for painting, it is necessary to prepare in advance all the tools and consumables for high-quality and quick painting. To do this you will need:
- finishing putty;
- putty knife;
- primer;
- dye;
- roller with fine or medium pile;
- corner brush;
- safety glasses and gloves.
To paint the ceiling you will need certain tools.
If there are scratches or gouges on the surface, they must be covered with putty and, after drying, rubbed with sandpaper. After this, the ceiling must be treated with a primer and left for 12–15 hours until completely dry. Finally, apply paint to the ceiling using a roller or brush. The paint is usually applied in two layers, with the last layer applied from the window towards the opposite wall. To paint corners and hard-to-reach places, we use a brush, after which the main area is covered with a roller or spray gun.
Preparation
The ceiling must be prepared for treatment with water-based emulsion. Moreover, experts recommend that when painting with any composition, you carefully remove the old finish. Only in such a situation can the surface be painted with high quality.
Although removing whitewash may seem difficult, if you use the right surface preparation techniques, it can be removed relatively easily.
Removing old coating from the ceiling occurs in two ways:
- dry method;
- wet method.
Let's look at both methods in more detail.
Dry method
In this situation, you will need the following tools:
- electric drill equipped with a brush attachment;
- grinder along with a grinding disc;
- sandpaper;
- Grinder.
The dry cleaning method, thanks to the use of the above tools, is carried out quite quickly. But it has several disadvantages, due to which it is used extremely rarely. The main disadvantage of this method is the huge amount of dust.
To carry out dry cleaning in a room, it must be carefully isolated. In this case, good ventilation of the room is necessary. Since a lot of dust will be generated during the processing of the ceiling surface, it is necessary to work only in personal protective equipment (goggles, respirator). After completing the work, all dust that has settled on the floor must be swept away. Then you need to rinse the floor thoroughly.
Wet method
The main advantage of this method is the minimum dust, which is much safer for human health. Although experts still recommend carrying out such surface preparation in a respirator. But the wet method takes much longer.
To remove trim using this method, you will need the following tools:
- metal brush;
- sharpened small spatula;
- a roller having a medium length of pile;
- spray;
- container with water.
The wet method involves the following steps:
First, you need to remove the maximum layer of whitewash by wetting the surface using a spray nozzle or a simple roller
Please note that you need to wet a small area so that you have time to wash off the whitewash before it dries completely. The solution should be applied generously, as the lime will actively absorb it. To increase the deoxidation of the whitewash, you need to add 5-6 tablespoons of regular soda and a few tablespoons of liquid soap to the water. After the solution has been applied, you need to wait a little (about half an hour). Then you can start removing the old finish with a putty knife.
Before painting, you should try to remove the main layer of whitewash from the ceiling surface. In this case, you should not use very sharp objects (chisels, chisels, etc.), as they can lead to scratches and other defects in the base.
This statement is especially important in a situation where under the whitewash there is a well-leveled layer of finishing putty
If scratches and gouges are found on the ceiling, they should be covered with putty. After it dries, all resulting roughness must be rubbed off using sandpaper.
After the ceiling has become smooth, it is necessary to prime its surface before painting. A primer applied before painting will allow for greater adhesion and uniform distribution of the paint composition over the ceiling surface.
Tool preparation
Painting any surface requires purchasing the appropriate tools. You can choose among several options, based on the preferences of the master. Before choosing, it is useful to study the features of each. You can paint the gate with the following tools:
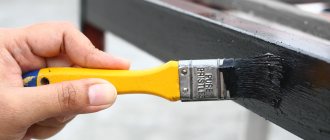
- Brushes are a well-known tool that can be used to paint any surface. They are also suitable for working with metal, but when painting, you need to take into account that it is difficult to achieve a high-quality result; brushes leave marks;
- Rollers make the process of painting large areas faster. They distribute the paint well over the base, but they cannot cope with hard-to-reach places; usually the work is combined with the use of brushes;
- A spray gun is an option that allows you to make a beautiful and even layer; the process will take a little time. But this is provided that you have some skills in using it; it will be difficult for a beginner to set up and distribute the composition over the surface, but if you have experience, the result will be reliable and attractive.
Painting any surface requires purchasing the appropriate tools.
At what temperature can gates be painted?
Working at the optimal temperature helps ensure proper paint distribution and drying. Experts call the temperature range between +10 and +20 degrees suitable. It is better if there is no wind on this day. It can cause specks to get onto the wet layer, and the drying process will not be uniform.
If the work is carried out in a different temperature regime, the following defects will be observed:
- The coating can swell when the metal is exposed to high temperatures; its heated state will repel the layer, and the paint will not adhere well;
- Obtaining an uneven dull shade;
- Manifestation of leaks and sagging.
Experts call the temperature range between +10 and +20 degrees suitable.
How to paint a whitewashed ceiling
When the surface is ready for painting, one more question should be resolved: how to paint a whitewashed ceiling. Of course, you can choose another finishing method: it can be covered with a suspended covering; fabric-based stretch ceilings are no less fashionable today; however, painting is also one of the common finishing methods
At the same time, it is important to decide not only the question of how to paint the ceiling after whitewashing, but also how to paint
It will be quite easy to paint the ceiling with water-based paint over whitewash. In general, experts believe: you can paint with either enamel or water-based paint. Painting using water-dispersed material is especially popular today. You can paint using a special sprayer; you can also paint with a regular roller. If a rich color is required, the paint can be applied in two layers.
The paint is diluted according to the instructions supplied with it in a certain ratio. In this case, it is better to leave some volume in reserve in order to be able to maintain tonal uniformity. The roller is used with long pile: it rolls out well and minimally overlaps the paint stripes. If you plan to paint it with enamel or other paint, then it can be primed with the paint itself, diluted in a ratio of one part to five.
Whitewashing begins from the edge of the wall, gradually moving to the center. The farthest corner is taken as the starting area - the one that is located directly opposite the front door. This is what needs to be painted first. Then you should take a smaller paint brush and walk with it around the entire perimeter of the room, painting a strip about four or six centimeters wide with it.
Roller movements should be smooth. Don't forget about the brush, which is not particularly effective when painting a large surface, but it is very convenient and almost indispensable for hard-to-reach places. After the first layer of paint is applied, it must be allowed to dry and only then can you begin to apply subsequent layers.
Typically the paint takes about twenty-four hours to dry. If you use a sprayer, you should apply three layers of paint for uniformity. When a roller is selected for work, it must be moistened in a bath of paint so that the paint is distributed evenly over its entire surface. The roller should be moved in several directions, for example, first from left to right, and then vice versa. You can also paint with a roller from top to bottom, and then back - from bottom to top.
The quality of the work performed can be checked with the help of light: to do this, you just need to look at it from such an angle that the part of the surface that was painted gets good light, which will immediately reveal all the defects. After completing the work, the room should be left to dry for approximately twelve hours. At the same time, care should be taken to ensure that there are no drafts in it. It is also undesirable for the painted surface to be exposed to direct sunlight.
Choosing paint for a wooden floor
How to paint a wooden floor? When visiting hardware stores, people are sometimes overwhelmed by the wide range of dyes available.
Each type of paint has its own advantages and disadvantages, which we tried to reflect in this table:
| № | Dye name | Advantages | Flaws |
| 1 | Oily | Wear resistance | Takes a long time to dry |
| 2 | Acrylic | Water resistance | Low wear resistance |
| 3 | Nitro enamels | Fast drying | Toxicity |
| 4 | Lucky | Aesthetics | — « — |
Oil paint
Oil paint today is used mainly to renew old painted floors. Oil paint is diluted with natural drying oil. The painted surface is not afraid of moisture and resists mechanical stress. The dye is absolutely non-toxic.
Acrylic paint
Acrylic-based dye is advantageous in that ordinary water is used as a solvent.
However, in rooms with intense mechanical loads (active walking), the painted surface wears out quickly.
Nitro enamels
Nitro enamels are attractive because they dry almost instantly. However, when burned, they release substances hazardous to human health. For more information on how to paint, watch this video:
Lucky
Varnish coating extends the life of wood
Varnishes are mainly used to cover parquet flooring.
Parquet coated with varnish takes on a beautiful appearance.
The varnish emphasizes the structure of the wood and is resistant to high indoor humidity.
This floor is easy to use. Easily withstands wet cleaning.
How to paint for whitewash
But since we all want to keep up with the times, and prefer painted surfaces, the question becomes: is it possible to paint over whitewash? How and with what? You can immediately answer that yes, but there are some nuances here. Let's look at them in more detail.
Is it possible to paint over whitewash
Painting, although undesirable, is possible. And only in those cases if:
- There is a very thin layer of whitewash;
- It holds up well, does not crack or crumble.
Otherwise, when painting, it will be removed with a roller. And in the end we will get a poorly painted and unaesthetic surface.
How to paint over whitewash
Before applying paint, the surface is coated with a deep penetration primer. Then, it is given time to dry completely. And then they test the feasibility of painting by scratching the surface. If it is easily damaged and removed, then it is better not to risk it and not paint it. In this case, you cannot do without completely cleansing the surface of chalk. Well, if the primed surface passes the test, then you can safely start painting.
Water-based paint for whitewash
If water-based paint is chosen as the paint for painting the surface, then you can do without a primer. This type of paint itself will act as a primer, binding and securely fixing the chalk particles.
If the layer of chalk or lime is thin, holds tightly and does not have swelling or cracks, then water-based paint applied to it will last for many years.
In what cases is it better not to paint the ceiling and walls over whitewash?
It is strictly not recommended to apply paint to chalk or lime if:
- There is a thick layer of whitewash with cracks and swollen areas;
- If you plan to apply oil paint or enamel.
In order not to take risks and end up with a bad result, it is better not to save time and effort, but to immediately remove the layer of chalk or lime. Then the result will be much better and will last for many years.
How to apply paint to whitewash. Methods for preparing ceilings or walls for paint application
If it is not possible to paint the ceiling or walls over the old coating, then you need to clean it off. This can be done depending on the thickness, applied layer and quality.
But in any case, the first thing you need to do is take care of all the furniture in the room. It must be closed with film and tape to avoid damage.
If the layer is thick, but does not adhere very well, then it can be removed with a spatula, after wetting it. Then you need to fill all the cracks and level the surface. And only then you can sand and prime it, preparing it for painting.