Everyone wants to admire in their home perfectly smooth, even walls, even geometry of lines in rooms and impeccable finishing. If the pleasure of a perfect renovation is still ahead of you, then you are faced with one of the most important questions - how to level the walls?
The walls in an apartment are usually leveled:
- plaster;
- drywall;
- putty (for small differences up to 1 cm).
Each of these methods has advantages and disadvantages. After analyzing them, you can decide for yourself which material to choose for leveling the walls and what is best suited for your apartment.
Selection of building mixture
Today, the construction industry offers a variety of mixtures for leveling walls, ranging from sand-cement, cement-lime and ending with gypsum, which is in demand for individual housing. What is the difference between them?
To make the right choice, you need to:
- take into account the amount of work to be done, room conditions (for example, humidity);
- Using a plumb line and level, approximately determine the curvature and unevenness of the walls;
- evaluate your financial capabilities, because the cost of plasters differs, including depending on the brand.
Basic alignment
To hide small irregularities, you should use gypsum plaster. It evens out differences of up to 50 mm. To prepare the solution, you need to pour water into a bucket and pour the plaster into it; you need to mix the mixture with a drill. The solution can be used for 40 minutes. Plaster allows you to firmly adhere to the wall. It must be smoothed out with a spatula after application.
Cement based mixtures
The grade of cement determines the quality of the dry mixture (M300, M400): the higher it is, the stronger the coating. For walls in residential premises, it is enough to choose cement grade M150, which is optimal for plastering work.
The amount of sand in the mixture and the size of the fractions affect the purpose of the work:
- Sand with larger fractions is suitable for rough rough finishing.
- For fine finishing, fine-grain material is selected.
Modern sand-cement mixtures cannot do without special polymer additives, which give the material plasticity and improve adhesive properties.
Advantages of cement-sand mixtures:
- Can be used for interior work in damp rooms. It is best to level the wall in the bathroom with cement-based mixtures.
- A lower price, which distinguishes them favorably among all building mixtures.
- Durability of the prepared solution.
USEFUL INFORMATION: Advantages and disadvantages of walls made of aerated concrete blocks
Disadvantages:
- Tendency to cracking, especially if the base of the wall is poorly prepared and has drawn out all the moisture from the applied layer.
- Long drying time for layers.
- Labor-intensive application on walls.
Let's name some characteristics of a dry cement-based mixture:
- The thickness of the layer for a concrete wall without the use of reinforcing mesh should not exceed 20 mm, for brick - 25 mm.
- Consumption is approximately 1.8 kg/sq.m. m with a layer thickness of 1 mm.
- The price of cement-sand plaster is from 145 rubles per 25 kg.
Properties and composition of cement plaster
Plaster cement mixture is a material that belongs to the category of the same products that are used to level walls.
It is not at all difficult to prepare such a composition with your own hands - it requires three components: water, sand, and cement itself.
And now in more detail:
- The function of the binding component in the plaster mixture is performed by Portland cement. The brand of cement for plastering walls is selected depending on the purpose of the material. Namely: for indoor work you can always choose M200-M400 cement, and for facade finishing, it is better to choose M500.
If you are going to plaster any room where there is a high level of humidity, then it is better to choose a brand that is more durable. M400, for example, will do just fine.
- Quarry sand works well as a filler (the main thing is that it is washed). The material of the middle fraction shows excellent results. In addition, “hog sand” is also often used - it is easy to recognize by its characteristic yellow tint. For such purposes, it is better not to use river sand, as well as material that contains silt, clay or dusty impurities;
- The mixture of sand and cement is mixed with water. For this task, use only clean water (purified from silt, dirt, debris, and other mixtures). Simple tap water is suitable, as well as spring water, well water, and industrial water.
Plastering walls with cement will help here.
This simple composition is enough - the solution will be a strong, reliable and durable coating in the future, which will ideally last for decades (perhaps even longer). The main thing is to correctly follow the preparation recipe first, and then the application technique.
You can also plaster walls with cement in facade work - the material is not afraid of frost, and it is also not afraid of moisture. Characterized by exceptionally high wear resistance and strength. It cannot be said that the surface quality will be the highest, but taking into account the fact that the technology is usually used for rough leveling, the result is definitely acceptable - this should not be denied.
Additives to the classic composition
To improve the quality of the future surface and increase adhesion to the base, certain additives are often added to the composition of the classic solution, which we will now talk about:
- Gypsum
- thanks to this material, the hardening time of the solution is reduced and the surface quality is increased. It is used to finish ceilings; it is also used to treat hard-to-reach places, where the speed of setting of the solution is of great importance; - Lime
– helps to increase the quality of the surface and affects the abrasionability of the coating. Thanks to this additive, the weight of the finishing layer is also lighter, which is important. Vapor permeability improves. Lime should be added to the plaster mortar in a slaked state - usually in the form of an aqueous solution or in the form of a dough. We are talking about small quantities - 0.1-0.8 of the total volume of cement; - PVA glue
– increases the ductility, strength and adhesion of the material. The coating will be strong and monolithic. Its characteristics will correspond to polymer cement plaster - this is a very good result; - Liquid soap
- used in cases where it is necessary to increase the plasticity of the solution and increase adhesion to the base. By using liquid soap, you can safely apply thicker layers, since the solution flows less with such an additive and sticks to the base much better. In addition, it should be noted that the surface is smoother and more even; - Factory-produced plasticizers and additives
- depending on the composition, these additives can be used to increase frost resistance, moisture resistance, ductility, strength and other properties of the solution. In addition, among these additives you can easily find antifungal and antiseptic drugs, which also have a beneficial effect on the quality level of the plaster.
The classic plaster cement composition is often supplemented with additives to improve quality
If we talk about the characteristic properties of cement mortars, we can mention their shrinkage. It is much more pronounced compared to lime and gypsum compositions. So, you are unlikely to be able to get a perfectly flat surface without the appropriate finishing coating.
Cement-lime mixtures
In the range of cement mixtures there is also a place for cement-lime mixtures. Adding lime to cement increases the plasticity of the solution; its properties are similar to gypsum, but at the same time more durable.
Advantages of cement-lime leveling mixture:
- Prevents the formation of fungus and mold. The coating regulates the humidity conditions in the room.
- The solution adheres firmly to the wall, including wood and concrete.
- When dry, it does not crumble or crack even when drilled.
Flaws:
- Low compressive strength.
- The price is higher than that of cement-sand plasters, from 205 rubles per 25 kg.
Primer: treating bathroom walls before laying tiles
Separately, I would like to say about the choice of primer. If the main goal you want to achieve with a primer is good adhesion of the tile to the surface, then contact concrete is suitable. It can be used even when there is still paint on the wall, but the wall is durable.
And if you need to fix a surface that is not the most durable, you need an impregnation primer. In this case, there may be 2-3 primer layers. Well, the thickness of the layer depends on what the walls are covered with.
So, the calculation will be as follows:
- For cement mortar, layer – 5 mm;
- For lime and gypsum, layer – 7 mm;
- Well, the final thickness of the soil should not exceed 17 mm.
And remember the golden rule of repair - only after the previous layer has completely dried can the next one be applied. Otherwise, all the work may go down the drain.
It happens that the adhesive solution just doesn’t want to come off - and this is the most difficult part of this repair. If you do not accept drastic measures such as an angle grinder, you can persistently moisten the walls for several hours after cleaning the seams. Then the solution softens, and when you drive a chisel under it, the tile will most likely be removed along with the solution.
Gypsum mixtures
For many, there is no longer a question of what is the best way to level walls, because gypsum mixtures occupy the first place in the popularity of plasters. They have excellent leveling properties, which means you don't have to use putty before finishing, and are very easy to apply.
Let's list other advantages of this material:
- Mineral, environmentally friendly material that does not contain harmful components.
- Does not shrink, does not crack, does not delaminate.
- Maintains a comfortable indoor microclimate due to the ability to absorb and release moisture.
- Consumption for the same thickness of the plaster layer is 2–3 times less than that of sand-cement mixtures.
- The low density of the material allows it to be applied in a thicker layer in one go, the thickness of which can reach 60 mm.
- Good adhesion and low weight of the material allow it to be used on poorly absorbed surfaces.
- High plasticity and fast setting, unlike sand-cement mixtures.
- Good heat and sound insulation.
- The result is absolutely flat and smooth leveled surfaces.
USEFUL INFORMATION: Do-it-yourself textured plaster: how to make decorative plaster from putty
Gypsum plaster is used to eliminate large unevenness, differences both in height and horizontally, chips and potholes. Apply in a layer thickness from 5 to 60 mm.
Disadvantages of gypsum plaster:
- Not suitable for rooms with high humidity (above 60%). The apartment has a bathroom and a kitchen.
- The speed of working with the finished solution should be high due to its rapid setting. You will have to prepare the solution in small portions.
- Low strength.
- Relatively high cost of the product. Gypsum plaster of a domestic brand costs from 275 rubles per 30 kg, the popular “Knauf Rotband” - from 360 rubles.
Gypsum plasters from different manufacturers are similar in their parameters. To properly follow the operating mode, you need to know:
- Working time with the prepared solution is about 20 minutes.
- Plaster consumption is approximately 8.5 kg/sq.m. m with a layer thickness of 10 mm.
- The total drying time for plaster on the wall is 7 days. Only then is further surface treatment possible - gluing wallpaper, painting, etc.
Installation work
For people who are interested in the practical application of all the tips that we discussed in this material, we offer step-by-step instructions on how to install cement plaster.
Here it looks like this:
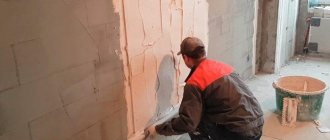
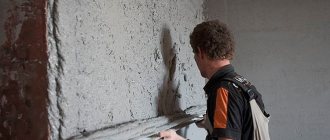
First, the surface is cleaned of old finishes and dirt.
- First, we clean the wall of all old coatings. We also remove hoops, stains, and dirt. We repair all serious defects and cracks (they are usually present on the surface). The surface must be impregnated with a primer. It is important to choose a deep penetration primer for the job;
- Next, you need to take a metal mesh (it must be galvanized or coated with polymer paint) and put it on the wall. To do this, use dowels with wide caps. There must be at least 15 fastenings for every meter of area; as a result, the mesh should not sag - that is, there must be a certain tension.
Self-tapping screws are screwed into the wall
- They are screwed into the upper corners of the wall being treated using self-tapping screws, and plumb lines are hung on them. A pair of self-tapping screws are also screwed into the lower corners - it is on them that the place where the plumb line will come into contact with the thread will be marked. Next, in this place you should tie the thread - this is done to the bottom screw. Further, in those places where there are fastenings of vertical threads, tie horizontal ones - they will connect the lower and upper screws (that is, in pairs). It is important to ensure that the distance between the horizontal threads and the wall is at least 150-200 mm;
- Beacons are placed along horizontal threads; the beacons themselves are usually made of metal profiles. They are fixed with alabaster or cement mortar. The step between the beacons is 150 cm, and the distance between the first beacon to the corner and the last is 300 mm;
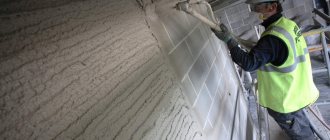
- Now you need to prepare the solution, throw it on the wall so that you get a continuous layer. For such work, a regular trowel or a special ladle is used. If the layer does not reach the beacons, you need to wait at least six hours and add a second layer. It is leveled with a rule: they simply pass it from bottom to top along the beacons - the main thing is not to do this very quickly. That is, the solution must have time to level out. All excess material is simply removed and thrown into a container with the solution.
At the beginning of work, cement plaster can simply be thrown onto the surface
- Once the base coat has been applied and leveled, wait approximately six hours. Then you can apply the finishing layer - a trowel, grater or spatula will help you here. The work is done in the same way as with putty - the material is simply rubbed into the main surface. If we talk about increasing the thickness, then everything should be done minimally; the main task is to fill all the depressions, pores and irregularities;
- When 100-150 cm of the surface has been covered with finishing, you can start grouting. A grater is used in this work. The damp, clean working surface of the tool is simply pressed against the surface to be finished. Next, you need to perform zigzag and rotational movements. This way you will rub out all scratches, pores, defects, pits, and other irregularities. The edges of the grater will cut off the protrusions, due to this you will get a really smooth, perfectly flat surface. Of course, not immediately, but after a certain time.
When working with smooth surfaces that have poor adhesion, you can apply special notches on them and then spray the walls with a special cement hammer (sand and water in one to one proportions - so that a liquid consistency is obtained).
When working externally, cleaning the base is also required.
Simply dip a broom into the solution, then hit it on a stick - this will cause splashes to fly onto the wall. This is exactly what we need.
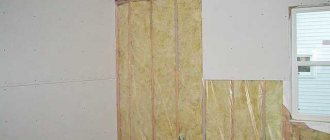
Advantages and disadvantages of leveling with plasterboard
What do you use to line the walls in your apartment if you want to make repairs quickly? Drywall allows you to quickly get results without having to deal with long waits, debris, dust and dirt. Using this material, you can eliminate even very large differences on the walls vertically and horizontally. And most importantly, all the work can be done independently, without resorting to anyone’s help. The following methods of installing gypsum boards on walls are distinguished:
- Frame method, in which gypsum board sheets are attached with self-tapping screws to a metal profile mounted on the wall using guides and vertical posts fixed to the floor and ceiling.
- A frameless method that involves gluing drywall to the wall using special compounds. Applicable if the wall has a slight slope.
By choosing drywall, you get:
- smooth and smooth walls with less effort and time compared to plastering;
- the opportunity to additionally equip sound and heat insulation, as well as conduct hidden wiring and install switches and sockets without gating.
USEFUL INFORMATION: How to make a plasterboard partition with a door with your own hands
But drywall also has its disadvantages:
- Installing a plasterboard wall reduces the space in the room.
- A wall made of such material is fragile and weak and can be damaged by an accidental blow.
When leveling walls with plasterboard sheets, you need to choose the right type of plasterboard.
How to check the quality of plastering work
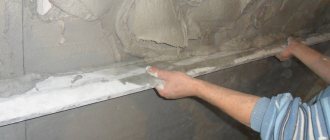
If you decide not to do the repairs yourself, but to hire a team of finishing craftsmen, then you will need to take part in the process of accepting the finished work. And here it will be very important to check the quality of the plastering work. This can be done in different ways. For example, use a new building level and a long rule (about 2-2.5 m).
First check for significant horizontal and vertical deviations. Differences are permissible, of course, but they should not exceed 1 mm per 1 meter of length. And their total height over the entire surface should not be more than 5 mm. There should be no more than 2 irregularities on the walls per 4 square meters, and even then with very smooth outlines. A long rule that is applied to the walls and ceiling vertically and horizontally in several places will help you calculate them. Its plane should not rise above the surface of the plaster by more than 2 mm.
Checking the walls with the rule
The most difficult thing to check is the evenness of the surface in places with batteries, sockets, switches, and near windows, but it is necessary to make sure that the walls there are even. And in general, surfaces need to be checked everywhere, not just at eye level. If there are uneven spots somewhere, especially in the area of window and door openings, then cracks will form in these places when installing the platbands.
If the list of works stated the alignment of angles up to 90 degrees, then do not forget to check this item during acceptance. Here they find out whether there are deviations in degrees horizontally. Moreover, even seemingly insignificant deviations are already violations. An angle of just 89.9 degrees on a wall 5 m long already gives a deviation of 1 cm, let alone large values.
Advice! Don't forget to check the strength of the coating. There should be no cracks or loud sounds when tapping the walls.
You can check the evenness of the corners with a tape measure. Measure the room along two diagonals and compare the lengths. If they are equal to each other, then the room is strictly rectangular, the corners are straight and even.
You can also use a square with long sides (at least 0.5 m) to check. It needs to be applied to the corner in several places, moving from floor to ceiling.
Checking corners with a square
If you needed to make opposite walls absolutely parallel to each other, then use a tape measure to measure the distance between them at the beginning and at the end. If the distances are equal, then the walls are truly parallel.
Video - Checking the quality of plaster
Using putty to level walls
Puttying walls without plastering can be carried out if the wall unevenness is small, within 1 cm. This is only possible in panel houses with smooth concrete walls; the brick will have to be plastered in any case. Putty is good for filling recesses and depressions. The procedure is carried out in two steps: the first layer is applied with a starting putty mixture, and after drying, the finishing layer is applied. Then everything is carefully sanded and cleaned, the wall turns out even and smooth.
The most common types of putty mixtures:
- cement;
- plaster;
- polymer.
The advantage of leveling walls with putty is the simplicity and ease of use of the finishing material. There are ready-made and dry mixtures on sale, which are diluted to a thick, creamy consistency. The solution is applied to the walls without effort, spreads easily and lies evenly.
Each layer applied to the wall should not exceed 5 mm and be well primed. The room temperature is maintained within the range from +5 to -30 C°, without drafts and overheating.
Deciding how to level lopsided walls is not a problem these days. The choice of building materials is huge, you just need to take into account the conditions in a particular specific case. How to level the walls in an apartment, on your own or with the help of specialists, is up to you to decide.
How to properly prepare walls with your own hands
To achieve the perfect wall, you don't always need to call in a professional. You can do it yourself, you just have to spend time. Let's see how to prepare the walls for finishing on your own.
Important! Remember that each of the steps described below is very important. Don't neglect any of them. The early stages are considered even more important than the subsequent ones, since defects formed during the preparation of the base cannot be corrected during finishing.
Plastering and puttying are important steps that should not be neglected.
The first step is to prepare the base itself. This is exactly what we briefly talked about above. At this stage, the remnants of old materials, if any, are removed, and it is also necessary to remove dirt, dust, and grease stains, if any. The easiest way to sweep away dust is with a brush or vacuum cleaner. Next, the already cleaned surface is treated with a primer. It will increase adhesion, and the materials that you apply next will adhere better and more reliably.
Then we start leveling. First, with the help of beacons, the so-called final alignment plane is formed. Beacons made of metal or plastic are installed strictly according to the level.
Important! Remember that after the plaster has dried, the metal or plastic beacons will need to be removed from the surface, and the resulting cavities will need to be sealed with plaster.
After installing the beacons, you can level the walls with plaster. Having prepared the solution according to the instructions indicated on the package with the dry mixture, apply it to the surface and then level it using the rule, focusing on the beacons. This layer defines the geometry and plane.
There is also visual plaster, when large holes and unevenness are hidden with a layer of plaster. This is an economical option, since plastering is not carried out over the entire wall. It should be used only in technical rooms where aesthetics and beauty are not important.
The next stage is making it smooth. Here the finishing putty is already applied in a layer of 1 to 5 mm. Remember that before applying the next layer, the previous one must be dry. After the finishing putty has dried, the surface must be sanded with sandpaper and the surface must be cleaned of dust and debris.
It is important to sand the walls thoroughly
Advice! To avoid scratching the wall, do not use a vacuum cleaner at this stage. It is better to take a slightly damp cloth and wipe the surface with it. You can use a mop with a microfiber attachment. The main thing is to wring out the fabric well.
After all these stages, the walls can be covered with wallpaper. If you decide to paint them, it is better to add one more stage of preparation - the so-called superfinish leveling. It will create an ideal surface without the slightest irregularities. At this stage, a polymer putty is usually applied, which is called superfinish. It has a uniform structure, is easy to use and is applied in a very thin layer. After it has dried, the wall must also be sanded with fine-grained sandpaper, and then dust must be removed from the surface.
Video - Sequence of painting work
Preparing the base
Before you start leveling the surface, you should prepare it. Assess the quality of the wall so that it does not crumble or delaminate.
| dismantle the old surface | all decorative and protective coatings must be removed mechanically | You can use a tool such as: a spatula, a rough brush or a grinder |
| If there are old fasteners in the wall (screws, nails), they need to be pulled out | the remaining recesses should be sealed and sanded | this can be done with pliers or a handy tool |
| degrease the wall and treat it against fungus | apply a special chemical | using a brush or roller |
The preparatory work is quite labor-intensive and dirty, but must be completed. If you don’t do them well, then all other finishing efforts will be in vain.
Plastering process
Having taken the necessary tool, perform the plastering operations step by step:
- The mixture is diluted in a container, following the manufacturer’s recommendations. For mixing, use a construction mixer or a drill with a special attachment.
Plaster, especially gypsum, hardens quite quickly. Therefore, you should not mix a large volume at once: it is difficult to work with a thickened solution, and some of it may simply disappear.
- Using a spatula or trowel, spread the plaster between two beacons so that it protrudes slightly above their surface.
USEFUL INFORMATION: An alternative to a roller and brush: to paint walls, choose a spray gun
- The most important and time-consuming stage: the rule is to level the plaster from the bottom up, pressing it tightly with your hands to the beacons. At the same time, smooth turns of the tool are made to the right and left, evenly distributing the mixture throughout the entire filled volume.
- If there are small depressions left on the surface, carefully add the solution to them and smooth them out with a spatula.
- So, step by step, all the niches between the beacons are filled with plaster.
- After allowing the solution to set, remove the profiles or slats that serve as beacons. Then the holes from them are leveled and smoothed with a grater.
Some craftsmen prefer to leave beacons in the wall, covering them with a thin layer of mixture on top.
All stages of applying plaster are shown in detail in the training video.
A complete step-by-step guide can be found here.
Necessary materials and tools for work
To level the surface you will need certain material and tools. You will need building mixtures: primer, plaster, putty. In addition, you need:
- painting mesh - metal, plastic or fiberglass;
- plaster beacon - as a supporting guide;
- finishing panels - wooden, plasterboard;
- brush or roller;
- container for mixing the mixture;
- spatulas of different sizes;
- plaster rule and trowel to apply or remove excess mixture;
- surface cleaning material.
Also, an electric machine for stirring mixtures and a machine for mechanized plaster would be an excellent assistant, but you can do without them
Preparatory stage
It all starts with preparation. Wall leveling technology includes the following steps:
- Remove the old coating, tap the surface to identify weak areas.
- Remove the old fragments and fill the potholes with putty.
- Clean the surface, remove dirt and dust.
- Apply a primer layer to improve adhesion so that the plaster of the walls in the apartment is of high quality. You need 2 coats, leaving 3-4 hours for the first to dry. The drying speed is indicated on the packaging.
Now we’ll learn how to properly level walls with putty.
Straightening with putty
Puttying is the most economical and fairly simple method. Used for slight curvature. Two types of putty are used - starting and finishing. The starting putty has a coarse texture and is used to seal large cracks, the depth of which exceeds 2 cm. The finishing putty is more plastic, uniform, and is intended to create the most even surface possible.
When carrying out puttying work at the preparatory stage, it is important to prime the wall. If when using plaster this advice is advisory in nature, then when using putty a primer is required. Otherwise, if there is dust or other tiny particles of debris, the mixture will not stick.
With this technology, a spatula or construction rule is used. The rule is used when applying starting putty, in this case the work progresses much faster, and the result is of better quality. To complete the work, the last stage is to paint the walls. It is also possible to use decorative plaster to complete the work.