Many homeowners prefer to use paint rather than wallpaper when decorating walls. More often, this method is chosen by more creative individuals, because by showing imagination, you can create an individual, effective, stunning design! How carefully you need to prepare walls for painting, how many times to repaint, what is the optimal number of layers - we’ll talk about this and more in detail.
Preparing the walls
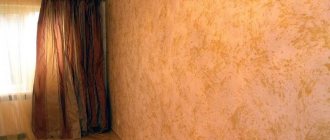
If we talk about the thoroughness of preparing walls for painting, in fact this is not always important. It all depends on the specific tasks and requirements: whether the surface should be perfectly matte, what shade is expected, whether there is enough natural light in the room, etc.
A striking example in the photo: if the walls here weren’t perfect, all the irregularities and defects would be clear to see.
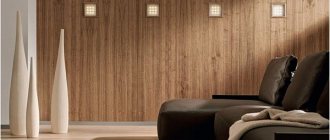
And somewhere quite the opposite, the very style of the room dictates the principle of decor - a kind of slight negligence and a kind of deliberateness, allowing for less strict requirements for the design of surfaces.
How to paint walls in an apartment or room: work order
High-quality painting of surfaces is a rather complex and labor-intensive process. Therefore, before starting work, you should familiarize yourself with how to paint walls in an apartment or room in order to get a satisfactory result.
Repair activities, regardless of the finishing method, are carried out using a certain technology, including preliminary preparation of the base, initial and finishing finishing. Painting walls is no exception.
And the first thing you need to do is clean the walls of the old coating. Ideally, the previous finish is removed down to the concrete base. However, in some cases this is quite difficult, so the surface should be cleaned as much as possible. The main thing is that there are no unstable or crumbling areas left.
After all the walls have been cleaned, the surface is primed. This will strengthen the base, improve its adhesion to finishing materials and additionally remove dust from the surface. If fungus or mold is found in some areas, you must choose a primer with antiseptic properties. Or additionally treat the surface with an antifungal agent.
Selecting a shade
Many people wonder: should I try different shades immediately on the wall or on paper, which I then apply to the wall? Of course, you can use the second method, but still the first option will be more prudent. After all, the surface of a wall for painting is not at all like a piece of paper. There are different absorbency, hiding power, etc. Just do your test paints in the least visible places. So, you definitely can’t go wrong with the future color of the walls.
How many times can you repaint the walls?
If you think that you can repaint the walls as much as you like, then, alas, this is not entirely true. Only light colors applied to well-filled walls allow repainting in similar colors.
As for the rich colors, and even the wallpaper on top intended for painting, most likely the wall will withstand two or three attempts at repainting. The fourth time the wallpaper will simply peel off due to the thick layer of paint. Not surprising, because in order to smooth out one color and get a completely different one, for example, instead of green - lilac, you need to add a two-layer intermediate paint in white.
How and with what to paint
To begin with, we will define the basis for the division of painting work, and bring out several main and relevant points:
- Types of dyes used in the work.
- Tools that can be used to paint a surface.
- Coloring technique.
Important! Each of the proposed components cannot exist separately, that is, in a paint shop everything is interconnected and a certain material and a certain tool are selected for a certain technique. This is how the technique, price and final result are formed.
Types of paint
Before moving directly to the variety of methods and types of coloring, let’s identify the types of paints that you can use with your own hands:
- Water-based . One of the most sought after and popular paints. It is used everywhere in any room, it is safe, dries quickly, and has all the advantages as a dye “for people”.
- Acrylic . No less popular, but more functional.
- Oily . This dye cannot be classified as a modern material, but it continues to be in demand.
- Powder paints . Used for specific coloring.
Common water-based dye
Important! In addition to the traditional idea of painting paint and varnish materials, painting walls with lime is still relevant, which cannot be classified as paint and varnish materials, but this is also a type of painting work!
Methods and techniques
Each type of finish, like the dye, has its own subtleties and nuances, however, the technique of painting walls also contains general recommendations that remain unchanged, we will display them:
- Before painting, the surface must be prepared, leveled, cleaned and primed.
- Application is carried out using the chosen method and paint diluted to a certain consistency.
- Application is done from top to bottom to minimize the possibility of drips.
- There is almost always a rule of applying several thin layers of paint rather than one thick one.
- The instructions also do not ignore hard-to-reach places that have to be painted with a brush, for example, when using a roller technique.
Brush for hard-to-reach places and for ceiling-wall joints
As for the rest, there is further division into specific application technologies.
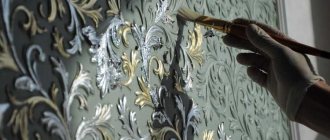
Relief
Quite a fashionable way of applying dye, which is also at the same time an element of decoration. For relief painting, a textured material with a dense, thick consistency that is even more reminiscent of putty is suitable.
Application in this method occurs in an interesting way as follows:
- The textured mixture is applied with a spatula to the surface prepared using standard methods.
- Then it is drawn over it with the selected tool.
- After 48 hours the surface is dry and can be applied with a finish.
It is worth noting here that the technique is very simple to apply, but relief painting of walls can offer a huge number of appearance options. After all, the only “stop tap” in this case is your imagination.
You can choose from popular reliefs, for example, brickwork, bark beetle, waves, aging effect, Marseilles wax, or you can come up with something of your own.
The bark beetle can look incredibly stylish indoors
The second option includes work in which painting the walls with a sponge comes first.
Application with a sponge is not just an original way of painting a surface, it is also a certain style, which, thanks to the chaotic and unsystematic application, always remains completely unique, the author's, if you like.
Moreover, the whole process is really very simple:
- A dye of several colors is required, usually dark and light shades.
- First, a darker shade is applied to the wall using a brush or roller.
- As soon as the surface is dry, you can begin applying the second layer with a sponge.
- With chaotic, light touches, paintwork is applied over the entire surface, creating a completely unique pattern.
The sponge allows you to give your coloring a completely new look.
Game of colors
Another incredibly interesting option is painting walls with a gradient. Behind the name is a simple transition from light to dark or vice versa. To work, you will need three shades of the same paint color - light, dark and medium, masking tape, a roller and several brushes.
The process itself looks like this step by step:
- The area to be painted is separated with tape.
- The area is painted with light-colored paint.
- The lower part of the wall is painted in a dark shade.
- A medium shade mixed from dark and light paint is applied in the middle of the wall.
- Above, the surface is painted in a light shade.
The most important thing is the transition. The whole gradient style depends on it. To do this, you need to use a dry brush to brush along the painted wall at the transition boundaries until the applied material has dried on the surface.
As a gradient option in the bedroom
Stripes
Another interesting point in painting work is painting walls with stripes. The style is quite fashionable and practical, yet the stripe can successfully change the visual perception of any room.
To work, you will need several colors of dye, depending on how many colors you want to see on the stripes and simple masking tape.
Paint and varnish materials will be applied as follows:
- The surface is painted in the main color.
- After drying, markings are made for future stripes.
- All markings are covered with tape.
- Painting is carried out in the second color along those stripes that are determined by the markings.
- The adhesive tape is removed after some time and the entire surface is in a strip, smooth and strictly defined along the boundaries.
An example of painting on tape to produce a stripe