To make a partition between rooms, it is best to use plasterboard. This is the most practical and cheapest material. But if you separate part of the room with a partition, the question arises: how to insert a door into a plasterboard partition?
To solve such a task, you will need some skills and good instructions, as well as the necessary tools and a set of consumables.
The door is installed in a plasterboard partition using a reinforced frame.
Installation of a frame for a wall with a door
The installation of a wall with a door is technologically no different from a frame for a blank wall, with the exception of the arrangement of a doorway and a false wall - with a sliding door structure.
Let us focus on these features of the device.
Option 1 - Wall with a finished swing door made of wood/plasterboard
A special feature of the arrangement is the door in the plasterboard partition.
For its manufacture, standard metal frame elements are used.
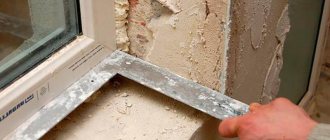
Ceiling and floor guides are exposed. Marking for their installation is best done using a laser level giving a projection on 4 sides. If this is not possible, use a building level and plumb line. Installation tolerances should not exceed 1-3 mm. Otherwise, the wall will turn out to be inclined and the door will open or close spontaneously.
After this, having measured the exact dimensions (along the outer contour of the door frame assembled with the door leaf), vertical profiles are installed. They are made double to give rigidity to the doorway. If a single profile is installed, it should be reinforced with a wooden block along the entire perimeter of the opening.
After installing the vertical posts, install a horizontal profile above the doorway.
The plasterboard doorway should be 10-20 mm wider than the door frame to be able to adjust the position of the door.
Further installation of the sheathing is carried out in a standard manner, with a step of 450-600 mm between the racks. The transverse profile above the opening is connected to the ceiling guide in short sections. There should be 2-3 of them. for a door 800 mm wide.
All vertical guides are connected to each other using crab fasteners in such a way that smooth cells are obtained.
After this, they begin to install plasterboard sheets on one side. The joints of the sheets should be exactly in the middle of the vertical and horizontal profiles. The frequency of fastening with self-tapping screws 25 mm long is every 150-250 mm.
Before installing plasterboard sheets, electrical communications are laid in a flexible corrugated channel. The gypsum boards mark where the wires exit for sockets and switches.
After installing the gypsum board, sound/heat insulating material is laid on one side - sheet foam, penotex or mineral wool mats. After this, the second surface of the wall is sewn up.
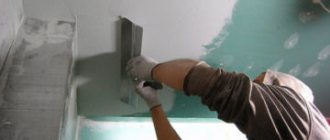
Depending on the edge of the gypsum plasterboard, the joints between the slabs are jointed (using a construction retractable knife) or self-adhesive sickle tape is applied. The walls are plastered and cleaned with sandpaper, after which they are puttied. After drying, they are leveled with sandpaper (mesh) on a block. They are treated with a deep penetration acrylic primer and, after drying, covered with wallpaper or tiles.
The final stage is installing the door into the plasterboard partition. It is fixed using self-tapping screws. The gaps between the doorway and the frame are foamed with polyurethane foam. Be sure to install spacers between the vertical posts of the door frame so that the foam does not deform them during polymerization. Before foaming, liners 2-3 mm thick are laid between the door frame and the door leaf.
Option 2 - Sliding doors
The wall with the doorway is made in the same way as described above. After this, a sliding door guide system is installed.
If you want the sliding door not to interfere with the installation of furniture, install a false wall. To do this, install a second sheathing parallel to the main wall, spaced from the main one at a distance equal to the thickness of the sliding door + 10-15 mm. A characteristic feature of the false wall sheathing is the absence of sheathing from the edge of the false wall to the width of the sliding door. If a continuous sheathing is installed, the wall thickness increases by 50–60 mm.
Installing a door in a plasterboard partition
Installing any interior doors on a plasterboard wall is done in approximately the same way. When installing canvases of various configurations, you must adhere to a certain sequence.
First of all, you need to assemble a box that must fit the dimensions of the opening and have a gap between the wall and the door of no more than 5 mm. The mounted box must be inserted into the opening and secured with wedges. This should be done to prevent them from falling out and once they are finally secured they can be removed.
The box must be checked for correctness of all parameters using a building level. If all dimensions are met, the box is fastened to the side posts of the opening using long self-tapping screws. The remaining gap is filled with polyurethane foam. To avoid distortion of the frame due to expansion of the foam, several spacers are installed in the box before this work.
Preparing the door leaf includes installing handles, locks and hinges. All fittings are secured using a screwdriver and self-tapping screws.
Before installing the canvas, you need to make sure that the foam has dried and the frame is attached firmly enough to the partition. The foam that protrudes is removed using a sharp knife. The finishing of the opening is completed with platbands, which are secured with special decorative nails.
How to organize the process
One of the most popular concepts of modern interior design is the constructive delimitation of space, allowing it to be divided into several zones. But if you look at things more realistically, most residential property owners have no time for design.
They often need to install a partition with a door in order to allocate, although not large, a separate room for an older child, or a young couple who still have to live with their parents. How to adequately cope with such a rather difficult task?
By searching: “Do-it-yourself plasterboard doorway video,” you can find and watch videos with master classes from professionals. But we think that theory will also not hurt – especially for those who have never encountered such work before.
Required materials and tools
Making a doorway for drywall requires, of course, a certain skill, but before you begin this work, you should stock up on the necessary tools. First of all, you will need two planes specifically designed for working with plasterboard. They are called: peeling and edging: the first one processes the cut line of the sheet, and the second one is necessary in order to cut a chamfer on it at a certain angle.
They cut sheets of drywall with a knife with a reinforced blade, but in some cases they use a special hacksaw, which you see below. To cut the profile, you can use ordinary metal scissors. For the rest, they use general construction tools that every owner has in their arsenal: a hammer drill with drills, a screwdriver, a hammer, a set of screwdrivers.
Hacksaw for cutting drywall
- Sheathing a doorway with plasterboard is the easiest way - the main thing is that the frame is correctly installed under it. The main role here is played by correct marking, which cannot be done without a building level, a plumb line, a paint cord, and a tape measure with a magnetic hook at the end. Professional installers use a completely different tool for this - but their scope of work is appropriate.
- In terms of materials, you will need two types of metal profiles: a guide, mounted around the perimeter of the partition (floor, walls, ceiling), and a rack, on the shelves of which there are stiffening ribs. Domestic profiles are marked PN and PS, while imported profiles are marked UW and CW, respectively.
Note! During the installation process, the profiles are joined, so they need to be selected in pairs - so that the height of the rack shelf matches the width of the backrest of the rail - for example: UW 75 * 40 mm and CW 75 * 50 mm
- The bearing capacity of the profile directly depends on the size of the section, and the longer the span, the thicker the partition will be. It must also correspond to the width of the door frame that is installed in the opening, therefore the standard size of the profiles must be appropriate.
- To strengthen a plasterboard doorway, you will need a couple more wooden beams. Since they will have to be inserted inside the racks framing the opening, the cross-section of the beam must correspond to the size of the profile. And, of course, you can’t do the work without fasteners. To fix the guides you will need 6*40 dowel nails, and to install the sheathing you will need 3.5*25 mm plasterboard-metal screws.
Connecting profiles with a cutter
- Fastening the frame elements to each other is done with small metal-to-metal screws, but if you purchase a cutter for the profile, you can make connections using the notch-and-bend method. The price of such a tool is not that high - you can buy an inexpensive option in the range of 580-980 rubles. But the connections are more rigid, and the work progresses much faster.
- All that remains is to buy basalt mineral wool 60 cm wide, which is used for the internal filling of the structure and, in fact, the cladding material. To mount a plasterboard doorway in a working partition, you need to take a wall gypsum board with a thickness of at least 12.5 mm.
Gypsum fiber sheets (GVL)
Better yet, use not plasterboard, but gypsum fiber sheets (GVL) - they have greater strength, since they are reinforced throughout the mass with asbestos fiber. The width of the sheets is standard: 1200 mm, but the length is selected depending on the height of the partition.
If it is higher than 2500 mm, then it is better to take sheets 3000 mm long - this way you will not have to insert narrow strips along the top. Accordingly, before covering the doorway with plasterboard, the sheet is oriented with the long side vertical.
Tools and accessories
For all installation work, you will only need very simple tools and equipment. If you don’t want to spend extra, then you don’t have to buy any of the tools, but you can rent them at any large supermarket in the city.
To make a plasterboard partition for installing a door you will need:
- Screwdriver.
- Hammer.
- Grinder/metal scissors.
- Building level.
- Roulette.
- Plumb.
- Electric drill.
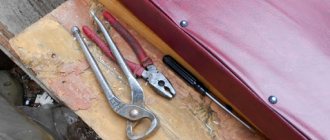
- Pliers.
- Bucket.
- Putty knife.
- Ruler.
- Roller.
- Rule.
As you can see, there is nothing non-standard; you will probably have all of the specified tools available.
Installation of partition structures
Despite the simplicity of working with drywall, installing the frame and covering it with sheets has a number of features and nuances. Only by following them can you obtain a high-quality and durable design. To do this, you should carefully read the step-by-step instructions for installing a plasterboard partition.
Tools and Supplies
To work you will need a set of the following tools and materials.
- A screwdriver or drill with a screwdriver attachment.
- Hammer.
- A grinder with a cutting wheel or metal scissors.
- Sharp knife.
- Hacksaw for drywall.
- Mesh plane.
- Roulette.
- Pencil.
- Construction or laser level.
- Pliers.
- Self-tapping screws for metal.
- Press washers (so-called “bugs”) for connecting profiles to each other.
- Set of frame profiles.
- GKL sheets.
Preparatory work
Before making a partition from plasterboard, a number of preparatory work should be done. First of all, you should draw up a project plan for the future wall structure. Then, in accordance with the drawings, the interior space is marked.
Lines along which the guide profiles will lie are marked on the floor, walls and ceiling, and the location of the doorway is also indicated. To project the lower markings onto the ceiling, use a plumb line or a laser level with a vertical adjustment function.
Frame installation
The next step is to install guide profiles on the supporting bases. Installation should begin from the floor, attaching the profiles to the floor slab or subfloor using a hammer drill and dowel nails. Next, the frame is installed on the walls of the room in exactly the same way, and after that - on the ceiling.
You need to drill holes for the dowels with a hammer drill directly through the metal profile attached to the marking line. The step between adjacent dowels should not exceed 25 - 30 cm. After this, the guide is removed, and a plastic dowel is hammered into the resulting hole. The last step is to align the hole in the guide with the hammered dowel, and the metal structure is fixed using a self-tapping screw.
After installing the guides, you can begin to design the doorway. This is done using the same guide profile, inside which wooden blocks are placed: they will serve as a supporting base when installing door hinges and hanging the door leaf.
When all work with the guides is completed, proceed to the installation of the racks. They are inserted into the guides and secured using press washers or rivets with a special cutter. The pitch between the individual racks depends on the thickness of the gypsum board sheet used, as well as the load expected during operation. At the same time, the minimum distance between the rack profile should not exceed ½ the width of the plasterboard sheet.
Frame covering
When all work on the installation of frame profiles is completed, you can proceed directly to covering the wall with gypsum plasterboard sheets. Gypsum is attached on both sides of the frame structure, and the staggered arrangement of the sheets must be observed. If the ceiling height is not significant, and the gypsum boards are placed in one row, you need to ensure that the same rack profile does not have joints on both sides at once.
When covering walls of considerable height, it is necessary to use additional gypsum board elements in the form of segments. These segments should also be arranged in a checkerboard pattern: if one insert is located at the bottom, then the adjacent one should be at the top.
For fastening, self-tapping screws are used, the length of which must be at least 3 times the thickness of the drywall, so that 2/3 of its length is in the frame. The thickness of plasterboard partitions depends on the design of the partition. If there is a need to create soundproofing protection, gypsum board sheets are attached from different sides to racks isolated from each other.
The installation of a double-sided plaster partition is shown in the video:
Using these instructions for installing plasterboard partitions, each owner of an apartment or house can independently zone the space with minimal effort, time and finances. The video shows the main stages of creating interior partitions from plasterboard sheets
Necessary materials
Wall base
It is assembled from wooden beams or galvanized metal profiles. The parts are secured with screws.
- Timber has more disadvantages than advantages. It is heavier and more massive than metal products. Wood changes size under the influence of the environment. It must be treated with antiseptics and varnished before use. It takes a lot of effort and time. Among the blanks there are often spoiled ones. Defects, such as resin leaks and falling knots, are of natural origin. The surface is easily damaged during transportation and installation, so workpieces are taken with a 10% margin. The main disadvantage of wood is its low resistance to constant mechanical loads. The opening and closing of the sash will weaken the connections between the elements.
- Metal is better able to withstand constant stress. The blanks are made of aluminum and galvanized steel. They do not require additional processing before starting work. The coating reliably protects them from corrosion. This makes it possible to install the frame in damp rooms. A humid environment and temperature fluctuations do not affect its shape and size. Defects are less common than with an array. Finding blanks is not difficult - they are supplied by domestic manufacturers. Steel is stronger than aluminum, but less resistant to corrosion. If the zinc coating is damaged, it will not last long. It is better to use ready-made, factory-produced perforated blanks, since the coating will be damaged during drilling.
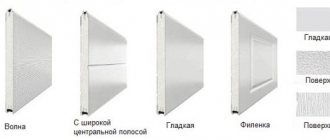
Types of metal profiles for frames
- PN - guide. For imported parts, the UW marking is used. Mounted on a reinforced concrete base around the perimeter of the structure. The contours of the opening are formed from it.
- PS - wall. Marking of imported elements is CW. Placed vertically from floor to ceiling.
- PU - corner - it is used to strengthen the opening at the joints of the gypsum boards.
Sheathing material
GKL sheets are produced abroad and in Russia. They are a hardened gypsum solution with additives, covered with a layer of cardboard. The ends do not have such a coating, so they do not withstand impacts well and instantly absorb water. The cladding is environmentally friendly and fireproof. It is easy to handle and install. A serious disadvantage is low strength. A single-layer coating will not be able to support a heavy hanging shelf. Places experiencing loads will have to be reinforced with additional guides and jumpers.
Before you make a plasterboard partition with a door, you need to choose the right products. There are boards with improved properties. Moisture-resistant sheets can be placed in bathrooms and steam rooms. They have a characteristic green color. Fire-resistant panels are used for lining the fireplace area. They can be placed near an open flame. Acoustic materials are lower in density, but their cladding provides good noise protection. The gypsum fiber core of GVL, reinforced with cellulose fibers, is characterized by increased strength.
Standard sizes of gypsum board sheets:
- 3x1.2 m.
- 2.5x1.2 m.
- 2x1.2 m.
Filling and fasteners
Mineral wool or cork is used as filling. Cotton wool is produced in the form of slabs and shapeless fibers. The panels differ in hardness and insulating abilities. The higher the density, the better the conductivity. Polystyrene foam is not suitable for residential premises - it burns well and emits toxic substances. In addition, the bubbles it consists of enhance sound vibrations. Their hard plastic walls are excellent resonators.
The guides are attached to dowel nails. Products measuring 6x40 or 6x60 mm are suitable. The wall slats are fixed with self-tapping screws for steel and aluminum marked LB 9 and 11. Self-tapping screws MN 25 and 3 are suitable for cladding.
A tape seal is placed between the base and the guides.
How to make a plasterboard partition correctly
Plasterboard partitions are considered environmentally friendly and quite durable. The structure consists of a metal frame and is covered with plasterboard on both sides. For the final result to be positive, you must follow the instructions:
- Mark along the perimeter of the wall surface using a level; the line should be continuous.
- Install a guide profile along the line and secure it with fasteners, which forms the frame.
- Step back 5 cm from the ceiling, cut the supporting profile to size, set it level and secure it with self-tapping screws (they are located every 60 cm).
- If you plan to make a partition with a sliding door, then you should leave a distance along the width of the future door and attach a CW profile around the opening.
- Measure the interval between the ceiling and the floor, cut the plasterboard sheets to size and screw them onto one side of the profile.
- Fasteners must be placed no closer than 15 centimeters to the edge of the material.
- It's time to place the wire, cable or other communications on the back of the mounted sheet.
- Use insulation (mineral wool) to fill the void between the drywall sheets.
- The second sheet is mounted in the same way as the first.
- Treat the surface on both sides with a deep penetration primer.
- Hide defects using finishing putty.
You can make a variety of shapes for the interior partition.
To do this, it is necessary to form complex curved sheets.
Using a needle roller, roll the wrong side of the material.
Moisten a foam sponge or brush and walk over the workpiece until the middle of the sheet is completely wet.
Place it on a pre-prepared template and bend it carefully. Secure the fold with self-adhesive tape and leave it in this position until completely dry.
In the bedroom
The advantages of an interior partition in the bedroom made of plasterboard sheets are:
- if there are several people in the room, the wall will allow everyone to have personal space and separate the functional area of the room;
- the issue of lack of living space in the apartment is resolved without radical restructuring;
- the functional area can be decorated with shelves on the partition;
- each individual zone is presented in different styles;
- with a well-executed design, shape and size of the wall, flaws in the layout of the room will be hidden;
- using a glass or mirror option with a plasterboard partition, the space visually increases.
By decorating with profile partitions, the appearance of the apartment improves.
In the living room
The properties of plasterboard—lightness and flexibility—allow you to make unusual arched partitions yourself. Both moisture-resistant and simple materials are suitable for this. In the living room you can create several types of such a wall:
- Arched. This type is considered popular in modern interiors. They look like a semicircle near the ceiling. The supports for them are decorative beams.
- Partitions with niches. This option replaces a closet or mezzanine that does not fit into the living room interior. The height of the structure may be slightly higher than a person’s height or the floor may be the ceiling.
- Semicircular. This option is complex, since the frame must be made of many parts.
In the children's room
The presence of a partition in a bedroom or children's room is not only a decorative, but also a functional element. There are several zoning options.
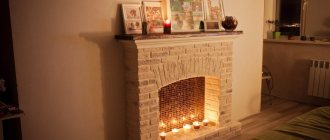
Open. This type includes a design with niches and various columns, which allows you to achieve not only a practical goal, but also decorate the apartment. Such a partition will separate the bedroom and living room and become a wall for any decorative structure, for example, a false fireplace.
Shelves that go through the wall look great; an aquarium is most often installed on them.
Closed. The partition with sound insulation is a complete structure. A frame is assembled for it from profiles, covered entirely with sheets of plasterboard. Its functionality and usefulness are no less than those of a solid wall.
Description of material
Sometimes you really want to diversify the interior of your apartment, add a touch of novelty, creativity and freshness. For example, replace old furniture with more modern ones, make cosmetic repairs, or decide on a major redevelopment by dividing a large room using partitions. Universal in its characteristics and practical plasterboard will help you successfully cope with the latter. Using it, you can not only fence off and delimit space, but also construct doors from plasterboard.
Installation of interior doors is a very popular service today, largely due to the fact that sliding doors made of plasterboard are a fairly functional design that can also decorate a room and save space.
Drywall doors, photos of which you can see below, are presented in different stylistic interpretations, and I must say that recently they have begun to be made quite often.
The practicality and appearance of such doors are not inferior to traditional designs, and in addition to designing the interior space, plasterboard is also used as furniture components.
It is easy to work with, and besides, it is a light and pliable material. No special installation skills are required, nor a large set of tools. It is quite possible to install a plasterboard door or partition with your own hands.
The easy-to-use material is even moisture resistant and can be used both in the kitchen and bathroom. There is no need to level plasterboard walls, and doorways can be designed in absolutely any shape.
Theoretically, it is easy to make absolutely any structure from plasterboard sheet (GKL), but it is important to observe all the nuances of working with this material.
Sliding door in plasterboard partition
One of the very popular door options is sliding doors, as they save the already small space of rooms. A common problem that arises when installing them is the need to somehow mask the mechanism of movement and fixation of the sashes. All these planks, boxes, overlays made of chipboard, MDF, laminate, wood do not always successfully complement the ambiance of the room. A partition, including one made of plasterboard, allows you to conveniently avoid these troubles. It turns out that the sashes slide along guides into a specially created gap inside the wall. The top profile, the stopper mechanism and all other parts are perfectly hidden there
What should you pay attention to when installing a sliding door in a plasterboard partition?
- The partition frame must be assembled taking into account the future door, because it is necessary to provide a place for the sashes, in which there should be no profile jumpers or other obstacles to the driving mechanism.
- All work must be carried out strictly according to the level.
- It is imperative to ensure that no other openings or objects are planned in the partition along the door wings: sockets, switches, cable ducts, etc.
- Bottom guide: if any floor covering is provided, then you need to make sure that their height matches the size of the profile. In linoleum it is necessary to make a groove for the guide. If this is not provided for, the door will open noisily, difficultly, or get stuck.
Subject to these conditions, a sliding door in a partition will be one of the most aesthetic and ergonomic options.
Installation of a door in a plasterboard partition
What will you need to install the door?
- Door frame assembled or 3 beams of the required width.
- Actually, the door.
- Platbands.
- Door fittings (locks, handles, etc.).
- Polyurethane foam.
Tools:
- a simple pencil and a ruler, preferably a meter-long metal one;
- roulette;
- calipers and protractor (as a last resort, a square);
- building level;
- a set of screwdrivers or a screwdriver with bits;
- flat chisel;
- hammer and saw;
- knives.
The simplest option is to attach the door to a plasterboard partition with a prepared opening.
The work itself is carried out in the following sequence:
Box installation. If it is prefabricated, then the box beams are connected to each other. At the same time, their joints need to be cut at an angle of 45 degrees (this is where you will need a protractor or square), if you miss the cutting angle, you will end up with a crooked door frame.
- Now you need to install the hinges. The hinges are either screwed on or cut in. The second option is more difficult, because You need to use a chisel and knife to remove from the surface of the door and frame a layer with a thickness and area equal to the base of the hinge. What makes the job easier is that the hinges can be purchased complete with screws. When hanging hinges on the door leaf, you need to ensure that it is clearly aligned with the door frame. Typically, hinges are hung at a distance of 17-20 cm from the edges of the door frame.
- The box is installed in the opening. This is done level to maintain verticality. The box is attached to the profile with screws or self-tapping screws. For a better decorative effect, their heads should be covered with plugs, or stickers, but they have a bad tendency to peel off. All cracks are filled with polyurethane foam. After it is completely dry (12-24 hours), all protrusions and irregularities can be cut off with a knife.
- It's a matter of fittings. Holes are drilled in the door leaf and frame for the lock and strike plate, the lock, handles, decorative trims, etc. are installed.
- The last stage is the installation of platbands. They can be nailed, mounted on screws or self-tapping screws, or attached with glue.
Installing a door into a plasterboard partition is an excellent redevelopment option that provides privacy.
Preparatory stage
Drawing up a drawing
Development of a partition scheme. Here you should take into account such points. Since you are installing not just a plasterboard partition, but a doorway, you need to choose a place for it in the “new” wall. In this regard, one should proceed from the specifics of the further use of adjacent rooms, their filling with household appliances, furniture, and so on.
Is there anything supposed to be mounted on the gypsum plasterboard sheathing? The sheets themselves do not differ in strength; they acquire it only with additional reinforcement. And if you simply cannot attach a shelf, a lamp, hang a massive picture or something similar to a plasterboard wall, then it is necessary to provide for the installation of load-bearing elements in the sheathing. The practice of constructing partitions from gypsum plasterboard shows that the installation of single vertical racks from profiles is impractical for a number of reasons. One of them is that a relatively thin metal “plays” under strong pressure.
A simple solution is to install a second, additional guide. If significant strengthening of the structure is necessary, it is advisable to place wooden blocks (thick slats) in the required places.
If the partition diagram is drawn up correctly, it is not difficult to find these elements after covering the frame. Alternatively, leave marks on the floor with a pencil or felt-tip pen.
When planning to make a partition from plasterboard, you should immediately determine which door it will have - a hinged or sliding one. In the latter case, when calculating the insulating material, the volume of its purchase is significantly reduced. And if the opening is large and the width of the room is small, then the cavities between the gypsum boards are generally left unfilled; otherwise the doors simply won’t move apart.
Vertical posts require reinforcement. Therefore, jumpers from the PN profile are installed between them. The layout of their location is developed independently.
Taking measurements
The dimensions of the room at the location of the partition are determined. You need to understand that floor slabs do not lie in a strictly horizontal plane. Therefore, the height should be measured at opposite walls. For what? If its difference is significant, then you will have to think about how to level out this drawback. The prospect of cutting a sheet of drywall at an angle, moreover, cutting off a small fragment from it, is not the best. Most likely, 1 – 2 samples will be hopelessly damaged.
The distances from the walls to the vertical posts that form the doorway are measured. This is necessary to calculate the required length of the lower guide profiles, since the threshold is not made. Consequently, you will have to attach two PN slats to the floor (before the passage).
Calculations
A gypsum plasterboard partition is made on your own, including due to reasonable savings on paying for the services of third-party specialists. The same applies to purchasing materials. A certain supply of them is necessary, but large quantities of surplus are not needed; the prospect of quick use is illusory, which means a waste of money.
You should not immediately buy drywall sheets and profiles at the first retail outlet you come across. Although they are of standard dimensions, not all manufacturers strictly adhere to standard dimensions. The task is to select samples so that you have to do as little cutting as possible. This will make your work easier and save on waste optimization.
On the other hand, in certain areas you will have to install small fragments of gypsum boards and install jumpers (to strengthen the frame) from profiles. Consequently, materials should be selected according to linear parameters with the expectation that after cutting them, finished “parts” will be obtained.
The connection of plasterboard sheets is done on vertical posts. The recommended interval between them is within 55±5 cm. If the gypsum boards are large, then one additional rack is mounted approximately in the middle to prevent pushing through the wall.
Recommended intervals between fasteners (mm): for profiles - 50, plasterboard - 25.
Making a doorway in a plasterboard partition
When making a partition from plasterboard, the problem of installing the door leaf always arises, since installing suspended structures in such walls requires a reinforced frame so that when doors are frequently opened and closed, the wall structure can withstand the loads.
Installation of plasterboard partitions.
If you need to install the door yourself, you need to prepare the material:
- wall plasterboard;
- metal profiles;
- facing aluminum profiles.
When making a partition, rack profiles are installed under the doorway to strengthen the structure and withstand the load of the door frame. The profiles are mounted into the frame using self-tapping screws using the usual method, but subsequently they need to be reinforced with wooden beams. It is installed inside the profile and secured.
Also, above the doorway, made in a metal frame, a lintel is installed under the drywall, which serves as the upper part of the door frame. An additional vertical profile can be installed above the opening, which should be secured and reinforced with a wooden beam. So, an auxiliary U-shaped frame structure will be made, and an additional vertically located profile will be installed in it.