Mechanized application of plaster is widely used by professional teams for quickly leveling walls, as well as applying some types of textured decorative coatings, such as “American”, “shagreen”, “liquid silk”, etc. In this article we will look at the principle of operation of a manual pneumatic hopper bucket for, rules for applying plaster and options for self-manufacturing pneumatic sprayers.
Plastering a façade from a wall hopper bucket
What it is
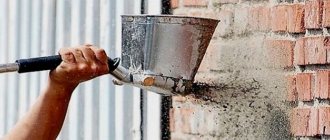
A hopper bucket (plaster shovel) is a plastering device that uses air pressure to spray plaster over the surface of a wall. A pneumatic bucket is used for mechanized application of cement-sand or gypsum mortar when leveling walls, as well as for decorative finishing using acrylic plasters or “liquid wallpaper”.
According to the principle of operation, a pneumatic bucket is similar to a cartouche gun, but differs from it in configuration, greater productivity, larger nozzles and their number.
The ladle structure is shown in the diagram:
Plastering shovel diagram
Operating principle: a plaster solution is applied to the ladle (hopper), or it is simply scooped out of the container. A hose from the compressor is connected to the handle; when the trigger is pressed, compressed air enters the hopper, passes through the hopper and, together with the plaster, flies out through the nozzles, spraying the mixture along the wall.
Pros:
- High speed of finishing work. One person can plaster about 60 m2 per hour, which is 3-4 times faster than manual application of plaster.
- Suitable for any mixtures (cement-sand, gypsum, clay, lime, glass fiber concrete, waterproofing, liquid wallpaper, etc.). The permissible particle size in the solution is up to 10 mm.
- Due to the high impact force of the solution on the surface, the adhesion of the applied material and the strength of the coating increase.
Flaws:
- The weight of the equipment with a metal ladle filled with plaster is about 10 kg.
- Splashes from the sprayed solution fall on the floor and clothing. Hand plastering is cleaner.
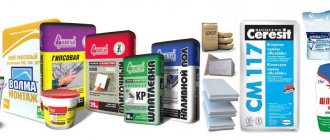
Preparing a solution for a spray gun
Essentially speaking, there is not much difference in mixing plaster for a spray gun or hand application. This process is extremely simple, although it has some nuances that increase the convenience of preparation. The proportions of water and dry mixture are always indicated on the packaging, and on average they are 700 grams of plaster per 1 liter of water. To get a good quality mixture without spending a lot of effort and time, just prepare a few simple items in advance. To conveniently mix the solution you will need:
- Drill or hammer drill
- Nozzle for mixing the solution
- Container (bucket or basin)
First of all, pour the required amount of water at room temperature into the container. Pour in the dry mixture and mix the solution with a power tool and a whisk. To avoid splashes, the rotation speed should be set to minimum. The consistency of the putty, ready for application, should resemble thick sour cream.
Adding the mixture directly to the water helps to mix the solution more evenly.
If, on the contrary, you add water to the mixture, then part of the solution on the bottom and walls of the container may not partially dissolve, which will make the mixture not so homogeneous. You can prepare the plaster mixture yourself by mixing cement with sand in a ratio of 1 to 3. To make the solution more flexible, you can add a little detergent to the water in advance. More detailed and visual instructions for mixing the plaster mixture are presented in the following video.
Types of plaster shovels
Ceiling option
Depending on the purpose, there are two types of pneumatic buckets:
- Wall. Designed for plastering walls and corners (looks like the photo above). Sometimes it has an additional handle on the hopper for convenience.
- Ceiling. Designed for applying plaster to ceilings and ceiling areas. Especially for this purpose, the angle of inclination of the hopper relative to the handle, as well as the nozzles in the hopper, has been changed. The extended handle allows you to raise the hopper bucket higher without the use of stepladders and supports. All this allows you to work comfortably in a vertical position, without fear of the mixture falling out of the hopper.
Operating principle
The device works by ejecting a decorative plaster solution from a nozzle at a certain angle. The cartouche pistol consists of the following parts:
- Steel short barrel.
- Nozzles with a set of various nozzles, the shape of which determines the pattern formed on the wall.
- A cone-shaped funnel - a container for the solution (its volume for effective use of the gun must be at least 3...5 l).
- Handles with a trigger lever that turns the gun into operation.
- Housings with a round suction tube - a nozzle, in the rear part of which there is a threaded connection to a high pressure hose.
- Hollow purge rod for clearing clogged holes.
The set of nozzles is determined by the density of the plaster solution. When using thick compositions (for example, gypsum-based), the diffuser nozzle for a cartouche gun is made with a bell angle within 30...45° - this increases the spray area of the plaster solution and increases productivity. For much less frequently used liquid solutions, the nozzle angle is reduced to 15...20°, due to which the solution flow rate remains the same and the plaster does not flow off the surface of the wall being treated.
As user reviews show, a cartouche gun is ineffective as a means of mechanizing the work of applying conventional plaster (or for the process of leveling walls). A thick solution requires high air flow and pressure created by the compressor, otherwise the mixture quickly slides, and the internal cone of the funnel becomes clogged with its residues. The reason is that the process of sucking plaster into the nozzle for a cartouche gun is divided into two stages - sucking the solution into the nozzle, and then pushing it out into the diffuser of the nozzle. With a sufficiently high initial density of the plaster mortar (at least 1500 kg/m3), a very powerful compressor will be required, with a rated pressure of at least 6...8 atm, and a flow rate of at least 1000 l/min.
Unlike the main one, decorative plaster mortar is applied in thin layers using the spraying method. Accordingly, the compressed air flow and pressure values may be lower.
Connection kit
Let's consider what else is needed to connect and operate the plaster shovel.
Pneumatic bucket
Geka quick release couplings 1/2 inch
Rubber hose 16 mm (inner diameter)
Air compressor
The Huck adapter with internal thread is screwed onto the tool handle. Another coupling with a nipple is inserted into the hose and clamped with a clamp. The connection of the two couplings is very simple, just align them and turn half a turn. In the same way, the other end of the hose is connected to the compressor.
Choose a rubber hose A smaller cross section will not be able to provide air supply up to 350 l/min. The hose must be reinforced with threads in order to withstand the pressure of the supplied air and not lose mobility in the cold (not become stiff). Pay attention to the marking, choose “VG” - water / gas.
The air compressor must be selected based on the characteristics of the hopper bucket, i.e. required pressure (atm) and air supply (l/min). Air consumption, in turn, depends on the number and size of supply holes. For example, for a hopper bucket with four nozzles measuring 20 mm, a compressor with a capacity of 350 l/min and a working pressure of 8 bar is suitable.
Also pay attention to the volume of the compressor's receiver. The receiver (compressed air storage tank) ensures uniform outlet pressure and air supply for uninterrupted operation. The larger its volume, the less often the compressor turns on.
What kind of compressor is needed for a hopper bucket?
Craftsmen often make pneumatic buckets with their own hands. Perhaps that is why much more is written about the plaster shovel than about the air blower. Meanwhile, not a single such “shovel” will apply the solution without supplying air under pressure. So a compressor for a hopper bucket is a necessary addition. However, not every unit is suitable for plastering work. In addition to the quality and technical capabilities of the plastering unit itself, the key factors are the correctly selected air injection mechanism and how correctly the connection to it is made.
The tasks of a beginner and a team of builders differ, first of all, in volume. An inexperienced person can perform plastering work slowly, mastering the craft of a plasterer as the work progresses. The use of a hopper allows even a beginner to obtain good quality plaster coating without much effort. For special teams, speed is important while maintaining high quality of work. For a beginner or for a team, the right choice is always different.
For DIYers
The performance of the air blower directly affects the speed of application of the solution. There is a minimum value of the supplied air pressure, with the help of which the solution can be sprayed onto the wall. Even a well-designed hopper with a low air supply will only release the working mixture without spraying or spraying. Therefore, when choosing a compressor, you don’t even have to consider units with a capacity of less than 200 l/min.
By plastering with a low-power compressor, you will not be able to exceed the speed of manual application of plaster, which is demonstrated by an experienced finisher, and, therefore, reduce finishing time. But the use of even low-power mechanization is an opportunity to obtain a good quality plaster layer, regardless of the worker’s skills.
Important conditions for using a low-capacity device:
- The low speed of application of the solution does not allow producing a large batch of solution quickly enough. Therefore, when using gypsum mixtures (for plastering walls manually), it is recommended to mix the solution in small batches.
- When purchasing a dry gypsum-based mixture, give preference to mixtures for mechanical application. They have a lifespan of approximately one and a half hours.
If it is not possible to use a more powerful unit, beginners can use a mechanism that provides an input of 200-350 l/min, with a minimum receiver volume of 25-50 l. In this case, you will have to wait until the pneumatic compressor pumps up the required pressure - 6-8 atm.
What to choose for advanced home craftsmen
If the backlog of plastering work is large, and you need to carry out plastering quickly, then it makes sense to purchase a mechanism that is powerful enough (creating 440-600 l/min at the inlet), equipped with a receiver of about 70-100 liters. For owners of private housing, the choice of such a machine is rational, taking into account the possibility of using a compressor for plastering, as well as for performing work on the estate with other pneumatic tools. Such a unit can easily cope with plaster mortars that have any base (even heavy cement and clay). It can also be used to putty, prime, and paint surfaces.
The increase in power is directly proportional to the speed and convenience of applying plaster. Another parameter for choosing a mechanism is the type of drive.
There are two types on sale:
- coaxial or direct (torque is transmitted directly from the engine to the shaft);
- belt (torque is transmitted through a belt and pulleys).
The second drive is head and shoulders above for the following reasons:
- Without a gearbox, starting the mechanism directly, especially in cold weather, is problematic.
- The two-kilowatt engine spins at 2850 rpm (and the piston engine does the same in direct transmission). Therefore, during direct transmission there is a lot of heating and a lot of wear. With an identical engine, compressors with a belt drive have a different torque at the head (1020-1080 rpm) - 3 times less due to the belt. Consequently, there is less wear on the head. Plus, due to the gearbox, the load is removed from the engine. Launching such devices is usually not a problem.
- Usually, larger volume receivers are installed on belt-driven compressors. It is also possible to install an additional receiver. The larger the receiver capacity, the more comfortable the work.
- Such a unit is not very noisy, which may influence the choice (use of the mechanism in multi-apartment buildings).
- Belt drive is easier to maintain.
- By replacing the pulley, the operating parameters of the compressor are changed.
The advantages of direct transmission include:
- lower cost of the unit;
- more compact design;
- slightly higher performance.
The pumping speed is not much different. Compressors of this capacity are suitable for private households when the owner does not do plastering professionally.
For professionals
For craftsmen constantly working on plastering, at least a 100-liter compressor with an inlet capacity of 440-460 l/min is required. When working with it, you don’t have to stop and wait for the device to reach operating pressure.
Choosing a compressor for professional plastering is not so much about price, but about speed and ease of operation. It is preferable for a team of plasterers to have not one powerful device (weighing 90 kg), but two paired ones of lower productivity. For example, a good option is two units with a capacity of 400-500 l/min (each) with a receiver of 50-70 l.
Two connected compressors with 50 liter receivers.
Such devices are less problematic when transporting and transporting the compressor in multi-story buildings. Two compressors for plaster, connected in conjunction asynchronously, are started even at sites where electricity is supplied according to a temporary scheme.
The advantages of this solution:
- The system provides stable power. Thanks to this air supply, the loss of the mixture from falling on the floor during spraying is minimized, and less time is allocated for cleaning.
- The air supply occurs evenly and continuously. The spraying power is constant. The combination of two units and the high-performance hopper involved is comparable to a plastering station in terms of operating speed. Moreover, such mechanization costs several times less.
- The system makes it possible to simultaneously connect via a quick release to one of the units of a paint sprayer or hopper of lower capacity. This connection does not affect the operation of the main hopper bucket.
- If one of the two compressors fails, the system will continue to operate, albeit at a slower rate.
- If you purchase two devices at the same time, you can negotiate a significant discount. It is possible that the price of purchasing two mechanisms will be comparable to purchasing one large compressor.
When using 2 compressors, there is a large load on the electrical network.
Applying plaster (video)
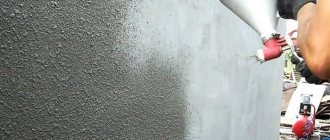
Plastering walls using a compressor is quite simple. After filling the tank with the solution, you need to hold the hopper at a distance of 5-10 cm from the wall and, turning on the air supply, apply the plaster from the bottom up.
Then the solution is leveled using the rule. They also move from bottom to top, guiding the rule along the beacons (if they have been installed).
Decorative plaster is sprayed in the same way as leveling plaster.
Important! Don't forget to rinse the ladle after use. To do this, lower its tank into a bucket of water and blow it with air.
The video below shows interior finishing using a mini plastering station.
Types of compressor for construction work
Let's start with air compression technology. The most popular are piston and screw devices. We will not go into a detailed description of the structures. Let's just say that the latter are indispensable under high loads and are more often used in the industrial sector. As for piston compressors, they are ideal for construction, repair, garages and, of course, workshops.
So, our choice is a piston compressor. But the gradations do not end there. Piston models, in turn, are divided into coaxial and belt. If the device uses a belt drive, it has a long service life, has increased reliability and produces relatively low noise. Disadvantages include the need for careful preparation before use and regular maintenance, in particular oil changes.
Coaxial compressors are available in oil and oil-free types. They differ in the type of lubricant. In oil devices there is a crater with lubricating fluid. What is it for? Its presence significantly increases the service life of the engine and connected pneumatic tools. However, this is not without its drawbacks - the oil present in it negatively affects the painting capabilities. To compensate for this effect, you will need to install an additional filter.
For tasks where you need high-quality air, a win-win option is an oil-free coaxial compressor. It is also inexpensive due to its simple direct drive design.