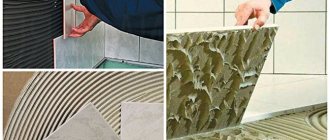
Types of ordinary plaster
According to the accuracy and quality of execution, plaster is divided into three types: simple (for falcon), improved (for rule) and high-quality (for lighthouses). For plastering work, hand tools are used, shown in Fig. 9.1.
Simple plaster
consists of spray and 1.2 layers of soil, there is no covering layer. Application and leveling of the mortar is done manually using a plaster spatula and a falcon. To level and grout the mortar, graters, half-graters, and rules of various lengths are used. By smoothing and grouting a relatively flat and smooth surface is obtained. Simple plaster is used to decorate utility rooms, basements, and warehouses. The total thickness of simple plaster does not exceed 12 mm; when applying a measuring ruler to the surface, it is allowed to have no more than two gaps of up to 5 mm each over a length of 2 m.
Improved plaster
performed by applying a spray layer, one or several layers of primer with leveling, and a covering layer with grout. Leveling the surface is done more efficiently using a rule or using a trowel. The total thickness of the improved plaster is up to 15 mm; it is permissible to have no more than two gaps up to 3 mm on a 2 m section of wall.
Rice. 9.1. Hand tools for plastering work:
1-brush-brush; 2-
rule; 3- truncated rule; 4- husk rule; 5- grater; 6- plaster falcon; 7 - plaster spatula; 8- plaster ladle; 9- scoop with swinging handle; 10- disc falcon; 11- grater; 12- trowel
High quality plaster
It must be carried out according to beacons; it includes the application of one layer of spray, one or several layers of primer with leveling, as well as a covering layer with leveling and grouting. Leveling the soil is carried out as a rule along the beacons; the covering layer is grouted with a wooden or felt trowel. The average total thickness of high-quality plaster can reach 20 mm; over a length of 2 m you can have no more than two gaps of up to 2 mm. Grouting of the surface is carried out only with lime-sand or cement-sand mortar.
Surely everyone knows the expression “Walls at home help.” They literally help us by keeping us warm, quiet and pleasing to the eye from the inside.
And plaster is a building mixture, thanks to which we ultimately achieve such comfort, safety and beauty.
Primer mixtures
Despite the fact that many experts have recently questioned the need for primer, it is still included in the instructions for construction work as one of the required steps. The solution underlying it consists of a film former and a coloring pigment, which allows it to provide preliminary leveling of the ceiling and increase its adhesive properties before applying the coating.
The choice of primer should be made based on the type of ceiling and plaster mortar. Thus, for a concrete surface, a universal mixture with antiseptics is recommended that prevents the formation of mold and mildew. The use of an acrylic composition, which is well suited to concrete or brick surfaces, cannot be ruled out. Drywall or foam-aerated concrete with a difference of less than 3 mm. It is better to use a deep penetration primer or concrete contact. In addition to increasing adhesion, they have good water-repellent properties.
Primer is a must procedure
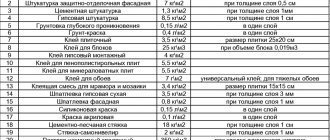
About the thickness of plaster in regulatory documents
Until 1988, the requirements for plastering were determined according to GOST 22844-77 “Typical Technological Processes”, after which the document was replaced by SNiP 3.04.01-87 “Insulating and finishing coatings”.
The current regulations include, among other things:
- technologies for applying plaster coatings,
- methods for monitoring the final result,
- THICKNESSS of single-layer coatings and individual layers of multi-layer plasters.
As can be seen from the table, SNiP 3.04.01-87 does not say anything about the total thickness of the leveling finish.
Thus, the required thickness of the plaster is determined by the degree of unevenness of the walls - to what extent they are blocked, these blockages must be removed by filling the depressions.
The packaging of ready-made leveling mixtures always indicates the thickness range of a single-layer coating:
- A layer made thinner than the minimum acceptable value will not have the proper strength characteristics;
- A coating that exceeds the permissible thickness in thickness will shrink more, may crack, peel off, or otherwise manifest this application error.
Based on the quality of execution, SNiP 3.04.01-87 classifies plaster into 3 types - simple, improved, high-quality and defines the requirements for them. But these requirements relate to the evenness of the surface - they do not contradict compliance with standard thicknesses and, moreover, they do not cancel them.
Features of ready-made wet systems
Many manufacturers of facade products have developed and produce their own systems for wet facades. The most popular systems are wet facades using ceresit and knauf technologies. I'll tell you a little more about them.
The knauf company offers consumers a ready-made system for facades of any size. The kit includes all the necessary components:
- KNAUF Therm Facade insulation based on mineral wool.
- Dry universal plaster-adhesive mixture KNAUF Senever.
- Composition for decorative finishing KNAUF Diamond.
Finishing using Ceresit technology involves the use of polystyrene foam from any manufacturer and a special adhesive composition, Ceresit ST 83. Additionally, the manufacturer offers mineral and acrylic plasters with a furrowed or granular texture, as well as bark beetle plaster.
The method of applying such systems is no different from the conventional method of application: the thickness of the glue, reinforcing layer and plaster is determined by the general technology described above.
Are you planning to decorate the facade? All you have to do is call, and then we will do everything ourselves!
+7
Multiline phone
Layer thickness depending on surface curvature
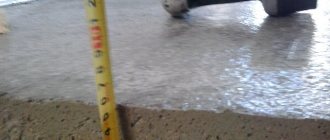
The smoother the walls, the less plaster will have to be applied to them. Simply put, the thickness of the layer will directly depend on the degree of evenness of the building base. For small differences in the plane, a minimum amount of composition will be required, which will be enough for perfect alignment. If the differences are significant, the layer will have to be made quite thick. If the size of the layer exceeds building standards, you will have to immediately cut off the most obvious bulges in order to smooth the surface as much as possible. This will reduce the risk of cracking of the plaster and reduce repair costs.
It is also equally important to adhere to the minimum possible thickness of the plaster - 5-10 mm, otherwise there is no point in carrying out leveling at all. When the height differences are significant, and there is no possibility to cut off the bulges, the work is carried out in this way:
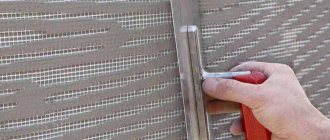
- successively apply layers 1.5-2 cm thick;
- After each layer, a reinforcing serpyanka mesh is applied;
- finally level the base with a common “shell” of 7 cm (or less);
- if the differences are more than 7 cm, use drywall instead of plastering.
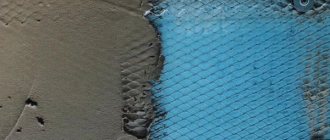
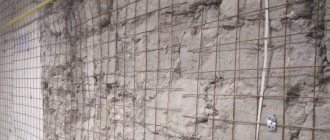
Applying the solution in several layers with a reinforcing mesh
Calculation of the volume of dry construction mixture
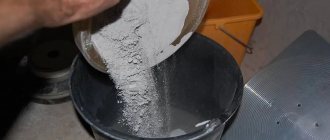
To prevent the procedure for applying plaster on the ceiling due to a lack of consumables, the required amount of solution must be calculated in advance. You will need to calculate the following exact values.
- The area of the ceiling of the room in square meters.
- Minimum planned thickness of plaster cladding. You can determine it based on the instructions above in the article.
- Ceiling drop level in mm.
In addition, consider the percentage of the total volume of dry material that will go to waste. This value depends entirely on the experience of the performer. Professionals know how to properly prepare the solution and apply it optimally, so they have no more than 5% of the consumable resource left unused. It is advisable for a beginner to take a reserve of up to 20%, which is enough to cover errors in calculations and application to the ceiling.
Calculate the required amount of solution in advance
Plaster thickness depending on the type of mixture
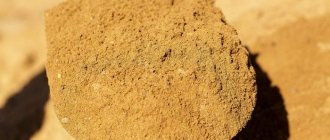
Let's consider what thickness of plaster should be applied when using different compositions. The most popular are gypsum and cement. Lime compounds are also used for premises, and clay finishing is often used. Each of the materials forms a coating, the strength of which depends on the size of the plaster layer. This property can critically manifest itself when the solution sets; if the thickness of the coating is less than permissible, it will tear when drying (the plaster will crack). The minimum is also determined by the size of the filler fractions.
The finishing of the premises can be done with gypsum or gypsum-sand mortar. According to the recommendations of the manufacturers, the dry gypsum mixtures they have developed can be applied up to 50 mm thick (Volma layer - up to 60). The minimum thickness indicated by companies is 5 mm, but craftsmen often apply a 3 mm layer of gypsum mixture. When applied by machine, the minimum is 8 mm. According to SNiP, the thickness of a single-layer gypsum coating is up to 1.5 cm.
When using a cement mixture, the normalized minimum is 1 cm, maximum 2 cm for one layer. When leveling plastering, the spray layer is up to 0.5 cm, a separate layer of soil is at least 5 mm. The total thickness of the coating is at least 10 mm.
Lime mixtures can be used for outdoor finishing (with the addition of cement), but are more often used in dry rooms. The thickness of the spray is up to 5 mm, the thickness of the soil is up to 7 mm. If a lime composition is used as an intermediate – buffer layer between cement and gypsum compositions, then the thickness of the “buffer” should be at least 4 mm.
Clay is an excellent plastic material. Most often it is used for wooden surfaces, onto which shingles are filled before plastering. The minimum layer of clay mixture on top of shingles is 10 mm. If the coating is thinner, the clay will simply peel off. Clay-sand cementless mortar is applied with a thickness in the range (mm) - 10-35, with the addition of cement - 15-35.
Preparation for work
The thermal insulation facade system is a multi-layer coating consisting of the following materials:
- Insulation. Plates made of mineral wool, expanded polystyrene or polystyrene foam, fixed to the outer surface of the wall using adhesive mixtures and facade dowels.
- A protective and decorative layer of plaster reinforced with a special mesh made of fiberglass or polymer threads.
The durability of this system depends primarily on the quality, materials used and strict adherence to the work technology. Insulation and plaster form a single system. Its functions are to increase the energy efficiency of the building. The calculation of the required amount of materials is carried out at the design stage by employees of a specialized organization.
Dry mixtures for plaster on insulation
In the case of independent performance of insulation and finishing work, determining the volume of purchases falls on the shoulders of the contractor. Calculating the number of thermal insulation boards is quite simple; it is enough to determine the area of all walls to be insulated.
The need for reinforcing mesh is also determined. The situation is somewhat more complicated when calculating the required amount of dry mixture for plaster.
Selection of materials for exterior finishing
The performance characteristics of the decorative and protective coating primarily depend on the physical and mechanical properties of the plaster, as well as the chemical properties of the reinforcing mesh.
The main criteria when choosing dry compositions for exterior finishing are:
- specific density of the colloidal solution mixture;
- maximum time for using the prepared mixture;
- permissible thickness of the decorative layer;
- mobility of plaster;
- the degree of vapor permeability established by the standard;
- high mechanical strength and ability to withstand tensile and compressive loads;
- frost resistance;
- good adhesion to the insulation material;
- small shrinkage.
Only well-known companies producing building materials can provide such characteristics. The relatively high price of their products corresponds to the quality, and when making purchases, you should ask the seller for a certificate.
Reinforcing meshes used for this type of finishing can be standard or reinforced. They must have a specific density determined by the standard; fiberglass or polymer threads are used in their manufacture.
Their thickness must be at least 0.47 mm for regular and 0.9 mm for reinforced meshes. The nominal cell size should be in the range of 3.5-5×3.5-5 mm and 6-8.5×6-8.5 mm, respectively.
Tools and equipment necessary for work
Minimum required set of tools
External plastering of a house over insulation is done manually using special devices.
A detailed list of tools includes the following items:
- metal spatulas wide and narrow;
- polymer buckets for preparing the mixture and for water;
- plastic holders for sanding paper;
- polymer or rubber spatulas for leveling plaster;
- scaffolding or climbing equipment for working at heights.
The instructions require strict adherence to rules and safety measures, especially when performing finishing operations on external building structures. Only specialists who have undergone appropriate training and have a standard permit are allowed to perform this type of work. Before performing operations with them, instructions are provided. And the place is fenced off to prevent injuries to workers and strangers.
Plaster on polystyrene foam insulation
Mineral
Facade mineral plaster is durable and aesthetically pleasing. The composition contains cement powder, sand, coloring pigments, additives. Manufacturers produce plaster in the form of a dry mixture, packaged in bags. The composition is diluted before finishing work. Mineral mixtures are affordable and are not susceptible to fungi and mold. However, it is necessary to take into account the limited palette of shades of the plaster variety.
Key excerpts from SNiP for plastering work
Here we present some excerpts from SNiP regarding the following points:
- temperature conditions for plastering work (7.1.1);
- wall surfaces and their treatment (7.1.8);
- allowance for applying several layers of finishing coatings to the surface, technology for using plaster mesh (7.2.6);
- plastering requirements.
7.1.1 Finishing work in premises should be carried out at an ambient temperature and of the surfaces to be finished from 5 to 30 degrees. Relative humidity should not exceed 60% unless otherwise specified by the material manufacturer. This temperature and humidity regime in the room must be maintained around the clock during the entire period of finishing work, plus the need to maintain it in the same regime for at least 2 days before the start and 12 days after the completion of work.
7.1.8 Before applying each subsequent layer, it is necessary to remove dust from the surface being treated and, if necessary, treat the base with a primer to reduce or level its absorbency.
7.2.6 Plaster mortar based on cement or lime-cement binder can be applied either in one layer or in layers according to the instructions of the material manufacturer. When installing a multi-layer plaster coating, each layer must be applied after the previous one has set. Depending on the type of work, the plaster mortar, the type of base, the unevenness of the wall and the thickness of the layer, if provided for by the project, if necessary, a plaster mesh is selected that is attached to the wall.
7.2.13 The quality of plastering work for simple, improved and high-quality plaster must meet the requirements below.
(It should also be noted that simple plaster can be performed without beacons, while for improved and high-quality plaster the use of beacons is necessary).
Simple plaster:
- vertical deviation is no more than 3 mm per 1 m, and also no more than 10 mm over the entire height of the room;
- horizontal deviation no more than 3 mm per 1 m;
- surface irregularities of a smooth outline no more than 4 pieces per 1 m, but not more than 10 mm for the entire element;
- deviation of window and door slopes, pilasters, pillars and the like from the vertical and horizontal is no more than 4 mm per 1 m, and also no more than 10 mm for the entire element;
- deviation of the radius of curved surfaces from the design value is no more than 10 mm for the entire element;
- deviation of the slope width from the design one is no more than 5 mm;
Improved plaster (mandatory use of lighthouse profiles):
- the vertical deviation of the wall is no more than 2 mm per 1 m, and also no more than 10 mm over the entire height of the room;
- horizontal deviation of the wall is no more than 3 mm per 1 m;
- surface irregularities of a smooth outline no more than 2 pieces, depth (or height) up to 3 mm;
- deviation of window and door slopes, pilasters, pillars and the like from the vertical and horizontal in area 4 is no more than 4 mm per 1 m, and also no more than 10 mm for the entire element;
- deviation of the radius of curved surfaces from the design value is no more than 7 mm for the entire element;
- deviation of the slope width from the design one is no more than 3 mm;
High quality plaster:
- the vertical deviation of the wall is no more than 0.5 mm per 1 m, and also no more than 5 mm over the entire height of the room;
- horizontal deviation of the wall is no more than 1 mm per 1 m;
- surface irregularities of a smooth outline no more than 2 pieces, depth (or height) up to 1 mm;
- deviation of window and door slopes, pilasters, pillars and the like from the vertical and horizontal in area 4 is no more than 2 mm per 1 m, and also no more than 5 mm for the entire element;
- deviation of the radius of curved surfaces from the design value is no more than 4 mm for the entire element;
- deviation of the slope width from the design one is no more than 2 mm.
The parameters indicated above in table form:
| Parameters and properties of plaster | Simple | Improved | High quality |
| Deviations from the vertical by 1 m, no more | 3 mm | 2 mm | 1 mm |
| Maximum deviation from the vertical throughout the entire height of the room | 15 mm | 10 mm | 5 mm |
| Number of irregularities per 4m2, no more | 3 | 2 | 2 |
| Depth of irregularities, no more | 5 mm | 3 mm | 2 mm |
| Deviation from horizontal by 1 m, no more | 3 mm | 2mm | 1mm |
| Base moisture content, no more | 8% | 8% | 8% |
Choosing the type of insulation for plaster
The entire list of finishing works is usually planned in advance, so even at the stage of choosing insulation it is worth understanding the properties of different types of material in order to plaster them using the correct technology. The most commonly used materials for insulating facades are polystyrene foam (foam plastic) and mineral wool.
- Expanded polystyrene;
Quite easy to install and inexpensive material with excellent resistance to moisture. Expanded polystyrene insulates the facade well, but is less durable than mineral wool. In addition, polystyrene foam is not fireproof.
It is most reasonable to choose expanded polystyrene for thermal insulation of brick facades, concrete, expanded clay concrete and slag concrete walls.
- Mineral wool;
Non-flammable and breathable material with excellent vapor-permeable properties. When planning to install such insulation, you should understand that its weight is greater than that of foam plastic, so to attach it to the facade you will need a stronger sheathing.
It is also recommended not to skimp on the quality of mineral wool and choose two-layer materials in the form of diabase or basalt slabs. They are quite dense and have a hard outer surface.
Mineral wool is used to insulate houses made of timber, expanded clay concrete, as well as walls made of gas silicate and aerated concrete.
When choosing plaster, it is necessary to take into account the type of insulation that will be installed on the facade. If you choose expanded polystyrene, the reinforcing mesh should also be special - resistant to alkalis.
Optimal plastering thicknesses
When the base does not have significant differences or deviations from the vertical, then theoretically leveling can be done with single-layer plaster of the minimum thickness inherent in this type of solution. But in practice, such a coating rarely meets the requirements of a particular room, as it must take into account the following:
- The need to cover electrical wiring. If round cables are used in the wiring of the room (marked “P” - normal), then the diameter of the wire may exceed the thickness of the minimum layer of plaster. When the lines are located in protective corrugations, the coating should be even thicker.
- Placing interior items on the walls. If the walls are concrete, then with minimally thin plaster, installing even lightweight accessories (wall lamps, shelves) will be difficult - the dowel may not go into the base, and you will need to drill the concrete, but the drill may get into the reinforcement.
- Possible mechanical impacts on the walls. A plaster coating of minimal thickness, made using polystyrene foam, has low strength and is vulnerable to even minor impact loads (children's rooms, rearranging furniture).
Thus, the optimal thickness of the plaster is the minimum value that not only ensures the alignment of the walls, but also takes into account the operating conditions of the room.
Plastering brick, concrete and aerated concrete walls
The maximum permissible thickness of single-layer cement plaster on brick is 15 mm. If the masonry is done with high quality (deviation from the vertical up to 10 mm per floor), then the thickness of the coating is limited to 7 mm plus the amount of deviation. In this case, it is advisable to install the electrical wiring along the embroidered seams of the masonry. The permissible jointing depth is 1 cm, and this is quite enough to bury most cables used in household networks.
When brick walls deviate from the vertical by more than 10 mm, the thickness of the plaster increases by the amount of the deviation, but without reinforcement only up to 20 mm.
The maximum thickness of a single-layer cement plaster coating on concrete is also 15 mm. As for the optimal layer, you should also take into account the corresponding minimum parameter of the mixture used, the degree of unevenness of the base and the characteristics of the room.
The optimal thickness of the internal cement plaster of walls made of foam concrete blocks is determined identically to the brick base. As for the coating on the outside, it is allowed no thicker than 10 mm, since exceeding this value sharply reduces the vapor permeability of foam concrete - an important advantage of this material.
The most popular facade insulation for plaster
To insulate a building, you can use a variety of materials that differ in their performance characteristics.
Expanded polystyrene or polystyrene foam
Thermal insulation with polystyrene foam, polystyrene foam is considered the most convenient option for a plaster facade. Among its advantages are:
- Availability – this is the most budget-friendly option for a heat insulator;
- Light weight, which makes working with the material easier;
- High thermal insulation properties;
- There is no need to use special protection for hands and respiratory organs.
- There is no vapor permeability, so the house “does not breathe” - in practice, this means that the room will need to be equipped with high-quality ventilation;
- Burning foam releases substances that are toxic to humans;
- Low strength makes the façade unstable to impact loads.
When choosing insulation, you need to pay attention to its density, which should be at least 25 kg/m3. Read more about these materials here.
Minvata
This type of insulation for facades under plaster is sold in the form of slabs. Among the advantages it should be noted:
- Vapor permeability;
- Environmental friendliness;
- Fire safety;
- Low thermal conductivity;
- High strength, at least compared to other heat insulators.
- More expensive compared to polystyrene foam;
- Relatively heavy weight;
- When working with mineral wool boards, it is necessary to protect the skin from getting fibers - they cause irritation.
When making a wet facade, only stone/basalt wool with a density of 100-125 kg/m3 is used. The use of slabs with a lower density is impermissible, since the load-bearing capacity of the facade suffers due to the low strength of the insulation. Its resistance to mechanical stress will be very low, and it will very quickly lose its aesthetics. How to properly insulate a facade with mineral wool is described here.
Penoplex eps
Penoplex is a type of polystyrene foam, however, production technologies are quite different. Penoplex has good thermal insulation properties, but vapor permeability is zero, which significantly limits the scope of its use in thermal insulation of buildings and implies the need to organize ventilation in the room in order to get rid of excess moisture in a timely manner. The characteristics of penoplex make it the best option for thermal insulation of parts of a building and basement immersed in the ground. How to insulate a facade with penoplex is described in this article.
Thickness of decorative plaster
Decorative compositions intended for decorating interiors and facades also have their maximums and minimums.
Existing types of finishing decorative mixtures are divided into:
- textured;
- structural;
- Venetian;
- pebble.
The Venetian can boast the most minimal layer of plaster. This is due to the fraction of the components included in the composition (the filler is stone flour). The finish with the effect of crinkled silk and Moroccan is also distinguished by its thin layers.
Structural compositions produce a layer no less than the size of filler granules. For example, the popular finishing of bark beetles, performed with roller compounds. By the way, for the bark beetle, the grain size dictates the maximum thickness. Indoors, compositions with filler of a smaller fraction are used than on facades. The same can be said about travertine plaster.
The thickest decorations are textured finishes and stone coatings. The thickness of the former can have a wide range - up to 5 cm. For example, imitation of brickwork, wooden surface or wave relief. The size of the layer of pebble plaster, for example, mosaic, depends on the size of the stone grains.
Examples of our work
Finishing of the facade in the Gar-Pokrovskoye community center
Finishing of the facade in KP Babenki
Finishing of the facade in the village of Firsanovka, Moscow region
Facade finishing in Antonovka
An exception
In some cases, the curvature of the walls is so great that more than 5 cm of mortar must be applied. For every additional 2 cm of layer, a reinforcing mesh must be used. Plaster is not the most expensive building material, but you need a lot of it, so in some cases it is better to abandon the use of mixtures in favor of plasterboard boards. In addition, such materials are quite heavy, so before starting work you need to make sure that the wall being treated is reliable.
Universal technology for plastering facades using insulation
Insulating the outside of the walls allows you to retain heat inside the room.
It is performed at the stage of construction or reconstruction of a building. Modern technology for facade insulation is carried out in two ways. A ventilated façade is a durable frame along the wall, which is filled with heat-insulating material and lined with porcelain stoneware or composite cassettes on the outside. And the second insulation system “wet facade” consists of insulation, reinforcing mesh, primer and requires final plastering. The work is carried out using water, which is why the epithet “wet” arose. The advantage is that the construction of an expensive frame is not required, and the necessary materials are attached directly to the wall. They are then covered with a beautiful finishing layer.
Features of aerated concrete
Aerated concrete is a porous building material from the cellular concrete family. It has a lot of positive properties that are not typical for traditional brands of concrete:
- light weight, allowing to reduce the thickness and depth of the foundation;
- low thermal conductivity, allowing walls to be made of relatively small thickness;
- smooth and precise geometry of gas blocks, the presence of special grooves and protrusions that ensure high quality masonry and a smooth wall surface.
All positive qualities are obtained due to the presence in the mass of material of small bubbles filled with gas. They arise during the technological process during the manufacture of the material. However, the presence of these tiny cavities has caused aerated concrete to develop negative qualities:
- low ability to withstand pressure or compression;
- the overall strength is much lower than that of traditional concrete;
- the ability to absorb water is noticeably higher than that of conventional brands of material.
All shortcomings are compensated by limiting the load on the walls (for example, the construction of houses no higher than 3 floors is allowed), as well as the mandatory use of protective finishing.
How to control the layer of plaster mixture
Of course, when applying a solution, it is difficult to determine the size of the formation thickness by eye, and without sufficient experience it is impossible. If you need to apply the solution in a thin layer on a flat wall, then use a 50-centimeter spatula and then level it using the rule. When performing decorative work, the size of the mortar thickness is checked by eye. In the case of applying the maximum layer of plaster, the thickness and evenness of the coating is ensured by the use of beacons.
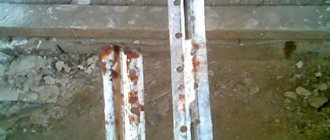
Beacons are guide profiles made of metal, mortar, plastic or wood. Standard metal profiles have a height of 6–10 mm, a length of 3–6 m. Mortar profiles can be made to any desired height. Before starting the installation of beacons, the walls are examined, irregularities are identified, and the minimum height of the future covering is determined. Using the chosen method, they create an auxiliary vertical plane along which the beacons are placed (read about installing beacons here).
In addition to beacons, corner profiles are used to apply the proper layer, installing them on slopes. To make arched doorways, templates are made from plywood.
Craftsmen with extensive practice and accumulated experience can change the thickness of the plaster coating within small limits. However, this is not recommended for beginners. It is correct to follow the instructions and standards so as not to end up with a “broken trough” - cracking and falling off plaster mass.
At first, plastering looks not only dirty, troublesome, but also complicated. There are many nuances in plastering that affect the result. Thus, the factor on which the quality and reliability of the finish in operation directly depends is the thickness of the plaster on the wall. There are many numbers given here that make your eyes widen. In fact, you will need those that are easy to remember. With the beginning of practice, the plastering process will no longer seem difficult. And over time, such work will become habitual.
Maximum thickness of finishing with gypsum compounds
Plastering in one layer gives a durable monolithic coating. Unlike other materials, gypsum makes this easy. The maximum possible thickness for the popular mixture of the Knauf HP Start brand is 30 mm, and for Rotband - 50 mm. As a rule, the more expensive the composition, the more mineral and polymer components it contains, which expand its capabilities. When finishing surfaces of equal area, the consumption of such plaster is 2 times less than the cement-sand mixture.
Grout
The grouting process helps to finally smooth the surface and eliminate remaining streaks, traces of groove filling and other minor imperfections. The work is performed in two steps:
- using a wooden trowel, make circular movements, smoothing the surface of the wall;
- take a grater and level the surface with energetic swinging movements, achieving the final result.
To obtain a smooth surface, the working plane of the tool can be wrapped in a soft cloth.
Articles on the topic
How to make a roof on a brick house - varieties, strengthening, instructions, advice from masons
Brick sides - what they are called, characteristics, instructions, advice from masons
Waterproofing a brick plinth - horizontal, vertical, instructions, advice from masons
Beating plaster from brick surfaces using machines and manually, instructions, advice from masons
Foundation for a brick house - strip, monolithic, slab, instructions, advice from masons
Brick partitions - preparation, construction, instructions, advice from masons
Brick foundation for a wooden house - types, instructions, advice from masons
How to decorate an arch with decorative bricks - stages of work, instructions, advice from masons
Reviews ()
Brick plaster for exterior and interior use
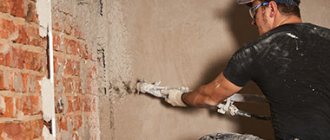
There is a great way to save on external facade finishing and get an impeccably smooth surface. Plastering a brick wall is a practical, beautiful and inexpensive finishing option. With minimal experience in the field of construction, you can cope with this work without the involvement of hired finishers.
Familiarize yourself with the features and stages of the process so as not to waste extra time on work and not be interrupted by searching for some material, tool, or thinking about what you missed. If you do everything consistently and correctly, plaster on sand-lime brick (as well as ceramic) will last so long that it will become boring.
Required tools and materials
List of what will be needed for plastering:
- for preparing the solution - containers, mixer, mortar mixer;
- for application - spatulas (in simple terms - spatula), ladle, trowel, trowel, rollers, brushes;
- for stretching, leveling - grater, grater, rule;
- for priming, forming a relief pattern, painting: rollers, brushes, brushes, sponges, stencils, other improvised means;
- for measuring, marking, installing beacons - level, plumb line, tape measure, masking tape, cord;
- for painting – brushes, sponge, rollers, spray bottle;
- for protection – glasses, respirator, gloves, work clothes
Materials you will need:
- components of plaster composition, SS or ready-made compositions;
- water;
- primer;
- shingles;
- lighthouses;
- reinforcing mesh;
- fastening parts - dowels, screws, nails;
Required material for plastering
Required inventory
Plastering the ceiling with your own hands requires preliminary preparation of the appropriate tools.
- A square-shaped container with a capacity of at least 15-20 liters. It is desirable that its walls are straight, which will make it easier to collect the solution with a tool.
- Set of spatulas of different sizes. Options with rubberized handles are recommended.
- Rule.
- Paint brush.
- Several types of sandpaper with varying degrees of grit.
- Construction mixer. If this is not available, a drill with a similar attachment will do. Used for intensive mixing of dry facing mortar with water.
- Construction trowel.
- Serpyanka.
- Ladder.
- A ribbed primer tray with a roller matching its width.
It is advisable to find a roller with a long handle for painting high walls and ceilings.
- Building level.
- Latex gloves.
- To protect the face, a plastic mask with a respirator is advisable (in a dry state, the mixture can disperse into the air when poured into a container. Inhaling it will be harmful to health).
Before you get started, you should prepare the necessary tools