Paint options
Most often, the following paint and varnish materials are used for decorative products made on the basis of epoxy resin:
- Latex paint. Allows protection from the adverse effects of sunlight. The disadvantages of the coating include susceptibility to mechanical stress; scratches, chips and other minor defects appear on the surface very quickly.
- Alkyd compositions. They are easy to apply and do not emit toxic substances; they can be found on the shelf of any building effect. Expensive coatings allow you to protect a product made of epoxy resin for a long time, even with regular use.
- Polyurethane one-component compositions. They have more pronounced protective characteristics compared to alkyd ones, but they are more expensive; they often contain amines, which make the mixture unsuitable for working with epoxy.
- Polyurethane two-component compositions. Presented on the market with pigmented and colorless compounds, they guarantee a glossy surface, protect against the negative effects of ultraviolet rays, and provide increased wear resistance. They are dangerous to the human body; extreme care must be taken when working.
- Epoxy paints. They are presented on the market in one- and two-component compositions, their characteristics are similar to polyurethane coatings, they protect the finished product from mechanical and chemical influences, from ultraviolet rays, and provide wear resistance.
- Antifouling paints. The name brings together many coatings with different characteristics. In most cases, paint can be applied directly to the cured epoxy resin product; sometimes it may be necessary to pre-treat the surface with a primer.
Regardless of the type of coating chosen, before starting work, you should read the detailed instructions from the manufacturer. Before large-scale application, it is advisable to test the interaction of the paint coating with the epoxy resin on a small area.
Surface application method
Before starting work, it is necessary to prepare the surface for varnishing:
- All debris, dust, and loose particles of the previous coating are removed from the surface.
- If the product is metal, then it is necessary to ensure that there is no rust on its surface.
- Before applying varnish to concrete, cracks and uneven areas must be filled with putty.
- The surface of the wood is primed and also sanded.
- Plastic materials are first matted using sandpaper and then degreased.
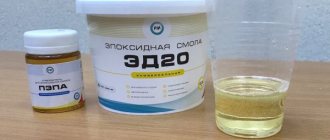
Epoxy varnishes are two-component, made on an epoxy base, so they must be prepared before use. To do this, add a hardener and mix thoroughly for 5-10 minutes. After this, you need to give it time to complete the chemical reaction, sometimes the transparent composition turns slightly white. Once the formation of bubbles has stopped, the substance can be applied.
The viability of the solution after combining the components is a certain time, for example, epoxy-polyurethane varnish is valid for 1 hour. Therefore, if you decide to process a large surface area, it is better to cook in portions.
For application, you can use pneumatic devices, airless spraying methods, or manually: with a brush, roller. In this case, it is necessary to maintain a temperature range of +5°...+30° C, and the relative humidity should not exceed 80% (provided that there is no dew on the surface being treated). Drying time is about 8-12 hours, and complete polymerization occurs after two days at a temperature of at least +20° C.
Floor application
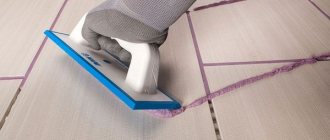
To apply epoxy floor varnish to parquet or other coating, it is better to use a wide tool, thanks to which the work will go faster and easier. Perform movements, trying not to repeatedly go over the painted area - this way the layer will be uniform and have an optimal thickness.
Experts recommend systematically cleaning the brush with a solvent. If you use a roller, it is better to make movements in a cross pattern. The transverse movement is intended to apply the substance to the surface, and the longitudinal movement levels the composition. The speed of movements should be reduced near walls or other obstacles. Before starting work, the roller should be rolled out.
Surface preparation before applying varnish
Preparatory work includes cleaning the surface from:
- Wax residues;
- Fat;
- Oils;
- Old varnish;
- Various stains and dirt;
- Polishes;
- Other substances.
The surface to be treated must not only be clean, but also dry. For better adhesion of the varnish to the epoxy, it is advisable to treat the surface with a sanding attachment (do not forget to remove the resulting dust).
Glossy varnish Pebeo “GLOSS” for products made of epoxy resins
Varnishing rules
The process of applying transparent varnish to concrete or parquet can be done using a spray bottle, or manually - with a roller or brush. The varnish must be applied at temperatures from 5 to 30 degrees, air humidity should be less than 80%. There should be no condensation or dew on the surface to be treated; the surface temperature should not be allowed to be below +5 degrees. The varnish usually dries in 8 to 12 hours, and completely polymerizes in about two days if the air temperature is 20-25 degrees.
The best application method is to spray with a spray bottle, but if you don't have a spray gun, you can use a wide roller. The wider the roller, the better, because the varnishing process will be faster and easier. When applying varnish to parquet or concrete, you do not need to go over the same place twice, thanks to this the coating will be uniform and the same in thickness.
If varnishing is done with a roller, then it is advisable to make cross-shaped movements. Thanks to transverse movements, the varnish is applied to the floors, and longitudinal movements level the applied solution. Near walls, columns, and other obstacles, it is necessary to reduce the application speed. Before starting varnishing, it is advisable to roll out the roller.
Application of a protective layer
The paint coating, which is applied over the decorative element, provides protection against mechanical damage (scratches, chips, abrasions, etc.) and interaction of the product with aggressive environments that can cause destruction of the material.
A properly selected protective coating can increase the overall service life of the finished epoxy resin product.
When choosing a varnish for epoxy resin, you should pay attention to the ability of the material to withstand ultraviolet rays. The sun directly affects the lifespan of the barrier layer; when it is destroyed, the product loses its original strength characteristics, changes color, and becomes unsuitable for further use.
It is better to give preference to white glossy or colorless varnishes. Such materials will allow you to preserve the product in its original form without loss of pigments for a maximum period, even with constant use.
Water-based polyurethane varnish Varatan, transparent gloss
Water-based polyurethane varnish for resin products
Popular brands
EP 2146
This parquet varnish is the leader in the list of domestically produced LKS from Yaroslavl Paints JSC.
Its advantages:
- It does not require primer.
- Peel-off drying time – 48 hours; between layers – 2 hours.
- Consumption – 1 kg per 1 sq. m.
- Gloss – 55% (semi-gloss).
- Type of material – one-component.
EP 730
This universal two-pack epoxy-based varnish is produced by Biokhim LLC from St. Petersburg. It is designed to protect metal and wood surfaces. This material is resistant to any type of influence: mechanical, chemical, alkaline, temperature.
Drying time – 1 hour.
Consumption – 80 g per square meter. m.
ET 3D
This composition is designed to create a 3D floor. It is applied to wood and concrete surfaces. The dense glossy fabric can withstand significant loads and is impervious to temperature changes.
Complete drying time – 48 hours.
Consumption – 1.5 kg per 1 sq. m.
Compatibility
Most paint and varnish coatings interact well with epoxy resin, creating a durable film on the surface that protects from chemical environments, adverse environmental factors, sunlight and mechanical damage.
If you are not 100% sure of the compatibility of epoxy with a particular varnish, you need to test coat a small area that you won’t mind disposing of if something goes wrong.
Remember that varnish should only be applied to fully cured epoxy resin. The hardening process may take about two weeks; to speed up, you can leave the product near the battery or place it in an oven at a minimum temperature for several hours.
You can speed up the hardening process by drying only on dark-colored products.
Epoxy experiments. Part 2
This is a continuation of my first article about experiments with epoxy resin.
So, I was inspired by the results and moved on.
On the left are the usual IKEA stars, but slightly tinted. Not entirely successful, but it’s a fact - epoxy is not only transparent!
To the right is nail polish (see last article).
At the bottom left are squares, lightly tinted with pens. Hurrrrah, it turns out. To my credit, the color is still holding up well (more than six months have passed).
You already know the rest: sequins, beads, sparkles and all the same mistakes.
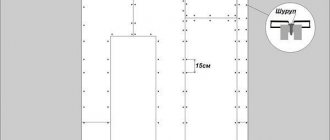
The heart and star are made on hand-cut templates, more about them below.
Then the thought struck me, why not tint the resin with pen ink.
I’ll say right away that storing them is a disastrous task; the rod must be used all at once. The ink dries very quickly. According to experiments, it turns out that you need at least 15 ml of resin per rod, otherwise it will come apart in lumps and the color will not be uniform. Well, and, accordingly, the more resin on the rod, the lighter the color.
On the right are the same ice trays. On the left - I took the plastic from the badge, traced the design and cut it out. I poured resin on top. I’ll say right away that the plastic can be easily separated after the resin has dried, and you just get something like this. All this stuff was painted with gel pens.
I will note that my resin reacted strangely to purple pens. In this photo, all the pink elements came from a purple rod. At the same time, on the edges it generally casts orange. Then I tried purple pens from different companies, but the orange effect still appeared. Strange and unusual.
Ikea fish (sorry for the newspaper in the background). Here you can see that it is purple with an orange tint. The blue fish is painted with stained glass paint, I have deco paint on an organic basis. The color is bright, but the resin loses its transparency. However, due to the peculiarities of the mold, all the fish turned out opaque. The green one is made from a metallic pen, shimmers like, in fact, metallic and is generally opaque.
Stars with holographic sparkles sparkle very beautifully. I filled the blue rounds in several stages: a layer tinted with stained glass paint, on it mica for nails (sold for nail art, pieces of foil or something like that) and filled with a white base. And just a piece of advice: if you fill in layers in stages, do not remove the unfinished product from the mold . Because if you take it out and put it back, air pockets will certainly form somewhere, into which a new portion of resin will joyfully rush. On the lower right cabochon you can see a coating on the right that looks like salt - this is overflowing epoxy.
By the way, I started braiding these cabochons with beads, made a bracelet, started a necklace, for some reason abandoned them, and when I found them, the white color turned very yellow and they stopped being beautiful. I think it depends on the brand of epoxy.
Disco series with sequins. Also step-by-step: first a transparent layer with sequins, then a layer tinted with black acrylic paint. By the way, it never came apart, it’s not visible in the photo, but the black layer with grains and when viewed through light is dark gray and not continuous. Conclusion: not very good with acrylic.
The heart shows the imprints of the thorns from the notorious rug. They are very difficult to clean and refill, sad thing.
On the left is also a sample, but here we need to make a small lyrical digression. I once came across an article online about the work of a Japanese craftswoman who made kanzashi from an unknown material (I saved the photo from that site, I don’t remember its name, unfortunately).
“Heh,” I think, “that’s epoxy on a wire frame!” Inspired by the fact that, except for the brilliant me, no one thought of it, I go to experiment. So I put the wire petals on the glass and pour them in. Everything flows past into the gaps. In general, after a week of various attempts, what you see in the previous photo turned out. To be honest, I didn’t really like it: the epoxy layer is quite difficult to calculate based on the diameter of the wire; it turns out that it extends a little beyond the boundaries. Unaesthetic in general.
Then I saw a video on YouTube with this Japanese woman, in which she dipped the frame into a jar of viscous liquid and dried it with a hairdryer. Yeah! We wait until the epoxy thickens a little, then dip it in. However, the resin bursts quite quickly, and a hairdryer didn’t work either. And then I actually came to the idea that she had stained glass paint in the jar. But that's a completely different story.
Here is a brief description of what I managed to photograph and remember. Finally, I want to share some thoughts.
1. Epoxy is not friendly with water. If you water undried plants (they contain water), after a while they will turn black and take on an unpleasant appearance. If you mix epoxy with anything water-based (I tried it with face wash), it just won't harden. It is not yet recommended to coat with water-based varnish - the resin may become cloudy. I once had a drop of resin drop into water and solidify like paraffin from a candle. I think it can be used somehow.
2. To get rid of bubbles, you can slightly heat the resin and blow on the bubbles. I saw how to disperse the bubbles with a torch and lighter, but I warn you, this can be dangerous , especially if you are not confident in your epoxy. I don't recommend doing this.
3. Sharp edges after hardening can be cut off (if they are thin) or sanded with sandpaper (do not scratch the product). When working with sandpaper, it is better to wet it and put on a bandage (dust from epoxy is not the most useful).
4. When combined with polymer clay, epoxy can *taaaaam* be baked in the oven with it. Do not exceed the recommended temperature and do not keep it there for a long time, pay attention to safety (as when working with polymer).
5. Standard: follow safety precautions, ventilate the room and keep it away from children. Well, don’t drink the resin yourself.
I wish you creative impulses,
Your Skilavka 
How to paint epoxy resin
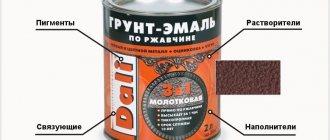
In the construction industry, paint often plays the role of insulation. Direct sunlight destroys the material, and it quickly becomes unusable. The sign is cloudiness.
Before starting work, the surface must be prepared to ensure adhesion. To do this you need:
- sand the hardened resin with sandpaper or a fine file;
- apply epoxy primer;
- treat with solvent.
Attention!
When purchasing a solvent, you need to familiarize yourself with the composition. If it contains methylene chloride, it is not suitable - this substance destroys the epoxy resin.
The coating must be renewed regularly, taking into account the type of dye and the duration of exposure to direct sunlight. The previous insulating layer must be washed off with a solvent.