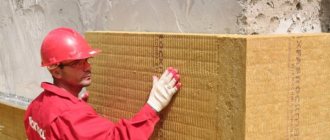
Process methodology
The gaps between the beams in a wooden structure must be sealed, like joints in concrete and brick walls.
However, sealing logs occurs differently and using other substances. The service life of simple sealants is short; due to shrinkage, they crumble and fall apart, and require frequent replacement. The so-called “warm seam” fixation element is much more effective and durable.
The stages of forming a “warm seam” are carried out in the following order:
- First of all, the gaps between the beams are filled with some composition with thermal insulation properties;
- A special cord is placed over the connection; it prevents contact with the sealant;
- The final stage is the formation of a “warm seam” using an acrylic, or silicone, or polyurethane fixation element, which is used for wooden surfaces.
The treated warm joint is painted with one or another composition. The seam will become airtight, waterproof and draft-proof.
The sealer is usually applied along with adding a layer of caulk, since the spacing between the beams is wide, so the sealant can bleed through as the logs shift due to shrinkage.
Insulation of a log house with sealant
The whole process is divided into several stages, which can be carried out no earlier than a year after the complete completion of construction, when the wood has completely settled.
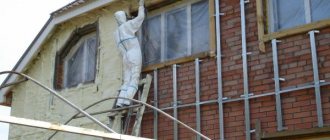
To insulate a log house with sealant, you need to contact trusted people who have extensive experience in the field of wooden house construction
Phased distribution of work
- All seams should be prepared properly - all types of contaminants are removed, if necessary, individual areas can be expanded, after which antifungal impregnation is applied.
- Then the entire surface is treated with a primer.
- The basis of the sealed seam is a sealing cord, which fills large openings.
- After this, the entire remaining cavity is filled with sealant using a special construction gun. Using a spatula, all irregularities are corrected, creating a seam of 4 to 6 mm.
- An aesthetically pleasing and finished seam should have a flat and smooth surface.
- Hardening of the sealant takes from 2 to 7 days, depending on the temperature and air humidity.
To obtain the maximum effect from insulating a wooden house, you can only get it if all stages are carried out professionally. Therefore, it is recommended to trust this process only to proven and certified professionals. They will be able to decide the most optimal type of sealant and select all the associated materials and tools.
A warm joint is the sealing and insulation of joints while simultaneously creating an aesthetic appearance for the entire structure, using elastic materials based on acrylic or rubber. We propose to consider the technology of arranging a “warm seam” based on the most popular materials that have a number of technological advantages and positive reviews.
All repairs using such sealant, inside or outside, have good adhesion to wood; after hardening, it repeats all changes in the base - expansion or reduction in volume that occur when weather conditions change. The seam can stretch and return to its previous state without damaging the seal. Also a plus is the material’s resistance to sunlight, winds, frost or precipitation.
A warm seam reliably protects a wooden house
It should be understood that the sealant is only an additional sealing that can fix the jute insulation and create a decorative finish, but does not exist as an independent seam. It perfectly fills space and can replace colored jute, although it is more durable, it has a high cost. This should be taken into account for quality work.
Characteristics of “warm joints” for wooden coverings
Wood fixings for professional use are multifunctional and effective.
They can be used for processing warm joints of log houses, brick walls, cracks in concrete and stone structures, as well as for use with materials such as plastic, foam and aerated concrete, and plaster.
The seam lock completely protects wooden structures from adverse weather conditions. All sealants contain substances that prevent the appearance of fungi and mold.
Advantages of sealing:
- Optimization of air exchange, which allows you to create favorable living conditions;
- Cost-effectiveness of the entire building due to minimizing heat loss;
- Sealing is a long-term type of work that allows you to reduce the cost of partial repairs;
- Protecting the house from moisture, wind and frost entering the wall structure, protecting the entire structure from premature repairs;
- No gaps conducive to the development of pests or mold;
- Maximum color matching compared to natural wood.
The main advantage of sealing the seams of a log house is the elimination of heat loss
Distinctive features of fixatives for wooden coverings
- Harmless to people and nature;
- Suitable for indoor and outdoor use;
- Very flexible (can increase in length by 7 times);
- Easily bonded to wooden surfaces and other building materials;
- Resistant to ultraviolet radiation and atmospheric influences;
- They do not turn yellow or darken over time.
High-quality fixatives are thixotropic. They can be applied to inclined and vertical surfaces, since they do not flow when at rest.
What are specialized wood sealants?
Regardless of the processing technology and type of wood, all workpieces, be it logs, timber or boards, are subject to natural shrinkage. Therefore, wooden houses are characterized by shrinkage, as a result of which the seams between the elements diverge and the log itself cracks. In addition, wood is characterized by changes in humidity depending on the season, that is, even after the end of the main shrinkage, the joints will “walk” somewhat during the entire service life. Traditionally, walls were caulked using natural materials (tow, moss, jute, flax, etc.), today synthetic ones based on polymer non-woven fiber are also used.
But achieving tightness of the seams only with caulking is quite problematic; to a greater extent, it helps to reduce heat loss. But moisture, as it penetrated from the outside, will continue to penetrate, and such sealing is generally not a hindrance to drafts, not to mention the laboriousness of the process.
To completely seal the seams, they now use specialized wood sealants - thixotropic (non-flowing) compounds that have good adhesion to the surface and resistance to the external environment.
Although there are several types of sealants (acrylic, silicone, bitumen, polyurethane), only acrylic is specialized for wood. Acrylic-based sealant best suits the specifics of wooden house construction today. It has the highest characteristics in terms of elasticity and environmental friendliness of use; it has no odor either before or after curing. All such specialized materials, whether domestic or imported, have an acrylic base.
How to choose a sealant for wood
The fixation element for warm seams must be selected very carefully. A low-quality wood fixer will reduce your efforts and financial resources to zero.
Before purchasing, you need to be sure that the sealant adheres well to the wood and is suitable for applying a warm joint.
Durability of operation in open space should be at least 15-20 years, and there should be no strong shrinkage after the product dries.
It is necessary that the fixation element is elastic and convenient for use: in the form of a tube suitable for installation in a gun.
The choice of elements for fixation for the “warm seam” technology is large. Acrylic sealant is one of the inexpensive and harmless. They can be used indoors as they are non-toxic, environmentally friendly and do not contain solvents.
Acrylic easily saturates the porous wooden surface, and then it can be painted with the appropriate color.
It can also be used outdoors, but acrylic sealant, compared to other fixatives, is less resistant to ultraviolet rays and moisture.
To form a warm seam, you can also use a silicone fixation element. Their service life is 20-25 years.
Such sealants are flexible, strong, proven. The price of acid-based compositions is low, and neutral sealants, which do not contain acids, interact better with building materials.
Silicone sealants have few disadvantages. A dried, warm joint cannot be painted, but prepared painted compounds are produced.
It is not advisable to manually mix dyes into the solution; in extreme cases, use a vacuum mixer.
Another type of warm joint sealant for wood is polyurethane sealant. They have the following properties:
- good adhesion to a wooden surface and good strength;
- resistance to reaction with chemical elements, moisture, shock resistance;
- no shrinkage occurs after hardening;
- the possibility of applying paint while the seam is drying;
- resistance to ultraviolet exposure to the sun;
- good flexibility, resistance to deformation.
Many polyurethane-based fixatives contain a solvent, so it is recommended to use it in open spaces. It is advisable to purchase sealants from popular brands, for example the following:
- Acrylic fixative "Neomid Wood Professional Plus". Its properties are viscosity, elasticity, strength;
- Bartons "Warm Home". Silicone based sealant that does not shrink. This composition contains a large number of fungicide impurities;
- “Perma Chink” is a quickly polymerizing acrylic fixative, strong and economical;
- "Energy-Seal" is an acrylic sealant designed for gaps less than 25 mm wide and withstands shape changes well.
Warm seam technology
The “warm seam” technology for wooden houses involves several stages of work.
Materials used, tools:
- Putty knife.
- Special construction pistol. During the work process, lubricant may be required for better operation of the gun mechanism.
Important!
The cut size of the spout allows you to adjust the amount of sealant released and the size of the seam.
- Primer for impregnation of the most absorbent parts of wood.
- Special insulating cord made of foamed polyethylene, for laying in wide cracks from 1 cm, to save the amount of sealant and improve the finishing of the seams.
- An industrial stapler with an elongated spout, or a hammer and small furniture nails, for possible fastening of insulation in cracks.
- A soap solution that moistens the surface of the spatula when leveling the seam.
- Construction tape may be needed for home owners who do not have experience working with sealant.
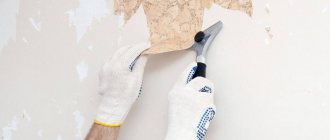
Preparatory work:
- Cleaning the wood surface from dirt and the top flaking layer.
Note!
Sealing should be done before covering the wood with an antiseptic, as the solution may interfere with the adhesion of the material.
- Drying the surface.
Basic operations:
- To simplify the work, stick special industrial tape onto the logs, which will protect the wood of the joint from contamination by sealants outside the application area.
- The sealant is applied to all seams between the logs and any cracks formed. If the gap is larger than 10mm, it is recommended to lay a special cord.
Cord installation diagram
- The cord can be installed using a chisel; in some cases, additional fixation of the cord along its entire length with small nails or a stapler may be required. The seam size should be within 4÷12 mm.
- Apply the composition using a gun or chisel. If using sealant in the form of a cord, remove the film and install the sealant into the gap.
Applying a seam using a gun
- Level the surface and remove excess elements from the seam using a chisel or sponge soaked in water. It is also allowed to work with only one spatula.
Working with a spatula
- Removing the tape.
- After the polymerization process is completed, the seam can be treated with acrylic-based paints and varnishes.
Carrying out the “warm seam” technology for wooden houses with your own hands, using a gun or spatula, is not a difficult task, but requires a certain skill and patience. Since for a beginner it will be problematic to apply a professional, even seam from the start, especially to do it quickly.
Using a sealant in the form of a cord will speed up the procedure, but this technology requires subsequent coating of the joint surface with an alkyd-based varnish.
Tools and raw materials
To start treating cracks with sealant, you need to purchase a retainer in a form suitable for the installation gun. For work you will also need:
- polyethylene foam in the form of a cord;
- narrowed spatula;
- brush for painting;
- a piece of fabric;
- water;
- spray;
- masking adhesive tape;
- primer for wood.
You can process the seams by hand, but using a mounting gun will speed up and simplify the process.
The device helps to comply with the consumption rate, treat the cracks with sealant, applying the fixative evenly in strips. It is almost impossible to achieve this manually.
Sealant is an important representative of modern home construction technologies.
Moisture-proof sealing of seams, holes, and fastenings, performed with sealants, greatly facilitates the work of builders of wooden houses. Modern sealants are elastic, adhere well to all surfaces, and are resistant to mechanical stress. Sealed materials are divided into three groups, according to the material that composes them. 1 group. Polyurethane sealant. These sealants have very good elasticity and adhesion to any surface. Polyurethane is a good adhesive for wood, concrete and plastic. They have the longest service life
But working with this material requires caution, as it contains caustic substances. Multi-storey panel houses contain many seams, which are sealed with polyurethane materials
Mainly outside, due to the resistance of this material to ultraviolet radiation and large temperature changes. Most of them contain antifungal agents in the sealant, which is a plus for the wood. 2nd group. Silicone sealant. Serves mainly for sealing window and door openings during construction and renovation. They have excellent grip on almost all surfaces. This sealant is often used for waterproofing house facades. It cannot be painted, but silicone sealing materials of any color are commercially available. The ability of silicone mass to insulate a window opening in minutes is valued in construction. Therefore, sales volumes for silicone sealant are significantly higher than others. Silicone can be acidic or neutral. Sealants containing acid react with cement, granite and metals and are therefore only used on plastic and wood. Neutral silicone sealants are suitable for any material. 3rd group. Acrylic sealant. Acrylic substances are mainly used to fill voids in seams and joints. These are harmless and can be used indoors. The setting of this material with the surface is slow, and final hardening takes a day. Acrylic sealants do not withstand severe frosts and therefore are not suitable for exterior work at home in Siberia. Previously, the difference in quality between materials made by foreign and domestic factories was significant. Now domestic manufacturers have improved their technologies, and their quality is almost equal to imported ones.
Preliminary stage
In outdated wooden buildings, the seams are usually sealed with rough tow. It is recommended to get rid of it to reduce the likelihood of mold and insect nests.
Next, dirt and dust are removed from the building, the previous layer of paint is removed, if there was impregnation with an oil solution, and the base is sanded.
The log house is coated with a solution that removes grease, a primer is applied, and left to dry. If there is no preliminary step, the fixative will not be applied in an even layer and will not adhere well enough to the surface being treated.
The next step is laying the polyethylene foam cord. It is necessary to seal the crown space, since it is not advisable to fill the entire gap with a clamp.
Large gaps are first filled with tow and fibers, then polyethylene foam is secured using metal staples. It is necessary to secure the treated surfaces with masking adhesive tape in order to apply the sealant evenly.
Caulk
The traditional method of processing seams is to use special devices to fill the grooves as tightly as possible with natural insulation, forming a small roller along the front side.
The walls are caulked both outside and inside; this method not only allows you to get rid of cracks and minimize heat loss, but also increases decorativeness. Since ancient times, moss was used for caulking, which simultaneously served as an antiseptic, but today other natural materials are more often used - flax, felt, tow or jute.
Primary caulking is carried out simultaneously with the assembly of the box - they use wide inter-crown insulation and form a roller from the protruding edge and hammer it into the seam.
The next treatment is carried out after shrinkage and polishing of the frame, the best option is after two years (OTSB) or after a year if occupancy is planned earlier. But in this case, after the first heating season, a repeat may be required. For many, this is a pressing question that worries one of our craftsmen.
glyuckFORUMHOUSE user
I spent a long time reading threads on the forum, but never came to a consensus. The frame is currently being sanded, I was thinking of caulking and painting later. The log house is 1 year old. But many people write that it is better to caulk a year after installing the heating, so that the logs dry out, otherwise they will caulk again. What about heating costs during the winter? How to do it better?
According to experienced forum users, it’s worth the wait.
Carpenter29FORUMHOUSE user
The best solution is to caulk after two heating seasons.
Another option.
IPaltusUser FORUMHOUSE
Now tuck openly dubious places, turn on the heating and caulk for the second or even third year.
Of course, you will have to flood the street, but it is justified.
avsergeev71FORUMHOUSE user
Believe me, the costs of re-caulking (and in this case you will definitely have to do it) will not be comparable to the costs of the heating season. As for a year, I would wait not a year, but two.
To ensure that heat loss is not critical and that blowing through the seams does not replace ventilation, you should not skimp on inter-crown insulation at the assembly stage. glyuck can afford to wait thanks to its responsible approach.
glyuck
That’s what I’ll do, I made the decision in time not to caulk it now. Moreover, my frame was laid on the thickest superjute, and each log was rammed with a huge sledgehammer. Now everything is quite tight, but in any case, in two years I will caulk it, as you advised.
Houses assembled from simple timber with natural moisture are also subject to shrinkage, although to a lesser extent than log houses. During the assembly process, inter-crown insulation is also used, and caulking is carried out on average after a year and a half.
Surface treatment with sealant
Using the “warm seam” technology, the fixative is used to process the cracks with a glue (mounting) gun.
This is done like this:
- Cut the tube spout to 45°;
- Insert the tube into the glue gun;
- Fill a special mounting gun suitable specifically for the fasteners used with unused sealant;
- Squeeze out the compound by squeezing the hook of the gun, drawing an even line of the required thickness (the thickness of the sealant should be such that the surface of the wood is treated 0.5-1 cm on each side);
- Spray the seam area with a spray bottle of water, then level it with a spatula and remove any residue;
- Wet a small brush and then work the gap completely;
- Remove marks with a rag, then remove the masking adhesive tape without waiting for the fixative to harden.
Most often, it takes 2-4 days to 14 days for the surfaces to completely set with the sealant. The duration of polymerization is affected by its type, brand, and weather. Painting a warm joint is allowed only when this stage is over.
Self-sealing errors
Non-professional craftsmen, when sealing the crown joints of a log house on their own, inevitably encounter problems. To do the job correctly yourself, you need to know certain subtleties and nuances.
Among the typical mistakes that untrained professionals most often make are:
- Wrong choice of sealant.
- Carrying out work in inappropriate weather conditions.
- Violation of work technology.
- Poor surface preparation, as a result of which the sealant does not adhere well and lags behind the wood.
- Careless application of the composition, which is why the warm seam looks rough and sloppy.
To ensure that the warm seam is made efficiently and accurately, and serves you for many years, contact professionals.
has many years of experience in insulating houses made of timber and logs using the “warm seam” technology. In our work, the main priorities are quality indicators. We employ experienced and highly qualified craftsmen. Our company has established a two-level system for checking the integrity and quality of work performed, which is carried out by the construction supervision department and the quality control department.
When you trust us to seal your home, you can be sure of excellent results. You can contact us using the coordinates on the “Contacts” page.
Calculate the cost of painting and insulating your home right now
Select types of work:
Select materials:
How is sealant used?
The fixatives are produced in the form of tubes with a volume of 300 and 600 ml, or in plastic buckets with different volumes. The size of the gap being processed affects the amount of sealant consumed.
For example, if the seam is five millimeters deep and twenty millimeters wide, then the consumption of the sealing compound will be 200-250 grams per linear meter.
Properties of wood sealants
Specialized sealants for wood must have a whole list of properties, since the scope of application involves harsh operation.
Resistance to deformation - seams are not static; with changes in temperature and humidity conditions they are constantly deformed, decreasing in size in winter and increasing in summer. Accordingly, the sealant must be designed to work under conditions of tension and compression, so that it does not first tear and then be squeezed out of the seam.
Wide temperature range of operation - in most parts of the country it is hot in the summer, and frosty in the winter, which determines special requirements for the sealant to work in a wide temperature range, which not all universal and external sealants can withstand. Conditions of use may also differ; most products are not intended for application when the temperature drops below +5⁰С, but there are also those that can be used in cold weather (down to -10⁰С). This is relevant when the need to insulate a house arises in winter, and it is not advisable to wait for spring.
Peel strength - so that the sealant does not simply fall out of the seam with a cord after the first winter, substances are introduced into the composition that increase vapor permeability and increase adhesion specifically to wooden substrates. Only specialized wood sealants can remain in joints for years without cracking or peeling.
Water evaporation follows the path of least resistance, but there is still pressure on the area where the sealant and wood meet. And if there is weak adhesion somewhere, there will be a separation of the sealant, albeit micro, but during the frost/thaw season, further separation will occur due to the ingress of water and its freezing/thawing.
Vapor permeability : wood is a “breathable” material that allows steam to pass through well; its humidity levels constantly fluctuate, but excess is discharged outside. At first glance, it is not very important whether the sealant allows steam to pass through; it seems that the throughput of the wood itself is sufficient. In fact, it is important.
Vapor permeability is important, if by analogy - our skin breathes, try sticking a piece of tape on your hand, how long will it take for it to itch? That is, a “quiet backwater” is created for mold; small areas of wood will have high humidity and will not dry out.
Achieving the required values of the indicators mentioned above is carried out due to the presence of special additives, as well as their certain quantitative composition. That is why specialized wood sealants meet the specifics of their application. And their special properties explain the differences in cost.
Durability - given the number of linear meters that need to be processed even in a small house, not to mention estates, it is natural that you want to carry out this procedure as rarely as possible. Therefore, the longer the service life indicated in the characteristics, the better. But these should not just be numbers on the label, but data from the manufacturer’s Specifications.
* The durability certificate must be issued by an independent and reputable institute that has the appropriate testing rights and procedures. But the mandatory certificates do not indicate the durability of the material anywhere. Obtaining such evidence of the service life of the sealant in Russian conditions today is a voluntary matter of the manufacturer. The vast majority of brands either do not indicate the service life, or indicate it, referring to some internal tests that are issued only upon request.
Hardening time
It is recommended to treat wooden surfaces with sealant when it is dry outside and the air temperature is from +5 to +35 C. The most suitable weather is when the humidity is 60% and the air temperature is from +20 to +23 oC.
In such weather, the drying speed of the sealant will be two millimeters in 24 hours; after half an hour or an hour, the seam will be covered with a primary film.
It is not recommended to form a “warm joint” in a wooden structure if it is raining, snowing, or there is high humidity outside.
The sealing process will be poor.
Seam sealant
A special acrylic sealant, characterized by high adhesion to wood and extreme elasticity, is used to seal the crown joints both on the outside and on the inside. It was invented in America and for a long time was produced only there, in particular by the leading companies Weatherall and Perma-Chink. Later, joint sealant began to be produced by the Finnish company Fin-Wood and the German Remmers. Today, similar material is produced by many different companies, including several domestic ones.
Acrylic joint sealant has approximately the same thermal conductivity coefficient as wood, so seams treated with it do not become cold bridges.
In addition to all the advantages of acrylic sealant for crown joints, it has one single drawback - high cost. Nevertheless, the “warm seam” technology has a right to exist, even despite its relatively high cost. Arguments in favor of acrylic sealant include unsurpassed durability and absolute sealing properties. Birds and insects do not touch it.
Meanwhile, high-quality caulking is comparable in cost to acrylic “warm joint”, and sometimes costs more. If we take into account the durability factor and a number of other advantages of the sealant, then the “warm seam” will be even more profitable. However, consumers often do not compare these technologies fairly, which is why they choose the cheaper and less practical option.
The relatively high cost of a “warm seam” is due not only to the considerable price of the sealant itself, but also to the work involved in its construction. If you seal the seams yourself, you can save a lot... money, of course, but not time. And here you need to think carefully about whether time or money is actually more valuable, especially since these two words are often equated.
If the volume of work is large, then it is probably better to use the services of specialists who professionally seal crown joints. They have all the necessary tools to help them do this work quickly and efficiently. In addition, the company will guarantee its work.
And this is very important for large volumes, because we are talking about a lot of money
Cost 1 linear m. of “warm seam”, taking into account the work, is in the range of 120...200 rubles. So, to seal one 8-meter wall of a two-story log house, consisting of 30 logs in height, you will need an average of 36 thousand rubles. And this is just one wall. Yes, it’s not cheap, but what’s cheaper: high-quality caulk or maybe siding?
A significant argument in favor of the “warm seam” is its durability, estimated in decades. Some manufacturers even claim that their sealant will last as long as a wooden house. This seems to be true, because if you take an interest in the statistics, you can find out that in the USA, where this technology has been used since 1985, there has not yet been a single warranty case. By the way, in North America, as you know, they cut without a groove, not like in Russia. That is, there are higher requirements for the seams between logs. And, of course, acrylic joint sealant corresponds to them.
Cuts and joints
The most labor-intensive process is the process of sealing cracks in the joints of the walls of a wooden building.
To seal cuts and warm joints, the gaps are filled using a spatula with a polyethylene cord of a certain length and thickness.
In many cases this takes a long time. Next, the seam is covered with sealant, leveling the applied product with a damp spatula.
In the case where the joints were impregnated with an oil composition (fire retardant), it makes sense to sand the wood with a grinder in advance, otherwise the sealant will not polymerize properly.
Required materials and choice of sealant
How much and what will be needed to carry out such work with your own hands? Taking into account the above quote, we will take into account that the initial insulation of the seams has already been done. And that means we need the following materials:
- Acrylic sealant for wood;
- Thermal insulation cord.
From the tools:
- Gun (manual, but preferably pneumatic);
- 2 spatulas (small - for the size of the seam and large for ease of removing excess from the first one);
- Brush (to remove excess);
- Possible: sponge and spray bottle (water sprayer)
How to store sealing compound
The wood sealant should be kept at a storage temperature of no lower than +5 °C and no higher than +30 °C, out of reach of sunlight and protected from moisture.
The fixative can withstand no more than seven freezing and thawing cycles (each cycle should not last longer than 24 hours at a temperature not lower than -18 °C).
Before use, sealant that has been frozen must be left at room temperature for at least 24 hours.
Warm seam: Answers to frequently asked questions
Published by Warm seam on March 29, 2021 March 29, 2021
Before reading this section, please note that we give all questions and answers from ten years of experience in the work performed by our teams, and not from the experience of Internet resources or the experience of other dubious theorists and practitioners with spoons instead of spatulas!
Question: At what ambient temperature can a house be insulated?
Answer: “Most acrylic-based sealants are smoothed and adjusted with water, the warm joint after completely sealing your home must dry and stick, this requires at least a week at a temperature of +20 and up to a month at a temperature of +5. Therefore, if you do not want to fill the seams of your house with a rough mass and spoil the aesthetics of your house, the average daily ambient temperature should not be lower than +5. Unfortunately, there are companies that are ready to heat up the walls in cold weather in order to seal your house; this technology is questionable and will add trouble to you with the appearance of additional cracks on a kilometer scale throughout the house in the future. For such companies, the basis of their activities is the commercial component, and not assistance in insulating your home.”
Question: Is it possible to work in rainy weather? Answer: “It is impossible to carry out sealing work on a wooden house under direct raindrops. This will cause the sealant to wash off! If it happens that it rains after some time, then simply cover the wall with film.”
Question: Is it possible to work under the scorching sun? Answer: “When sealing your house, you need to move in the direction of the sun, because when open sunlight hits a warm seam, as a result of heating the vilatherm cord and the release of air from it, minor bubbles may appear on the seam itself!
Question: When can a house be sealed after erecting the walls of a wooden house?
Answer: “After your house has shrunk, which is at least 6 months from the date of construction of the walls and roof.”
Question: “At what stage of the finishing work is it necessary to seal the house?
Answer: “at a very early stage after sanding, painting and casing. In order to exclude as much as possible all blowing, it is necessary to seal under them before installing the hem and installing the platbands!”
Question: How to prepare surfaces before applying a warm joint?
Answer: “The surface must be clean or primed!”
Question: In what order is the warm joint applied (before paint on clean wood or after paint?
Answer “Acrylic 100 Remmers sealant can be applied in any order, based on the capabilities of your wooden house (painted or sanded). Also, the sequence depends on your aesthetic preferences (namely, to highlight or not to highlight a beautiful and correct warm seam).
The main thing is that the surface is properly prepared and has a clean or primed surface.
Exceptions are the compositions of paints intended for application. If these are paints where the base is oil or wax, such as Biofa, Leinos, Osmo, etc. (premium class), then the sealant cannot be applied over all layers; this does not apply to such varieties of paints as Tikurila, Belinka, where it happens 3-5% oil or wax is added to the base. In such cases, the sealant can be applied in any order. True, dubious specialists often insist on applying the seam before painting. This is explained by the fact that people use poor-quality and incorrectly made warm seams with paint.”
Question: What is the Vilatherm spacer cord used for?
answer 1) make a correct and even warm seam 2) save sealant consumption Where and where it is laid depends on the specific shrinkage and shrinkage of your wooden house!”
Question: What is the consumption of sealant when sealing a wooden house?
Answer: “The consumption of sealant when sealing a wooden house depends on the following factors:
1) Type of logs: chopped, rounded, timber, carriage, etc. 2) Types of cutting, quality of cutting: depth of groove, overcuts, locks, etc. 3) Diameter of log 4) Qualification of specialists: correct laying of the Vilaterm cord, correct seam width
Therefore, with standard compliance with all norms and rules for one log diameter of 20 cm, the consumption of the German Remmers sealant looks like this:
consumption Tube with a volume of 600 ml, depending on the type of log: Chopped = 4 meters Rounded = 6 meters Timber = 7-8 meters”
Question: What should be the thickness of the warm seam? answer: “The thickness of the seam is selected for your home based on the characteristics of shrinkage, laying and diameter of the log. On average it ranges from 1 to 1.5 cm”
Question: Do you use tape to straighten the warm seam?
Answer: “All houses sealed by our teams using the Warm Seam technology were completed without a single meter of tape. The experience of our employees allows us to make a correct and even seam using a spatula.”
Question: What kind of pistol do you use?
Answer: “All houses sealed by our employees using the Warm Seam technology are made with mechanical guns, which you can purchase on any construction market. This is explained by the fact that according to the Remmers sealant technology, after application it is necessary to smooth it out and level it with a spatula, the excess remains on the spatula, which can be easily achieved with a conventional gun, and the speed of squeezing the sealant out of the tube does not play any role here! (that is, we do not pour sealant from the compressor into the seams, which is contrary to technology, because adjustments are required in the areas of adhesion!)"
Question: If you remove the caulk before sealing a wooden house, will the house shrink?
Answer: “We do not completely remove or penetrate the old tow found under the logs and inside your home. We cut off or push in with a spatula the tow that prevents us from making the correct warm seam, so your home is not subject to additional shrinkage or lifting!”
Question: How and with what should you paint a wooden house?
Answer: “In order to properly paint a house, it is necessary to work with brushes with 100 percent natural bristles so that the paint is rubbed into the log, penetrating into the pores of the log. In the case of painting a wooden house, we should not talk about any compressors and spray guns, because apart from the speed of application, smudges and cheapness, they are of little use when it comes to protecting the wood. It is also necessary to use mobile scaffolding and tours, because transitions from the number of storeys of rearranging scaffolding that was nailed untimely and late to a different height of the wall may be visible!”
Question: Which paint is better, transparent or covering, for applying to a wooden house?
Answer: “Coating paint does not transmit sunlight, and therefore does not burn through logs like a lens, so its service life before subsequent renewal is several times longer than transparent paint (subject to surface preparation technology).
The peculiarity of Covering Paint is that it completely hides the structure of your log, which is why it is less popular at the stage of the first painting.
Transparent paint is often used for aesthetic reasons and practicality in the future. You can always, at the time of updating the paintwork of your wooden house after 5-7 years, paint it with a covering without sanding the log, which cannot be done with a covering. And all these years you can enjoy the beauty of the structure of your wooden house!”
Question: Is it possible to paint a warm seam?
Answer: “In the Remmers line of sealants there are always options to apply sealant with so-called grain, which, unlike domestic analogues, will always allow you to paint the seam where there will be no streaks or unpainted areas, which cannot be said if you use sealant without grain. Sealant without grain is more suitable for interior work, because it may not be necessary to renew the surface inside a wooden house for the entire period of residence.
Summarize
Dear readers, remember a warm seam is not only insulation of the house, but also its beauty! You need to know what a correct warm joint looks like, so if you have employees who do a good job of making stairs or building houses or professionally laying tiles, this does not mean that they will do as good a job sealing your home. Trust only companies that specialize only in sealing houses! This will save you from at least one mistake related to the beauty and warmth of your beautiful wooden house!
Instructions for sealing seams
It is possible to reliably and firmly seal the cracks between the logs and insulate the house only by carefully studying the technology and strictly adhering to all stages of the process. All actions must be performed in strict sequence.
Preparatory operations
All walls of a wooden house that will be insulated must be thoroughly cleaned of dirt, dust, old insulation, paint and any coating.
Then the logs need to be primed for better adhesion of the materials. To do this, you need to dilute the sealant with water 1:10 and apply the mixture on the surface where the sealant will be laid and let it dry completely.
Preliminary preparation of walls is very important. If dirt remains on the surfaces, the sealant will not adhere well and may later fail.
It is also important to remember that all antiseptic compounds are used only after completion of the main work, since they greatly reduce the adhesion of materials.
Applying sealant
In order not to smear the surfaces adjacent to the seam with materials, you can stick masking tape on them.
A polyethylene cord is caulked into the joints between the logs using a chisel to seal the cracks and reduce the consumption of sealant.
The main task of this procedure is to fill as much of the space between the logs as possible. If this is done using sealant, then you will need a lot of it and it will require significant funds. The insulating agent is used only as the topmost, securing layer.
Then a sealant 1-2 cm wide is applied to the seam with a construction gun.
If the sealant is in tubes, then it is inserted into a special hole in the construction gun. Or you can simply take the product from the bucket in which it was sold. Then you need to cut the special nozzle at an angle of 45 degrees to create a hole for the width of the seam. After this, apply the insulating material according to the principle of polyurethane foam. It is more convenient to use a pneumatic construction gun; this will speed up the work.
After this, the seam is moistened with a spray bottle and smoothed with a spatula and excess insulating material is removed. Finally, smooth it with a damp brush and wipe it with a dry cloth to remove water stains, which may later harden. Finally, you can remove the masking tape.
If insulation of a house is being done for the first time, then the corners and cuts in the walls of the house can present difficulties in the work. Although, by and large, the whole process is completely identical to that carried out on flat sections of walls.
To seal the corner, you need to measure in advance the required length of the polyethylene cord and then cut it into appropriate lengths. Then lay the cord in the space between the logs using a spatula or chisel and secure it with sealant on top. Then follow the instructions described above.
I would like to note that the entire “warm seam” insulation technology is not too complicated, but rather painstaking and monotonous.
It takes at least two weeks for the insulation to dry completely. After this time, the seam can be painted.