Elimination of heat loss
The weakest points from the point of view of cold penetration are the joints.
There should be no gaps between individual pieces of insulation. The insulating material is laid tightly to the sheathing. For floor insulation, an important point is the connection to the walls. In these places, the insulation is laid with a slight overlap on the walls and is fixed. When applying a vapor barrier, make sure that each layer of material overlaps the previous one with a slight overlap.
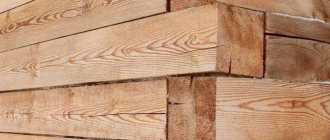
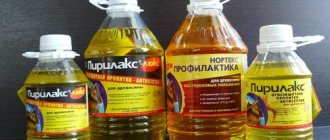
The insulating material is applied directly between the wooden beams before insulating the walls of a wooden house from the inside. For this, long-known materials are used - tow, linen rope, flax wool. You can fill the joints of the beams with modern sealants - latex, acrylic, rubber.
Also, to reduce heat loss in a wooden house, the “warm seam” method is used.
Applying a warm seam
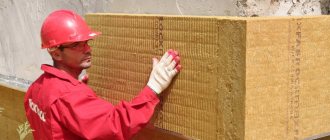
Selection of material for insulation. Expanded polystyrene
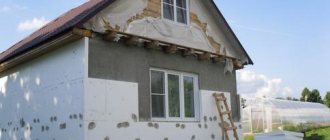
In the variety of materials for insulating the external walls of multi-storey buildings, any buyer will be able to choose for himself what he needs, based on the price category, external qualities and performance characteristics. Insulation materials vary in installation technology, resistance to moisture, frost, fire and many other parameters. It is advisable to carry out insulation of the external walls of an apartment yourself only if it is located on the lowest floor of an apartment building. If this is not the case, then there is a need for special equipment and professional high-altitude climbers.
Let's consider one of the most popular and effective insulating materials - polystyrene foam.
It has been used in thermal insulation work for quite a long time. It is characterized by low moisture absorption and lightness, as well as ease of cutting, which can be carried out without the use of special tools. The most ordinary knife will do for this. The main “stain on the reputation” of expanded polystyrene is its flammability. Also, due to low-quality raw materials, toxic substances can be released during combustion.
Therefore, before purchasing, you need to check the product certification. High-quality modern types of this heat-insulating material are characterized by good fire resistance and do not support the combustion process, unlike insulation materials of dubious quality from unknown manufacturers. Expanded polystyrene is excellent for insulating the external walls of apartments in a multi-storey building due to the fact that it is very easy to replace if it becomes unusable.
Wet method of finishing the facade with polystyrene foam
The technology for installing polystyrene foam includes several stages. First comes the preparation. It must be present not only during insulation work in houses outside using this type of insulation, but also with any other material.
- Before starting work, it is necessary to dismantle the air conditioners, satellite dishes and other objects located on the walls that will interfere with the alignment of the wall. Their removal is necessary in order to install the insulation in solid slabs, and not to cut out small parts from it. Then you need to directly level the wall surface. Differences of no more than 2-3 cm are allowed. If this stage is neglected, the finished facade may break from an impact or other mechanical impact on the walls. The preparatory stage ends with stripping the walls of old paint (if the building is not new) in order to strengthen the adhesive properties of the glue and improve its adhesive ability.
- The readiness of the wall for further work can be checked this way: you need to run your hand over it, and if a trace of purple color remains, then an additional layer of primer is needed. If the layer crumbles during cleaning, then rough puttying will be required, and then priming using a sprayer. If there is no shedding, then there is no need to prime. You can apply the primer using a brush only when the wall is not crumbling. With the primer, additional cleaning of the wall with a brush will also occur. Otherwise, you need to use a spray bottle.
- It is better to start gluing expanded polystyrene from the bottom, additionally setting the starting bar to the desired height. Such a strip will stop the polystyrene from sliding until the adhesive mixture has completely dried. Tip: It is better to apply the adhesive not to the insulation itself, but to the surface of the walls along the perimeter corresponding to the size of the insulation slab in order to give strength to the joints between adjacent slabs. Glue lines should be small.
- A sheet of polystyrene foam is applied to the wall and pressed lightly. The sheets are glued according to the chessboard principle so that the joints between them look like the letter “T”. After gluing the insulation, it is better to wait a couple of days so that the glue is completely dry and firmly set, and the insulation itself “shrinks.”
- Then you can begin to fix the polystyrene foam layer using mushroom dowels. Holes for fasteners are made with a hammer drill using a 10 mm drill. It is better to drill them at the joints of the plates and in the center. A “fungus” is then inserted into each hole. If, after finishing the wall lining, there are joints of more than 5 mm between the insulation, they are sealed with special foam. Irregularities are eliminated by grouting with polystyrene foam. Finally, you can decorate the facade of the house. But before this, the walls must be primed.
Thanks to the video, you can understand in more detail all the nuances of fastening and get the necessary advice.
https://youtube.com/watch?v=yYClVc3ptLg
The essence of the problem
In order to finally decide whether polystyrene foam can be used indoors where people live or work, it is necessary to understand what this material is. In general, polystyrene foam is a whole class of foamed, gas-filled polymers. Most of its volume is the gas component, which provides low specific gravity, high thermal insulation properties and noise protection. These properties of the material make it attractive for cladding walls, floors and ceilings.
https://youtube.com/watch?v=b37p1VOMOrI
Modern foam plastics are available in the form of slabs of different thicknesses and sizes, as well as in the form of roll material.
Depending on the base, the basic properties of the material differ: mechanical strength, specific gravity (density), chemical resistance and other characteristics. At home, polystyrene foam is usually associated with expanded polystyrene - the most used insulation.
What makes you doubt the possibility of using polystyrene foam when decorating your house or apartment from the inside? The following negative aspects are noted:
- When burned, almost all foam plastics emit very toxic gases, which are extremely dangerous to human health. Moreover, this effect is also observed when the material is overheated, which limits its use in steam rooms, near heating devices and chimneys.
- Polystyrene foam has low resistance to a number of solvents (acetone, benzene, etc.) and their vapors, which must be taken into account when using paints and varnishes.
- The polymer itself is not susceptible to rotting and the influence of various microorganisms that form mold, but it has a rough surface in the recesses of which they can accumulate.
- When cutting foam plastic with a heated string, the harmfulness of production increases, and the lack of protective measures can affect human health.
- Low vapor permeability creates a risk of condensation accumulation on the surface of the insulation.
- Low mechanical strength for bending and impact, and the ability to crumble require the adoption of measures to protect against mechanical impact and complicate the installation of thermal insulation.
Despite the listed disadvantages and the risk of harmful effects, do-it-yourself wall insulation with polystyrene foam has become widespread. This is facilitated by the availability of material and the improved quality of modern products. All negative aspects must be taken into account, but they can be circumvented if the work is carried out correctly.
Pros and cons of the material
Polystyrene foam is a foamed plastic material and therefore has a fairly low density. In modern times, it is a worthy alternative to gypsum.
Its positive properties:
- high thermal insulation;
- fireproof;
- lightweight, easy to install, process, and transport;
- not susceptible to damage by mold or parasites;
- repairable;
- suitable for wet areas;
- does not lose its appearance for a long time;
- good as insulation;
- suitable for decorating facades and interior decoration;
- withstands a wide temperature range;
- does not deteriorate when washed;
- very cheap.
Types of penoplex
According to technical characteristics and scope of application, penoplex is classified:
- penoplex “C” (wall). Application: insulation of basement floors, walls, partitions;
- penoplex "F" (foundation). Application: insulation of foundations, ground floors, basements;
- penoplex “K” (roof). Application: roofing of any structure;
- penoplex with the designation “Comfort”. Application: private buildings, loggias.
- penoplex 45. Density from 35 to 47 kg/m³. Application: insulation of industrial buildings, runways, railways and highways.
IMPORTANT! Temperature changes (from freezing to thawing) do not affect the properties of the material, regardless of what type it is.
In addition, based on application indicators, you can decide on the purchase of one or another type of panel.
Advantages of insulating walls outside
By insulating the room from the outside, we acquire a number of useful qualities of our home.
- You will constantly be in a fairly dry and moderately humid climate, in addition, the rooms will maintain the necessary, comfortable temperature for you.
- The improved sound insulation properties of your building will never become unnecessary for your comfort.
- The outer part of the wall will not succumb to corrosion - the house will become durable and will retain its good aura for your children and grandchildren.
- From the inside we will get rid of fungal formations and unpleasant odors.
- The next reason, and the most significant, is that external wall insulation, depending on the thickness of the layer and the quality of the insulation, allows you to save up to 70% of your hard-earned money in heating costs.
- Another useful quality is that the walls of your house will not freeze. “Wall freezing” is an eternal problem for all builders that must be constantly taken into account. There is such a thing as the “dew point” (in simple terms, this is the temperature difference at which condensation forms), and due to freezing of the walls, the “dew point” shifts to the center of the building. As a result of this, a slight, but catastrophically unnecessary temperature difference occurs inside the room. Warm air from the center of the room moves to cooler walls and corners, causing condensation to accumulate on them, destroying your drywall and peeling off your new wallpaper. We don’t need this, so we draw the right conclusions and insulate the walls from the outside.
- Among other things, insulating a wall with polystyrene foam from the outside is a less labor-intensive task than doing it from the inside of the room.
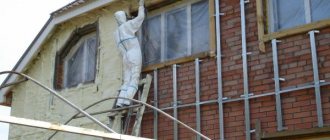
The process of insulating walls with polystyrene foam from the inside
Let's consider the procedure for installing polystyrene foam insulation with your own hands:
- Dismantling the slopes and window sill of the window unit, removing baseboards and other elements that prevent the installation of insulation.
- Thoroughly clean the wall of old paint (especially oil paint), wallpaper, paneling or other finishing materials.
- Inspection of the wall, assessment of surface quality.
- Apply a leveling layer of plaster, wait until it dries.
- Installation of sheathing bars (if necessary),
- Preparing PPS - cutting the required pieces to size.
- Preparation of the adhesive composition (if a dry mixture is used) or special glue in cylinders.
- Installation of insulation. The work is carried out from the bottom up, glue is applied to the back surface of the PPS over the entire area (if special glue is used, along the perimeter and several stripes in the center). It is recommended to additionally fasten the insulation sheets with dowels with a wide head.
- PPS joints are coated with glue or filled with polyurethane foam, which is carefully trimmed after crystallization.
- After the installation of the PPS is completed, a vapor barrier is installed (if necessary).
- Installing wall panels or applying a layer of finishing plaster.
- Installation of new slopes and window sills, installation of baseboards.
Gluing expanded polystyrene boards
Coat the joints with mint foam
In each specific case, some specific actions may be added due to necessity or circumstances.
As a conclusion, it should be noted that internal insulation is rather a forced measure, due to the impossibility of a more effective solution to the issue.
At the same time, the choice of PPS as insulation is most successful; this material provides the most reliable cutoff from steam and protects the wall from getting wet and destroyed, while at the same time allowing it to retain heat inside the house.
But at the same time, do not forget that polystyrene is fire hazardous and is not recommended for installation indoors for safety reasons.
Methods for attaching foam to the wall
Three methods are used:
- Dry mixes . Materials like tile adhesive are diluted to the desired consistency with water.
- Special glue . Most often it is produced in cylinders, reminiscent of polyurethane foam.
- Dowels with a wide cap are fungi.
The glue is applied directly to the foam. Usually the entire area of the slab is not covered, applying stripes along the perimeter and in the central part. The joints are additionally coated with an adhesive or, in special cases, filled with foam.
Fastening with polyurethane foam
Methods
So, insulating the walls of a private house from the outside has many more advantages than disadvantages
But it is important to understand the features of individual materials and structures
Houses made of expanded clay concrete blocks are insulated from the outside most often using:
- mineral wool;
- polystyrene foam;
- its more modern analogue is penoplex.
The first option is preferable due to zero fire hazard and low cost. But the problem is that the affordable price is largely negated by the need to organize a protective screen. Polystyrene foam is lightweight, also belongs to the budget group of materials, and it can be installed quickly.
Quite often people are faced with the problem of insulating the external facades of old panel houses. The main condition for high-quality thermal protection is its design in which the permeability to vapor increases from the living space to the street. There is no need to remove the outer cladding of the home; a number of technologies have been developed that make it possible to install thermal insulation on top of it.
When choosing a suitable option, you should give preference to solutions that do not overload the foundation and absorb the least amount of water. It is the significant heaviness and the presence of the dew point inside the hygroscopic thermal protection that cause the most problems for the owners of panel buildings.
Insulating dacha houses for winter living is very important.
It is imperative to provide thermal protection:
- internal floors on the ground;
- floors of the first tier (if the foundation is not insulated);
- external walls;
- cold attic floor or attic roof.
It makes no sense to single out any one of these elements, even something as important as walls. If at least one area is not insulated, all other work can be considered wasted, as well as the money spent on it. The walls must be equipped with waterproofing and vapor barrier; when choosing mineral or environmental wool for insulation, it is necessary to leave a ventilated gap of 50-100 mm. The insulation of a panel house from the outside has its own specifics. The slightest irregularities should be removed, and ideally, leveling should be done using a primer.
If paint is splitting or other finishing is falling off, all these layers are removed, even if the technology does not require such manipulation. In most cases, polystyrene foam is used for external thermal protection of concrete walls, and the most reliable way to attach it is to combine glue and dowels. The work is carried out from the bottom up; a special bar is installed at the lowest point, designed to prevent the material from slipping. Please note: it is possible to replace dowels with plastic nails. Regardless of fastening methods, it is necessary to carefully monitor any gaps that appear.
The insulation of the junction of the wall and the roof deserves a separate discussion. This work is done traditionally using stone wool, but for lovers of modern technologies it is better to focus on Macroflex foam. In many cases, a steel bonding apron is formed. Whether it is needed in a particular house, on a particular wall, only trained specialists can find out. The insulation of junctions is too complicated to be done properly by the owners of the house themselves or by randomly found freelance craftsmen.
Installation of sheathing
For the sheathing, beams with a cross section of 5x5 cm are taken, and it should be taken into account that the width of the board should be equal to the width of the slab.
The lower profile is pre-attached. The bars are nailed with self-tapping screws.
The vertical posts are fastened in such a way that the width of the slab fits tightly into the opening between the beams.
In this step, the sheathing is installed around the entire perimeter of the wall.
It is recommended to make the lathing from wood, but you can also use a metal profile.
All elements of wooden sheathing should be treated with an antiseptic to prevent the formation of mold and mildew.
After installing the sheathing, begin installing the insulation.
Preparing the walls
Even taking into account the ease and simplicity of this work, it has many nuances and subtleties. For example, preparing a wall. This is the initial stage of work.
Here are some tips:
If your house is brick, then its walls should be plastered.
Next, the surface that has dried from the putty is primed and the finishing leveling is carried out with putty.
And provided that, simultaneously with insulation, repairs are also being carried out in the house, then the following conditions must be observed:
- Cleaning the work surface from previous material: paint, wallpaper, cork;
- Search for defects and irregularities in the wall;
- Elimination of these defects. This is where putty or plaster will come to the rescue again. And large cracks can be eliminated with polyurethane foam;
- Leveling the restored surface;
- The resulting smooth walls should be primed again: this will ensure reliable installation of the material.
- Laying waterproofing material. It will limit the access of moisture to the insulation. As a rule, polyethylene film can serve as such a waterproofing material, although the modern building materials market provides unlimited quantities of such material.
So, before starting installation, you need to make sure that the wall is dry, the thermal insulation layer has no cracks or joints, and the insulator has maximum moisture resistance.
Ceiling stucco
Polystyrene foam is lightweight, which is why it is used for finishing suspended, suspended, and ordinary ceilings. The following parts are used:
- decorative panels - square tiles, approximately 50 by 50 cm in size, with which the ceiling is completely covered, usually have convex parts;
- ceiling sockets - they are used to decorate the bases of lamps mounted on the ceiling;
- caissons - available in the form of textured rectangular and square tiles;
- domes - have the shape of round concave tiles;
- ornaments, including corner ones - details of different sizes in the form of flowers, curls, diamonds, attached to both the ceiling and walls;
- ceiling plinths - mounted between the ceiling and the wall, sometimes decorated with lighting.
To order, some companies produce entire ceiling and wall panels, stylized as the Renaissance era or with an image that the client wants.
Is it possible to insulate walls with foam plastic from the inside?
Before we start getting interested in insulating a house from the inside, let’s remember what polystyrene foam is, its positive and negative sides. It is a special composition of polystyrene foam, which is foamed in a certain way. Foam plastic for insulating walls inside has the following properties.
Excellent insulation (keeps the house warm well);
Does not load the foundation because it is light in weight;
Advantageous: inexpensive;
Does not absorb moisture;
Mold and mildew do not penetrate into it.
When heated, it emits an unpleasant odor;
It ignites quickly because it has low fire resistance;
Poor air passage;
Reduces living area.
From all of the above, you can decide that walls can be insulated with foam plastic only from the outside. But it is not so. You can also insulate your room from the inside. But this can only be done in certain cases:
If the building has architectural value and the authorities have placed a ban on changing its facade;
There is an expansion joint between the buildings behind the wall;
If the neighboring room is unheated, in which there is no possibility of insulation. For example, an elevator shaft.
But it should be remembered that insulating walls inside an apartment can only be truly effective if such a process is provided for in the construction project.
Choosing polystyrene foam for wall insulation
The main requirements taken into account when choosing polystyrene foam are: density and required thickness. As for density, denser material is easier to work with. It will not scatter in the form of balls throughout the room.
According to the standards of DSTU B.V.2.7-8-94 “Polystyrene foam boards. TU" polystyrene foam is divided into four groups and is marked in the following order: PSB-S 15, PSB-S 25, PSB-S 35 and PSB-S 50. The properties of each brand are indicated in the table
Table - selection of polystyrene foam for wall insulation - markings and properties
The letters PSB-S mean the method of producing polystyrene foam - the pressless method. The properties of these brands are unchanged over a long period of time (up to 40 years).
At the same time, many mistakenly believe that the numbers at the end of the marking indicate the actual density of the material. However, it is not. After all, according to the mentioned DSTU
Extract from DSTU on foam density
The second point is the required sheet thickness. Many people wonder what thickness of foam to choose. The answer depends on a number of factors:
- temperature regime in the region;
- wind direction and strength;
- wall material (brick, concrete, wood);
- expected increase in heat after insulation.
Specifics of insulating a wooden house
When carrying out measures for installing thermal insulation in a house made of timber or logs, it is necessary to take into account the characteristics of wood as a material. There are many of them, but the main ones are two - high vapor permeability and susceptibility to fungus and other microorganisms.
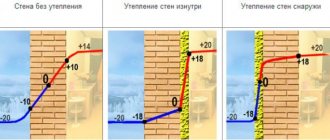
The walls of a wooden house are characterized by high vapor permeability
The first means that wood absorbs and transmits moisture well, both from the inside and outside. Accordingly, insulation for a house built from timber or logs must have comparable vapor permeability indicators - otherwise the walls will gradually become damp, rot and become unusable. In addition, there is a need for a ventilation gap between the external finish and the insulation - without it, the latter will absorb too much water and lose its thermal insulation qualities.
The table shows vapor permeability indicators for basic building materials and insulation materials. As you can see, wood along the grain has the highest value of this parameter and is comparable only to mineral wool or autoclaved aerated concrete
On the left you can see the negative effect that occurs if the vapor permeability of thermal insulation and external finishing is lower than that of the wall - dampness and condensation appear.
And the second feature of wood, associated with the susceptibility of the material to fungus and microorganisms, requires mandatory treatment of all walls and parts of the thermal insulation system with antiseptic compounds, and in several layers.
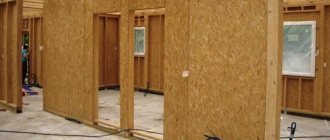
Insulation of a private house can be divided into two types.
- Internal, when a layer of heat-insulating material is located on the side of the living quarters and is covered with plasterboard, clapboard or any other finishing material.
- External, when thermal insulation is located on the walls on the street side. On top it is covered with a windproof film and external finishing, which can be boards, siding, corrugated sheets, artificial stone, etc.
Internal insulation of the walls of a wooden house
Internal insulation in wooden houses is usually used when there is a need to preserve the “wood” appearance of the building. This usually applies to log houses.
But at the same time, such a thermal insulation system has a number of disadvantages:
- reduction of useful area of residential premises;
- suboptimal dew point position, leading to dampness and condensation;
- gradual destruction of walls from the outside, caused by temperature changes.
Insulation of a wooden house
Therefore, external insulation appears to be a more preferable option. Such a solution has the following advantages.
- Saving living space - the insulation layer and the frame for it are located outside, which means you save several square meters inside the house.
- Shift of the dew point outside the walls of the house - with good external thermal insulation along the entire thickness of the wall made of timber or logs, the temperature will be above zero. Consequently, condensation will not fall on the wall from the inside, there will be less dampness, and the service life of the structures will be longer.
- By shifting the dew point and using ventilated facade technology, the risk of mold and rot is significantly reduced.
- Walls made of timber or logs can serve as interior decoration; the original “texture” of a country cottage is preserved.
Due to these advantages, the article will focus on how to insulate a wooden house from the outside and what materials are suitable for this
Difference in dew point position for walls with internal and external insulation
Features of using polystyrene foam as insulation
When securing material from the warm air side, special attention should be paid to safety. It is worth considering several disadvantages of insulating walls with polystyrene foam, which can be combated at the construction or renovation stage. These disadvantages include:
- flammability;
- low vapor permeability;
- the need for additional vapor barrier;
- the likelihood of a greenhouse effect occurring indoors with insufficient ventilation.
To prevent the risk of fire, strict compliance with all fire regulations is required. When choosing a material for thermal insulation of the walls of a house from the inside with your own hands, you should give preference to those types that are highly resistant to fire. The flammability group is indicated by the letters:
- NG - non-flammable;
- from G1 to G4 - varying degrees of flammability.
The higher the number on the label, the more dangerous the material is offered. In the store, it is recommended to choose the foam that has the lowest degree of flammability of all those presented. You can additionally consult with the seller.
To prevent the appearance of mold and mildew on the walls, it is necessary to move the point of condensation from the surface of the connection between the wall and the insulation. The thermal insulation material is attached to the wall from the inside with your own hands without any gaps. This way you can avoid problems with condensation.
The most important task when using polystyrene foam as a heat insulator is to ensure the necessary air exchange. If there is insufficient ventilation of the premises of the house, the microclimate is disrupted. There may be problems with humidity and indoor air temperature. To prevent troubles, you need to think about ventilation at the building design stage.
To prevent condensation, use the following techniques (simultaneously):
- a small ventilation gap is provided between the wall insulation and the interior decoration;
- a vapor barrier is attached on top of the insulation;
- carry out measures to install a forced air ventilation system.
The most reliable insulation scheme from the inside
If you take into account all the features of foam plastic as a building material, you can use it for the wall of a house without fear. Installing thermal insulation with your own hands requires attention to every detail and adherence to the technology for performing the work.
Important! We strongly recommend creating a gap between the vapor barrier and the finishing layer. Because only this - and no other - method will 100% avoid the formation of condensation and the inevitable re-repair.
Procedure for installing insulation
If you decide that you will insulate the house with polystyrene foam from the inside, first of all you need to prepare the walls. An absolutely flat surface is necessary, because only in this case can foam sheets be fixed to the wall without gaps or cracks. The surface is cleaned of the previous coating and leveled with putty, checking the result using a level. Then the wall is treated with an antifungal primer.
Next, a special adhesive mastic for foam plastic is gradually applied to the surface. Foam sheets are laid starting from the bottom of the wall. Each row is offset by half a sheet so that the joints end up in a checkerboard pattern. The density of the joints should be maximum. After the glue has dried (about 3 days), the sheets are additionally attached to the wall using mushroom-shaped dowels.
The next stage is sealing the joints between the sheets with polyurethane foam. Excess foam can be cut off with a knife, and then the joints can be rubbed with a special grater for foam plastic. After this, a layer of adhesive is applied to the foam plastic and the reinforcing mesh is fixed. The top of the mesh is again covered with glue and the surface is leveled with sandpaper. The finished wall is opened with a primer.
Next, a layer of vapor barrier is laid. We must not forget that while you are insulating the walls, there should be a ventilation gap between the vapor barrier and the finishing coating. You can avoid the process of installing a vapor barrier material by insulating the house from the inside with penoplex. This material is similar to polystyrene foam, but penoplex itself is vapor-proof.
Internal wall insulation technology
The insulation process, although simple, requires careful preparation. First you need to calculate the number of foam sheets, prepare tools and additional materials. Standard sheet sizes:
- width – 1 m and 0.5 m;
- length – 1 and 2 m;
- thickness - 10, 20, 30, 40, 50 and 100 mm.
For internal thermal insulation, foam plastic 1x0.5 m and 1x1 m, 50 mm thick, is best suited. Large sheets will still have to be cut, and transporting them is not very convenient. To calculate the required amount of material, the area of the room must be divided by the area of one slab and added 10%, since when cutting the insulation there will certainly be waste.
- cement mortar;
- glue;
- mushroom dowels;
Fungus dowel
- waterproof primer;
- reinforcing mesh;
- plaster composition;
- putty;
- set of spatulas;
- sandpaper;
- drill;
- Master OK;
- level;
- sharp knife.
Step 1: Clean the walls
The polystyrene foam is attached to a clean, dry and level wall, so the old coating is first dismantled. Wallpaper, decorative plaster, panels and other finishing are removed completely, but paint should be removed only if there are peelings or cracks. If the wall is smooth, completely intact, and the paint layer is very durable, you can immediately begin insulation.
Step 2. Alignment
After dismantling the covering, the walls are carefully inspected for damage. Cement mortar is used to fill deep grooves and cracks; smaller defects can be smoothed out with putty. Be sure to check the surface with a level to make sure there are no irregularities.
Antifungal primer
After drying, the treated areas are rubbed with sandpaper, and then the entire wall is coated with a primer with antifungal properties. If the wall material is too porous, it is recommended to apply the primer in two layers.
Primer of walls
Prices for different types of primer
Step 3. Installation of insulation under windows and radiators
The first to insulate problem areas is windows, radiators, door slopes.
Wall insulation
First, they accurately measure the area to be insulated, and then transfer the measurements to the foam plastic. Cut the sheet according to the markings and apply it to the wall. When all the fragments are adjusted, you can begin installation. The glue is diluted with water according to the instructions, stirred well, and allowed to soak. The adhesive composition is applied to the foam plastic according to the following scheme:
Glue application diagram
The glue layer should be uniform and thin. After this, a fragment of insulation is applied to the corresponding section of the wall, leveled and pressed tightly with your hands. Next, the next fragment is attached until the entire area is covered with foam.
Applying glue
Step 4. Wall insulation
It is much easier to insulate exposed sections of the wall. They start from the bottom: a sheet of foam plastic is covered with glue, placed against the wall and leveled, then pressed tightly over the entire area.
Wall insulation
Adjacent sheets are laid so that there are no gaps at the seams. Vertical joints must be shifted by half the sheet, that is, in a checkerboard pattern. The entire process is constantly monitored by level, otherwise distortions or unevenness in the horizontal plane may form. When the entire area is covered with polystyrene foam, you need to take a break for 2-3 days so that the glue dries completely.
How to attach foam to the wall
Step 5. Sealing seams and fastening with dowels
If, during the process of fastening the sheets, gaps remain at the joints, you will need foam for sealing. You cannot use foam with toluene - it destroys the structure of the insulation. Cracks 4 cm wide or more are first filled with pieces of polystyrene foam, and then blown in with foam.
How to attach foam to the wall
After 3 hours, excess foam from the treated joints is carefully cut off with a sharp knife, and the seams themselves are coated with glue. Next, each sheet is reinforced with mushroom dowels in 4-5 places. This combined fixation of the insulation will ensure maximum fit and reliability during operation.
Fastening the dowel-fungus
Step 6. Reinforcement and plaster
The thermal insulation layer must be protected from external influences. The easiest way is to apply plaster. To do this, first strips are cut from the reinforcing mesh along the height of the wall with a small margin; The first strip is applied to the wall and the plaster solution is applied with a spatula along the upper edge so that it holds the mesh.
Reinforcement and plaster
The plaster layer is made up to 5 mm thick. After this, the solution is applied with a spatula from top to bottom and across the entire width of the strip. On the side where the adjacent strip will be attached, you need to leave a vertical protruding edge of the mesh 2 cm wide.
Foam plaster
An important point: reinforcement is first carried out along the perimeter of door and window openings, behind radiators, at slopes and in corners, and only then on open areas of the wall. The edges of the strips are overlapped by 1 cm; the layer of plaster should be evenly distributed over the walls, completely covering the mesh.
Prices for popular types of plaster
Step 7: Finishing
The dry surface is treated with a special grater or sandpaper, periodically wetting the walls with water. The wall smoothed in this way is covered with 1-2 layers of finishing putty, then sanded, primed and painted.
Final wall putty
If artistic plaster is used instead of paint, the puttying and sanding process can be skipped. At this point, the insulation of the walls inside the house is considered complete.
Painting walls