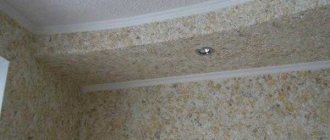
Until recently, it was considered a classic to have a snow-white ceiling in an apartment or house. Applying water-based paint does not require large investments and is very simple technologically. With the advent of new types of finishing on the building materials market, they were quickly transferred to the ceiling. As a result, today in the upper part of the apartment you can find paint, trellises, PVC panels, decorative plaster and liquid wallpaper. From the above series, ceilings with liquid wallpaper look the most original, elegant and with a unique design. Below are instructions on how to decorate the ceiling with liquid wallpaper with your own hands.
Is it possible to apply liquid wallpaper to the ceiling?
Liquid wallpaper is a universal type of finish that adheres well not only to walls, but also to ceilings made of various materials (concrete, wood, plasterboard) and different geometries. Wherein:
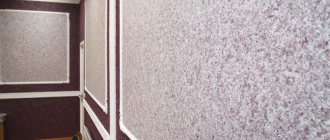
- on flat surfaces the effect of depth is created;
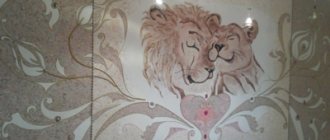
- The multi-level ceiling, boxes and niches emphasize the texture of the finish.
Finishing the ceiling with liquid wallpaper is in perfect harmony with other types of decor not only on the walls, but also on the ceiling space: it can be combined with any finishing material in color and texture. Can be applied simultaneously to walls and ceilings.
How to make liquid wallpaper at home
Homemade wallpaper is no worse in decorative properties than purchased
wallpaper. If you wish, make such wallpaper yourself. For this:
- take 40 sheets of A4 paper, cut into small pieces;
- pour the paper base into a suitable container, pour in 1.25 liters of water;
- leave for one hour to swell;
- mix with a construction mixer;
- add two caps of a suitable color, mix again;
- pour 40 teaspoons of gypsum mixture into the resulting composition, pour in 200 ml of PVA glue, stir, give the wallpaper time to set.
When properly diluted, homemade wallpaper will not be inferior in decorative properties to purchased ones.
Liquid wallpaper will help make the interior interesting and sophisticated. At the same time, preparing and applying the composition will not cause difficulties even for a beginner. Using this finishing method, you can reproduce reliefs, ornaments, drawings on the ceiling surface and quickly update the room. The main thing is to carefully read the instructions before work and follow the recommendations.
One of the finishing options is wallpaper for the ceiling for painting or photo wallpaper for the ceiling - tips for choosing, correct gluing.
Pros and cons of this solution
The choice of liquid wallpaper for finishing the ceiling space is explained by the many advantages of the material:
- can be applied to any ceiling: plasterboard, concrete, wood (boards, plywood, OSB);
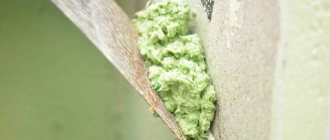
- the finishing hides the imperfections of the ceiling surface: gaps between boards, sinks and chips in concrete, etc.;
- a smooth surface without seams or joints looks more aesthetically pleasing;
- the presence of several levels, niches and boxes on the ceiling does not complicate the work, unlike simple trellises;
- the ability to obtain different textures, from smooth to embossed, allows you to highlight design solutions for the interior of the room;
- preparing the ceiling for liquid wallpaper is not labor-intensive and expensive work;
- applied to water-based or oil-based paint, which simplifies preparatory work;
- belong to products that are safe for human health - the components contain natural materials that do not cause allergies;
- the coating made from “Danish plaster” is durable - the service life is about 10 years;
- are good insulators;
- have a high level of sound absorption;
- can be easily removed when switching to another type of finish;
- easy to prepare and apply - a beginner in the construction business can handle the job;
- have no waste - leftovers can be stored in the refrigerator for repair work;
- damaged areas are easily restored;
- with their help you can create various patterns and color designs;
- can be used repeatedly. It’s enough to remove it, repaint it, or even just wet it and apply it again;
- have high elasticity - withstand the shrinkage of the building and do not crack;
- budget cost of finishing work - liquid wallpaper has moved from the very expensive category to the sector with an average and low price.
There are also disadvantages, but they are not significant:
- afraid of high humidity. Therefore, rooms such as the kitchen (used, but not in the wet area and covered with aquatic) and the bathroom are not for them. Other finishing materials are needed here, which violates the general design concept of the apartment (house);
- cheaper types quickly fade in the sun;
- limited bright colors (in general, manufacturers indicate from 100 to 200 colors);
- dry slowly after application, maintaining high humidity in the room, which can, in turn, lead to deformation of the door frame of the interior door (therefore, during the drying period, everything that can be opened is opened).
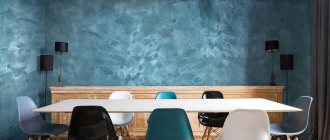
Photos of liquid wallpaper in the interior and some features of their use
In interior design, the main thing is a harmonious combination of colors and materials. This rule also applies to liquid wallpaper. You should not combine this material with traditional wallpaper, paper, non-woven or vinyl.
Examples of using cellulose coating in the interior:
Advice! The best decoration for a wall with paper plaster is paintings or artistic panels. Fresh flowers also look good against this background.
Using paper plaster, you can easily zone a room. For this purpose, materials of different colors or even textures are used.
No risk: using liquid wallpaper for the bathroom
There is a traditional opinion that the bathroom and toilet should be decorated with ceramic tiles and nothing else. It must be admitted that ceramics can now satisfy the most demanding tastes. You can choose not only the original color, but also use decoration with ornaments or ceramic-based panels.
Liquid wallpaper can be called a bold and extraordinary solution for decorating a bathroom. This room is characterized by a humid atmosphere and temperature changes. For this reason, you should approach the choice of wall and floor coverings with special care. Ordinary wallpaper is not suitable in this case. They won't last even a couple of months, and that's only if you used high-quality glue. But liquid wallpaper is another matter. It turns out that they are great for the specific conditions of the bathroom.
See what liquid wallpaper looks like in toilets, photo gallery of Internet options:
According to reviews, liquid wallpaper in bathrooms copes well with dampness, temperature changes and poor ventilation of the room. In addition, this material successfully resists the development of fungus.
To decorate the bathroom, a material with special characteristics is used. It costs more than conventional cellulose composition
Advice! Before you start decorating your restroom, determine the places on the walls where water most often gets from the sink and bathtub. Here it is better to use ceramics, combining it with the main decoration of the walls using cellulose plaster.
For additional protection, the decorative wall covering should be treated with acrylic varnish. But don’t get carried away with the process: 1-2 layers are enough. If you overdo it, the wallpaper will be difficult to replace in damaged areas and may develop cracks. Before choosing such a coating, study the photo of the interior. Liquid wallpaper requires a special approach. If you have the skills to apply this composition, you can safely experiment with patterns and ornaments.
Pay attention to the photos of liquid wallpaper in the apartment, from which real masterpieces are created:
This material has many advantages that are worth mentioning.
Table 2. Advantages of liquid wallpaper
| Advantage | Description |
| Ease of use | The dry mixture is diluted with water in a ratio of 1x6 and applied to the wall with a regular spatula. |
| Big choice | The range of materials is very wide. A rich palette of colors and textures allows it to be used in almost any interior. |
| Use on any surface | Paper plaster can be applied to the ceiling and walls, and there will be no joints or seams on the surface. |
| Correction of uneven walls | The paper mixture can be used to smooth out small defects in the walls. It is important that the base is painted white. |
| Breathable surface | The structure of this coating does not prevent oxygen from reaching the wall surface. |
| Freedom of creativity | The material allows you to “play” with texture, volume and color. Skillful use of liquid wallpaper will make your interior unique. |
Check out what liquid wallpaper looks like in an original interior:
For those who are against the use of liquid wallpaper in the kitchen: photos of interiors
A modern kitchen is not just a place for cooking. There is no shame in hosting guests in a beautiful kitchen. Lunch with loved ones here will be filled with special comfort and a sincere atmosphere. The kitchen, like the bathroom, is a room with special operating conditions. There is not only high humidity and high temperature, but also steam and soot.
You can often find negative reviews about liquid wallpaper in the kitchen. Skeptics argue that any plaster, cellulose or traditional, is a difficult coating to clean. They are right, but only partly. Materials created using modern technological techniques can be adapted to specific operating conditions. Some useful tips on how to use liquid wallpaper for the kitchen:
- paper plaster should not be used in the work area. It is better to decorate the space above the sink and near the stove with ceramic tiles;
- so that the coating does not absorb odors and is easy to clean, it should be coated with acrylic varnish;
- if necessary, you can renew part of the coating by soaking the wallpaper with plain water;
- For cosmetic repairs, you should stock up on wallpaper from the same batch as the main coating.
By following these recommendations, you will achieve excellent results. See what the kitchen interior looks like with this coating:
Advice! If you plan to decorate your kitchen interior with wallpaper, be sure to install a hood above the stove. It will keep the wall covering in its original form for a long time.
Related article:
Wallpaper for the kitchen is washable: the catalog of photo ideas discussed in our review will allow you to choose the best options without mistakes from the entire variety presented on the modern market.
Liquid wallpaper for a small corridor space
Paper plaster fits organically into the interior of the narrow hallway space. With its help, you can even out wall errors, and the exquisite texture will give the interior a special zest.
Considering that in the hallway, as a rule, there are no windows, you should choose light colors for decoration. Do not use liquid wallpaper in overly bright colors. If the hallway has low ceilings, you can make a smooth transition of two shades: a light tone on top, a darker tone below.
In the corridor, you can even create three-dimensional designs using cellulose plaster. But everything should be in moderation. A drawing on the wall that is too fancy will look heavy in a small space.
Designer recommendations for combining liquid wallpaper with other materials:
- use regular wallpaper inserts on non-woven or vinyl base;
- combine liquid wallpaper with cork, bamboo or wood panels;
- combine paper plaster with inserts of regular plaster, observing harmonious color transitions.
Photo of using liquid wallpaper in the hallway:
Related article:
Wallpaper for the corridor and hallway: photos of the best options can be seen in our review, as well as familiarize yourself with the main criteria for choosing canvases.
Types of liquid wallpaper
Liquid wallpaper is classified according to many parameters. According to the surface structure, they can be smooth or embossed. By color scheme: white or colored. But the most significant is the division of decorative finishes according to the composition of the mixture. Here are liquid wallpapers based on:
- cellulose;
- cotton;
- silks;
- several materials in various combinations. Experts call them combined.
Note that the appearance, durability, performance characteristics and price of the decor depend on the type of material from which the wallpaper is made.
Cellulose mixtures. Liquid wallpaper based on cellulose fibers are among the cheapest finishing materials due to the low cost of raw materials. The low price is matched by consumer properties: durability and ultraviolet resistance.
Cellulose liquid wallpaper.
At the same time, bleached cellulose fibers allow them to be dyed in bright colors. The fragility is compensated by the ability to refinish the ceiling after 5-6 years. The only plus, besides the low price, is their excellent adhesive ability, which makes them stick to the ceiling better than other types of liquid wallpaper.
Cotton blends. Cotton wallpaper is based on crushed cotton fibers, which makes it possible to obtain an environmentally friendly material with a soft structure and a matte shine. Due to their high level of noise and heat protection, they are most in demand for children's rooms and bedrooms.
Cotton based wallpaper.
Silk mixtures. The use of durable and beautiful natural silk fibers as the basis for liquid wallpaper has made this type of finishing material elite, with a price corresponding to the level - high. The introduction of various decorative additives into the composition allows you to obtain a finish with the effect of fabric or marble.
Silk wallpaper.
Mixed formulations. The introduction of cotton and natural silk fibers in various proportions into cellulose mixtures makes it possible to obtain finishing materials that are cheap but have high consumer properties. Such wallpapers do not fade, last a long time, and have a beautiful appearance.
Mixed liquid wallpaper.
A more detailed description of the types of liquid wallpaper can be obtained in the material “What is the difference between liquid wallpaper and decorative plaster and what to choose?”
Wallpaper classification
The range of wallpapers is quite diverse. There are not very many manufacturers of this material on the finishing materials market. The most popular and purchased due to its availability and low price are the products of the Russian company Silk Plaster. The Turkish manufacturer Bayramyx has approximately the same assortment. To decorate premium interiors, they use finishing from French manufacturers Fibres de cotex and Senideco.
Cotton
Cotton wallpapers are made from 100% natural cotton; they are distinguished by softness and high environmental friendliness. The mixture contains 98% cotton, and 2% are natural impurities: cellulose, mica, textile fibers. They are not afraid of drafts and shrinkage, do not bubble, and do not move away from the walls. This is an ideal find for decorating rooms intended for children's pastime. Manufacturers of cotton liquid wallpaper offer up to 240 different shades. You can always mix several colors together.
Pulp
Cellulose wallpaper is in great demand due to its affordable cost. In appearance they look like silk, although they cannot boast of the same durability. Over time they lose color. A general recommendation from a specialist is that if renovations are carried out in an apartment every 5 years, then this is the best choice in terms of price and quality. If you want to make repairs that will last forever, choose silk ones.
Silk
Silk liquid wallpaper is premium wallpaper. Their high price is more than compensated by their beautiful appearance and durability. The material contains silk fibers. The resulting coating looks great thanks to its silky texture, does not fade in light, does not change color and looks great for many years, as can be seen in the photo.
Mixed
Mixed or combined silk-cellulose wallpaper is the best option in terms of price/quality parameters. The material contains silk fibers with cellulose. Such wallpaper is resistant to ultraviolet radiation and retains its original appearance for a long time.
Ceiling preparation
Liquid wallpaper is a specific finishing material. On the one hand, it does not require complex preparatory work, on the other hand, it imposes a number of requirements on the ceiling surface. The surface should be:
- durable. Under the force of gravity, poorly reinforced areas will quickly crumble. Therefore, everything that does not adhere well is removed from the ceiling: paint, whitewash, putty, chips on concrete, etc.;
- white. Otherwise, various stains will show through the layer of wallpaper;
- flat. Despite the fact that among the advantages it is stated that the material is able to hide problem areas, it is not omnipotent. Recesses or protrusions of 2 mm are perfectly camouflaged. There are no big errors. They are generally unacceptable;
- homogeneous - everything unnecessary should be removed from the ceiling;
- rough - poor adhesion to smooth surfaces.
To fulfill the above conditions, you must:
- completely remove old finishes: wallpaper, whitewash, decorative plaster. Paint is removed only in places where it does not adhere well;
- remove foreign objects, if any (screws, anchor bolts, nails);
- clean off dirt and then degrease.
Further preparation depends on the type of material from which the ceiling is made.
Concrete
It will not be possible to apply liquid trellises directly to the concrete floor for the following reasons:
- from smooth concrete the mixture will constantly fall down - the adhesion force of the glue to the ceiling is not enough to support the weight of the wallpaper;
- a dark gray surface will drown out the color of the trellis, making it grayish-dirty;
- the ability of concrete to absorb moisture will not allow the “Danish plaster” to adhere to the ceiling.
You can prepare the concrete floor for applying liquid trellises as follows:
- the ceiling is treated with “Betonokontakt” in white or transparent color (pink, blue, green tints are difficult to cover up when painting) twice. The first layer closes the pores, the second creates roughness;
- painted in one layer with water-based emulsion to create a light background and slight roughness for better adhesion, preferably with facade paint, as it is more resistant to water.
For information: the color of the primer can be removed using the following technology: the ceiling is primed with gypsum putty, and then painted with water-based paint with the addition of PVA glue in a ratio of 2 to 1, where 2 is paint, 1 is glue.
Drywall
Various instructions on how to cover a ceiling with liquid wallpaper with your own hands, which can be found on the Internet, say that this type of finish can be applied directly to sheets of drywall without pre-treatment.
This cannot be done, since gypsum board is afraid of moisture. Under its influence, the gypsum core is destroyed. Wet wallpaper takes a long time to dry, about 2-3 days. During this time, the cardboard gets wet, and through it the moisture gets onto the plaster, which begins to crumble when wet. Using moisture-resistant cardboard when covering the ceiling solves the problem. But other reasons remain valid:
- It will not be possible to remove the wallpaper without damaging the cardboard shell of the gypsum board: in some places it, together with the glue, will lag behind the plaster;
- the green color of waterproof drywall will break through the layer of trellis;
- The heads of the hardware, when attaching the gypsum board to the sheathing, become covered with rust under the wallpaper, which will be clearly visible.
The problem is easily fixed. To do this you need:
- recess the heads of the screws a little into the drywall and then paint them with white oil paint;
- prime the surface with a white or colorless primer, and then putty in two layers;
- Apply primer to the putty in one layer.
The last two operations (the second layer of putty and primer) can be replaced by painting the surface with white acrylic water-based emulsion with the addition of 1/3 PVA glue.
Natural wood, plywood
Wood absorbs water well. Therefore, all preparation comes down to creating a waterproof film and white color. The problem is solved in one step by painting the surface with white oil paint, which is then sanded. With the same effect, you can prime the walls, paint them with white water-based emulsion with PVA glue, and prime them again.
Dye
A mixture of liquid wallpaper can be glued to all types of paints. The preparation technique is simple:
- loose paint is removed;
- the remaining paint is sanded off with sandpaper to create a rough surface;
- areas without paint are cleaned of paint and dirt residues, and then primed and puttied;
- After the putty has dried, the entire ceiling is treated with a primer.
After processing the material, the existing ceiling moldings are sealed with masking tape.
How to decorate paper plaster
Sequins
Modern wallpapers have a textured surface and different patterns. Wallpaper with glitter looks especially attractive. Reflective particles make the interior light and shining, especially in natural light. Glitter for liquid wallpaper will help focus attention in a certain area, for example, on the far wall or on the ceiling.
Gloss in the mixture
Stencils
Stencils will help you create unusual patterns on the walls. With their help, even a novice master can make a real painting. Multicolor compositions look especially original. To apply a mixture of different colors, you will need to make several templates. Using stencils for liquid wallpaper, three-dimensional compositions are also created. To do this, the mixture is applied to the base coating through a template in several layers, achieving the creation of a three-dimensional figure.
Using a stencil
Related article:
DIY stencils for decor: templates and techniques for making them. From the article you will learn what stencil designs are, what they are needed for, pros and cons, examples of decorating furniture and mirrors, and you will also find templates for downloading.
Varnish and paint
Using varnish for liquid wallpaper is a common technique. It allows you to protect the coating from moisture and make it more resistant to mechanical damage. In addition, the varnish will help the coating retain its original color for a long time. Acrylic varnish is added directly to the mixture or applied over it after drying.
It is worth considering that adding varnish will significantly complicate the process of removing wallpaper from the wall in the future.
Advice! If liquid wallpaper is applied in a thin layer, the varnish can make it transparent, which is not always good. To prevent this from happening, after application the wallpaper is first coated with a transparent primer, and only then with varnish.
Is it possible to paint liquid wallpaper? Can! But keep in mind that too thick a layer of water-based or acrylic paint can cause the material to peel off the walls. Therefore, before painting, treat the paper plaster with primer.
We have already talked about whether it is possible to glue wallpaper to liquid wallpaper. It's possible, but not necessary. But if the situation is hopeless for some reason, for example, your beloved mother-in-law comes, and her rider includes walls with green birch wallpaper, try it. Preliminarily inspect the old coating for peeling, treat it with primer and glue it after complete drying. It will take a couple of days to do everything, and you will still have time to hang Yesenin’s portrait and euthanize the cat before your guest arrives.
Required materials and tools
To apply liquid wallpaper to the ceiling with your own hands you will need:
- dry mixture of wallpaper;
- gypsum putty;
- not tinted water-based emulsion. If the surface is white, do not buy;
- stepladder or strong, high table;
- primer cuvette;
- containers for mixing wallpaper: one 12 liters for one bag and a large one for several batches;
- roller and brush for primer;
- wide and narrow spatula;
- transparent plastic grater;
- Master OK;
- ironer
Flow calculation
It is easy to calculate the need for finishing material:
- multiplying the length and width of the room to find the area of the ceiling;
- Based on the consumption of the mixture per 1 m2 (indicated on the packaging), the total volume of purchased material is determined.
- Dividing the resulting volume by the weight of one package determines the number of bags of dry mixture.
After this, the resulting figure is adjusted for the thickness of the layer and the availability of work experience.
Layer thickness. The packaging shows the material consumption for a layer thickness of 2 mm. In practice, achieving such a result is extremely difficult even for professionals. Therefore, the volume of purchased material increases by approximately 15%.
Having work experience. Practice shows that a lack of work experience leads to an increase in the consumption of liquid wallpaper by another 15-20%.
In general, you need to purchase about 30% more material for the ceiling than the initial calculations show.
Inspiring photos: drawings with liquid wallpaper on the walls
If the usual uniform coating seems too boring to you, pay attention to design techniques. One of these is decorating walls with your own drawings. Liquid wallpaper makes it possible to create multi-color compositions with complex relief.
Some tips for making wall art:
- carefully consider the image, make a stencil or draw outlines on the wall using a marker;
- when applying the mixture to the markings, it should extend beyond the edges by 1 millimeter;
- Wallpaper should be applied to borders with a small rubber spatula; it is better to use a contour border to create clear lines;
- Each piece must be completely dry before you move on to the next piece.
To add accents and decorate the design, use beads, beads, large glitter and other fillers.
For your information! Professionals can apply liquid wallpaper in such a way that the surface imitates stone or brickwork or leather.
Some will find it easier not to create a design step by step, but to apply it using the appliqué method. Before you begin this work, keep in mind that the bottom layer of coating may get wet and bubble. First you need to coat the surface with primer and varnish.
Photos of drawings from liquid wallpaper on the walls in the interior:
Technology of applying liquid trellises to the ceiling
Manufacturers' recommendations on how to glue liquid wallpaper to the ceiling consist of several sections:
- how to properly install wallpaper;
- how to apply wallpaper to the ceiling;
- possible options for further finishing.
Preparation of liquid trellises
Liquid trellises are available for sale in 3 packaging options:
- in the form of a dry mixture ready for dilution, where all components are pre-mixed. Wallpaper is packaged in sealed transparent bags weighing 1 kg or more;
- in dry form with separate packaging of each component of the composition (4 bags);
- ready for application (wet).
Dry mixtures are diluted using the same technology. You can find differences only in small things: the amount of water for stirring (5-8 l) or the ripening time (8-12 hours). You can always read about these nuances on the packaging.
When starting stirring, you must follow some rules, ignoring which may lead to repeating the finishing process.
1. It is strictly forbidden to mix part of the package or several bags at once in one batch if you purchased wallpaper with all the components in one package. According to the rules, each package is mixed separately in a small container, and combined into the mass required for the ceiling is done in a larger container.
2. The trellises, packaged in 4 bags, are poured out and stirred in turn: first the glitter, then everything else.
The glitter falls out first.
3. Properly store leftover liquid wallpaper not in diluted form, even in a hermetically sealed bag, but in dried form. There is a technology for this:
- a thin layer of wet trellises is applied to the plastic film and dries overnight at room temperature;
- the dried wallpaper together with the film is rolled into a tube and crushed with hands or a rolling pin (another hard object);
- the reconstituted mixture is placed in a polyethylene bag and tied (the air is removed). In this form, liquid wallpaper can be stored for several years, despite the fact that manufacturers limit the shelf life to a maximum of 2 years.
The step-by-step algorithm for wallpaper breeding consists of a chain of technological operations:
- in the original packaging the structure of the fibers is restored. To do this, the bag is crumpled and shaken until the compacted mass becomes voluminous;
- the contents of the bag are poured into a smaller container (10-12 l) and stirred by hand (the mixer will turn the fibers into dust) until a homogeneous, voluminous mass is formed;
- slightly heated water (about 30o) is poured into the container in the volume indicated on the packaging (usually 5 l);
Important: components packaged separately are poured into water. At the same time, after each package everything is thoroughly mixed so that the resulting mixture does not have a heterogeneous composition.
Attention: many professionals simplify the process of preparing the total mass of wallpaper for the ceiling. Their work follows a chain: the batch from one bag is again placed in a bag for aging and only the matured wallpaper is mixed in a common container.
- again with your hands, the contents of the bucket or other container are mixed until a homogeneous batch consistency is formed;
- The mixture, ready for application, is transferred to a basin or other large container;
The number of trellises required to finish the ceiling.
- the procedure is repeated with the second package. The knead is added to the basin. And so on until the amount of mixture for finishing the ceiling in one room is obtained;
- The mass in the basin is thoroughly mixed, placed in bags from which the air is removed. The packages are tied;
- the resulting mixture is left to mature. The specific time is indicated on the packaging. In practice this is 8-12 hours;
- the ripened mass is returned to the basin and mixed. If necessary, wallpaper can be diluted with clean water.
Attention: you don’t have to buy liquid wallpaper. They can be made at home from waste paper or used cotton items. You can see how to do this in the work “How to make liquid wallpaper with your own hands.”
The composition for application is ready. But how to glue liquid wallpaper to the ceiling? More on this in the next section.
What is liquid wallpaper and its varieties
There is a version that liquid wallpaper was first invented in France and its appearance was historically associated with Charles VII. Allegedly, it was in the castle he captured that the walls were first covered with a mixture of crushed silk and flour. The king was impressed by this original idea of the masters and this technology was used in other palaces.
The use of this material can give an ordinary room a palace luxury
In fact, it would be correct to call the material paper plaster, and not wallpaper, but that’s the way it is. So, liquid wallpaper - what is it? This is a crumbly dry multicomponent mixture, which is packaged in bags by weight, and for application diluted with water or an adhesive composition.
Liquid wallpaper contains the following components:
- Cotton or cellulose fibers. This component makes up 90 percent of the material. Recycled raw materials can be used for the mixture. The waste from textile and woodworking production and waste paper is used.
- Decorative elements. Their main task is to decorate and give a special relief to the coating. For this purpose, sequins, silk fiber, small beads, wood chips or threads and various dyes are used.
- Adhesive base. The binder composition can be PVA, regular wallpaper glue or bustilate, paste. Natural compounds, non-toxic and inexpensive are welcome.
- Additional additives. To prevent mold fungi and pathogenic bacteria from multiplying on the surface of the material, antiseptics are added to paper plaster. If you plan to use the coating in rooms with high humidity, it is advisable to coat it with varnish.
For your information! Mixtures are available for sale, diluted with water and ready for application. They are sold in buckets. These wallpapers are a little more expensive.
The color palette of the material is very rich. You can choose a plain or variegated coating, combine different colors in patterns and relief coating
Table 1. Types of material
| Photo | View | Description |
| Silk | Consists of silk fibers. Does not fade from the sun, is durable and easy to care for. The price corresponds to the quality. | |
| Cellulose | Does not like direct sunlight. More suitable for rooms with artificial lighting. They do not have a long service life, but they are inexpensive. | |
| Silk-cellulose | Combining cellulose and silk fibers gives excellent results. The resulting material is of excellent quality and is UV resistant. |
Application instructions
For those who have at least once glued liquid wallpaper to a wall, there is nothing new in the instructions on how to apply liquid wallpaper to the ceiling. For beginners, here are the basics.
- The ripened mass from all the packages is shaken out into a basin, after which the consistency of the composition is checked (thick wallpaper is difficult to apply in a layer of 2-3 mm). If necessary, warm water is added in small portions until the working thickness is reached. After each addition of water, the mixture is kneaded - it is better to waste time at the initial stage than to redo everything later.
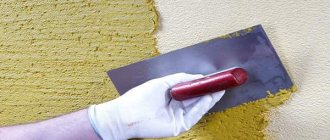
- Using a trowel, liquid trellises are applied to the ceiling anywhere.
- Using a wide spatula, preferably a plastic one, since the metal of the spatula can oxidize during operation and leave unwanted spots or stains, the applied mixture is evenly distributed over the surface in a thin layer. The most convenient way to do this is to hold the tool at an angle of 20o relative to the ceiling.
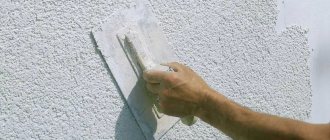
- After the initial finishing of an area of approximately 1 m2, the surface of the wallpaper is sprayed with water and rubbed with a plastic trowel to a layer 1.5-3.0 mm thick.
Rubbing wallpaper with a smoothing iron.
- On the side of applying a new portion of the mixture, the edges of the already applied trellises are wetted. It is recommended to complete the work within 1 hour, as the mixture in the container begins to thicken, and further addition of water is prohibited.
How much material will be needed per 1 square meter
To avoid noticeable transitions and joints, it is advisable to immediately prepare the required amount of material. The mixture is sold in 1 kg packages, each indicating how much area it is enough for (3-6 square meters, depending on the composition and manufacturer).
But in reality the cost may be higher. The fact is that the calculations are given for ideal conditions: a properly diluted mixture and a well-prepared base. Then a layer of 1.5-3 mm is enough. Some factors increase consumption:
- If the solution is too liquid, the wallpaper will not stretch well.
- If it is too thick, it also results in a thick layer.
- When the surface is smooth, adhesion decreases and the amount required increases.
- Material gets caught in cracks and imperfections, causing more wastage.
Therefore, it is better to buy wallpaper with a reserve. The remainder can be used for minor repairs. To do this, the mixture is spread on polyethylene in small cakes and dried, and then removed.
To roughly calculate how much mixture will be needed, first measure the area of the ceiling. This number is divided by the minimum specified footage. The result is rounded to the nearest whole number. This will result in the smallest number of packages that need to be purchased.
How to prepare the ceiling?
Before you begin preparing the ceiling, you should remove all unnecessary items from the room or move large furniture to the side. Next, you need to remove the chandeliers and dismantle the ceiling lights. Electrical wiring must be insulated. It is better to turn off the electricity in the room.
If the ceiling is made of plasterboard, then the gap between the sheets should be filled with putty and rubbed with an abrasive tool. After this, apply a primer to improve the adhesion of the plaster layer.
If the ceiling was previously covered with wallpaper or paint, this old layer should be cleaned, washed from dust, apply several layers of primer and after it has dried, you can begin laying the liquid plaster layer.
Features of the material
How to glue with your own hands
The versatility of the material lies in the fact that they look equally good on any surface in the room - on the ceiling or walls, and they can also be combined with other finishing materials. The plasticity of the composition, which resembles the method of application of plaster, makes it possible to finish structures of complex shapes.
If we talk about the ceiling, then these are multi-level plasterboard structures of bizarre shapes. After drying, liquid wallpaper creates a durable monolithic coating without joints or seams, which is its distinguishing feature from ordinary roll wallpaper.
How to apply it yourself, photo
Liquid wallpaper is sold in the form of a dry mixture, which includes cellulose or textile fibers and various additives. Some manufacturers offer a ready-to-use solution. It will be enough to dilute the dry color mixture with additives with water.
Instructions are indicated on the packaging. The third option is when only the dry raw materials themselves are sold, and the color and additives have to be added to the composition with your own hands.
Variety of colors and textures
Liquid wallpaper received its second name - “silk plaster” for its silky coating that is pleasant to the touch (with silk fibers in the composition) and the method of applying the material.
Ceiling liquid wallpaper: how to glue
There are several external features of this material:
- The texture of the coating depends on the size of the fibers that make up the dry mixture - it can be almost smooth or have a pronounced texture;
Structure, learning to glue
- As mentioned earlier, the dry mixture can be sold already colored or white , which allows you to give it any desired shade using color;
Package
- The dry mixture may contain additional additives that enrich the texture and give the coating a more expressive appearance;
Colored liquid wallpaper is sold as a ready-made dry mixture
- Depending on the type of fiber, products can be cellulose, cotton, silk or combined.
The roughness of the finished coating depends on how high the expressiveness and size of the fibers that make up the material are. You can also add originality to the appearance of the finished coating using various additives. It can be stone chips, metallic sequins, silk or cotton threads.
Application options
The relief can be enhanced by using a special technology for applying liquid wallpaper, when tools in the form of a texture roller are passed over the wet layer of the laid material, creating the necessary pattern on the coating. As for the color range of the material, manufacturers offer a wide range of shades.
Liquid wallpaper on a wall decorated with moldings
Important! When applying liquid wallpaper to a wall, do not be afraid that the wet layer differs from the color of the dry mixture - as it dries, the coating will lighten to the stated shade.
In cases where problems arise with choosing the required shade, you can use special water-soluble colors, with the help of which the white mixture acquires the desired color.
Color
Important! The material at the base of the mixture of liquid wallpaper affects not only the decorative effect of the coating, but also its performance. The price of the material also depends on the selected components.
Colored additives for home preparation
Positive traits
Liquid wallpaper on the ceiling
Among the positive qualities of liquid wallpaper, used not only on walls, but also on the ceiling, the following can be noted:
- When choosing a finishing material, special attention is paid to its decorative effect, which liquid wallpaper undoubtedly has. They have the same structure due to the homogeneous fibers used in their production. Different appearances can be achieved due to the fact that fiber fillers have a rich color palette and different shade saturations. The most expensive, included in the line of exclusive liquid wallpapers, are those that, after application, create a canvas with some pattern, thanks to the special distribution of fibers in the composition. Conventional liquid wallpaper is characterized by a chaotic distribution of fibers, which does not reduce the effectiveness and decorativeness of the finished result;
Decorative surface
- The unique quality of this finishing material is its high maintainability. If the integrity of the coating is compromised due to mechanical impact or the fragment has received impurities that cannot be removed, then repairs can be performed on your own. The damaged area is moistened with plain water and removed with a spatula, then a new layer of wallpaper is applied to this area and smoothed. Once dry, the repaired area will be completely invisible. If there is a cat in the house, scratches sometimes appear on the wallpaper. In this case, you don’t even need to remove part of the material - just moisten the damaged area with water and smooth it out.
On the ceiling, liquid wallpaper can be combined with stretch fabric
Advice! In order to promptly restore the damaged fragment of the coating, it is necessary to leave a small supply of the finished mixture. It will dry out over time, but it can always be restored to working condition by diluting it with water.
- Due to the fact that the texture of the working mixture resembles a plaster composition, there is no need to carefully level the ceiling surface before applying liquid wallpaper. The material fills minor depressions and cracks, leveling the surface. The only thing that is required is to pre-paint the ceiling with white water-based paint so that the shade of the coating has the necessary saturation and color;
- Liquid wallpaper is an environmentally friendly material due to the use of natural ingredients in its production. This allows them to be used for finishing bedrooms and children's rooms;
Wallpaper for the ceiling
- The creation of optimal microclimatic parameters in a room is also influenced by the vapor permeability of the material;
- Liquid wallpaper has heat and sound insulating qualities, which is important when using it to decorate the ceiling in a multi-story building;
- Removing dirt from the ceiling is quite problematic, however, with liquid wallpaper such work will have to be done less often, since static tension and, accordingly, dust do not accumulate on their surface;
In the children's room
- Liquid wallpaper has a long service life of 15 to 20 years, which is important when using it on the ceiling, since repairing this surface always involves a lot of physical effort. When exposed to sunlight, liquid wallpaper does not fade and does not react to temperature changes;
- Thanks to its elasticity, this material can be used in newly built houses without fear that it will deform during the natural shrinkage of structures;
Using liquid wallpaper, you can apply any color image to the surfaces of walls and ceilings.
- Working with such material does not require special construction skills and knowledge. The material is easy to apply and also easy to remove if necessary;
- Using stencils, you can create unique designer patterns and ornaments on the ceiling surface;
Liquid wallpaper pattern
- The coating is smooth and monolithic, with no seams or joints. Thanks to its liquid texture, the solution is easy to apply to hard-to-reach places and corners of the room.
Disadvantages of liquid wallpaper
Ceiling decoration with liquid wallpaper
Among the disadvantages of liquid wallpaper, it can be noted that the material is not moisture resistant, but when used on the ceiling in living rooms this is not a problem. If liquid wallpaper is intended to be used in the kitchen, then the surface of the finished coating is treated with acrylic transparent varnish.
In this case, the ceiling can be wet cleaned, but the vapor permeability of the material is lost. Also, liquid wallpaper is a fairly expensive finishing material.
Important! The cheapest option for liquid wallpaper are those that contain cellulose, but over time such wallpaper fades and loses its visual appeal. Compositions with cotton or silk fibers (30 - 40%) are more durable.
Adviсe
- before preparing the mixture, first of all, you should carefully read the instructions for use and find out whether liquid wallpaper can be applied to the ceiling;
- if there are defects on the ceiling, then it should be taken into account that the mixture consumption in this case will increase;
- If the plaster layer is damaged during operation, this can be easily corrected by wetting and smoothing the surface with a spatula.
Necessary preparatory work
- Cleaning the work surface. Removing old coating and plaster. Carefully remove the dirt; if there is a fungal infection, apply an antiseptic solution to the surface.
- Fill large cracks. For this purpose, you can use not only putty, but also a diluted solution of the liquid wallpaper itself.
- Primer of the ceiling plane. Pre-applied primer will strengthen the surface and prevent moisture from penetrating inside.
For this purpose, it is advisable to take a colorless deep penetration primer. The primer mixture is diluted with triple the amount of water. You can use white water-based paint. If the ceiling was whitewashed with chalk, then there is a way to prepare the primer yourself.
- Slaked lime - 3 kg.
- Laundry soap - 200 g.
- Drying oil - 100 g.
Find out everything about liquid wallpaper and its types
You can give the ceiling a relief roughness using a primer mixed with quartz dust or fine sand. On a rough surface, liquid wallpaper will lie in an even layer. Application on a smooth surface will be problematic. Tears are possible and the layer will be uneven.
Attention! It is strictly forbidden to use Ceresit ST17 as a primer on the surface, as yellow spots and streaks may subsequently appear on the wallpaper.
If the ceiling was painted with oil paint or enamel, there is no need to remove this layer. It is enough to check the coating for swelling and peeling. If there are any, clean these places. Apply a layer of putty and two layers of water-based paint. Paint the ceiling metal fittings with oil paint or PF enamel.
When preparing the ceiling surface, you should pay attention to the absence of separating areas and the presence of excess moisture and rust. The surface should not actively absorb moisture. If exposed to moisture, the base should not lose color. That is, the base must be colorfast.
Material advantages
The technology of liquid wallpaper for the ceiling is increasingly gaining popularity due to its following advantages.
- The main difference between liquid wallpaper and similar materials is the naturalness of all components. Thanks to this, they do not emit toxic gases during installation and drying.
- This material does not contain synthetic fillers, as a result of which liquid wallpaper will not absorb dust. They also have antistatic properties.
- The noise-insulating qualities that liquid wallpaper has will be very relevant in multi-storey buildings, where there are a lot of extraneous sounds. The material has a microporous structure through which steam can pass.
- In addition, liquid wallpaper for the ceiling is very easy to care for and does not require the use of additional products.
Surface preparation
Liquid wallpaper is demanding on the base. If they are used for finishing premises, the most important thing is good preparation of the surfaces. The material itself is quite easy to apply.
An important point is that all electrical work must be done and tested. Otherwise, a situation may arise when, after wallpapering, it turns out that the chandelier or soffits are not working. The same rule applies to walls.
If the floors in the room are already made, they need to be covered with thick plastic film. To do this, it is spread over the entire area of the room and glued with masking tape as close to the walls as possible. The joints of the film are also connected using masking tape.
To prime or not to prime
People who independently renovate an apartment often have a question: is it possible to glue wallpaper to an unprepared surface? It's better not to do this. The primer serves as a kind of layer between the ceiling and the wallpaper. Those. it prevents the penetration of moisture from the wallpaper into the walls and vice versa. Even if the surface is clean and dry, a primer must be applied.
What happens if the ceiling preparation for liquid wallpaper has not been done:
- when dry, moisture can penetrate 10-15 cm into the wall, and this will create favorable conditions for the development of fungus;
- there may be mold in the thickness of the walls - the wallpaper will pull it towards itself;
- ceiling slabs are reinforced - plaster can attract rust.
As a result, the liquid wallpaper on the ceiling will become stained and become unusable. Therefore, you need to carefully select a primer and apply it to the surface. To better understand its importance, we can recall the fact that when insulating walls, a layer of vapor and water barrier is laid between the insulation and the finishing. This is done precisely to protect against the free passage of moisture between different materials.
Priming the ceiling is a prerequisite before applying liquid wallpaper
Primer selection
The entire surface of the ceiling must be uniform, i.e. absorb moisture equally in all areas. If this does not happen, stains will appear on the finishing coat. Therefore, the ceiling must be coated with a primer. In addition, it serves to waterproof the surface and give it a uniform background.
Primer requirements:
- high concentration;
- water-repellent properties;
- quartz sand.
The liquid for preparing the ceiling should be of a high degree of concentration, no less than 1 to 5, and preferably more. Moreover, you need to choose water-repellent compounds. This must be remembered, because... there are plenty of other options. For example, deep impregnation, strengthening, simple impregnation, etc.
Waterproofing the ceiling is necessary so that when the surface dries, moisture evaporates freely into the room and does not go into the walls. In addition, the use of a moisture-resistant base will make it easier to remove the material from the walls in the future.
It is advisable that the primer contains quartz sand - it gives the surface roughness. Due to this, liquid wallpaper will stick to the ceiling better.
Ceiling priming
The ceiling is primed 2-3 times, the liquid is not diluted. If the ceiling has been damaged by fungus after severe leaks or has a chalky coating, then the primer is applied in three layers.
The composition is applied slowly, in several passes. You should not try to paint your entire ceiling with one roller. For coating in one dip, the optimal area is no larger than 1 by 1 m. This way the surface will be well saturated and the layer will be uniform.
It is also important to take into account that drops may form on the ceiling - this happens when the layer is too oily. Those. You need to ensure the uniformity of the coating. Corners or hard-to-reach places for the roller should be passed with a brush.
Good ceiling preparation is the key to successful and high-quality finishing with liquid wallpaper
The interval between two coats of primer should be at least 12 hours. This will allow it to absorb well into the wall and dry. A protective film with a slight shine should form on the surface - this indicates that the ceiling can be covered with a second layer. There is no need to wash the roller. It is enough to pack it in a plastic bag so that it does not dry out. If you clean it before applying the next layer, there will be water left in it, which will act as a thinner, which is very undesirable.
3 layer
As a third layer of primer, many craftsmen recommend using water-based paint. What are the advantages of this:
- additional layer of waterproofing;
- silk plaster will adhere to the water-based emulsion better than to the primer;
- the paint will hide stains on the ceiling.
The paint should be washable or facade - regular paint does not stick well to primed surfaces.
Do I need to putty a concrete ceiling?
If the ceiling surfaces are made of concrete, liquid wallpaper can be applied without prior putty. This material itself has leveling properties - the finished layer of the finishing coating is 2-5 mm. Therefore, minor defects will be hidden without problems.
But it is better to repair large damage, irregularities and cracks. This will be faster and cheaper than covering an unplastered ceiling with liquid wallpaper. In this case, you need to ensure that there are no loose areas left on the ceiling.
If the ceiling is finished with plasterboard, all joints and screw heads must be puttied. At the junction of the sheets, a plaster mesh is glued.
Puttying drywall joints is required
If there was a chalk covering
A situation often occurs when there are many layers of whitewash on the ceiling with a chalk base. Is it possible to apply liquid wallpaper to such a surface? No, it needs to be removed right down to the concrete.
The whitewash needs to be cleaned off, not washed away. If you wet it with water, the chalk can be absorbed into the slab, and subsequent finishing will pull it onto itself and the coating will either become stained or simply fall off.
The same goes for fungus. It is best to remove mold from walls with a spatula or a stiff brush. You need to wash the surface after cleaning it.
What kind of surface should be obtained as a result of preparation:
- flat;
- with a uniform coating;
- water-repellent;
- with the same absorption;
- no stains;
- neutral color (or similar to wallpaper).
If all conditions are met, finishing the ceiling with liquid wallpaper will go without incident, it will not stain or fall off.
Preparing the mixture
Pour the contents of the package into a bucket of water and carefully move it with your hands. The water should be at room temperature. The ratio of water and mixture can be found in the instructions included with the wallpaper. If you need to add color, pour it into this mixture. You can use a construction mixer to mix the composition. The mixture after preparation should be plastic without air bubbles.
Next, you should leave the material for an hour to swell, after which the mixture is ready to be applied to the ceiling. To prevent drying out, wrap the substance in plastic wrap and use it as you apply it.