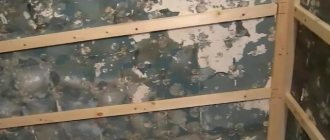
In a private house, the issue of attic space arises acutely. Why waste useful space if you can turn it into a living room. It is not very difficult to equip an attic for living, as long as such a desire arises. This room is located under the attic and has a sloping ceiling, which significantly distinguishes it from other rooms.
Finishing an attic with plasterboard is a more difficult task than renovating an ordinary room, precisely because of the sloping ceilings. However, it is worth it, because the created room will not only be beautiful, but also completely livable.
What are the advantages and disadvantages of using gypsum boards?
After all, the attic can be covered with various materials, of which there are a huge variety. Why should you choose drywall?
- Environmentally friendly material is always preferable to something of dubious origin. A plaster core wrapped in thick cardboard, what could be harmful about that?
- Cheapness is also a powerful argument. Anyone can afford to buy enough plasterboard to convert an attic into living space.
- Despite the use of cardboard, this building material is fire resistant. It does not burn, but can only smolder.
- A plasterboard attic can be additionally insulated. This is possible due to the fact that plasterboard sheets are attached to the sheathing, forming a cavity into which thermal insulation materials can be inserted.
- You can also hide power cables and other communications under the casing.
- Sloping ceilings are very difficult to level with conventional materials, but with plasterboard the level will remain level.
There are certain nuances that may force you to abandon the use of gypsum boards when finishing the attic. The fragility of drywall is its Achilles heel. One blow is enough to break this material and render it unusable. Even a tightly screwed screw can lead to unwanted deformation.
Drywall should not be used in new homes. If the house can shrink, then the gypsum board will not withstand this and will be deformed.
Bringing large drywall into the attic is not very convenient. And if the material is cut in advance, it can result in a lot of waste. Increased humidity and dampness in the attic will cause the plaster to absorb it and swell, which is also extremely undesirable.
Attic insulation
After completing the construction of the metal frame, the ceiling and walls will need to be insulated. This can be done using different materials (read the link about choosing insulation for drywall), but the most popular solution is mineral wool. Let's look at its installation.
Cotton wool can be produced in rolls or slabs. The first option has a low density, which makes it more difficult to work with on vertical and inclined surfaces, but they retain heat well. A 10-centimeter layer of such insulation is sufficient. The slabs are dense, they support their own weight, but are less effective as an insulator - they are placed in a layer of at least 15 cm.
Mineral wool laid over the frame
It is very important to properly close all the cracks and provide the necessary layer of insulation, otherwise the room will freeze in the winter and heat up along with the roof in the summer, especially if the latter is metal.
The insulation is slipped under the frame. Each new layer must be placed offset along the seams to minimize the number of cold bridges. In particularly difficult places, insulation can be supplemented with polyurethane foam.
Multilayer ceiling insulation
It is necessary to work with mineral wool only in protective clothing, as it generates a lot of dust. The particles of the material are very small, easily get into the skin, get into the eyes and respiratory tract. Then it causes irritation - you walk around like a hedgehog. We recommend using basalt wool for insulation. The described effect is less pronounced, and it contains less formaldehyde.
The problem with installing mineral wool under a metal frame is that it needs to be covered with a layer of vapor barrier, but there is nothing to attach it to. For this reason, the frame is often made multi-layered - first they install insulation, sew lathing on top, create a vapor barrier, and only then build a metal frame. This is exactly what we advise everyone to do.
Selection of drywall
It is wrong to think that covering an attic with plasterboard can be done using classic wall and ceiling plasterboard. You will have to use moisture-resistant materials for the reasons described above.
GKLV has a greenish color and has excellent moisture-resistant characteristics so that it can be used under a roof. Hydrophobic impregnation will do its job, and you won’t have to worry about high humidity. However, such sheets are very heavy, which is fraught with high loads on the ceiling frame.
| Drywall weight | ||||
| View | Sheet size (mm) | Thickness (mm) | Sheet weight (kg) | Weight 1 sq.m. (kg) |
| Wall | 1200x2000 | 12,5 | 22,32 | 9,3 |
| 1200x2500 | 27,9 | |||
| 1200x3000 | 33,48 | |||
| Moisture resistant | 1200x2000 | 12,5 | 24,24 | 10,1 |
| 1200x2500 | 30,3 | |||
| 1200x3000 | 36,3 | |||
| Moisture resistant ceiling | 1200x2000 | 9,5 | 24 | 10 |
| 1200x2500 | 30 | |||
| Ceiling | 1200x2000 | 9,5 | 17,5 | 7,3 |
| 1200x2500 | 21,9 | |||
| Arched | 1200x2500 | 6,5 | 18 | 6 |
| 1200x3000 | 21,6 | |||
| Fire resistant | 1200x2500 | 12,5 | 30,6 | 10,2 |
Everyone will have to independently look for a middle ground when choosing drywall.
What calculations are needed
A preliminary study of the topic of how to properly sheathe an attic is mandatory. It turns out that several large-scale works have to be carried out on the technology. Therefore, in order to sheathe an attic with high quality, it is necessary to take into account all the nuances associated with a specific room:
- First of all, it's location. The attic, as a rule, occupies the top floor, located under the roof itself. This means it makes sense to additionally insulate the room before sheathing it.
- Some difficulty is presented by the uneven angles created during the installation of structural elements. The nuance is created by the sloping shape of the roof. It is necessary to take into account that the sheathing is carried out at an angle.
The nuances together serve as reasons for thorough preparation before covering the attic with plasterboard.
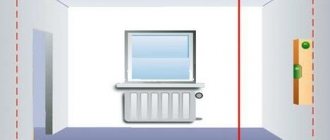
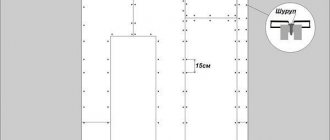
There is a need to draw up a drawing and carry out calculations.
It is clear that it is impossible to complete the work without first drawing up a diagram or project. All the features of the floor should be reflected on a sheet of paper. All calculation results are displayed: area, length, width, height of main, individual structures, sections.
To draw up a drawing, perform the following steps:
- take measurements of the room;
- put the room parameters on a sheet of paper;
- indicate the markings for installing the frame and its attachment points. Corner places are given increased attention;
- mark the places where the wiring will pass and electrical appliances will be installed (lamps, sockets, switches).
If the attic is wide, it can be divided into rooms isolated from each other. It is necessary to install plasterboard partitions with a doorway in order to have free movement in space. Mark the design parameters on paper: height, width, height, thickness. The frame under plasterboard should be installed in such a way as to provide internal insulation and sound insulation.
Based on the finished drawing, you can make an accurate calculation of all the necessary materials. Determine exactly how many racks and guides are required if a metal frame is installed. Perform calculations of wooden blocks if a wooden option is being considered. Based on the marked areas, calculate the need for drywall.
It is necessary to add 10-15% to the results obtained for each calculation. All standards take into account overspending. When work is carried out by non-professionals, it is better to play it safe and increase the results obtained.
Photos of attic schemes can be found in the photo on our website. They will serve as guidelines in your work, greatly facilitating the task of determining basic calculations.
Preparatory work
You can’t just go ahead and start carrying out repair work without prior preparation. It's not only about purchasing fasteners, but also about bringing the work surface into the desired shape. Preparation includes the following points:
- you need to make sure that the roof does not leak and does not have any defects. The best time to check this is in the fall, when it rains en masse;
- You can determine the humidity level in the attic in advance using a hygrometer. It is useless to do such a check in summer due to the intense heat. Perhaps the attic is made so well that there is no dampness. This will give you an idea of what kind of drywall to use;
- wooden beams must be treated with an antiseptic, if this has not already been done;
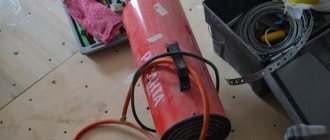
- Before covering the attic with plasterboard, you need to decide on places for sockets, lamps, ventilation, etc. After this, communications are laid out;
- we purchase consumables and tools: screws, glue, plasterboard, profiles or bars, screwdriver, metal scissors, building level, etc. The set of tools may vary depending on the specific case.
Sheets of drywall need to be brought into the room where repairs will be carried out for 1-2 days. The sheets adapt to local temperature and humidity, which means they will not deform after installation.
Tips and tricks
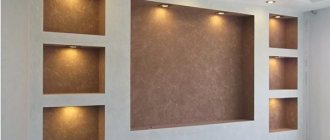
Covering attic walls with plasterboard requires painstaking and leisurely work with the utmost care in handling the material and the entire wall structure. It happens that due to lack of experience or haste, mistakes are made, and often surface defects are located in the most visible places.
In this situation, the situation can be corrected using decorative plaster. To cover the flaws, you can use inserts made of textured fabric, cork and fiber trellises, photo wallpaper, you can even lay out artificial stone decor or apply graphics to the walls. This will only strengthen and enliven the attic cladding.
What to make the frame from
The most reliable and correct method for covering an attic with plasterboard is to use a special frame. However, in some cases the sheets can be attached directly to the inner roof sheathing. If the distance between the rafters does not exceed 60-70 cm, then you can safely attach drywall to them.
Fastening drywall to a wooden attic frame
If the attic area is too large, the rafters are far from each other, or you plan to create an interior of a special shape, then you will have to create a frame. It is with its construction that the finishing of the attic with plasterboard begins.
The positive side of the renovation work is the fact that the attic space is made level, and there is no need to level the surfaces.
If you are making a wooden sheathing, then you need to find bars along the length of the room and attach them to the rafters. Then drywall is attached to these sheets with self-tapping screws. If you use a metal profile, then everything will be a little more complicated, but finishing the attic ceiling with plasterboard will be of better quality.
You can learn more about how to make markings for the ceiling in the video.
Finishing of the attic floor made of plasterboard
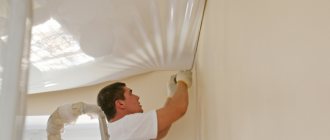
After all the attic cladding parts have been laid and secured to the frame, they proceed to sealing the seams. Typically, joints and cracks are filled with putty and sealed with masking tape. The same procedures are performed on corners. If the length of the seam is more than 110 cm, then it is advisable to secure the joint with a few drops of silicone sealant before using the primer.
The most common finishing option is painting the attic walls with water-based paints. If there are rafter frame parts in the room, they can be painted in contrasting colors - black or dark brown. With light walls, you get a very interesting and pleasant color design for the room.
Assembling a metal frame for cladding the attic
Let's look at an example of performing work on one sloping ceiling. The rest, if any, are done similarly. The attic is distinguished by its sloping ceiling, and the walls and even ceiling are the same as in a regular apartment.
To work, you will need a guide profile UD 27x28mm and CD 60x27mm. Attics are often larger in size than ordinary rooms, so the length of the guides may not be enough. A profile extension bracket will help solve this problem.
Along the sloping ceiling on adjacent walls you need to attach two guides. A distance of 5 cm from the ceiling will be enough. You can mark in advance to make it easier to attach the guides. Moreover, special measurements are not needed, because everything is already level.
Profiles 60x27 mm are inserted into the guides so that they run parallel to the floor. We lengthen them if the room is too large. The pitch between the profiles should be 60 cm. At the joints they are fastened together with small self-tapping screws. There must be profiles along the edges of the sloping ceiling, where it connects to the wall and to the straight ceiling.
The recommended pitch between profiles is 60 cm
To prevent the plasterboard ceiling in the attic from falling off, we need to secure the hanging profiles with hangers. The hangers are screwed to the ceiling in increments of 60 cm. Before attaching profiles to them, you need to make sure that there is no sagging anywhere and the ceiling will come out smooth. To do this, several threads are pulled across the profiles. The thread will show whether the profile is in the desired plane. After this, you can attach them to the hangers. The suspension ears are bent after installation so as not to interfere. Just don’t bend them too much; they may still be needed for laying insulation.
Attics. Interior and exterior decoration
The main elements of the system are covering the frame with conventional or moisture-resistant gypsum boards in one or two layers. The frame is made of beams and wooden slats. Also, the frame can be standard profiles for finishing attics CD, profiles C of the RIQISTIL system, and a flat profile. Details: ES and acoustic brackets, RIQISTIL CD and C profile hangers for wooden structures. Mineral or glass wool, including foil, is used as insulation. The minimum recommended insulation thickness is 160 mm. For attics, two layers of wool 100 mm thick are usually laid. Polyethylene film is used as a vapor barrier.
It is necessary to ensure good ventilation of the under-roof space and the insulating layer. When laying insulation, do not allow the wool or film to rip or sag.
As fasteners, use metal screws for metal profiles TN 25 mm for one layer of plasterboard sheets and 35 mm for two layers of plasterboard. GKL is attached to wooden beams using TD wood screws of 35 mm in one layer of fastening sheets and 55 mm if fastening sheets in two layers.
Sequence of installation of the attic frame
With a wooden attic frame, it is necessary to tightly lay a piece of wool between the rafters. To do this, the width of the segment must be 20 mm greater than the pitch of the rafters. A ventilation gap of at least 3 cm must be left between the wool and the roofing material, a vapor barrier film is laid on top of the wool, then wooden slats are fastened across the rafters with screws, leveling them in the same plane using wooden pads.
Wooden frame: 1 - cotton wool; 2 - vapor barrier film; 3 - wooden slats
The cross-section of the slats depends on the pitch of the rafters and the thickness of the plasterboard sheathing. So, with a rafter pitch of 1 m and a single-layer plasterboard sheathing, beams measuring 60x40 cm are used. The spacing of the beams is 40 cm if the plasterboard sheet is attached lengthwise, and 50 cm if crosswise.
If there is a need to increase the thickness of the wool, its second layer is laid between the beams, perpendicular to which an additional frame of 50x30 mm wooden slats is attached, which is sheathed with gypsum boards. The vapor barrier film should always be between the gypsum board and the cotton wool.
For metal framed attics, after laying the first insulation layer, it is necessary to attach ES brackets or acoustic brackets to the rafters. A second layer of cotton wool is laid horizontally, “putting” it on the staples. The CD profile is secured into the brackets, and then the rows are aligned into one plane. The step between the rows of profiles should be 40 cm if the gypsum boards are attached lengthwise and 50 cm if across.
An anchor suspension CD profile for wooden structures is also used as a connecting element between the rafters and the profile. A metal frame is used for rafter pitches greater than 1000 mm.
Connection to the floor. The joint between the plasterboard wall and the floor should be carefully insulated. A gap of 10 mm is left between the floor and the plasterboard sheathing. For insulation, special sealing tapes are used, which are secured with tile adhesive. To glue tiles to gypsum plasterboard, adhesives with high plasticity should be used. The final insulation of the joint is done with sealant.
Connection between wall and floor
Holes. Holes in gypsum boards for pipes are cut with a diameter 10 mm larger than the diameter of the pipe. The cut surface is primed. After passing the pipe, carefully seal the hole with sealant.
If the plumbing fixtures are secured using special rubber seals that provide reliable waterproofing, there is no need for additional sealing.
Finishing the attic with cladding
The KNAUF complex system is used for finishing premises using the “dry method”. This method eliminates all kinds of “wet” processes associated with the use of plaster and masonry mortars, eliminates the use of concrete mixtures and, as a result, finishing attics is completed much faster. Complete systems M 681 are designed for interior finishing of attics and are among the most technologically advanced and promising, ensuring simplicity and reliability of design and ease of installation. The main element of the system is a gypsum fiber sheet, which is installed on a wooden or metal frame. The M 681 system is a lathing made of wooden blocks of a certain cross-section, fixed directly to the rafters or using direct hangers.
The distance between the load-bearing bars of the sheathing is determined by the method of laying the sheets in relation to the bars. Thus, a gypsum fiber sheet with a thickness of 10 or 12 mm is laid at a distance of 50 cm when laying transversely and 40 cm when laying longitudinally. The distance between the axial posts will be 60.3 cm (table).
Table. Method of laying sheets in relation to bars
The distance between the points of attachment of the sheathing bars to the load-bearing rafters is determined depending on the load on the frame and the cross-sectional size of the bars (table).
Table. Dependence of the cross-section of the bar on the interaxial distance and load on the frame
The M 682 system consists of PP profiles fixed to the rafters using direct hangers. The vertical (wall) part of the frame can be made of PS 50 x 50 rack profiles. The distance between the frame profiles is determined in the same way as when attaching a wooden frame. Suspensions for fastening the frame with a load of up to 0.30 kN/m2 should be installed at a distance of 1 m from each other.
If there is a need to divide the attic into separate rooms, it is necessary to take into account that the sequence of installation of the cladding (ceiling, slopes, walls) and partitions is determined by the requirements for the degree of sound insulation of these rooms. If you want to achieve better sound insulation, you must first install partitions that are attached in the upper part directly to the rafters or specially constructed lintels made of PP profiles. Partitions are installed between the rafters with a pitch of no more than 40 cm in profiles PN 28/27. It is recommended to lay mineral wool or other soundproofing material in the cavity of the cladding frame and partitions.
The frame of the M 681 system is mounted as follows:
1) mark the attic rafters for installation of sheathing (suspensions) and guide bars;
2) install the hangers using FN 35 screws;
3) attach the sheathing to the hangers with TN screws (Fig. b) or to the rafters (Fig. a).
Rice. Attic with sheathing on a wooden frame: a - fastening the ceiling and slope sheathing bars directly to the rafters: 1 - rafters, 2 - thermal insulation, 3 - vapor barrier, 4 - guide bar, 5 - ceiling and slope sheathing block; b - fastening the beams of the ceiling sheathing and slope to the rafters using direct hangers for wooden beams: 1 - putty and reinforcing tape, 2 - straight hanger, 3 - gypsum fiber sheet, 4 - rack bar
The lower guides are fastened directly with dowels, and the upper ones with screws in increments of 50 cm.
The frame of the M 682 system is mounted as follows:
1) mark and install hangers to the upper guides using FN 35 screws, and the lower one with a dowel in increments of 50 cm;
2) install, align and fasten PP profiles in hangers using LN 3.5×9 screws (one on each side);
3) install and fasten rack profiles in the guides using LB 3.5x9.5 screws (Fig.).
Rice. Attic with sheathing on a metal frame: a - wall construction using PS 50/50 racks and PN 50/40 guide profiles (fastening the top guide is shown as one of the possible solutions): 1 - rafters, 2 - thermal insulation, 3 - vapor barrier, 4 — PN — profile, 5 — PS — profile, 6 — straight suspension, 7 — PP — profile; b - wall construction using ceiling PP 60/27 and PN 28/27 guide profiles: 1 - PP - profile, 2 - PN - profile
Cover the frame with gypsum fiber sheets in the following sequence:
1) install a gypsum fiber sheet with a gap between the sheets of 5-7 mm;
2) fasten with screws of the required length. For a wooden frame with a cladding thickness of 10.12 mm, screws for gypsum plasterboard 3.9×30 mm are used, the same for a metal frame. With a sheet thickness of 2x12 mm on a wooden frame - a gypsum plasterboard screw 3.9x30 mm + 3.9x45 mm, the same for a metal frame;
3) seal the seams between the gypsum fiber sheets, puttingtying with a special putty mixture “Fugenfüller GV” using reinforcing tape at the junctions of the ceiling-pitched-wall transitions;
4) putty the heads of the screws that were used to fasten the sheathing, hangers and upper guides. The screw must enter the body of the rafters to a depth of five screw diameters, but not less than 24 mm. On the ceiling and slopes, the screws are installed at a distance of 15 cm, and on the walls - at a distance of 25 cm. With two-layer cladding, the seams of the first and second layers are puttied. The screw fastening step in the first layer can be increased three times.
The sheets are laid with the end seams offset by at least 40 cm. When laying transversely, the end seam must be on the block or profile. When attaching gypsum fiber sheets, the temperature in the attic must be at least 10 °C.
Ceiling lining and finishing
To hem the ceiling under the plaster, use low-grade unedged boards, nailed at a distance of 10-12 mm from each other. If the boards are wider than 12 mm, then they are wedged to avoid warping from moisture (from plaster mortar).
If the ceilings in the attic are wooden from good (without defects) wood - high-grade planed board, then the filing is done in the following order:
1) take the boards, planed and cut to length, into the attic;
2) stack in piles on scaffolding;
3) lift and lay out on slats suspended from the ceiling beams (Fig.);
4) lift the board to the batten and nail it to the beam.
Rice. Ceiling lining with preliminary laying out of boards on the mounting rail
The nails are driven in at an angle to the beam. The upholstery is done on support bars. Do not attach boards and battens directly to the ceiling. The beams must be drilled and the holes countersunk. They are attached to beams or floor slabs at intervals of 60 cm. Cladding boards or slats are attached to the support bars with nails.
There are various ways to attach the sheathing to the support bars. The fastest and easiest is the open method using nails with visible heads. They are arranged in even rows and hammered in using a punch so as not to damage the surface with a hammer. The hammer is placed on a nail and hit with a hammer, pushing the nail head into the wood. Then the recesses are sealed.
Hidden fastening involves driving thin nails at a 45° angle into the tongue of a tongue and groove joint, hidden in the groove of an adjacent board. If the nail is driven in incorrectly, the wood may split off.
Wooden surfaces can be stained, varnished or painted, depending on whether you prefer a modern or country style.
Today, the most popular are modular suspended ceilings made of mineral corrugated boards. The reason for this popularity is the best ratio of functional qualities and price.
They are distinguished by such functional properties as simplicity, quick absolutely dry installation with the possibility of installing a multi-level or inclined ceiling, the structures have a weight of 2.5 kg/m2, high aesthetic and environmental qualities of the panels, fire safety, the ability to select sound-absorbing panels, the presence of free space between ceiling and ceiling (Fig.).
Rice. Ceiling structure: a - lining of attic spaces; b - ceiling cladding: 1 - frame; 2— GVL; 3 - insulation; 4 - board; 5 - tiles
Lighting sources are installed in suspended ceiling cells (raster lamps 60×60 or 120×60) or embedded in ceiling slabs (spot mirror lamps).
In addition to plasterboard suspended ceilings, aluminum slatted ceilings are widely used. Their advantages: quick installation and dismantling, the ability to obtain curved and multi-level surfaces, a rich palette of colors, lightness of construction, durability.
Such a ceiling is mounted by snapping the slats into the grooves of a special wave-shaped profile suspended from the base structure. Ceilings made of lining, regardless of the material (plastic, chipboard, fiberboard, wood), are installed in small rooms: apartments, dachas, etc. At the same time, wooden lining is most often used in dachas.
Plastic panels are often used to cover the ceilings of kitchens, corridors and bathrooms.
When finishing ceilings with clapboard, they use a combination of panels of different colors, decorative inserts, and vary the direction. Tiling ceilings has become very popular. They are made from polystyrene. They measure 50x50 cm, are easy to cut and attached to the ceiling with glue. They are used primarily in rooms with high humidity. The appearance is very diverse - smooth and embossed, painted and covered with film. The glue forms a waterproof seam. The adhesive is applied spotwise or in a continuous layer around the perimeter of the tile. After 1-2 minutes, press firmly onto the prepared base. Glue drying time is about 1 hour.
Stretch ceilings, due to their high cost, have so far received very little; modest distribution, despite its visual appeal and ease of installation. There are still enough materials that can be used to make the ceiling.
Decorative finishing of the outer wall and gable of attics
You can finish the outer wall not only with traditional wet plaster, but also using decorative panels.
Siding is a multilayer panel designed for decorative finishing of walls outside the house. The inner layer of siding is different: it can be based on steel, aluminum or vinyl. The outside of the siding is covered with a plastic layer that imitates various textures (brickwork, stone, wood grain, etc.). Metal-based siding panels are more durable and rigid (especially steel panels). Vinyl siding is more popular because it is inexpensive. Metal panels are recommended for use in areas with harsh climates and strong winds, while vinyl siding is better for homes in temperate climates. It does not crack or break when temperatures change, it tends to contract and expand under the influence of changing temperatures, which must be taken into account when attaching it (leaving a gap for expansion). Vinyl siding does not require painting; the color of the panel is given by the pigment included in the material during the manufacture of the panel. In addition, the paint contains titanium dioxide, which protects vinyl siding from UV radiation.
The advantages of this siding include the fact that it hides external defects in the walls of the building and is easy to install. The siding is sold as a set with all the necessary fasteners and components (external and internal corners, window and door frames). Each panel has a hole for mounting.
Siding can be done on any wall (wooden, concrete, brick or other stone-like). If the wooden walls are smooth, then the siding is attached to the wall without sheathing, and on stone-like walls a sheathing of wooden slats measuring 2.5x8.0 cm is installed. They are nailed at a distance of 30-40 cm from each other, depending on how sidings will be attached - horizontally and vertically. If the attic needs to be additionally insulated, then a rigid or semi-rigid thermal insulation layer is laid between the slats up to the level of the slats.
To fasten siding panels, use galvanized or aluminum nails 20 mm long and 3 mm in diameter longer than the thickness of the slab and expansion allowance with a nail head diameter of 10 mm.
Before laying, the siding panels are marked and then cut with tin snips or a hand saw. Start cutting from the top edge of the sheet, where the holes for fastening are located. If the panel is sawn, then a deep cut is made along the entire length and the slab is broken, placed on the edge of a flat surface strictly along the edge (using glass cutting technology). Then, if the panel will be attached around the window, you need to make a marking equal to the width of the window plus 6 mm on each side for possible expansion of the panels. When cutting gable panels, it is necessary to measure the angle of inclination of the slope and cut off the ends of the panels according to it. Preparation and fitting of corner joints of edges are carried out during the finishing work.
Installation of horizontal siding is carried out as follows:
1) you need to find the bottom point that will be covered with siding, and at a distance of 4 cm above it, check with a level that the surface is horizontal along the perimeter of the house or along the length of the gable;
2) then strengthen the lower edge of the siding so that its upper cut; coincided with the outlined marking line. A gap of 6 mm should be left between the individual edge links (for possible expansion). Sometimes a gasket is placed under the edge to ensure a tight fit of the siding. In addition, you need to know that when fastening edges and panels, nails need to be nailed at a distance of 30-40 cm from each other so that between the front surface of the panel and the nail head there is a gap of 1.0-1.5 mm so that the panel is mobile. The nails are driven strictly into the center of the siding fastening holes;
3) at the junction of the walls, vertical corner parts (external or internal corner) are installed. From above, the vertical parts are fixed 6 mm below the level of the cornice, and the same is done from below. These parts need to be attached so that they hang freely on the two top nails. All other nails are fastened in increments of 20-40 cm, driven exactly in the center of the fastening hole. If the corner piece is short, then it is extended. To do this, the lower edge is cut by 2.5 cm, with the exception of the central part. Then the lower part is put on the upper one, but not all the way (by 2 cm), and 0.5 cm is needed to expand the panel;
4) then install the edging around the windows and doors, cutting off the front protrusion at an angle of 45°.
Row panels are laid from bottom to top. After attaching the first panel, all subsequent panels are inserted into the upper edges of the underlying siding, and the top is nailed. The sidings are laid with an overlap of 2.5-3.0 cm. The last nail should be at least 10 cm from the edge of the panel. The top panel is nailed flush against the edge cornice.
The pediment is sheathed similarly to a wall with pediment siding, having previously installed an edge along the slopes. The vinyl siding kit includes soffits (lined panels for the eaves overhang), which are attached both to open eaves overhangs and to overhangs already hemmed from below with boards. There are soffit models with and without ventilation holes.
The open eaves overhang is hemmed in the following order (Fig.):
1) nail an edge to the wall of the house 2.2 cm above the level of the eaves overhang, and the second edge along the eaves overhang;
2) cut the soffit to the required length, equal to the distance from the eaves overhang to the wall, but 6 mm less (for possible expansion);
3) install soffit panels, securing them to the edges;
4) cut the corners of the panel at an angle of 45° and then additionally fix it in two edges, reinforced end-to-end along the bisector of the corner.
Rice. Attaching a vinyl soffit along an open eave overhang; 1 - roofing; 2 - rafter leg; 3 - wall; 4 - F-edge; 5 - vinyl soffit; 6 — upper S-edge; 7 - chamfer panel
The closed eaves overhang is hemmed in the same way. The only difference is that an edge of a different configuration is attached to the wall. In addition, the soffit edge cornice itself can be hidden behind the chamfer panel. If vinyl siding becomes dirty, it can be washed with a mixture consisting of 4.5-5.0 liters of water, 2/3 cup of liquid cleaning agent or 1/3 cup of cleaning powder, using a soft brush or rag. Vinyl siding is easily cleaned from soot, dust, mold, dirt, and oil stains are washed off with any solvent, applying it to the surface with a rag. After cleaning, the panels are rinsed with clean water. Rust is removed with oxalic acid (1 glass of warm water, 1 tablespoon of acid crystals).
Finishing the attic on the facade
Decorative cladding with polyalpane in the form of panels of varying widths from 30 cm to 1 and up to 12 m long is used quite widely for finishing attic on the facade. It is used to decorate any surface of attic walls with or without a wooden cornice. The cladding is weather-resistant, moisture- and rot-resistant, and not afraid of frost. The polyalpan panel consists of three layers: on the outside there is a metal sheet made of an alloy of aluminum, manganese and magnesium, varnished on both sides; the second layer is thermal insulation made of polystyrene foam and polyurethane (foam - polyurethane); vapor barrier layer made of aluminum foil 0.05 mm thick.
To install this sheathing, it is necessary to arrange a sheathing of wooden slats measuring 25x80 or 24x60 mm, laid horizontally every 60 cm. Under the sheathing, you can use a metal sheathing attached to the walls with galvanized bolts. This lathing is used when covering the walls of buildings more than three floors high.
For attics, a wooden sheathing to which a polyalpane panel is attached with nails is sufficient. These panels have special groove systems that allow them to be joined into a single sheathing. The seams between the panels are sealed with silicone sealant for exterior use. For finishing attics of complex configurations, special polyalpane profiles are produced.
The service life of such panels in attics is at least 30 years. Cork finish
It is advisable to plaster a brick or reinforced concrete panel that serves as an attic wall with a pitched roof with lime-cement mortar or cover the wall after insulation and stick on wall tiles made of natural cork. This will provide not only warmth and coziness, tranquility and comfort, but also environmental cleanliness of the attic space.
In order to perform such masonry, you do not need a qualified tiler; the technology for attaching these slabs is simple and consists of the following:
1) draw two perpendicular lines in the center of the wall and determine the location of the first cork plate (Fig.a);
2) the first cork tile is laid at the angle formed at the intersection of the lines, having previously applied water-based glue to the surface of the tile and wall. The adhesive is applied with a notched trowel with 1.5 mm recesses and a distance of 5 mm between the centers of the recesses. On the wall surface, glue is applied to an area that can be cleaned within 15-20 minutes from the moment the glue is applied. The plate with glue is glued to the wall immediately after applying the glue (Fig.b);
3) after laying the tiles (plates), it is necessary to check whether the surfaces stick together well, and then roll the surface of the laid tiles with a press (roller) from top to bottom and from left to right (horizontally to the floor). The same rolling must be performed when laying slabs laid out within half an hour, or following the instructions indicated on the specific adhesive (Fig. c).
Rice. Technology for fastening cork tiles: a - determining the location of the first cork plate; b - gluing the plate; c - rolling with a roller
Installing jumpers for additional rigidity
The ceiling frame is not ready yet, because it lacks rigidity. For this purpose, jumpers are installed (60 cm pitch) between the newly fixed profiles. For greater convenience, you can use special crab brackets, to which pre-cut jumpers will be attached. If you don’t want to endure additional waste, then you can go another way.
Scheme for attaching jumpers to the profile using crab brackets
The ceiling profiles are installed in such a way that nothing can be inserted into them from the side. There are two options to solve the problem:
- small pieces of guides are attached to the sides of the profile with self-tapping screws so that a jumper can be inserted into them;
- the jumper is made a little longer, and its ribs are cut off a little. The lintel, cut on both sides, easily fits onto the ceiling profile and is then screwed to it.
Jumper mounting options
Regardless of which method is chosen to install the jumpers, the installation will be of high quality and the frame will be rigid. In this case, finishing the attic with plasterboard will be successful. However, the roof still needs to be insulated and the frame sheathed.
Tools and materials
Profile for drywall installation
So, in order to install your plasterboard ceiling, you will need to prepare a certain set of tools and materials.
To work you will need:
- UD profile , sometimes called the starting profile or perimeter. This profile will be attached in those places where the ceiling comes into contact with the walls.
- CD profile (guides, main profile). It is attached along the length of the sheets being hemmed, as a rule, the profile spacing is 40 cm.
- Fastenings for CD profile (suspension, spacers) – special parts for fastening the main profile. It is used in cases where it is planned to install ceilings so that the new covering is lowered relative to the floor slab to a maximum of 12 cm. If you need to lower the ceiling lower, special spring hangers are used, with which you can make the ceilings even a meter lower.
Advice! Suspensions are sold unfolded; during installation, they are bent so that they acquire a U-shape. After securing the profiles, the free ends of the hangers should be bent or cut off.
Of course, installing a plasterboard ceiling cannot be done without using anchors. To attach the starting profile and suspension to the ceiling, dowel-nails or screws are used, and the guide profile is attached to the suspension using self-tapping screws.
Advice! When attaching the starting profile, the spacing of the anchors should be about 50 cm; the hangers for attaching the CD profile are installed in increments of 1 meter.
Of course, you will also need the sheets of drywall themselves. This material is available in a wide range. As a rule, it is recommended to choose sheets with a thickness of 9.5 or 12.5 mm.
In some cases, it is recommended to use moisture-resistant drywall. This option is suitable for finishing a kitchen or bathroom. However, even moisture-resistant material will not save you from a flood from above.
If neighbors tend to forget to turn off the tap, then you should choose a different finishing option. Since after a water leak, the only option would be to dismantle the ceiling and completely redo the repair.
The required amount of materials can be determined by reading the article Calculating a plasterboard ceiling: what and how much to buy.
Attaching drywall to the frame
The actual finishing of the attic with plasterboard is a simpler process than all the work that was carried out before.
It is recommended to install the sheets horizontally to make it easier to work with a sloping ceiling. They should be staggered so that the load is evenly distributed on the frame. Self-tapping screws 25 mm long will be just right.
Drywall is screwed with self-tapping screws in increments of 15-20 cm. It is attached to the guides, to the ceiling profile and to the lintels. Although this is not an ordinary ceiling, there is still a slope, which means the fixation must be reliable. In order for the self-tapping screws to hold the sheet better, they need to be screwed 1 mm below the level of the drywall. In this case, the sheet shell should not break through, otherwise such fastening will be useless.
Some people prefer to use two layers of gypsum board for reliability, but this makes no sense here. Thermal and sound insulation has already been laid, and a reinforced ceiling is not needed in the attic. The second layer will only create additional weight, and no one wants that.
This completes the finishing of the attic with plasterboard, and all that remains is to carry out the final finishing of your choice. The main thing is to prime everything well and putty it well. The remaining parts of the attic are covered with plasterboard in the same way. There should be no problems with joining in the corners, despite the presence of a sloping ceiling.
Rafter fastening
Finishing the attic with plasterboard and attaching it to the rafters is recommended for a small room with a pitch between rafters of up to 75 cm.
The advantages of this option are the speed of completion of the work, minimum costs compared to the construction of sheathing, and minimum physical effort during the installation process.
The downside is the possibility of difficulties arising when leveling the finishing layer due to the imperfect alignment of the rafters.
Therefore, to smooth out this defect, a thicker material is selected - 25 mm, since thin plasterboard sheets will be subject to bending and damage when the roof slab vibrates.
Installation technology
Lathing for fastening drywall
Let's look at how to install plasterboard ceilings with your own hands step by step. Whatever ceiling design is conceived, at the first stage a simple one-level structure is installed - a frame for the ceiling made of plasterboard, and then more complex finishing can be done on its basis.
Marking
To install drywall on the ceiling, you need to make markings.
- First you need to beat the level along all the walls of the room. It is most convenient to measure the level at eye level, and then from the intended line measure the distance to the location of the perimeter.
- Level lines must be measured using a level - hydraulic or laser. It is very important to correctly mark the location of the starting level, since the evenness of the finished ceiling depends on this.
Frame assembly
- The installation of a plasterboard ceiling begins with fastening the starting profile. It is strengthened strictly along the intended line using dowel nails.
- Next you need to determine where the CD profile will be located. For this, an installation diagram must be prepared, since it is important that the joints of the plasterboard sheets (lengthwise) are located on the profile. The profile spacing is 40 cm.
- Spacers are attached to the ceiling along the designated lines; they must be placed in a checkerboard pattern and in increments of about a meter.
- Now you can attach the profiles themselves, but it is important that they are positioned strictly parallel to the level line.
Advice! To make it easier to work, you should stretch threads across the room from perimeter to perimeter.
- The profile is attached to the hangers, and the guides are simply inserted into the starting profile. At the joints of the CD profile (if necessary, extend the length) a special connector is used, which is attached to both parts of the profile with self-tapping screws.
- After all the structures have been assembled, you should once again check the horizontality of the structure, and then, if planned, carry out all communications and install fastenings for additional elements, for example, a chandelier.
How to choose drywall for the attic
The choice of material category is determined by the requirements for the future coating:
- Water resistance - spaces under the roof often have high humidity; in such conditions it is better to use plasterboard boards reinforced with hybrophobic impregnation (GKLV - green);
- Fire resistance - to protect wooden roof rafters, non-flammable gypsum plasterboards with fiberglass filling (red marker) are suitable;
- Manufacturers produce a modified type of drywall with a combination of properties and qualities inherent in fire-resistant and water-repellent boards;
- Acoustic plasterboard sheets have sound-absorbing characteristics.
When calculating the rated load on the frame, the weight of the plasterboard is taken into account. A standard 12.5 mm thick plasterboard board weighs approximately 10 kg. It is important to remember that specialized analogues of drywall have a larger mass.
The number of required sheets for cladding is calculated by dividing the area of all surfaces that are planned to be covered with the material by the area of one sheet. It is advisable to make a small supply of drywall.
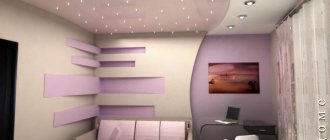
An example of an attic interior
Sheet filing
Filing plasterboard sheets
When assembling plasterboard ceilings, it is more convenient to carry out the installation with a partner, but if necessary, you can do it alone. In this case, it is necessary to prepare supports made of timber in the shape of the letter T; they will be used to hold the sheet while it is not yet attached to the hanger.
Here are the basic rules by which the process of installing sheets on a frame takes place:
- The sheets cannot be hemmed close to the wall; you need to leave a gap of 2-3 mm.
- The sheets are fastened in a staggered manner so that the joints do not coincide. To do this, a whole sheet is strengthened in the first row, and half a sheet in the second.
- Self-tapping screws are used for fastening; the spacing of fasteners is 20 cm.
- The self-tapping screw must be tightened so that its head is flush with the surface of the sheet. To do this, it is convenient to use a screwdriver with a fixed screwing depth.
conclusions
So, building your own ceilings from plasterboard sheets is not so difficult. The main component of successful completion of the work is the accuracy of markings, a precise understanding of how to mount the structure and accuracy in work.
A truly practical and reliable plasterboard ceiling in the attic can only be achieved if a full-fledged metal frame is installed. The sheathing is arranged in the same way as it would happen in an ordinary room with smooth walls and ceilings. To secure sheets of plasterboard to the surface of the attic ceiling, you need to assemble a frame - this is a traditional solution.
The smaller the attic area, the more justified the solution will be to install gypsum boards on a wooden frame made of rafters of thin bars fixed on beams. to screw the top screw into the ceiling profile. You can't get to it from above with a screwdriver, this is the easiest way I've come up with. Next, at the ridge, two hangers are attached to each pediment. They must be on the same line (strictly parallel to the central axis of the attic).
For this I also used a laser plane builder. I pulled a thread between them and screwed on the intermediate hangers along the thread:
Choosing a multi-level ceiling
Which ceiling should you choose? How much money can you spend? What is better - drywall or a simple stretch ceiling? These are very important questions that determine the choice between a variety of types of ceilings. Let's look at the advantages of plasterboard ceilings in more detail, so that in the future there will be no doubt about the right choice.
Design of plasterboard ceilings in the living room, they have almost all the qualities required when decorating a modern interior. You need to see all the photos of plasterboard ceilings that designers can offer on special websites in order to understand what kind of ceiling you can make at home. Drywall will always be in demand, since its cost and ease of use are accessible to everyone.
Your home plasterboard suspended ceiling should be appropriate and not look like a pile of tiers. It is best to come up with beautiful lighting by creating a couple of tiers. You can only use one level and the Starry Sky system. Design of plasterboard ceilings photo:
In most cases, with a low ceiling in an apartment, plaster is used in the central part of the ceiling for leveling, and nice plasterboard boxes with niches are made near the walls for installing ceiling lights, in particular, LED strips.
The design of beautiful plasterboard ceilings and modern lighting technologies make it possible to arrange magnificent multi-colored compositions on the ceiling. And economical modern chandeliers and mini spotlights provide the right amount of light in the right place.
Also, when choosing, you need to pay attention to different aspects of the design of a plasterboard ceiling. If you are thinking about creating a multi-tiered asymmetrical ceiling, then, of course, you need to extend the tiers deep into the room
Design of multi-level plasterboard ceilings photo ideas:
Ceiling extensions can be beautifully designed above the bed area in bedrooms, above tables and work counters in kitchens and along the perimeter in the living room, thereby highlighting an expensive, exceptional chandelier.
However, despite the ease of working with drywall, choosing the right ceiling design is a very serious matter. It is best to entrust it to a specialist, because construction (installation) and design (interior) are completely different things. Everyone can become a builder, but not everyone can become a designer. So the choice is always yours! Design of plasterboard ceilings photo ideas for your interior:
Installation of gypsum boards on rafter legs
This option is suitable for a small attic. For frameless cladding, plasterboard sheets with a thickness of 20 mm or more will be required.
After making sure that the rafters are installed firmly and securely, are not damaged by rodents, are not susceptible to mold and cracking, proceed to fixing the plasterboard sheets directly to the roof rafters.
On wall surfaces, plasterboard boards are placed on a layer of glue. Self-tapping screws are also used for the ceiling. Height unevenness and differences are leveled with embedded slats.
Main features of gypsum plasterboards
In addition to ease of processing, gypsum sheets have several important features that you should know about in advance. First of all, it needs to be isolated from external factors, such as precipitation and condensation drops.
To protect the gypsum board, you need to carefully prepare the ceiling. Having built the insulating layer, it is necessary to cover it well with a vapor barrier material. If this is not done, drops of condensing moisture may appear on the inside of the plasterboard sheets, which will destroy the coating. The film is attached to the outside of the constructed sheathing.
Another important feature of this material is the need to construct a special sheathing on which the sheets will be attached. This will slightly reduce the usable volume of the room. When planning the finishing, this point must be taken into account.
Price. Many people mistakenly consider gypsum boards to be the most inexpensive option for ceiling design. It is not always so. It is necessary to take into account not only the cost of the material itself, but also the cost of putty, paint and decorative details, which form an integral part of decorating the surface.
Taking into account the fact that the ceiling area in the attic room is quite large, all these factors can significantly affect the final cost of repairs.
Types of ceiling plinths
Repairing the ceiling in the hallway photo, do it yourself
It is difficult not to get confused in the widest range of skirting boards, because the market offers ceiling products that differ in material, shape, and size.
Polystyrene ceiling plinth
Polystyrene extruded ceiling plinth has the following characteristics:
- pronounced relief;
- Smooth surface;
- dullness.
Such properties provide designers with a wide field for realizing their fantasies.
Advantages of polystyrene foam ceiling moldings:
- moisture resistance;
- possibility of imitation of stucco molding;
- low price;
- aesthetic appearance;
- White initial color allows any coloring.
Disadvantages: fragility due to weak rigidity, low strength.
Ceiling plinth: polystyrene foam – wide for high rooms
Tip: The higher the room, the more massive the baseboard should be selected. Before purchasing the product, be sure to measure the height of the room.
Polyurethane ceiling plinth
Polyurethane foam products contain rubber, which makes them much more flexible and stronger than ceiling extruded polystyrene. These qualities make it possible to finish residential premises with a large number of broken, curved elements of the ceiling structure.
Advantages of ceiling products made of polyurethane foam:
- possibility of finishing rooms with high humidity – bathroom, swimming pool;
- hygroscopicity;
- strength;
- flexibility.
The disadvantage of polyurethane foam ceiling products is their higher price than polystyrene ceiling skirting boards.
Ceiling plinth, wide, flexible, made of polyurethane foam
Tip: If you are going to decorate a room with a complex geometric shape using stucco molding, pay attention to a decorative molding for the ceiling - polyurethane foam molding. Flexible PPU ceiling plinth has a good price/quality ratio
By painting individual elements of the product in gold, you will get an interior in the Baroque style.
PVC ceiling plinth
An economy class option is a PVC ceiling product.
Advantages:
- low price;
- hygroscopicity;
- ease of installation;
- variety of colors;
- possibility of selecting imitations like marble or wood.
Colored PVC ceiling plinth complete with panels made of this material
Flaws:
- impossibility of repainting;
- demanding to temperature changes.
Ceiling wooden plinth
Lovers of the classics, of course, prefer wooden ceiling products. Although they are much more expensive, the consumer still chooses natural material.
Ceiling plinth photo - the interior demonstrates loyalty to traditions
A narrow wooden ceiling molding, coupled with massive trims and doors made of the same dark material against the background of white walls, looks very elegant and expensive.
Advantages:
- naturalness;
- environmental friendliness;
- strength;
- durability;
- sophistication of appearance.
The only drawback is the high price.
Ceiling plinth with lighting - semicircular
Advice: If your budget allows it, it is better not to use imitations in the interior. Opt for natural wood products. Even in conditions of a complex geometric shape of the space, you can choose a flexible plinth for the ceiling made of natural wood, fortunately the industry does not stand still.
Gypsum plinth for ceiling
Gypsum - as a very plastic material - is directly created for making stucco molding. Craftsmen create works of art from it.
Ceiling fillet - different widths, different patterns gives a large selection of elements with stucco molding
Designers often use stucco in interior design. Gypsum, as a natural, plastic material, is ideal for these purposes.
Tip: It is possible to manufacture various interior items - moldings, baguettes, sockets for lighting devices. Choose elements in the same style.
Advantages:
- high quality;
- environmental friendliness;
- allows you to implement complex design ideas;
- durability.
Disadvantages: heavy weight, fragility, high price.
Important: You are a big fan of stucco and environmentally friendly materials, and you want to decorate your attic with such elements. Be sure to consult with a specialist whether your roof can withstand the heavy weight of the products
The resulting conclusion will give you the opportunity to decide whether you need such decor. In addition, often the small size of the attic space does not allow the interior to be designed in this style, so as not to clutter it.